Arenti Laxihub J1 User manual

加工要求
印刷尺寸(单页):76x110mm
折叠方式:骑马钉
材质:128G铜版纸

EN Wireless chime
FR Carillon sans fil
NL Draadloze gong
DE Drahtloses glockenspiel
IT Campanello senza fili
ES Campana inalámbrica
PT Carrilhão sem fio
RU Беспроводной звонок
TU Kablosuz zil sesi
QUICK GUIDE
powered by
J1

Functions
EN
Reset
Power Interface
Speaker
Description
Mini USB
DC5V±10%, USB power supply
Press the RESET for 5s to restore Factory Settings;
Short-press the RESET button to pair the doorbell
Blue light blinks: Awaiting for configuration;
Blue light solids on: Configuration completed
You can choose your own ringtone among the four ringtones
Customize Your Ringtone
The Chime
'
s volume could be adjusted by sliding the volume of your
smartphone
Adjust the Volume
Status Light
Status light
Reset
Chime Appearance
1

EN
Step 1: Supply power to your Chime and Doorbell.
Pair via pressing Doorbell button
(not included)
USB compatible
charger(DC5V)
Step 2: A short press on the RESET button on the Chime, and you will see
the indicator flashes blue, indicating the device is in pairing mode.
Step 3: Press the doorbell button. When successfully paired, a voice or tone
will be played and the Chime LED status indicator will be in solid blue.
Note: The Doorbell and Chime have been configured before leaving the
factory. If the Chime isn’t paired by default, please refer to the
following instructions to pair it with the doorbell camera.
Reset Button LED Indicator
Pairing the Chime
2

ENChime Pairing
Note:
If the configuration fails, please press the "RESET" button for 5 seconds
to reset your Chime and then short-press the "RESET" button to add it
again.
Step 1:Short-Press the"RESET" button of the Chime. When successfully enter
the configuration mode, the LED status indicator will flash blue.
Step 2:Access to “Settings” of your App, press “Basic Function”.
Step 3:Select “Wireless Chime“, and then press “Chime Pairing“, confirm the
blue light of chime blinks.
Step 4:Press "Pair" and your Chime will automatically pair your doorbell.
Step 5:After pairing successfully, the Chime status light will be in solid on
blue.
3

FR
Les fonctions
Réinitialiser
Interface d'alimentation
Orateur
La description
Mini USB
DC5V ± 10%, alimentation USB
Appuyez sur RESET pendant 5s pour restaurer les
paramètres d'usine
Appuyez brièvement sur le bouton RESET pour coupler
la sonnette
La lumière bleue clignote: en attente de configuration
Voyant bleu allumé: configuration terminée
You can choose your own ringtone among the four ringtones
Customize Your Ringtone
The Chime
'
s volume could be adjusted by sliding the volume of your
smartphone
Adjust the Volume
Voyant d'état
Voyant
d'état
Réinitialiser
Apparition du carillon
4

FR
Étape 1: Alimentez votre carillon et votre sonnette
Associer en appuyant sur le bouton de la sonnette
(non inclus)
Compatible USB
chargeur (DC5V)
Étape 2: Un appui court sur le bouton RESET du carillon, et vous verrez
l'indicateur clignoter en bleu, indiquant que l'appareil est en mode d'appairage.
Étape 3: Appuyez sur le bouton de la sonnette. Une fois l'appairage réussi,
une voix ou une tonalité sera jouée et l'indicateur d'état du carillon LED
sera en bleu fixe.
Remarque: La sonnette et le carillon ont été configurés avant de quitter l'usine.
Si le carillon n'est pas couplé par défaut, veuillez vous référer aux
instructions suivantes pour le coupler avec la caméra de la sonnette.
Bouton de réinitialisation Indicateur LED
Jumeler le carillon
5
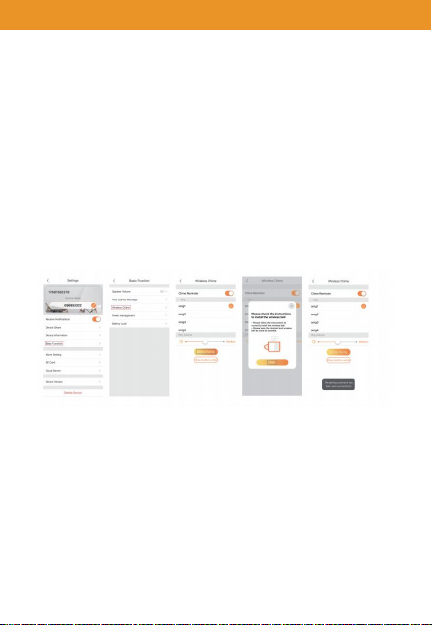
FRCarillon Jumelage
emarque:
Si la configuration échoue, veuillez appuyer sur le bouton "RESET"
pendant 5 secondes pour réinitialiser votre carillon, puis appuyez
brièvement sur le bouton "RESET" pour l'ajouter encore.
Étape 1: Appuyez brièvement sur le bouton "RESET" du carillon. Quand entrer
avec succès le mode de configuration, l'indicateur d'état LED clignote en bleu.
Étape 2: Accédez aux "Paramètres" de votre application, appuyez sur "Fonction
de base".
Étape 3: Sélectionnez "Carillon sans fil", puis appuyez sur "Couplage du carillon",
confirmez la lumière bleue du carillon clignote.
Étape 4: Appuyez sur "Pair" et votre carillon appairera automatiquement votre
sonnette.
Étape 5: Après le couplage réussi, le voyant d'état du carillon sera allumé en
continu bleu.
6

NL
Functies
Reset
Stroominterface
Spreker
Omschrijving
Mini USB
DC5V ± 10%, USB-voeding
Druk 5 seconden op de RESET om de fabrieksinstellingen te
herstellen
Druk kort op de RESET-knop om de deurbel te koppelen
Blauw lampje knippert: wacht op configuratie
Blauw lampje brandt continu: configuratie voltooid
U kunt uw eigen beltoon kiezen uit de vier beltonen
Pas uw beltoon aan
Het volume van de Chime kan worden aangepast door het volume van uw
te verschuiven smartphone
Pas het volume aan
Statuslampje
Status light
Reset
Koppelen Verschijning
7

NL
Stap 1: Voorzie uw deurbel en deurbel van stroom
Associer en appuyant sur le bouton de la sonnette
(niet inbegrepen)
USB-compatibel
oplader (DC5V)
Stap 2: Druk kort op de RESET-knop op de bel en je zult het zien de indicator
knippert blauw, wat aangeeft dat het apparaat zich in de
koppelingsmodus bevindt.
Stap 3: Druk op de deurbelknop. Bij een succesvolle koppeling, een stem of toon
wordt afgespeeld en de Chime LED-statusindicator brandt continu blauw.
Remarque: De deurbel en deurbel zijn geconfigureerd voordat ze de fabriek.
Als de Chime niet standaard is gekoppeld, raadpleeg dan de
volgende instructies om het te koppelen met de deurbelcamera.
Bouton de réinitialisation Indicateur LED
De gong koppelen
8
Table of contents
Languages: