Aquatic AQ-BC-6UBT Guide

PLEASE READ THIS INSTRUCTION MANUAL BEFORE
INSTALLATION AND OPERATION
USER / INSTALLATION MANUAL
AQ-BC-6UBT
BLUECUBE+‘HIDE-AWAY’ MEDIA PLAYER
for Bluetooth, USB, Apple iOS, Android, MP3 devices and FM Radio

1 Getting Started....................................................................................................................
1.1 Contents........................................................................................................................
1.2 Connections...................................................................................................................
1.3 12-pin Harness Connection...........................................................................................
1.4 Mounting the BlueCube+ Media Player..........................................................................
1.5 Bluetooth Antenna Installation......................................................................................
1.6 Power Attenuation Wires.................................................................................................
1.7 Power On.......................................................................................................................
1.8 Handheld Remote Control Charging..............................................................................
1.9 Handheld Remote Control Synchronizing.......................................................................
2 Location of Controls............................................................................................................
2.1 Wireless Handheld Remote Control.................................................................................
3 Listening to Devices............................................................................................................
3.1 Listening via USB..........................................................................................................
3.1.1 Listening via USB...................................................................................................
3.1.2 Device Charging.....................................................................................................
3.2 Listening via Bluetooth..................................................................................................
3.2.1 Pair with Bluetooth Device......................................................................................
3.2.2 Listening via Bluetooth Device...............................................................................
3.2.3 Bluetooth Multi-link................................................................................................
3.3 Listening via Auxiliary Input...........................................................................................
3.4 Adjust Volume Level.......................................................................................................
4 Listening to FM Radio...........................................................................................................
4.1 Enter FM Radio Mode.....................................................................................................
4.2 Scan or Seek FM Radio Channels...................................................................................
4.3 Saving Radio Channel to Memory...................................................................................
4.4 Listening to Saved Radio Memory...................................................................................
4.5 Adjust Volume Level.......................................................................................................
5 Additional Features.............................................................................................................
5.1 Audio Menu....................................................................................................................
5.2 Virtual Bass (VBass)......................................................................................................
5.3 External 12V Triggers.....................................................................................................
5.4 Bluetooth Halo Aerial Technology..............................................................................................
5.5 Connecting Multiple Amplifiers or High Current Draw Lighting Systems........................
6 Specifications & Dimensions..............................................................................................
6.1 Specifications................................................................................................................
6.2 Dimensions....................................................................................................................
7 Warranty Information..........................................................................................................
3
3
3
4
5
5
5
6
6
6
7
7
8
8
8
8
8
8
9
9
9
9
10
10
10
10
10
10
11
11
11
11
11
12
13
13
13
14
Table of Contents BlueCube+ Media Player AQ-BC-6UBT
2www.aquaticav.com

1.2 Connections (see Diagram 1.2.1)
1. 12-pin Watertight Harness
The 12-pin harness supplies power and ground connections to the BlueCube+ Media Player
and four (4) speaker channel output connections from the BlueCube+ Media Player (see Wir-
ing Diagram 1.3.1 on page 5).
Do not cut or modify the 12-pin harness on the Bluecube+ side or warranty will be void.
2. FM/AM Radio Antenna Jack
Allows connection of FM/AM radio antenna. For best FM/AM performance make sure the
antenna is extended to the highest achievable position.
3. Auxiliary Outputs - Rear
Allows external amplifiers to be connected to power additional speakers.
4. Auxiliary Outputs - Front
Allows external amplifiers to be connected to power additional speakers.
5. Auxiliary Inputs
Allows an additional RCA input, from a standalone unit or another stereo source.
6. 12V DC External Trigger (x2)
Allows for external lighting or relays to be triggered (2A max load).
7. USB Input
USB for connection of USB devices and USB flash drives. Charges compatible USB devices
when connected.
8. Wired Remote 8-pin DIN Cable
Allows connection of the wired Remote Control (AQ-WR-6F sold separately).
9. Power On LED
When the BlueCube+ is powered On the LED will illuminate red.
10. Bluetooth Halo Aerial Connector
Connect the Bluetooth Halo Aerial Technology Antenna (AQ-BTANT-1) to the male SMA
connector. Do not apply excessive torque on the SMA connector (no more than 0.5N-m). Use
hands to tighten the connection (do not use a wrench). See section 1.5.
11. Power Attenuation Wires
The AQ-BC-6UBT power has been factory set to -3dB of maximum power to avoid blowing
very small speakers used spa applications. See section 1.6 for further details.
Aquatic AV does not recommend the wired Remote Control AQ-WR-6F for use in spa applications.
1.1 Contents
• AQ-BC-6UBT BlueCube+ Media Player
• 2-Way RF Waterproof Remote Control (AQ-RF-6UBT-T)
• Wiring Harness (AQ-UNH-2 or manufacturers version)
• Four (4) Stainless Steel Mounting Screws
• User/Installation Manual
• Charging Cable
• Mounting Template*
• Bluetooth Antenna
*Retail packaged models only.
Getting Started BlueCube+ Media Player AQ-BC-6UBT
3www.aquaticav.com

The AQ-BC-6UBT includes the universal harness AQ-UNH-2 in order to connect the stereo to
power and speakers.
All open wire connections should be soldered and protected against water and dust for best long-
term performance.
1.3 12-pin Harness Connection
1.3.1 12-pin Harness Wiring Diagram
No lower than a 2 Ohm load should be used
or damage may occur to the Media Player.
Make sure the polarity of speakers are
connected correctly.
1.2.1 Connections Diagram
FM Radio Antenna Jack
12-pin Watertight Harness
RCA Auxiliary Outputs - Rear
RCA Auxiliary Outputs - Front
RCA Auxiliary Inputs
12V DC Trigger (x2) (Brown)
USB Connector
Wired Remote 8-pin DIN
Connector
Power On LED
Bluetooth Halo Aerial
Connector
Power Attenuation Wires (1x white, 1x black)
Getting Started BlueCube+ Media Player AQ-BC-6UBT
4www.aquaticav.com
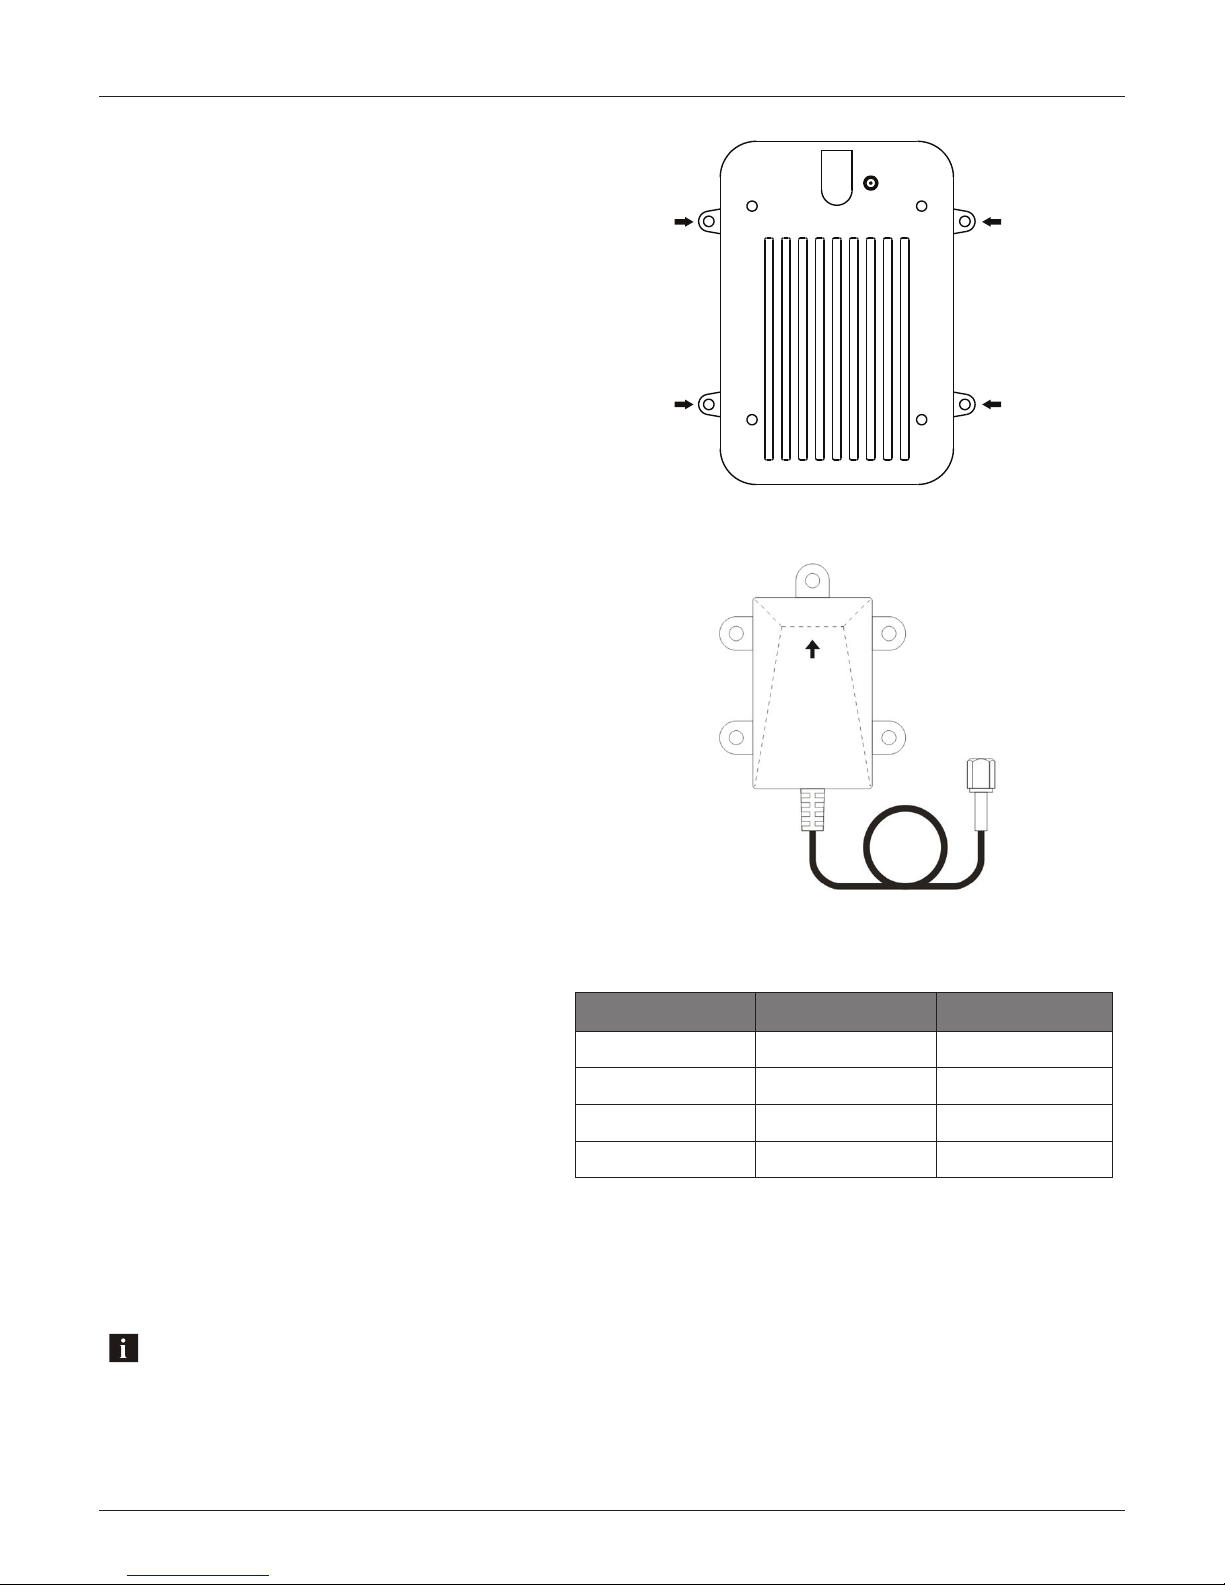
1. Make sure the outside surface is clean
and clear of debris.
2. The BlueCube Media Player has four (4)
front screws. Drive the screws using a screw
driver. Make sure screws are snug and do
not over tighten.
1.4. Mounting the BlueCube+ Media Player
1.5 Bluetooth Antenna Installation
1. Screw on the provided Bluetooth Antenna,
avoiding bending the cable at a 90° angle.
2. Install the Bluetooth antenna as high as
possible, above the waterline of the spa if possible,
and making sure the arrow is pointing directly
upwards towards the sky to ensure the Bluetooth
range is maximized. If there is no suitable surface
to screw it in, we recommend using a good quality
double sided tape.
1.6 Power Attenuation Wires
The AQ-BC-6UBT Bluecube+ stereo’s power
is set to -3dB of the maximum power to
avoid blowing very small speakers used spa
applications.
By cutting the black wire only the power/
volume will increase to the maximum (0dB
nominal).
By cutting the white wire only the power/volume will decrease to -6dB.
By cutting both the white and black wires the power/volume will decrease to -9dB.
These modifications should only be carried out by an experienced audio installer.
Black Wire White Wire Output Level
Intact (not cut) Intact (not cut) -3dB
Cut Intact (not cut) 0dB (reference)
Intact (not cut) Cut -6dB
Cut Cut -9dB
Should you cut the wrong wires or wish to reconnect them to further alter the attenuation, the Power Attenuation
Wires can be crimped back together.
Getting Started BlueCube+ Media Player AQ-BC-6UBT
5www.aquaticav.com

The remote has a built-in Polymer Lithium rechargeable battery and comes with a charging
cable. Connect one end of the charging cable to the charging connection on remote control
and connect the USB end of the charging cable to any USB charger (5V DC) for charging.
Make sure the remote has been charged before used.
1.8 Handheld Remote Control Charging
The remote should already be paired from the factory, but if you need to synchronize the
remote, follow the steps below.
1. Make sure BlueCube+ Media Player is powered ON (red LED)
2. Put the remote within 0.5 meter of the BlueCube+ Media Player.
3. Press and hold MODE on remote control until the LCD shows “Pairing in Progress”. Re-
lease the button.
4. WIthin 2 seconds, the LCD will show “Paired”. If it fails to pair, the LCD will show “Retry
again”. If this happens, wait 5 seconds and repeat steps above.
For any additional remote controls, you will also need to synchronize those remote controls to
the BlueCube+ Media Player.
1.9 Handheld Remote Control Synchronizing
If the pairing process is not successful, try again to put your remote close to the remote receiver or charge the remote
control if the battery is low.
Depending on the frequency of usage, the remote may drain its battery. Please charge the remote before use. If the LCD
shows nothing, the battery has been drained and will need charging.
If you have lost or damaged your remote control and buy a new remote control, follow the above steps to pair the
new remote control.
The AQ-BC-6UBT requires +12V DC to both the red and yellow wires. When both of these wires
have power the AQ-BC-6UBT is always powered on, indicated by a red LED on the heatsink of the
stereo. Ground is connected to the black wire.
In a spa application this requires the red and yellow wires to be jumped together and then con-
nected to the +12VDC output of the power source. In this set up the AQ-BC-6UBT will always be
on, with a very low current draw when idle.
In a boat, ATV or other application requiring power from a battery, the yellow wire (constant
power) should be connected to the battery, and the red wire should be connected to the ignition
or a switch.
For detailed instructions you can check out our online video:
‘How to wire your Aquatic AV stereo system’
http://www.aquaticav.com/support/videos
1.7 Power On
Getting Started BlueCube+ Media Player AQ-BC-6UBT
6www.aquaticav.com

2.1 Wireless Handheld Remote Control AQ-RF-6UBT-T
USB
Save & Exit Audio Menu
Location of Controls BlueCube+ Media Player AQ-BC-6UBT
7www.aquaticav.com

1. Switch on your Bluetooth device.
2. Select ‘AQUATIC AV’ from the list of available devices to pair (no password is needed).
3.2.1 Pair with Bluetooth Device
3.2 Listening via Bluetooth
3.1 Listening via USB
3.1.2 Device Charging
When specified USB devices are connected to the USB input the devices battery will charge
automatically. The USB socket can deliver 1A of current to charge a device battery.
1. Attach your USB thumb drive or devices USB cable to the female USB socket of the
BlueCube+ Media Player.
2. Press MODE on the remote to select USB mode.
3. Press PLAY to play or pause the music.
4. Press FAST REWIND / FAST FORWARD once play previous / next song file.
5. Press and hold FAST REWIND / FAST FORWARD to fast forward / fast rewind the song file.
3.1.1 Listening via USB
Listening to Devices BlueCube+ Media Player AQ-BC-6UBT
8www.aquaticav.com

3.4 Adjust Volume Level
1. Press VOLUME UP once to increase the volume.
2. Press VOLUME DOWN once to reduce the volume.
3. Press and hold either VOLUME UP or VOLUME DOWN to increase or decrease audio
volume continuously.
3.2.2 Listening via Bluetooth Device
1. Bluetooth mode will be activated once a Bluetooth device is paired in any mode. Use
MODE to change to the Bluetooth mode to listen to music.
2. Play the song from device and the sound will play through the BlueCube+ Media Player.
3. Press PLAY/PAUSE to play/pause the song.
4. Press FAST REWIND/FORWARD buttons to play previous/next song file.
4. Press and hold FAST REWIND/FORWARD buttons to fast forward / fast rewind the song
file.
5. Previous/next track and volume up/down can be controlled directly from your Bluetooth
device or directly from the BlueCube+ Media Player remote control.
3.2.3 Bluetooth Multi-link
A second Bluetooth device can pair to the BlueCube+ Media Player even when it has been
paired to another Bluetooth device. The second Bluetooth device will be able to play once
the first device has stopped playing.
3.3 Listening via Auxiliary Input
1. Connect your MP3 device to the RCA inputs.
2. Press MODE on the remote control to select ‘AUX’ mode.
Only one Auxiliary input (RCA) can be used at any one time.
Listening to Devices BlueCube+ Media Player AQ-BC-6UBT
9www.aquaticav.com

4.5 Adjust Volume Level
1. Press VOLUME UP once to increase the volume.
2. Press VOLUME DOWN once to reduce the volume.
3. Press and hold either VOLUME UP or VOLUME DOWN to increase or decrease audio
volume continuously.
4.2 Scan or Seek FM Radio Channels
1. Press FAST REWIND/FAST FORWARD to seek another station.
2. Press once FAST REWIND/FAST FORWARD to -0.05kHz or +0.05kHz to the frequency.
4.3 Saving Radio Channel to Memory
To save the current frequency to memory, press and hold 1, 2 or 3 for more than 2 seconds.
The station will be stored into relevant button.
4.4 Listening to Saved Radio Memory
Press the 1, 2, or 3 preset button once to listen to the station stored in that button.
4.1 Enter FM Radio Mode
1. Press MODE on the remote control to switch to FM radio mode.
2. Press PLAY/PAUSE to mute or unmute the audio.
If this is the first time you listen to FM radio, the default frequency will be 87.5MHz, as shown on the remote
LCD.
FM radio is only available when you are in FM Radio mode.
Listening to FM Radio BlueCube+ Media Player AQ-BC-6UBT
10www.aquaticav.com
Other manuals for AQ-BC-6UBT
1
This manual suits for next models
1
Table of contents
Other Aquatic Media Player manuals

Aquatic
Aquatic AQ-MP-5UBT Guide

Aquatic
Aquatic BLUECUBE+ AQ-BC-6UBT-X Guide

Aquatic
Aquatic AQ-MP-5BT-H User manual

Aquatic
Aquatic AQ-MP-5UBT-H Troubleshooting guide

Aquatic
Aquatic BLUECUBE6 BC6 MINI Guide

Aquatic
Aquatic AQ-BC-6BT Guide

Aquatic
Aquatic AQ-MP-5BT-H Guide

Aquatic
Aquatic BLUECUBE AQ-BC-5BT User manual

Aquatic
Aquatic AQ-BC-5UBT Manual

Aquatic
Aquatic HS Sport Plus Kit Guide


