AIRMSEN TDQR03 User manual
Meet a better life USER MANUAL
Complete Portable Countertop Dishwasher
Model No.: TDQR03
Questions or Concerns?
[email protected] www.airmsen.com
Please give us a chance to make it right and do better!
Contact our friendly customer service department for help first. Replacements for missing
or damaged parts will be shipped ASAP!
@AIRMSEN
04 05
06 07 08 09 10
11 12 13 14 15
16 17 18 19 20
21 22 23 24 25
26 27 28 29

04 05
06 07 08 09 10
11 12 13 14 15
16 17 18 19 20
21 22 23 24 25
26 27 28 29
CONSTANT INNOVATION —
TO ALLOW CONSUMERS TO GET BETTER PRODUCTS
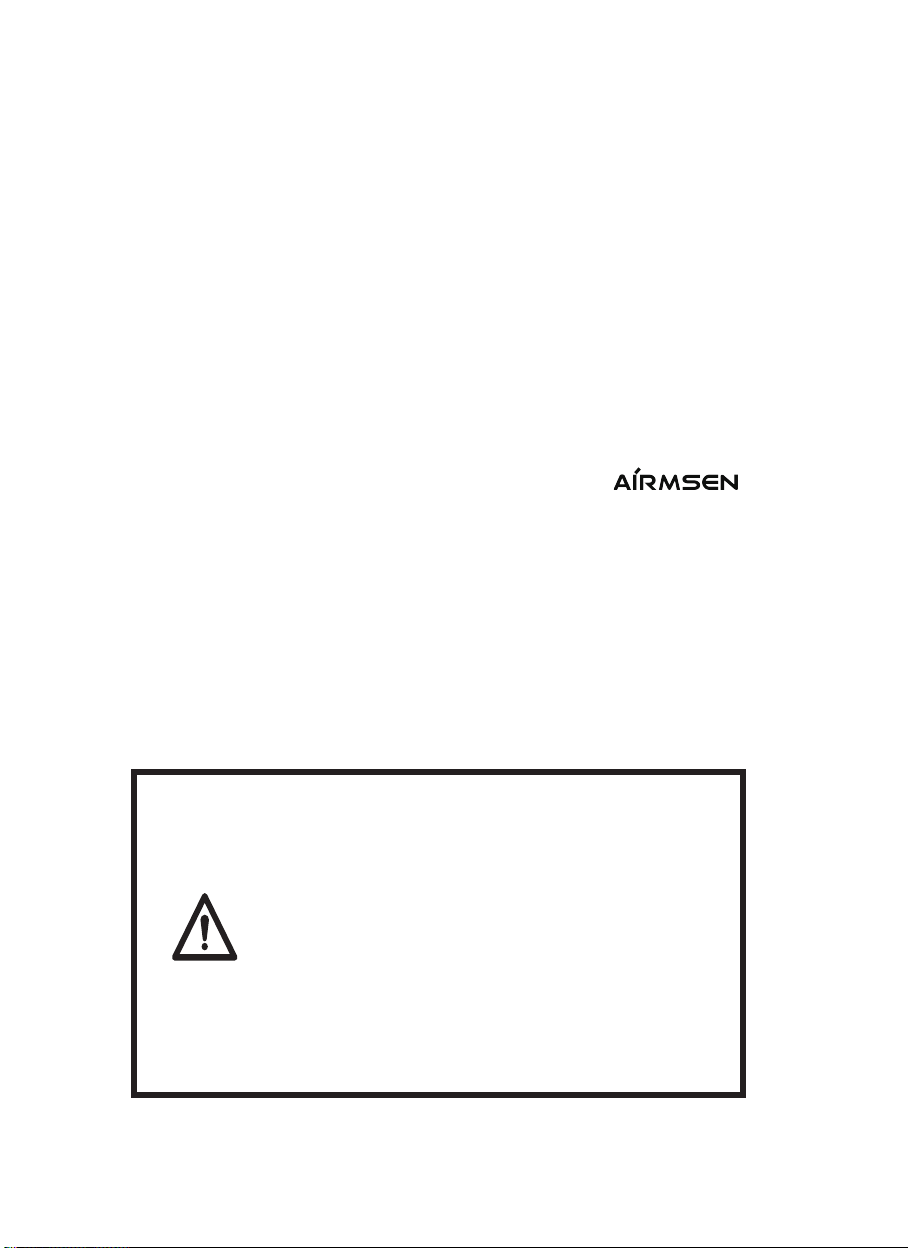
SAFETY
Your safety and the safety of others is very important.
We have provided many important safety messages in this manual and on
your appliance. Always read and obey all safety messages.
Take “technology, innovaon, health” as its core value, to be the preferred brand of
household products in your healthy and quality life.
AIRMSEN focus on researching, developing and manufacturing various kinds of
household supplies with advanced technologies and the idea of sustainable
development, to promote the evoluon and transform of our lifestyle, to make it more
healthy, green, intelligent and with high quality, and to bring a happy, healthy and
eco-friendly home life to around the world.
All safety messages will follow the safety alert symbol.
All safety messages will tell you what the potential hazard is, tell you how
to reduce the chance of injury, and tell you what can happen if the
instructions are not followed.
This is the safety alert symbol.
This symbol alerts you to potential hazards that can cause
serious injury to you and others.
MEET A BETTER LIFE
04 05
06 07 08 09 10
11 12 13 14 15
16 17 18 19 20
21 22 23 24 25
26 27 28 29

TABLE OF CONTENTS PACKAGE CONTENTS
PACKAGE CONTENTS
SPECIFICATIONS AND PARAMETERS
IMPORTANT SAFEGUARDS
General Safety
Operating Safety Precautions
GETTING TO KNOW YOUR DISHWASHER
DISHWASHER FEATURES
Built-in LED Lamp
CONTROL PANEL
LED DISPLAY
PARTS LIST
INSTALLATION
Connecting the Drain Hose to the Machine
Connecting the Drain Hose to a Sewer
Adding Water to Dishwasher
OPERATING INSTRUCTIONS
Loading the Dishwasher Basket
Recommended Layout for 4 Place Settings
DETERGENT USE
MODE SELECTION
WASH CYCLE
EXTRA DRYMode
StartingaWashCycle
ForgettoAddaDish?
AttheEndof aWashCycle
CLEANING&MAINTENANCE
FILTER SYSTEM
SPRAY ARMS
CARING FOR THE DISHWASHER
ERROR CODES
TROUBLESHOOTING
WARRANTY INFORMATION
CUSTOMER SUPPORT
1 × Inlet Hose (61 in/154 cm)
1 × Drain Hose (61 in/154 cm)
1 × Fruit Basket
1 × Pitcher
1 × Hose Collar
1 × Cutlery Basket
1 × User Manual
1 × Warranty Card
04
05
06
06
06
07
07
07
08
09
09
10
10
10
11
13
13
13
14
15
15
15
16
17
17
18
18
20
21
23
24
27
28
04 05
06 07 08 09 10
11 12 13 14 15
16 17 18 19 20
21 22 23 24 25
26 27 28 29

CONGRATULATIONS ON YOUR PURCHASE
OF A FARBERWARE PROFESSIONAL 5-LITER
COMPLETE PORTABLE COUNTERTOP DISHWASHER
FEATURES INCLUDE:
• 5 Wash Programs
• Choice of Built-in Tank or Faucet Hookup
• Steam generated during clean cycle cleans baby bottles
• LED Digital controls
• Use any place there is water and electricity
• Automatic Air circulation dries dishes
SPECIFICATIONS AND PARAMETERS
THIS PRODUCT IS FOR USE IN 120V AC OUTLET ONLY.
Power supply 120VAC 60Hz
Rated power 900W
10A 120VAC
4 Place Settings
0.03 ~ 1 Mpa
1.3 gallons (5 L)
PTC hot air
50 dB
A++
12 kg / 26.46 lbs
458 × 428 × 425 mm / 18.05 × 16.86 × 16.75 in
Specification of the socket
Capacity
Inlet pressure
Water tank capacity
Dry mode
Noise level
Product size (H × W × D)
Product weight
Energy rating
04 05
06 07 08 09 10
11 12 13 14 15
16 17 18 19 20
21 22 23 24 25
26 27 28 29

IMPORTANT SAFEGUARDS
Always follow basic safety precautions when using your countertop dishwasher.
Read all instructions.
General Safety Operating Safety Precautions
Power socket must be grounded, avoiding to
possible electric leakage or shock;
Any of new parts or power cord will be replaced
by service man after damages;
Dispose of the machine in an environmentally
friendly manner under local regulations;
To protect against electrical shock do not
immerse cord, plug or any part of this unit in
water or other liquids.
Unplug from outlet when not in use, before
removing parts and before cleaning. Allow to
cool before putting on or taking off any parts
and before cleaning.
The manufacturer does not recommend the use
of accessory attachments other than what is
provided by the manufacturer. Use of attach-
ments may cause injuries.
Do not use the appliance for other than its
intended use.
Do not place the machine in an environment
under 0℃, like outside door in cold weather;
Please use the salt and detergent which is
special for automatic dishwasher;
Do not place and use the machine in the
platform which is not stable, wet, smooth,
inflammable avoiding to any damage;
Do not place and use the machine within
150mm far from gas stove or other heating
source;
Do not place any heavy object on the door
when door open avoiding to the machine turn
over;
Do not splash water into the machine avoiding
to electric shock or fire;
Do not drink the left water in the machine;
Do not let children operate the machine
independently avoiding to any danger;
Do not open the door when washing avoiding
to hot water flying out causing any hurts;
Do not touch or block the side air outlet;
Do not tilt or move the machine when washing;
When loading the dishwasher locate sharp
objects in the basket with sharp edges facing
down so that they do not damage the door seal;
Please stop washing, power off, and close tap
when any faults;
Please check and clean the machine time from
time in order to the best performance;
Please fix the drain hose avoiding to the stained
water outflow;
Do not forced pull power cord, drain hose,
press cutlery tray avoiding any damage;
Do not use wet hand to operate the machine
avoiding electric shock;
Children should be far from the chemical
material such as salt, detergent avoiding to any
hurt.
Do not modify the plug provided with the
appliance.
Improper connection can result in risk of an
electric shock.
Check with a qualified electrician or service
representative if you are in doubt whether the
appliance is being used correctly.
SAVE THESE INSTRUCTIONS
04 05
06 07 08 09 10
11 12 13 14 15
16 17 18 19 20
21 22 23 24 25
26 27 28 29
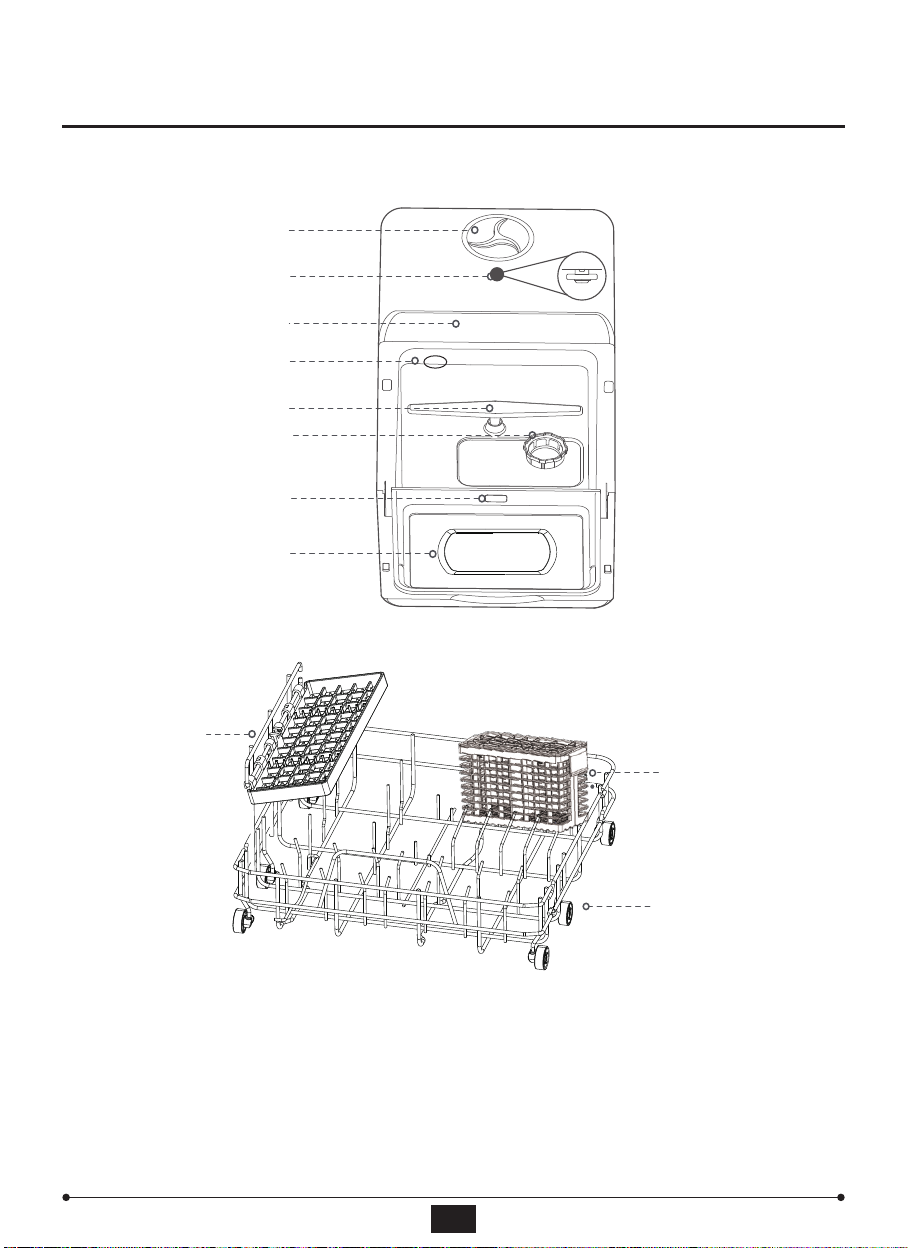
DISHWASHER FEATURES
Built-in LED Lamp
GETTING TO KNOW YOUR DISHWASHER
Water tank
Control panel
LED lamp
Lower spray arm
Filter system
Detergent dispenser
Glass door
Upper spray arm
Tableware basket
Cutlery basket
Storage rack
The LED lamp allows you to clearly check the working status of the dishwasher. When the glass door is
opened, the lamp will automatically turn on and when the glass door is closed, it will automatically turn off
within 2 minutes. If the door is kept open for more than 5 minutes, it will automatically turn off. In the last
10 minutes of the drying process, the LED lamp will turn on, indicating that the drying is almost complete.
04 05
06 07 08 09 10
11 12 13 14 15
16 17 18 19 20
21 22 23 24 25
26 27 28 29
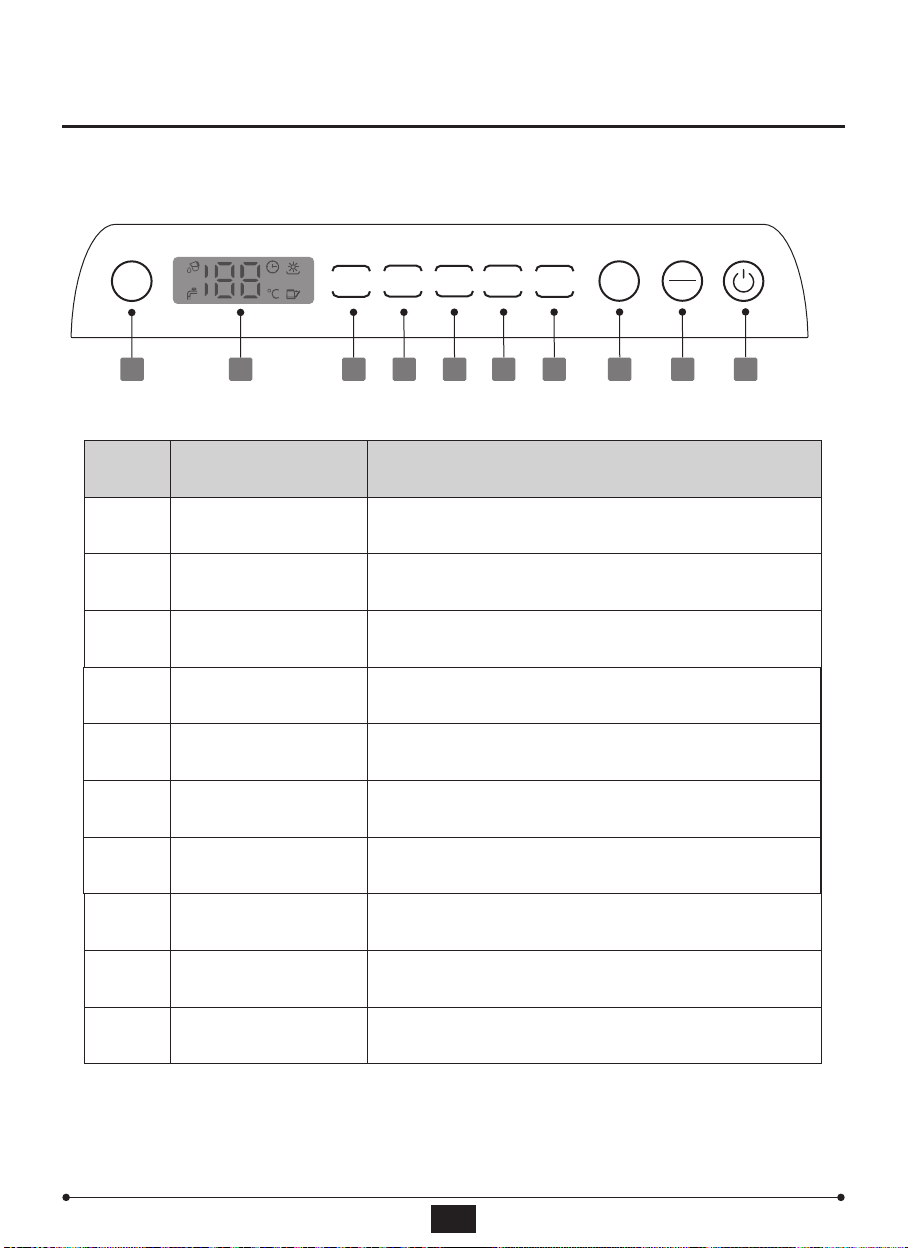
CONTROL PANEL
GETTING TO KNOW YOUR DISHWASHER
MODE
FRUIT
BABY
CARE
GLASSSPEED
NORMAL
EXTRA
DRY
START
PAUSE
10 23456789 1
NO. BUTTON / INDICATOR FUNCTION
1
2
3
4
5
6
Press and hold this button for 3 seconds to turn on or turn
off the machine.
Suitable for washing baby bottles, oily and grimy tableware,
or pet products.
Use this mode to wash hard surface fruits with room
temperature water. There is no need to add detergent.
Press this button to start or pause a wash cycle.
The temperature is suitable for delicate ware with light soiled.
A shorter wash for lightly soiled loads.
For normal soiled loads such as dishes, glasses, and other
tableware.
Displays temperature, time, error code, etc.
Adds 60 minutes of hot air drying and 72 hours of automatic
intermittent ventilation to remove odors and facilitate storage.
Press this button to choose a wash cycle and dry mode.
POWER
START / PAUSE
MODE
FRUIT
BABY CARE
GLASS
SPEED
NORMAL
DISPLAY
EXTRA DRY
7
8
9
10
04 05
06 07 08 09 10
11 12 13 14 15
16 17 18 19 20
21 22 23 24 25
26 27 28 29

LED DISPLAY
PARTS LIST
GETTING TO KNOW YOUR DISHWASHER
Water tank mode
Faucet mode
Temperature icon in Celsius
Door opened
Time icon
Dry indicator
Display of temperature, time, error code, etc.
Inlet Hose × 1
(61 in/154 cm)
Drain Hose × 1
(61 in/154 cm)
Fruit Basket × 1
Pitcher × 1 Hose Collar × 1 Cutlery Basket × 1
04 05
06 07 08 09 10
11 12 13 14 15
16 17 18 19 20
21 22 23 24 25
26 27 28 29
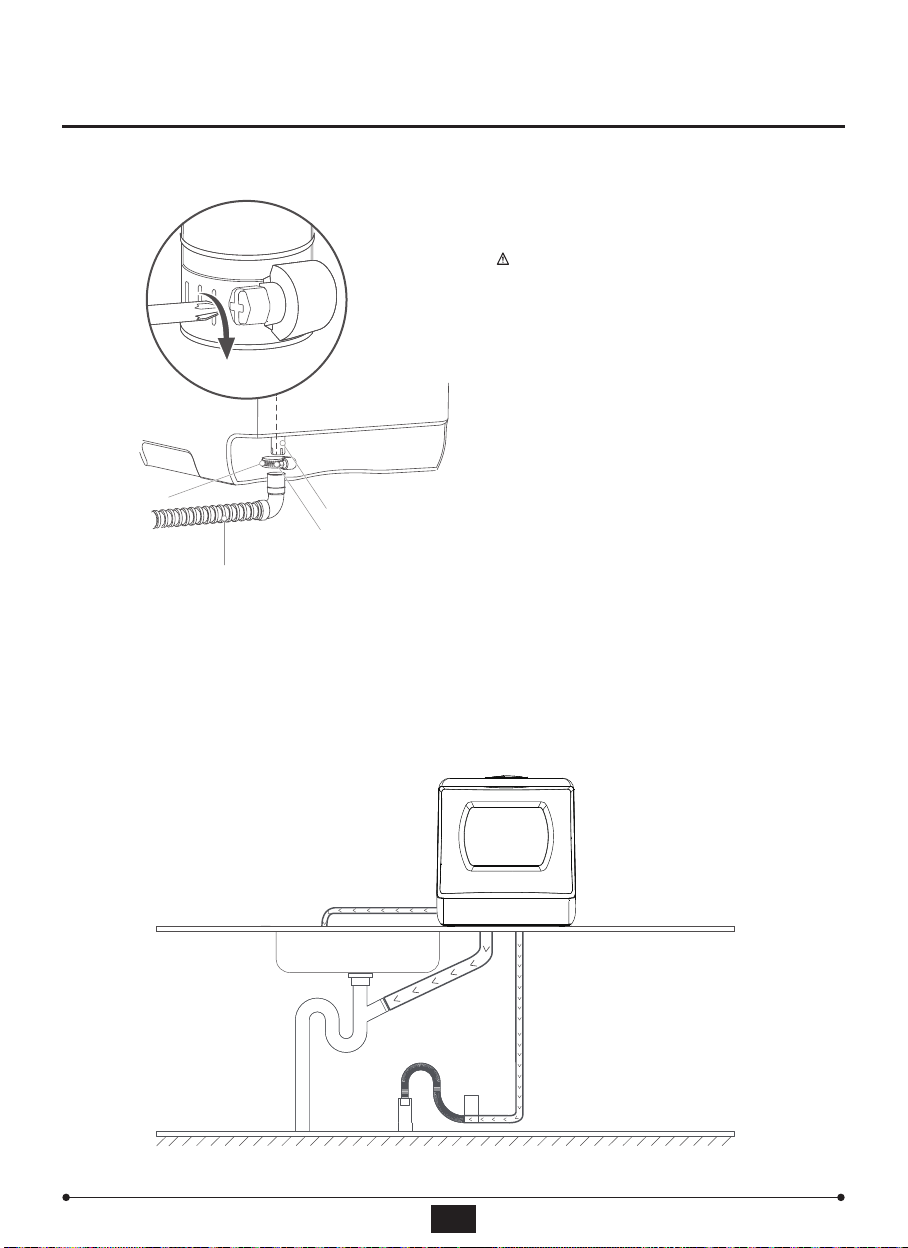
Connecting the Drain Hose to the Machine
Connecting the Drain Hose to a Sewer
INSTALLATION
Hose Collar
Drain Hose
Water Outlet
Hose collar screw
WARNING: The dishwasher drain hose is an
essential part of the machine, so it must be
installed correctly to drain water and perform
its job effectively.
A Drain hose
C Drain hose
B Drain hose
There are three options for sewer connection, A(sink), B(sink drainpipe), and C(drainage pipe). For options
B and C, it is required to drill a hole on or under the counter so that the pipe can go through the counter.
The drain hose must be property fitted to its containment source (such as a sink, bucket, etc.) to avoid
water leaks, Ensure that the drain hose is not kinked or impeded in any way.
1.
2.
1.
2.
Connect the drain hose to the water outlet
located on the back of the machine.
Tighten the hose collar screw with a
screwdriver.
04 05
06 07 08 09 10
11 12 13 14 15
16 17 18 19 20
21 22 23 24 25
26 27 28 29
Other manuals for TDQR03
1
Table of contents
Other AIRMSEN Dishwasher manuals


