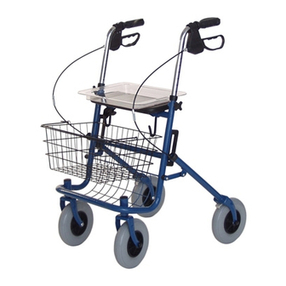
aidapt VP174 Manual

EN
Tri-Wheeled Walkers
Fixing and Maintenance Instructions

Fixing and Maintenance Instructions Ver.3 03/2013 (1326)
2
INTRODUCTION
Thank you for choosing your Aidapt Tri-walker.
Our tri-walkers, as with all of our products, are manufactured from high quality materials.
Your tri-walker has been designed to assist the user to walk and carry small items of
shopping with our optional special shopping bag designed specifically to fit your tri-
walker. Only use basket and bags supplied and designed for your Tri-walker.
Do not use or combine bags or baskets from other manufacturers.
n normal use, i.e. when both hands are placed on the handles of the Tri-Walker, please
ensure it is fully opened and locked into position. Always keep both hands on the Tri-
Walker, do not put full pressure on one side as this may cause tipping.
t is very important that the side locking levers (see fig.1) are properly tightened so that the
tube will not slip down when normal height is applied to the handles.
When not in use, you can simply fold the tri-walker and store away until you require it next.
The tri-walker is designed for use inside and outside the home. Please ensure fingers are
clear of the locking mechanism to reduce the risk of entrapment when closing the Tri-
Walker
NB. This equipment must be installed by a competent person.
VP174 Aidapt Lightweight Tri Walker with Bag & Basket 115 kg (18 st) weight limit
VP172A Aidapt Red Tri Walker 110 kg (17 st.) weight limit
VP173A Aidapt Blue Tri Walker 110 kg (17 st.) weight limit
VP174R Red Tri Walker with Bag 115 kg (18 st) weight limit
VP174S Blue Tri Walker with Bag 115 kg (18 st) weight limit
VP174RS Red Tri Walker with Bag 115 kg (18 st) weight limit
VP174SS Blue Tri Walker with Bag 115 kg (18 st) weight limit
VP100C Chrome Tri Walker with Bag 110 kg (17 st.) weight limit
VP100CP Chrome Tri Walker with Bag & Basket 110 kg (17 st.) weight limit
Do not exceed the maximum load; doin so could put the user at risk.
FEATURES
•User friendly loop brakes lever with lock
•Soft plastic solid wheels
•Swiveling front wheel
•Height adjustment
•User friendly height adjusting levers
•Ergonomic handgrips to reduce pressure
•Optional bag or basket attachment

Fixing and Maintenance Instructions Ver.3 03/2013 (1326)
3
ASSEMBLY INSTRUCTIONS
1. Carefully remove all packaging. Check the product thoroughly for damage
or obvious faults.
If you suspect the unit to be faulty, please do not use, but contact your
supplier immediately for service.
2. Release the side locking levers (fig. 1) left and right of the frame.
3. Carefully insert the brake assembly (fig. 2) within the frame.
4. Adjust the handles to the height desired, ensuring that both brakes are even
in height and the tri-walker is sitting evenly on the ground.
5. Retighten the side lever locks (fig.1). Ensure you have tightened these locks
sufficiently so that the adjustable brake tubes will not move accidentally
and the locking levers are finger tight.
6. Fix the brake cables into the integral brake cable clip welded onto the frame
if not already assembled (fig.3).
Fig. 1 Fig. 2 Fig. 3
LOCKING MECHANISM
1. Open out the tri-walker frame by pulling the grip
handles outwards in opposite directions forming a ‘V’
shape (fig.4). Once this is completed pull/push the
central locking bracket so the plates are parallel by
using the handle mounted in the centre.
Ensure the frame is locked before usin it and never
use a semi-closed position as this may lead to the
frame collapsin .
Fi . 4
2. To close your tri-wheeled walker stand behind the walker and pull the handle
towards yourself to release the lock. Then apply pressure to the outside of the
handgrips and the walker will fold. Please ensure fingers are clear of the locking
mechanism to reduce the risk of entrapment when closing the Tri-Walker.

Fixing and Maintenance Instructions Ver.3 03/2013 (1326)
4
OPERATING THE BRAKES
1. To stop, gently apply a gripping pressure to both brakes simultaneously (fig.5),
this will slow down and stop your tri-walker.
2. The brakes on your tri-walker have a park option (fig.5a). To operate the park
option, push downwards on both brakes simultaneously. You will feel the brake
make a very slight click. Your brakes are now in the ‘lock’ position.
3. To unlock, simply pull up the brake again, you will hear a slight click as the ‘park’
disengages.
Fig. 5 Fig. 5a Fig. 5b
FITTING THE CARRY BAG
1. The Tri-walker bag should be fitted when the walker is set in the open position.
2. Take the strap situated upon the upper side of the tri-walker bag, and wrap this
around the diagonal bar of the frame (fig. 6) and push the stud fasteners
together. Repeat on the opposite side.
3. Take the strap on the side of the tri-walker bag and wrap this around the vertical
bar of the frame (fig. 6a) and again push the stud fasteners together.
Fig. 6 Fig. 6a

Fixing and Maintenance Instructions Ver.3 03/2013 (1326)
5
CARE AND MAINTENANCE & YOUR OBLIGATION
1. Only use your Tri-walker for the purpose for which it is intended, which is an aid
to walking. t is intended that your Tri-walker is only used on standard
pavements or at home and should not be used on rough terrain or pot holed
surfaces. The use of you tri-walker on these surfaces can seriously compromise
your safety.
2. Keep your Tri-walker clean by wiping down with a damp cloth with a mild
detergent. Do not under any circumstances use an abrasive or solvent based
cleaner, as this will seriously damage the tri-walker and void your warranty.
3. Wipe off with a dry cloth and use water dispersing agent such as WD40 on all
joints
4. Check that all wheels and the folding mechanism function correctly and that all
wheels move freely. Pay particular attention to the front wheel, ensuring that it
rotates freely and without obstruction.
5. Check the centre mounted bracket (see fig.4), always make sure that this is
securely in place before using.
Withdraw your Tri-walker immediately if the bracket lock will not locate or
if any of the wheels become difficult to turn or if you suspect dama e or any
other fault.
6. Monthly Checks – check that the side locking levels are properly secure (fig.1).
a. Check that no components are loose.
b. Check the brakes; ensure that the brakes are correctly adjusted with 3 mm
between tyres and brakes.
Do not fit any parts or accessories to your Tri-walker manufactured by any
other company. To do so will annul your warranty and, may seriously
compromise your safety.
7. We suggest that you check your tri-walker visually everyday. However we
recommend that you should have your tri-walker serviced every three months or
less if used or issued to various users. Servicing should be carried out at an
approved service station or directly by Aidapt, see section 12 for details.

Fixing and Maintenance Instructions Ver.3 03/2013 (1326)
6
ADJUSTMENT
1. Your Tri-walker brake system will require periodic adjustment (fig.7).
2. Look for an adjusting barrel, a long hollow bolt in which the cable housing
terminates, but the inner wire goes through. This adjusting barrel may be on the
hand lever (fig.7a), or on the brake calliper (the main part of the braking system
at the wheel, fig. 7b).
3. You can fine adjust the brake tension by unscrewing the adjusting barrel a little
bit. This effectively shortens the cable.
Fig. 7 Fig. 7a Fig. 7b
4. Check the park brakes by pushing down on the brake handles, ensuring that
both brakes lock in the park position.
5. Lift the two ‘braked’ wheels off the ground and spin to ensure they turn freely. f
either braked wheels rub onto the brake arm, please check for obstructions and
repeat the brake procedure above, this time loosening the brake bolt slightly to
increase the distance between the brake arm and wheel.
6. t is important that you check brake adjustments on a regular basis to take into
account wear and tear. However brake adjustment must be checked at least
once a month and definitely prior to a change of user.
CLEANING
Clean using a non-abrasive cleaner or mild detergent with a soft cloth only. Only use a mild
detergent or disinfectant; never use an abrasive cleaner. Always ensure that you wipe dry
all equipment after cleaning.

Fixing and Maintenance Instructions Ver.3 03/2013 (1326)
REISSUE
f you reissue or are about to reissue this product, please thoroughly check all components
for their safety.
This includes:
•Bent or damaged tubes or cracks at the tube joints.
•Loose or worn horseshoe clips
•Elongated adjustment holes.
•Loose handles.
•Loose or worn Wheels and wheel fasteners (where fitted)
•Smooth, worn or split ferrules (rubber tips).
Replace all worn, missin or dama ed parts where necessary. If in any doubt, please
do not issue or use, but immediately contact your supplier for service support.
CARE & MAINTENANCE
Please make a safety check of the product at regular intervals or if you have any concerns.
WARRANTY
This product carries a 12 month warranty from the date of purchase against manufacturing
defects.
Misuse or Damage is not covered.
This warranty does not affect your statutory rights.
IMPORTANT INFORMATION
The information given in this instruction booklet must not be taken as forming part of or
establishing any contractual or other commitment by Aidapt Bathrooms Limited, Aidapt
(Wales) Ltd or its agents or its subsidiaries and no warranty or representation concerning
the information is given.
Please exercise common sense and do not take any unnecessary risks when using this
product; as the user you must accept liability for safety when using the product.
Please do not hesitate to contact the person who issued this product to you or the
manufacturer (detailed below) if you have any queries concerning the assembly/use of
your product.

Fixing and Maintenance Instructions Ver.3 03/2013 (1326)
8
Aidapt Bathrooms Ltd, Lancots Lane, Sutton Oak, St Helens, WA9
3EX
Telephone: +44 (0) 1744 745 020 • Fax: +44 (0) 1744 745 001 • Web: www.aidapt.co.uk
Email: accounts@aidapt.co.uk • adaptations@aidapt.co.uk • sales@aidapt.co.uk

FR
Déambulateurs
Notice d'Utilisation et d'Entretien

Notice d'Utilisation et d'Entretien Ver.3 03/2013 (1326)
10
INTRODUCTION
Lors du déballage, si vous constatez un défaut, veuillez contacter votre revendeur.
Dans ce cas, n'utilisez pas le déambulateur car cela ne serait pas prudent.
Nous vous remercions d'avoir choisi un déambulateur Aidapt. Notre gamme de
déambulateurs, comme tous nos produits, est fabriquée à partir des meilleurs matériau et
est conforme au normes CEE en vigueur.
Un déambulateur est destiné à aider l'utilisateur à marcher et transporter ses courses peu
lourdes grâce au sac de shopping optionnel. Utilisez uniquement la sacoche et le panier
fournis et prévus pour le déambulateur.
N'utilisez pas des sacs ni paniers provenant d'autres fabricants.
UTILISATION DU DÉAMBULATEUR
En utilisation normale, c'est-à-dire quand les deu mains sont placées sur les poignées du
déambulateur, veuillez vérifier que le déambulateur est complètement ouvert et
verrouillé.
Gardez toujours les deu mains sur le déambulateur, ne mettez pas tout votre poids sur
l'un des deu côtés car cela pourrait faire basculer le déambulateur.
Il est très important que les leviers de verrouillage (voir fig. 1) soient correctement serrés
de telle façon que le tube ne glisse pas vers le bas quand un poids normal est e ercé sur les
poignées.
Quand vous n'utilisez pas le déambulateur, vous pouvez simplement le plier et le ranger
jusqu'à ce que vous en ayez à nouveau besoin.
Le déambulateur est prévu pour une utilisation à l'intérieur et à l'e térieur. Tenez les doigts
éloignés du mécanisme de verrouillage pour ne pas vous pincer quand vous fermez le
déambulateur.
N.B. : Cet équipement doit être in tallé par une per onne compétente et une
évaluation de ri que e t néce aire quant à la pertinence du produit pour
l'utili ateur.
VP174 Déambulateur Léger Aidapt avec Sacoche & Panier Poids Limite 115kg
VP172A Déambulateur Rouge Aidapt Poids Limite 110kg
VP173A Déambulateur Bleu Aidapt Poids Limite 110kg
VP174R Déambulateur Rouge avec Sacoche Poids Limite 115kg
VP174S Déambulateur Bleu avec Sacoche Poids Limite 115kg
VP174RS Déambulateur Rouge avec Sacoche Poids Limite 115kg
VP174SS Déambulateur Bleu avec Sacoche Poids Limite 115kg
VP100C Déambulateur Chromé avec Sacoche Poids Limite 110kg
VP100CP Déambulateur Chromé avec Sacoche & Panier Poids Limite 110kg
Ne dépa ez pa le poid limité indiqué-cela ferait prendre de ri que inutile à
l'utili ateur.

This manual suits for next models
8
Table of contents
Languages:
Other aidapt Mobility Aid manuals

aidapt
aidapt VP174FC Manual

aidapt
aidapt VP122 Manual

aidapt
aidapt VM917 Programming manual

aidapt
aidapt VM903 Programming manual

aidapt
aidapt VB540C Programming manual

aidapt
aidapt VM904 Programming manual

aidapt
aidapt VP119 Manual

aidapt
aidapt VP174RS Manual

aidapt
aidapt VM936R Programming manual

aidapt
aidapt VM945 Programming manual
Popular Mobility Aid manuals by other brands

Rhythm Healthcare
Rhythm Healthcare B3800F manual

AMF-BRUNS
AMF-BRUNS PROTEKTOR installation manual

Drive DeVilbiss Healthcare
Drive DeVilbiss Healthcare OTTER Instructions for use

Rhythm Healthcare
Rhythm Healthcare C500U Assembly and Fitting Instructions

Lumex
Lumex RJ4200A manual

Rebotec
Rebotec Jumbo user manual