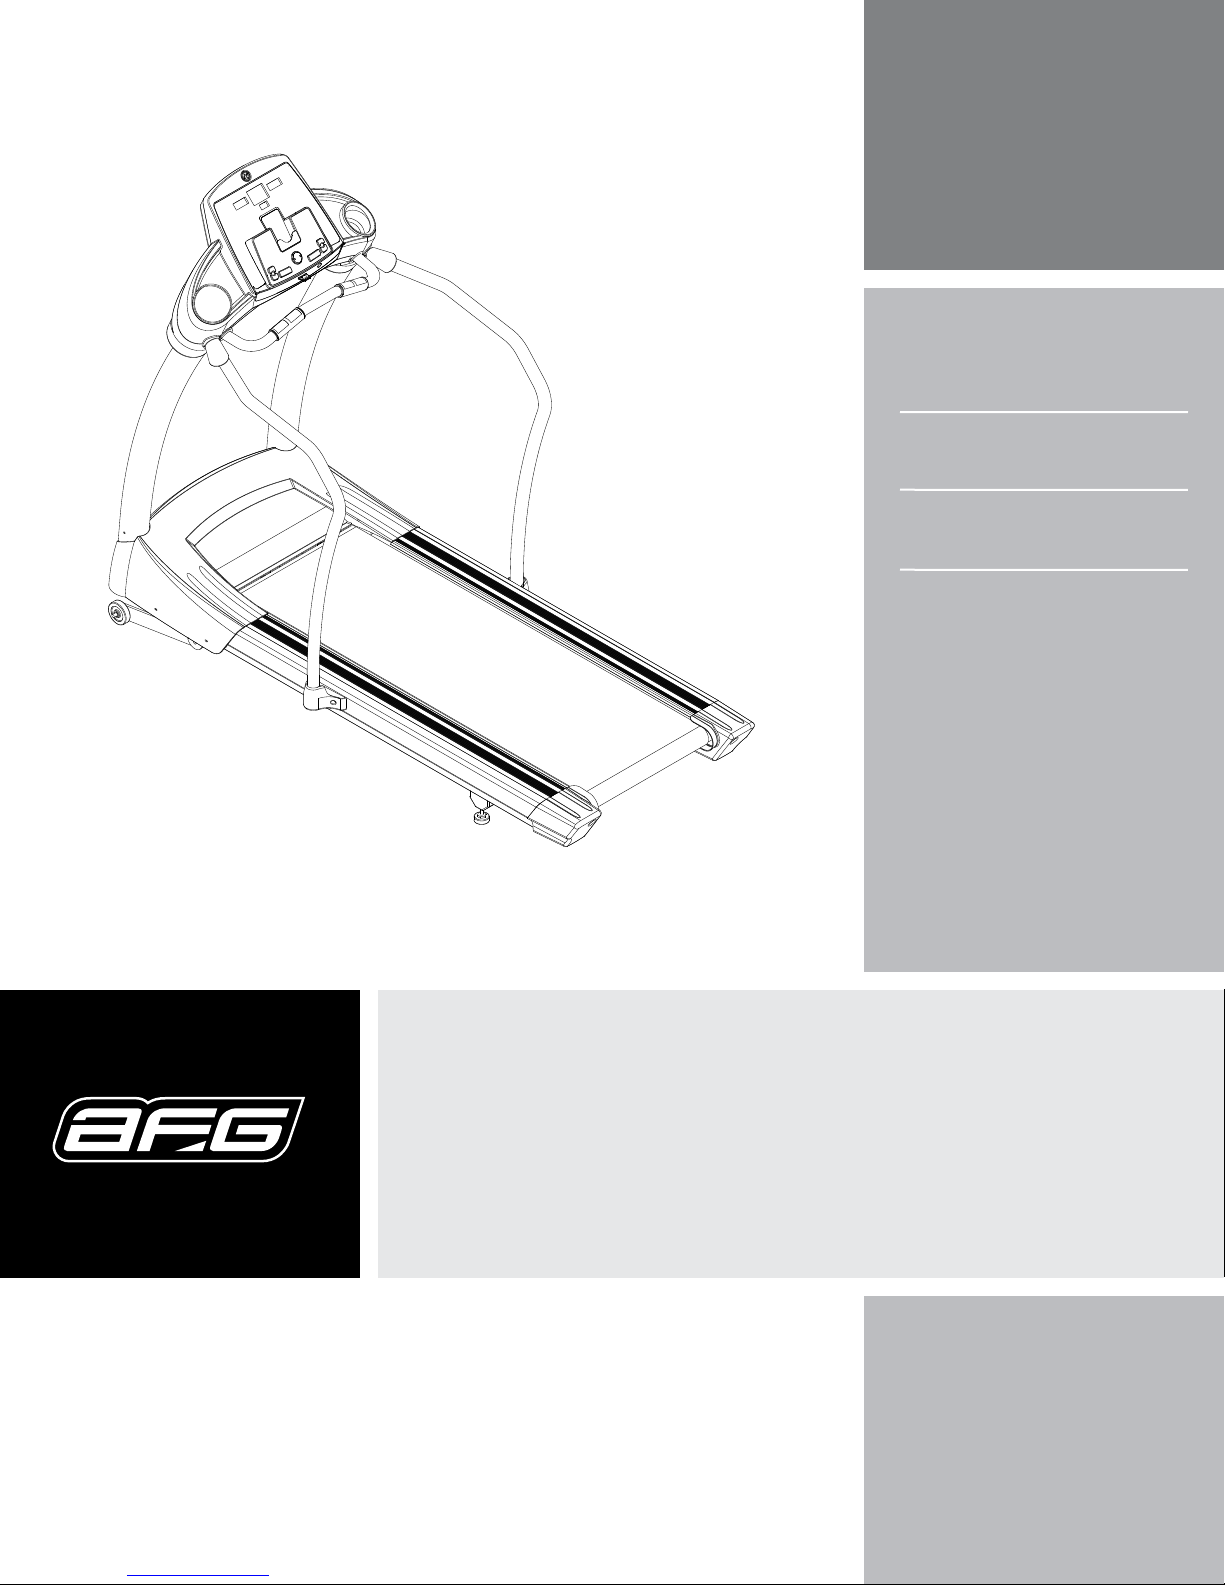
AFG 13.0AT User manual

TREADMILL USER’S GUIDE
AFG SERIES
FOR MODEL :
13.0 AT


3
INTRODUCTION
IMPORTANT
PRECAUTIONS
ASSEMBLY
BEFORE
YOU BEGIN
TREADMILL
OPERATION
CONDITIONING
GUIDELINES
TROUBLESHOOTING
& MAINTENANCE
LIMITED
WARRANTY
CONGRATULATIONS and THANK YOU for your purchase of this AFG treadmill!
Whether your goal is to win races or simply enjoy a fuller, healthier lifestyle, an treadmill can help
you attain it – adding club-quality performance to your at-home workouts, with the ergonomics and
innovative features you need to get stronger and healthier, faster. Because we're committed to designing
fitness equipment from the inside out, we use only the highest quality components. It's a commitment
we back with one of the strongest frame-to-motor warranty packages in the industry.
You want exercise equipment that offers the most comfort, the best reliability and quality in its class.
The AFG delivers.
INTRODUCTION
Important Precautions
Assembly
Before You Begin
Treadmill Operation
Conditioning Guidelines
Troubleshooting & Maintenance
Limited Warranty
CONTACT INFORMATION
4
6
12
15
25
31
34
Back Panel
TABLE OF CONTENTS

4
INTRODUCTION IMPORTANT
PRECAUTIONS ASSEMBLY BEFORE
YOU BEGIN TREADMILL
OPERATION LIMITED
WARRANTY
TROUBLESHOOTING
& MAINTENANCE
CONDITIONING
GUIDELINES
This product is rated more than 15 amperes and is for use on a circuit having a nominal rating of 120 volts and
is factory-equipped with a specific electric cord and plug to permit connection to a proper electric circuit. Make
sure that the product is connected to an outlet having the same configuration as the plug. No adapter should
be used with this product. If the product must be reconnected for use on a different type of electric circuit, the
reconnection should be made by qualified service personnel.
IMPORTANT SAFETY INSTRUCTIONS
OPERATION
To reduce the risk of damaging important components on your treadmill, it is
strongly recommended that your treadmill is plugged into a dedicated 20 amp
circuit, without the use of an additional extension cord and/or power strip.
Failure to comply may void the warranty.
IMPORTANT: The treadmill is not compatible with GFCI-equipped outlets.
It is essential that your treadmill is used only indoors, in a climate controlled room. If your treadmill
has been exposed to colder temperatures or high moisture climates, it is strongly recommended that the
treadmill is warmed up to room temperature before first time use. Failure to do so may cause premature
electronic failure.
SAVE THESE INSTRUCTIONS
Read all instructions before using this treadmill. When using an electrical product, basic precautions
should always be followed, including the following: Read all instructions before using this treadmill. It is the
responsibility of the owner to ensure that all users of this treadmill are adequately informed of all warnings
and precautions. If you have any questions after reading this manual, contact Sears at the number listed on
the back cover of this manual.
WARNING
Connect this exercise product to a properly grounded outlet only.
See grounding instructions.
GROUNDING INSTRUCTIONS
This product must be grounded. If a treadmill should malfunction or breakdown, grounding provides a path
of least resistance for electrical current to reduce the risk of electrical shock. This product is equipped with
a cord having an equipment-grounding conductor and a grounding plug. The plug must be plugged into an
appropriate outlet that is properly installed and grounded in accordance with local codes and ordinances.
WARNING
Improper connection of the equipment-grounding conductor can result in a risk of
electric shock. Check with a qualified electrician or serviceman if you are in doubt
as to whether the product is properly grounded. Do not modify the plug provided
with the product. If it will not fit the outlet, have a proper outlet installed by a
qualified electrician.
WARNING
FOR HOUSEHOLD USE ONLY

5
INTRODUCTION
IMPORTANT
PRECAUTIONS
ASSEMBLY
BEFORE
YOU BEGIN
TREADMILL
OPERATION
CONDITIONING
GUIDELINES
TROUBLESHOOTING
& MAINTENANCE
LIMITED
WARRANTY
TO REDUCE THE RISK OF BURNS, FIRE, ELECTRICAL SHOCK OR INjURY
TO PERSONS:
WARNING
Never use the treadmill before securing the
safety tether clip to your clothing.
If you experience any kind of pain, including
but not limited to chest pains, nausea,
dizziness, or shortness of breath, stop
exercising immediately and consult your
physician before continuing.
Do not wear clothes that might catch on any
part of the treadmill.
Always wear athletic shoes while using this
equipment.
Do not jump on the treadmill.
Unplug treadmill before moving or cleaning
it. To clean, wipe surfaces down with soap
and slightly damp cloth only; never use
solvents. (See MAINTENANCE)
At no time should more than one person be
on treadmill while in operation.
The treadmill should not be used by persons
weighing more than 350 pounds. Failure to
comply will void the warranty.
Thetreadmillisintendedforin-homeuseonly.
Do not use this treadmill in any commercial,
rental, school or institutional setting. Failure
to comply will void the warranty.
Do not use treadmill in any location that is
not temperature controlled, such as but not
limited to garages, porches, pool rooms,
bathrooms, car ports or outdoors. Failure to
comply may void the warranty.
•
•
•
•
•
•
•
•
•
•
An appliance should never be left unattended when plugged in.
Unplug from outlet when not in use, and before putting on or
taking off parts.
Close supervision is necessary when this appliance (or treadmill)
is used by, on, or near children, invalids, or disabled persons.
Use this appliance (or treadmill) only for its intended use
as described in this manual. Do not use attachments not
recommended by the manufacturer.
Never operate this appliance (or treadmill) if it has a damaged
cord or plug, if it is not working properly, if it has been dropped
or damaged, or dropped into water. Return the appliance (or
treadmill) to a service center for examination and repair.
Do not carry this appliance (or treadmill) by supply cord or use
cord as a handle.
Keep the cord away from heated surfaces.
Never operate the appliance (or treadmill) with the air openings
blocked. Keep the air openings free of lint, hair, and the like.
Never drop or insert any object into any opening.
Do not use outdoors.
Do not operate where aerosol (spray) products are being used or
where oxygen is being administered.
To disconnect, turn all controls to the off position, then remove
plug from outlet.
Do not operate under blanket or pillow. Excessive heating can
occur and cause fire, electric shock, or injury to persons.
•
•
•
•
•
•
•
•
•
•
•
•
When using an electrical appliance, basic precautions should always be followed, including the following.
Read all instructions before using this appliance:
SAVE THESE INSTRUCTIONS
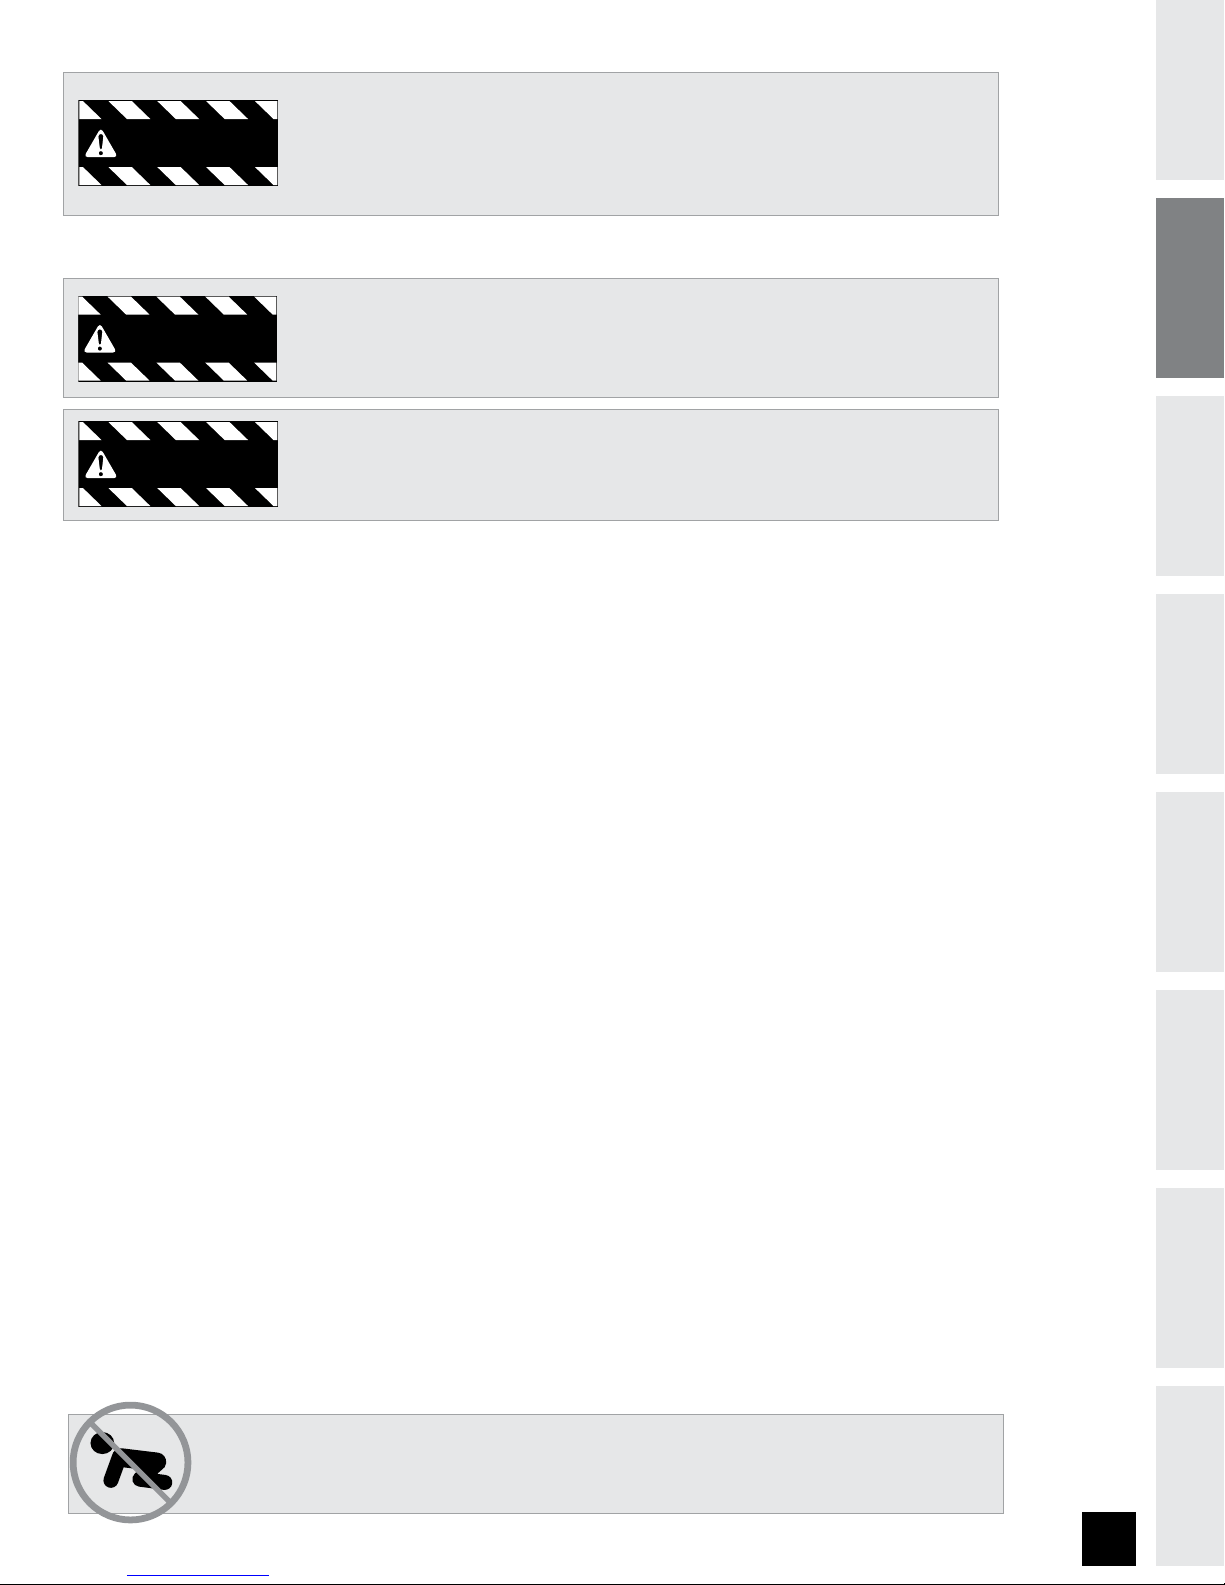
At NO time should pets or children under the age of 12 be closer to the treadmill than 10 feet.
At NO time should children under the age of 12 use the treadmill.
Children over the age of 12 should not use the treadmill without adult supervision.
TO REDUCE THE RISK OF ELECTRIC SHOCK:
Always unplug this appliance (or treadmill) from the electrical outlet
immediately after using and before cleaning.
DANGER
TO REDUCE THE RISK OF INjURY TO PERSONS:
Stand on the siderails before starting the treadmill. Read Instruction
Manual before using. Remove safety key when not in use and store out of
reach of chidren.

WARNING

6
INTRODUCTION IMPORTANT
PRECAUTIONS ASSEMBLY BEFORE
YOU BEGIN TREADMILL
OPERATION LIMITED
WARRANTY
TROUBLESHOOTING
& MAINTENANCE
CONDITIONING
GUIDELINES
ASSEMBLY
IMPORTANT: READ THESE SAFETY INSTRUCTIONS BEFORE USE!
During the assembly process of the treadmill there are several areas that special attention must be paid.
It is very important to follow the assembly instructions correctly and to make sure all parts are firmly
tightened. If the assembly instructions are not followed correctly, the treadmill could have frame parts that
are not tightened and will seem loose and may cause irritating noises. There should be no side-to-side play
in the console masts or any forward and back play in the console assembly or handlebars. If there is any
play in these areas, the treadmill has not been properly assembled. To prevent damage to the treadmill, the
assembly instructions must be reviewed and corrective actions should be taken.
UNPACKING
Place the treadmill carton on a level flat surface. It is recommended that you place a protective covering
on your floor. Take CAUTION when handling and transporting this unit. Never open box when it is on its
side. Unpack the unit where it will be used. FAILURE TO FOLLOW THESE INSTRUCTIONS COULD RESULT IN
INJURY!
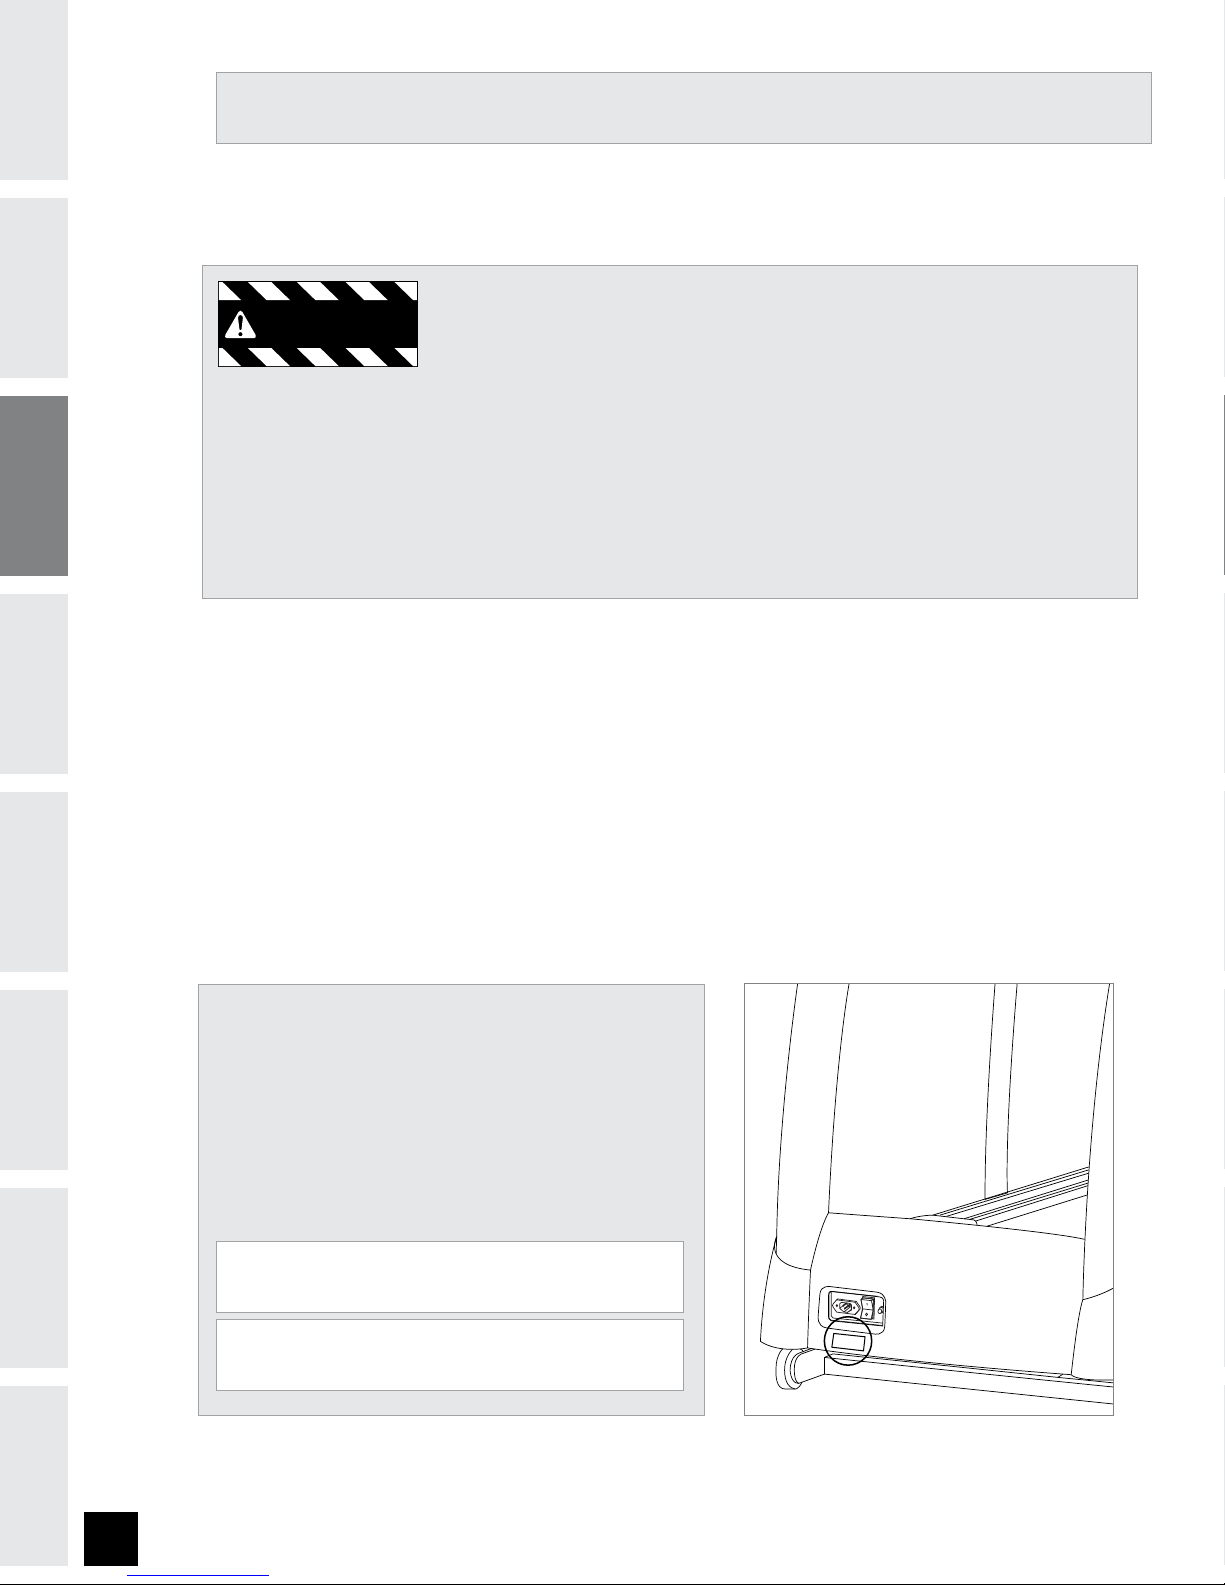
Before proceeding, find your treadmill’s serial number
and model name located below the on/off power switch
and power cord and enter it in the space provided
below.
ENTER YOUR SERIAL NUMBER AND
MODEL NAME IN THE BOxES BELOW:
SERIAL NUMBER:
MODEL NAME:
* Refer to the SERIAL NUMBER and MODEL NAME when calling for service.
* Also enter this serial number on your Warranty Card.
WARNING

7
INTRODUCTION
IMPORTANT
PRECAUTIONS
ASSEMBLY
BEFORE
YOU BEGIN
TREADMILL
OPERATION
CONDITIONING
GUIDELINES
TROUBLESHOOTING
& MAINTENANCE
LIMITED
WARRANTY
TOOLS INCLUDED
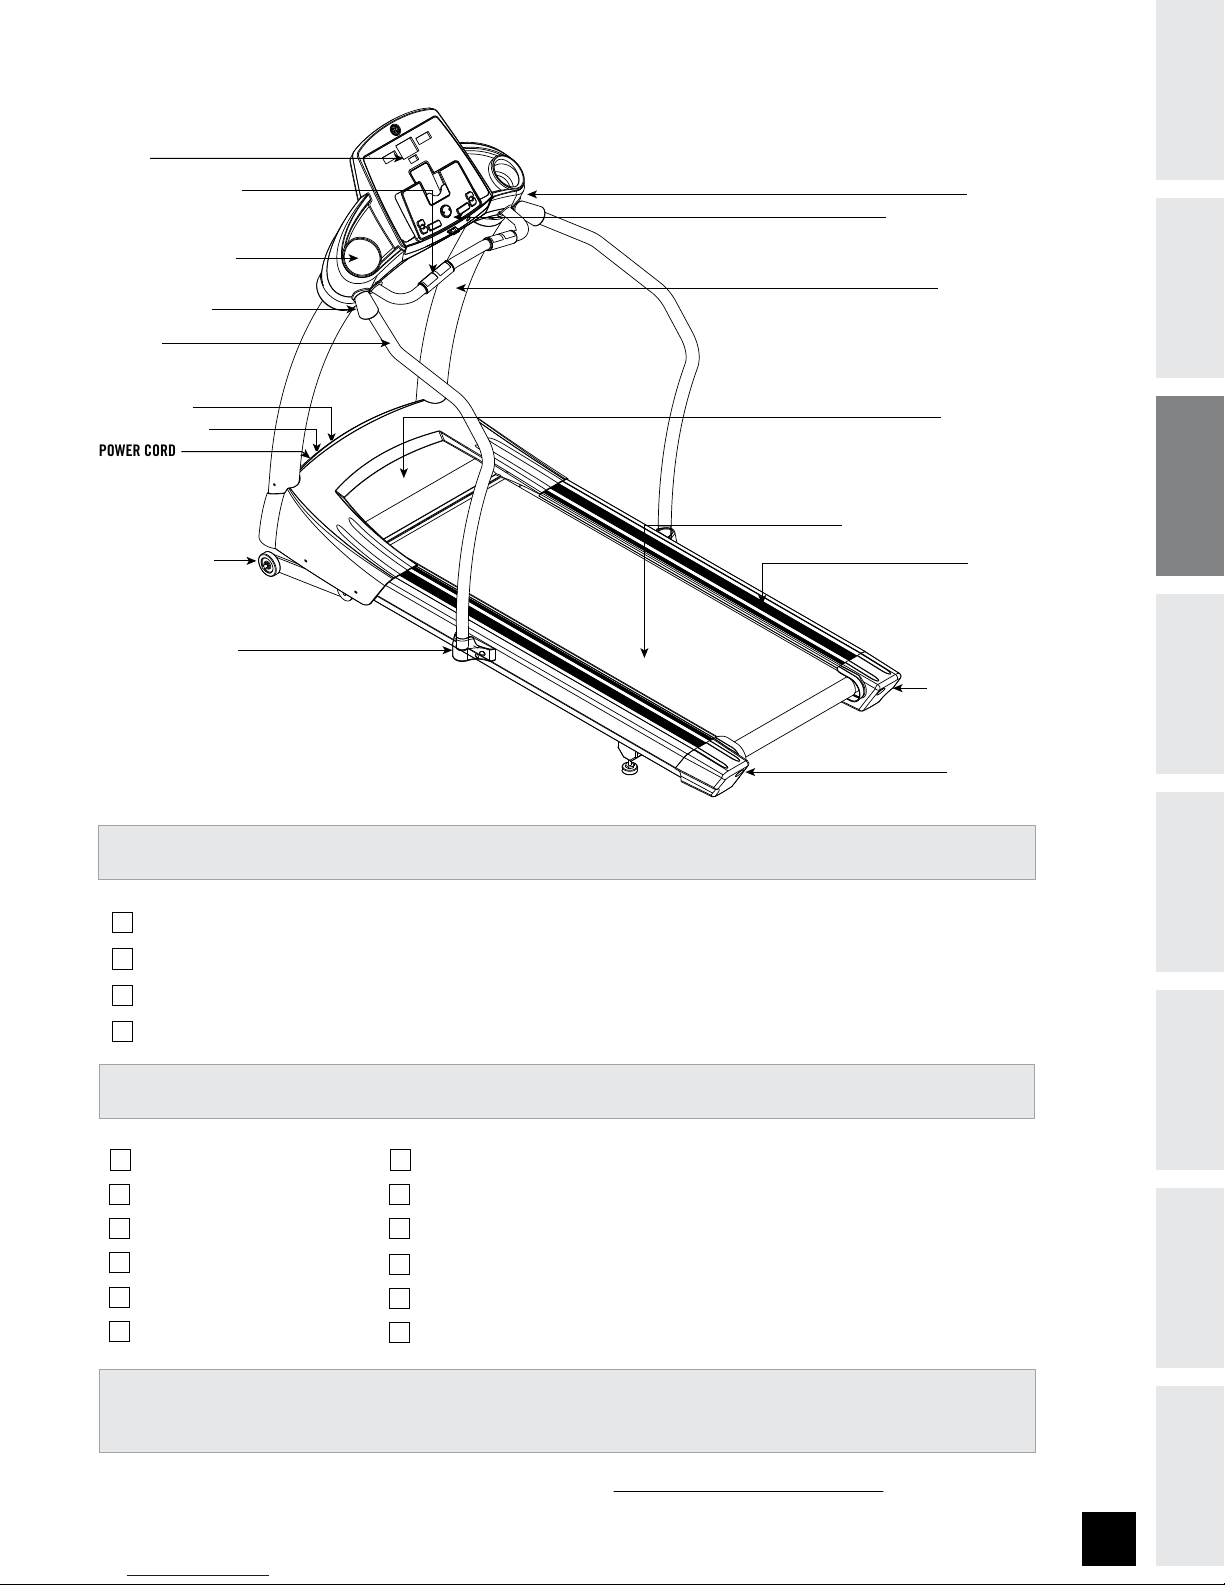
PARTS INCLUDED
1 Safety Key
1 Console Assembly
1 Power Cord
4 Hardware Bags
2 Hand Rails
2 Hand Rail Base Covers
2 Console Masts
2 Cup Holders
2 Hand Rail Sleeves
1 Bottle of Silicone Lubricant
1 Audio Adaptor Cable
1 Water Bottle
DISPLAY
WATER BOTTLE HOLDER
GRIP PULSE HANDRAILS
ON/OFF SWITCH
CIRCUIT BREAKER
TRANSPORT WHEEL
POWER CORD
CONSOLE
SAFETY KEY PLACEMENT
MOTOR COVER
RUNNING BELT / RUNNING DECK
SIDE RAIL
ROLLER END CAP
CONSOLE MAST
REAR ROLLER
ADJUSTMENT BOLTS
If you have questions or if there are any missing parts, contact Customer Tech Support.
Contact information is located on the back panel of this manual.
For a complete exploded diagram, visit us at www.advancedfitnessgroup.com
5 mm Allen Wrench
6 mm T-wrench
8 mm T-wrench
Screwdriver
HAND RAIL
HAND RAIL SLEEVE
HAND RAIL BASE COVER

8
INTRODUCTION IMPORTANT
PRECAUTIONS ASSEMBLY BEFORE
YOU BEGIN TREADMILL
OPERATION LIMITED
WARRANTY
TROUBLESHOOTING
& MAINTENANCE
CONDITIONING
GUIDELINES
NOTE: During each assembly step, ensure that ALL nuts and bolts are in place and partially threaded in before
completely tightening any ONE bolt. NOTE: A light application of grease may aid in the installation of hardware.
Any grease, such as lithium bike grease is recommended.
PRE-ASSEMBLY
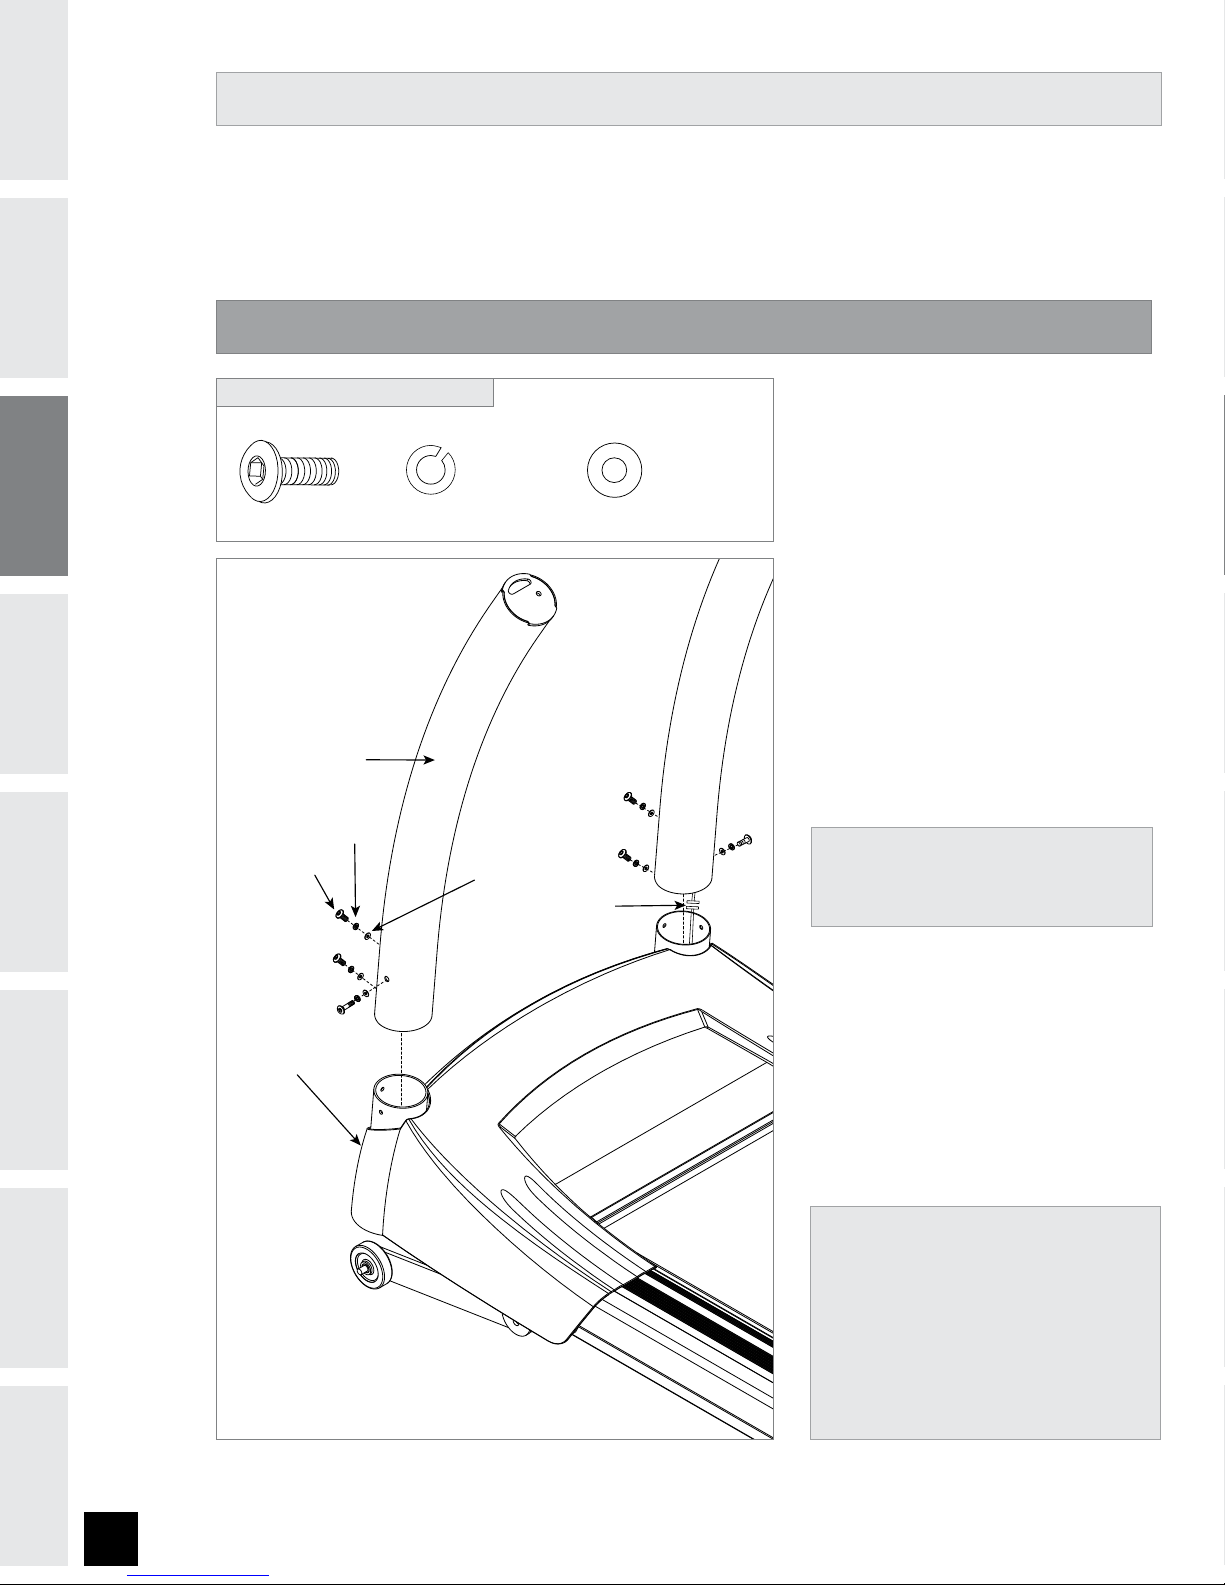
ASSEMBLY STEP 1
BOLT (A)
15 mm
Qty: 6
ARC WASHER (C)
8.4 mm
Qty: 6
SPRING WASHER (B)
8.2 mm
Qty: 6
PINK HARDWARE BAG CONTENTS :
BOLT (A)
SPRING WASHER (B)
WASHER (C)
CONSOLE MAST
BASE FRAME
CONSOLE WIRES
A Open PINK HARDWARE BAG.
B Connect the CONSOLE WIRES
from the BASE FRAME to the
bottom of the CONSOLE MAST.
C Attach LEFT CONSOLE MAST
using 3 BOLTS (A), 3 SPRING
WASHERS (B) and 3 ARC
WASHERS (C).
D Repeat on other side.
* NOTE: Be careful not to pinch any
wires while assembling the masts.
* NOTE: During mast
assembly, ensure that ALL
screws and bolts are in place
and partially threaded in
before completely tightening
any ONE screw or bolt.

9
INTRODUCTION
IMPORTANT
PRECAUTIONS
ASSEMBLY
BEFORE
YOU BEGIN
TREADMILL
OPERATION
CONDITIONING
GUIDELINES
TROUBLESHOOTING
& MAINTENANCE
LIMITED
WARRANTY
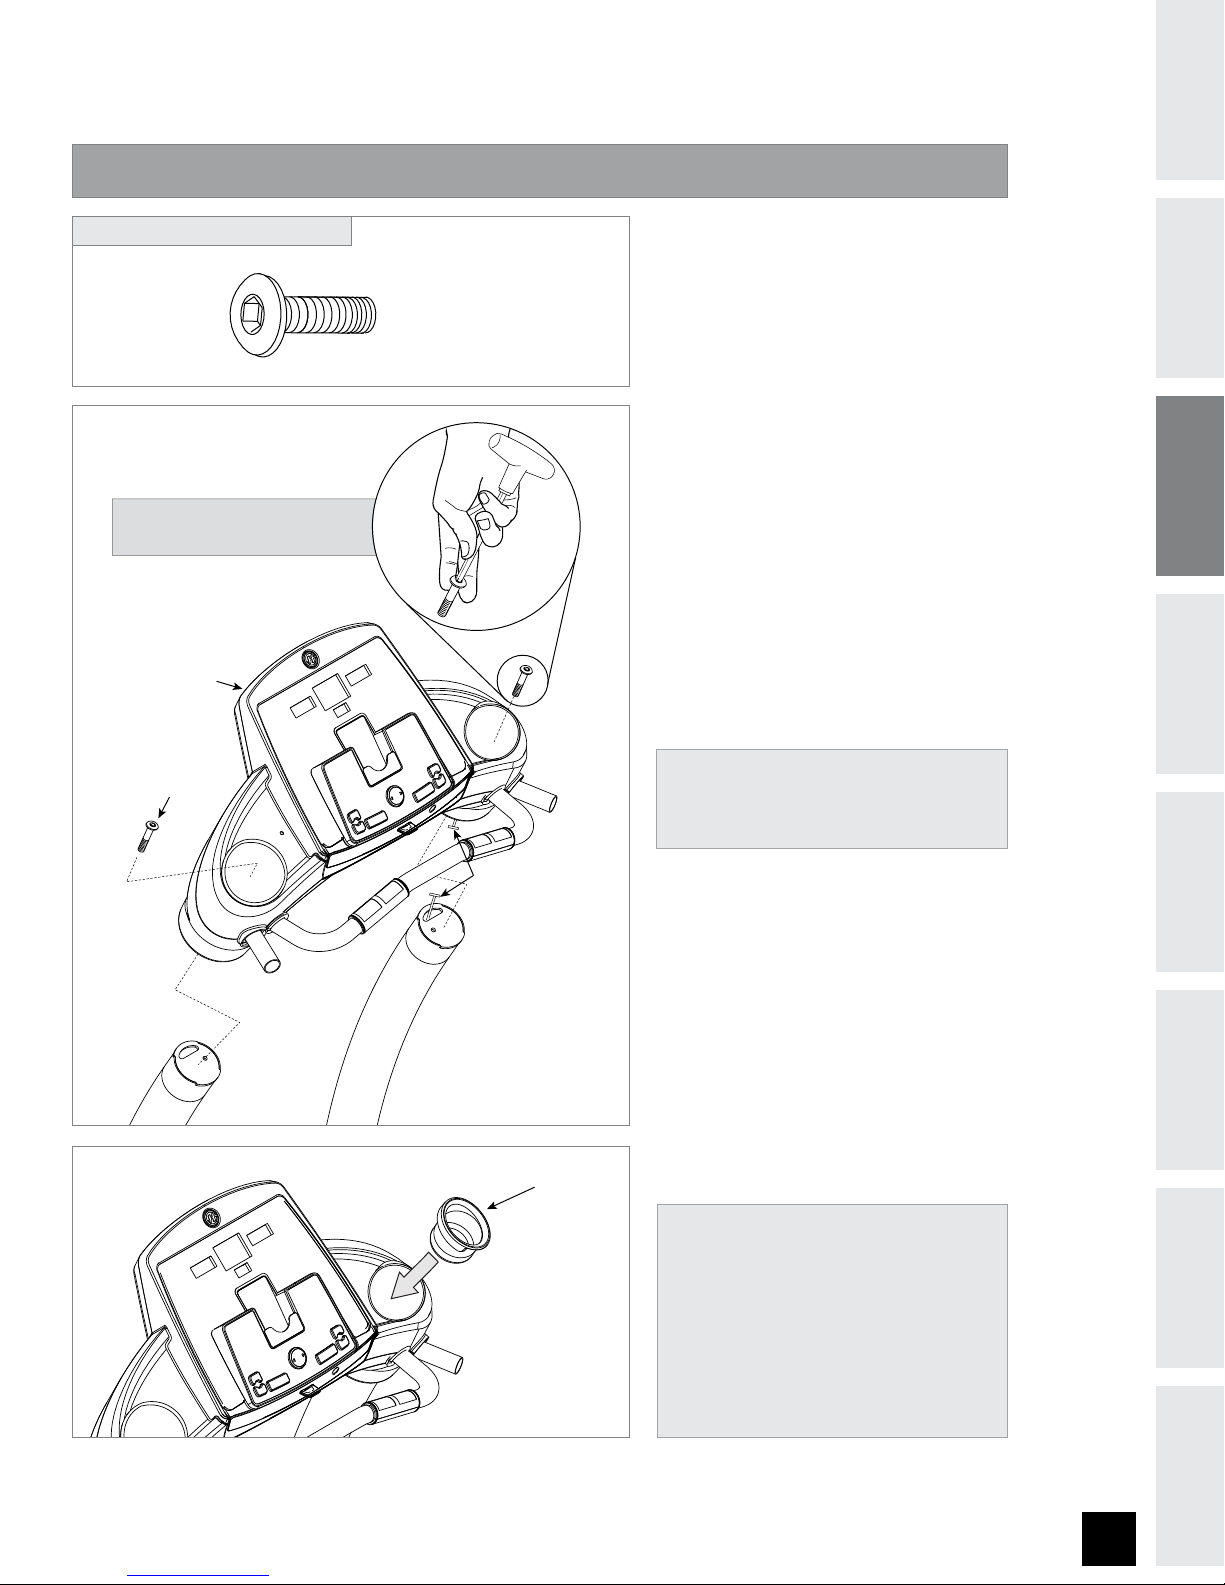
A Open BLUE HARDWARE BAG.
B Connect the CONSOLE WIRES
from the CONSOLE to those from
the top of the MAST.
C Attach CONSOLE to the
CONSOLE MASTS using
1 BOLT (D).
D Repeat on other side.
E Tighten all console bolts.
F Snap each of the CUP HOLDERS
firmly into the CONSOLE.
ASSEMBLY STEP 2
BOLT (D)
20 mm
Qty: 2
BLUE HARDWARE BAG CONTENTS :
BOLT (D)
CONSOLE
SUGGESTED METHOD FOR STARTING BOLT
CONSOLE WIRES
CUP HOLDER
* NOTE: Be careful not to pinch any
wires while assembling the console.
* NOTE: During console
assembly, ensure that ALL
screws and bolts are in place
and partially threaded in
before completely tightening
any ONE screw or bolt.

10
INTRODUCTION IMPORTANT
PRECAUTIONS ASSEMBLY BEFORE
YOU BEGIN TREADMILL
OPERATION LIMITED
WARRANTY
TROUBLESHOOTING
& MAINTENANCE
CONDITIONING
GUIDELINES
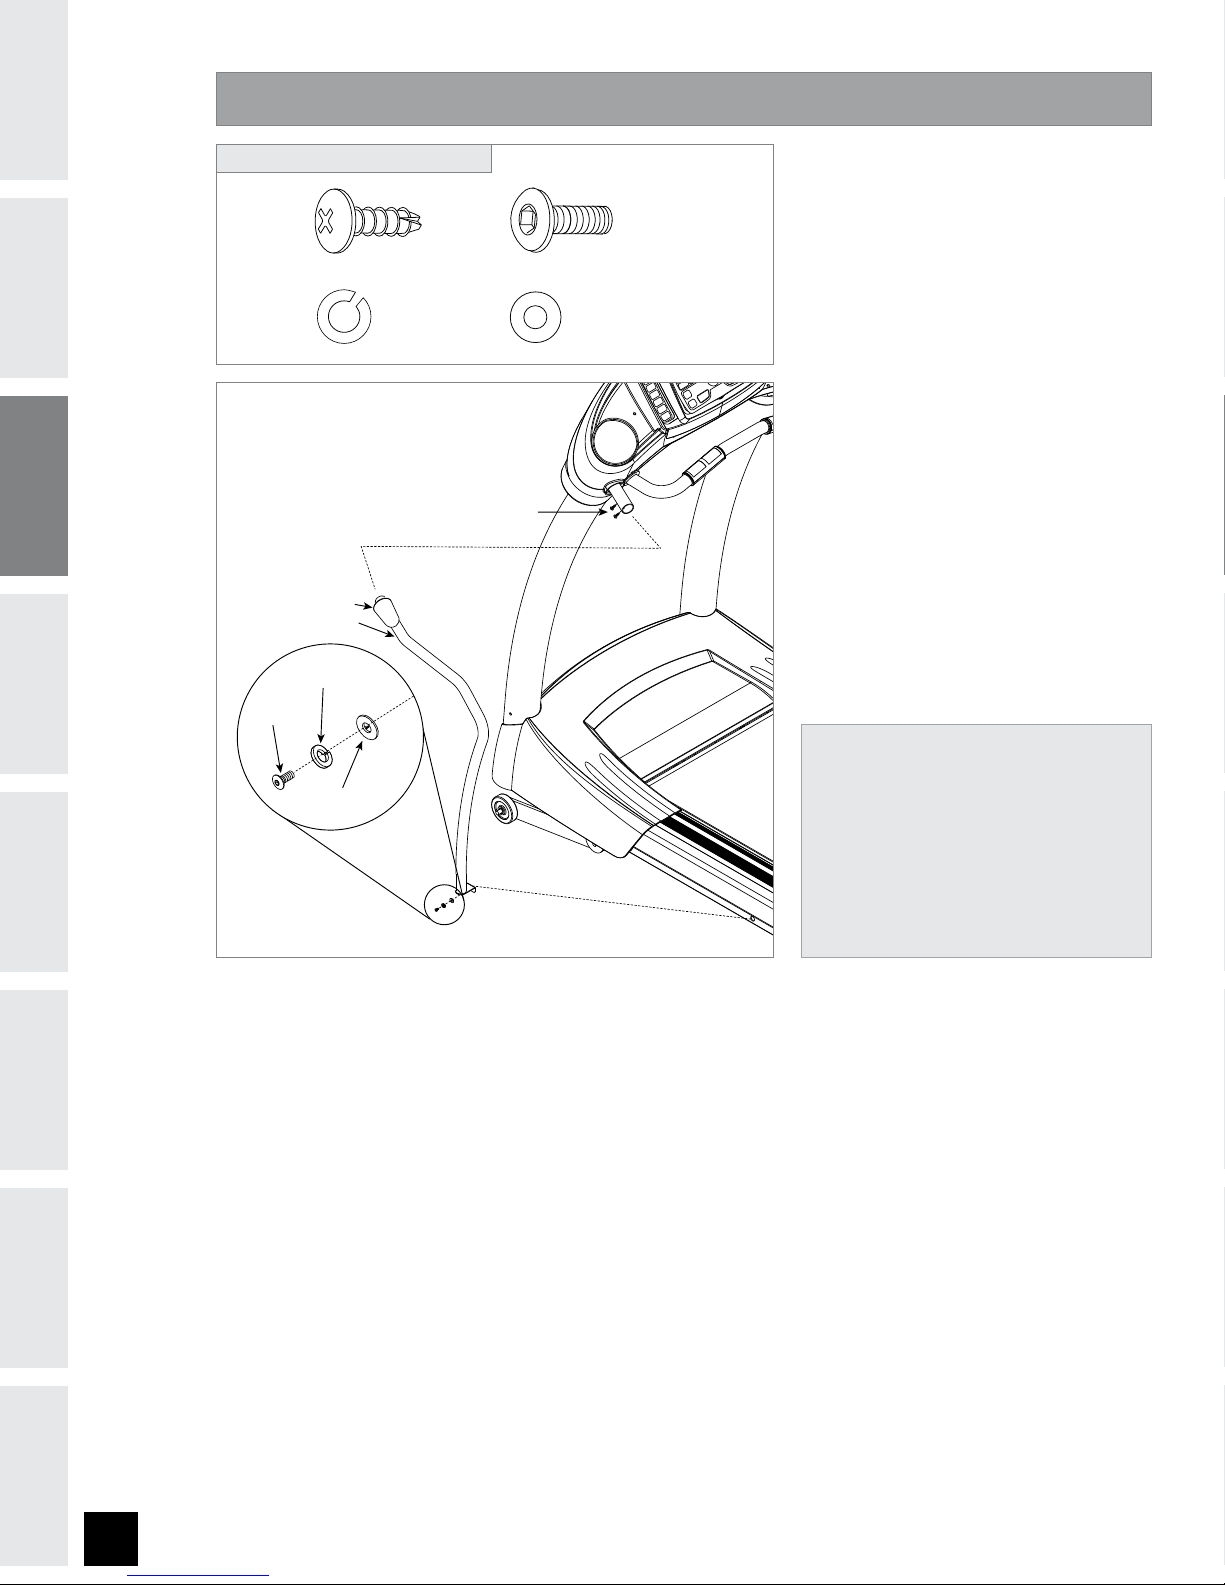
A Open WHITE HARDWARE BAG.
B Slide HAND RAIL SLEEVE over
the top of the hand rail.
C Attach top of HAND RAIL to
the console extension using 2
SCREWS (G)*.
D Attach bottom of HAND RAIL to
the base frame using 1 BOLT
(H), 1 SPRING WASHER (I) and
1 WASHER (j).
ESlide HAND RAIL SLEEVE firmly
against console.
FRepeat on other side.
ASSEMBLY STEP 3
SCREW (G)
15 mm
Qty: 4
BOLT (H)
30 mm
Qty: 2
WASHER (J)
8.2 mm DIAMETER
Qty: 2
SPRING WASHER (I)
8.2 mm DIAMETER
Qty: 2
WHITE HARDWARE BAG CONTENTS :
HAND RAIL
HAND RAIL SLEEVE
WASHER (J)
BOLT (H)
SPRING WASHER (I)
SCREW (G)
* NOTE: During handlebar
assembly, ensure that ALL
screws and bolts are in place
and partially threaded in
before completely tightening
any ONE screw or bolt.
Other manuals for 13.0AT
2
Table of contents
Other AFG Treadmill manuals
Popular Treadmill manuals by other brands

Smooth Fitness
Smooth Fitness EVO 3i user manual

NordicTrack
NordicTrack NETL81810.0 user manual

Schwinn
Schwinn 830/Journey 8.0 Assembly manual / owner's manual

Keys Fitness
Keys Fitness HealthTrainer HT-740T owner's manual

Spirit
Spirit XT8 Service manual

NordicTrack
NordicTrack T 14.0 Treadmill Manuel de l'utilisateur