
AEG 8820 User manual

HI 8820
CHDI 8820
Dunstabzugshaube
Afzuigkap
Hotte
Cooker Hood
Montage- und Gebrauchsanweisung
Installatie- en gebruiksaanwijzing
Notice d utilisation et d installation
Operating and Installation Instructions

61
Printed on recycled paper
EG - putting words into action
Contents
Safety warnings 62
For the User 62
For the Installer 62
Description of the Appliance 64
Extraction 64
Recirculation 64
Control Panel 65
Control device for grease and charcoal filters 66
Grease filter LED (D) 66
Charcoal filter LED (E) 66
Resetting the saturation indicator 66
Maintenance and care 67
Cleaning the hood 67
Metal grease filter 67
Removing the metal grease filter 67
Charcoal filter 68
Changing the light bulb 69
hat to do if 70
Special accessories 70
Technical assistance service 71
Technical Specifications 72
Mounting accessories included 72
Electrical connection 73
Safety warnings for the electrician 73
Installation 74

62
Sa ety warnings
For the User
The cooker hood is designed to extract unpleasant odours from the kitchen, it will not
extract steam.
lways cover lighted elements, to prevent excess heat from damaging the
appliance. In the case of oil, gas and coal fired cookers it is essential to avoid
open flames.
lso, when frying, keep the deep frying pan on the cooker top/cooker under
careful control.
The hot oil in the frying pan might ignite due to overheating.
The risk of self-ignition increases when the oil being used is dirty.
It is extremely important to note that overheating can cause a fire.
Never carry out any flambé cooking under the hood.
Always disconnect the unit from the power supply before carrying out any
work on the hood, including replacing the light bulb (take the cartridge fuse
out of the fuse holder or switch off the automatic circuit breaker).
It is very important to clean the hood and replace the filter at the
recommended intervals. Failure to do so could cause grease deposits to
build up, resulting in a fire hazard.
The appliance is not intended for use by young children or infirm persons without
supervision.
Young children should be supervised to ensure that they do not play with the
appliance.
ARNING - Ensure that the appliance is switched off before replacing the lamp to
avoid the possibility of electric shock.
For the Insta er
When used as an extractor unit, the hood must be fitted with a 150mm diameter
hose.
Should there already be a pipe with a diameter of 125mm that ducts to the outside
through the wall or roof, it is possible to use the 150/125 mm reduction flange
provided. In this case the hood will be slightly noisier.
hen installing the hood, make sure you respect the following minimum
distance from the top edge of the cooking hob/ring surfaces:
electric cookers 500 mm
gas cookers 650 mm
coal and oil cookers 700 mm min.
The hood can be installed above these heights but for optimum performance it should
be installed at the distance quoted for the appropriate heat source.

63
The national Standard on fuel-burning systems specifies a maximum depression of
0.04 mbar in such rooms.
The air outlet must not be connected to chimney flues or combustion gas ducts. The
air outlet must under no circumstances be connected to ventilation ducts for rooms in
which fuel-burning appliances are installed.
The air outlet installation must comply with the regulations laid down by the
relevant authorities.
When the unit is used in its extractor version, a sufficiently large ventilation hole
must be provided, with dimensions that are approximately the same as the outlet
hole.
National and regional building regulations impose a number of restrictions on
using hoods and fuel-burning appliances connected to a chimney, such as coal or
oil room-heaters and gas fires, in the same room.
Hoods can only be used safely with appliances connected to a chimney if the
room and/or flat (air/environment combination) is ventilated from outside using a
suitable ventilation hole approximately 500-600 cm2 large to avoid the possibility
of a depression being created during operation of the hood.
If you have any doubts, contact the relevant controlling authority or building
inspectors office.
Since the rule for rooms with fuel burning appliances is outlet hole of the same
size as the ventilation hole, a hole of 500-600 cm2, which is to say a larger hole,
could reduce the performance of the extractor hood.
If the hood is used in its filtering function, it will operate simply and safely in the
above conditions without the need for any of the aforementioned measures.
When the hood is used in its extractor function, the following rules must be
followed to obtain optimal operation:
short and straight outlet hose
keep bends in outlet hose to a minimum
never install the hoses with an acute angle, they must always follow a gentle curve.
keep the hose as large as possible (preferably the same diameter as the outlet
hole).
Failure to observe these basic instructions will drastically reduce the performance
and increase the noise levels of the extractor hood.

64
Description o the Appliance
The hood is supplied as an extractor unit and can also be used with a filtering function
by fitting one charcoal filter.
You will need an original EG charcoal filter for this function ( vailable from your
local EG Service Force Centre).
Only for CHDI 8820: The cooker hood is supplied ready for use as a recirculation
hood and may be used for extraction by
removing the charcoal filter which has been fitted
inside the cooker hood.
Extraction
In this version fumes are extracted to the
outside via a hose connected to the coupling
ring A. Fig. 1.
In order to obtain the best performance the
hose should have a diameter equal to the outlet
hole.
Should there already be a pipe with a diameter
of 125mm that ducts to the outside through the
wall or roof, it is possible to use the 150/125
mm reduction flange provided. In this case the
hood will be slightly noisier.
Fig 1
Recircu ation
The air is filtered through a charcoal filter and returned to the kitchen.
You will need an original EG charcoal filter for the filtering function. (See Special
ccessories).
Fix the deflector using 4 screws Ø 3.5x6.5 mm. Fig. 2.
F
Fig 2
A

65
Control Panel
Best results are obtained by using a low speed for normal conditions and a high
speed when odours are more concentrated.
Turn the hood on a few minutes before you start cooking, you will then get an
under pressure in the kitchen. The hood should be left on after cooking for about
15 minutes or until all the odours have disappeared. The control switches are
located on the units front panel.
1- Mains switch, ON/OFF
Press for less than 1 1/2 seconds and the cooker hood goes into the "stand by"
position (point "b" is illuminated).
Press for more than 1 1/2 seconds and the cooker hood turns off, LL the
controls (except the light push button) are disabled (the display is off).
Press again for more than 1 1/2 seconds to reset the cooker hood to "stand
by".
2- Light ON/OFF
3- Display
4- Start and choice of motor speed 1-2-3-1-2.........
5- Intensive speed on/off. The Intensive speed runs for 5 minutes:
If the hood is on when the Intensive speed is activated, the hood will revert to
previous speed after 5 minutes.
If the hood is off when the Intensive speed is activated, the hood will
automatically turn off after 5 minutes.
To interrupt the Intensive speed, press button 1 or 4.
The letter P appears on the display and the remaining time (the point a is
flashing), if interrupted an acoustic signal is heard.
6- Self-Timer: times all the speed levels (the point b is flashing), and then the
cooker hood switches off:
The self-timer is set as follows: 1st speed level 20 minutes
2nd speed level 15 minutes
3rd speed level 10 minutes
The display shows the remaining operation time, at the end of the time an
acoustic signal is heard. Depressing the push-button again exits the function.
Should the hood or the controls fail to operate: disconnect the power supply for at
least 5 seconds. fter reconnecting the power supply wait 15 seconds and then
check that the cooker hood is now operating
correctly.
123 456
ab
Fig 3

66
Contro device for grease and charcoa fi ters
This hood is fitted with a device that signals when it is necessary to clean the grease
filter or the charcoal filter (if the hood is used in the recirculation version with a
charcoal filter).
On delivery, the hood is not supplied with a charcoal filter, so the saturation indicator
will be disabled.
If the hood is to be used with a charcoal filter, the saturation
indicator light must be enabled as follows:
Press buttons 4 and 5 simultaneously and hold them for 3 seconds. t first only the
grease filter LED F will illuminate, but when the charcoal filter LED C illuminates the
saturation indicator will be enabled.
To disable it: Press buttons 4 and 5 again simultaneously and hold
them for 3 seconds, until the charcoal filter LED C goes out.
Grease fi ter LED (F)
LED F will start to flash when it is time to clean the grease filter.
Cleaning will be necessary after 40 working hours. lways comply with the
maintenance instructions for the grease filter.
Charcoa fi ter LED (C)
The charcoal filter LED C will start to flash when the charcoal filter needs to be
replaced.
This operation is necessary after approximately 160 working hours.
Resetting the saturation indicator
fter cleaning or replacing the filters, press button 1 for 3 seconds until the grease
filter LED F or the charcoal filter LED C stops flashing.
arning! The resetting of the saturation indicator MUST be done in stand-by, never
disconnect the hood from the mains.

67
Maintenance and care
The hood must always be disconnected from the electricity supply before
beginning any maintenance work.
C eaning the hood
Clean the outside of the hood using a damp cloth and a mild detergent.
Never use corrosive, abrasive or flammable cleaning products.
Never insert pointed objects in the motors protective grid.
Wash the outside surfaces using a delicate detergent solution. Never use caustic
detergents or abrasive brushes or powders.
Only ever clean the switch panel and filter grille using a damp cloth and delicate
detergents.
It is extremely important to clean the unit and change the filters at the
recommended intervals. Failure to do so will cause grease deposits to build up
that could constitute a fire hazard.
Meta grease fi ter
The purpose of the grease filters is to absorb grease particles which form during
cooking and it must always be used, either in the external extraction or internal
recycling function.
ttention: the metal grease filters must be removed and washed, either by hand or in
the dishwasher, every four weeks.
Removing the meta grease fi ter
First, push the metal grease filter stop (f1)
backwards, then extract the filter (f2), pulling
downwards. Fig. 4.
Hand washing
Soak grease filters for about one hour in hot
water with a grease-loosening cleaner, then
rinse off thoroughly with hot water. Repeat the
process if necessary. Refit the grease filters
when they are dry.
Dishwasher
Place grease filters in the dishwasher. Select
most powerful washing programme and highest
temperature, at least 65°C. Repeat the process.
Refit the grease filters when they are dry.
When washing the metal grease filter in the dishwasher a slight discolouration of the
filter can occur, this does not have any impact on its performance.
Clean the inner housing using a hot detergent solution only (never use caustic
detergents, abrasive powders or brushes).
Fig 4
f1
f2
68
gg
h
d
i
h
g
g
Charcoa fi ter
The charcoal filter should only be used if you want to use the hood in the recirculation
function.
To do this you will need an original EG charcoal filter (available from your local
Service Force Centre).
Cleaning/replacing the charcoal filter
Unlike other charcoal filters, the LONGLIFE charcoal filter can be cleaned and
reactivated. t normal use the filter should be cleaned every second month (when
using the hood 2,5 hours per day, in avarage). The best way to clean the filter is in
the dishwasher. Use normal detergent and choose the highest temperature (65º
C). Wash the filter separately so that no food parts gets stuck on the filter and later
causes bad odours. To reactivate the charcoal, the filter should be dried in an
oven for 10 minutes with a temperature of maximum 100º C.
fter approximately three years of use, the carbon filter should be replaced with a
new, as the odour reduction capacity will be reduced.
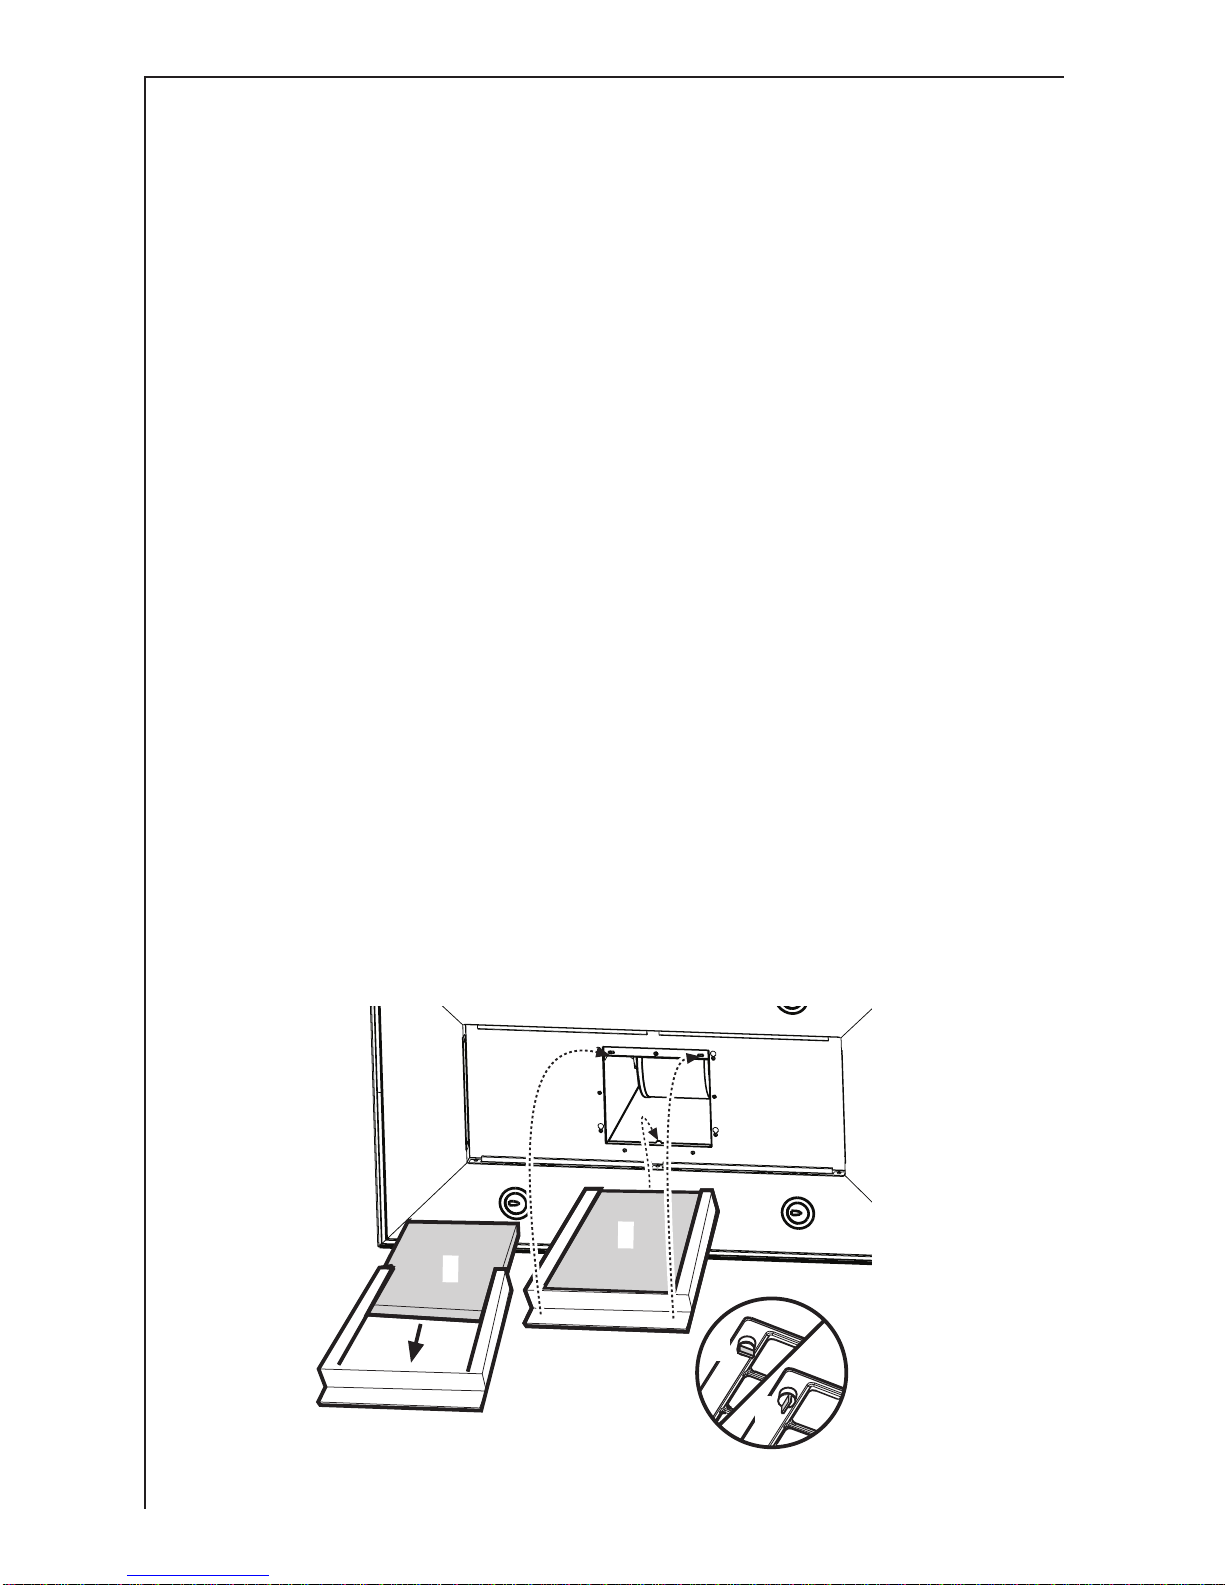
Fitting
Remove the frame i which supports the filter h by turning 90° the two knobs g.
Insert the charcoal filter inside the frame and put all parts back in their place. Fig. 5.
To remove proceed in the reverse order.
lways specify the hood model code number and serial number when ordering
replacement filters. This information is shown on the registration plate located on
the inside of the unit.
The charcoal filter can be ordered from your local EG Service Force Centre.
Fig 5

6
Warning
Failure to observe the instructions on cleaning the unit and changing the filters will
cause a fire hazard. You are therefore strongly recommended to follow these
instructions.
The manufacturer declines all responsibility for any damage to the motor or any
fire damage linked to inappropriate maintenance or failure to observe the above
safety recommendations.
Changing the ight bu b
Disconnect the cooker hood from the mains supply.
Remove the lamp cover, use a screw driver as a lever. Fig. 6.
Replace the old bulb with a new one of the same type.
Refit the lamp cover.
If the light does not come on, make sure the bulb has been inserted in correctly
before contacting your local EG Service Force Centre.
Fig 6
This manual suits for next models
2
Other AEG Ventilation Hood manuals





