Advaning LUXURY Series User manual

For your safety and the safety of others, please read all of the instructions and
warnings in this manual carefully before proceeding with an installation and usage.
LUXURY SERIES
Retractable Awning
Owner’s Manual (Dual-Use Mounting Brackets)

1
Safety instructions and warnings........................................... 2
Package contents and parts .............................................. 3
Tool requirements ...................................................... 4
Product features ....................................................... 4
Installation
Bracket placement reference chart ................................... 5
Determine where to install your awning ............................... 6
Install wall brackets
Standard stud installation ....................................... 7
Masonry installation ............................................ 8
Install ceiling brackets ............................................ 11
Install awning onto brackets ....................................... 12
Ready your awning............................................... 13
Install power cord for electric models ................................ 13
Prepare remote control ........................................... 13
Operation
Manual operation ................................................ 14
Electric operation................................................ 14
Fabric rolling direction ............................................ 15
Adjust awning pitch ............................................. 15
Maintenance.......................................................... 16
Warranty..........................................................17~18
The awning arms contain tensioned
cables. Always use caution, securely tie
the awnings arms to the awning when
performing installation, adjustments, or
repairs. Sudden movement of tension
arms can result in serious personal injury,
product and/or property damage.
CAUTION
In order to avoid
accidental injury or
damage, DO NOT
remove arm safety
restraints until
instructed.
Fig.1
SAFETY INSTRUCTIONS
TABLE OF CONTENTS
www.advaning.com

SAFETY FIRST, PLEASE READ THE FOLLOWING POINTS TO REDUCE THE RISK OF
FIRE, ELECTRIC SHOCK OR PERSONAL INJURY.
2
SAFETY INSTRUCTIONS AND WARNINGS
DO NOT keep the
awning open during:
A: RAIN
B: SNOW
C: STRONG WIND
D: UNSUPERVISED
PERIODS
A B C D Fig.2
www.advaning.com
Installation
• Pay close attention throughout the installation process to ensure that the Advaning awning is installed properly and
according to the safety guidelines outlined herein.
• Do not attempt installation while under the inuence of alcohol or drug substances.
• Do not remove the safety restraints from the awning’s lateral arms until instructed to do so. The arms contain tensioned
springs and may release very quickly. Always ensure no persons or objects are directly in arm projection path at all
times.
• Do not proceed with an installation if you feel that you cannot properly and safely complete, please seek professional
help.
• Always wear protective gear and gloves when handling sharp metal parts.
• Only perform installation/maintenance/cleaning in dry and optimal weather conditions.
• 2 or more persons are recommended for installation. Installation will require to lift the assembled awning onto the
brackets. Ensure help is available to help lift.
Usage
• Only use Advaning recommended accessories and original replacement parts.
• Only perform installation/maintenance/cleaning in dry and optimal weather conditions.
• Do not place any heat source or open ame under or near the awning.
• Do not place, hang, or stand objects or persons on the awning itself. Doing so can damage the awning or cause severe
personal injury and in extreme cases death.
• Do not carry out any maintenance other than what is shown in this manual. For any issues that are not covered in this
• The product should only be operated by an adult that understands all the functions and operations. Please keep unsu-
pervised children away from playing with the awning or its parts.
• The product should be used only as described in this Advaning Owner’s manual.
Electric Awnings Only
• Do not disassemble the awning motor, please seek support from Advaning Customer Service. Email: [email protected].
• Do not handle any part of the power plug or motor with wet hands or objects. Doing so could induce an electric shock.
• Do not use the electric option if the cord or plug is damaged. For damaged power cords and plugs, please seek sup-
• Ensure that the power cord is not strained and that it has ample slack to avoid damage. Avoid pulling the cord around
sharp edges or corners. Keep the power cord away from high trafc areas.
• Do not pull or tug on the cord. Grasp the plug by the base when unplugging the device to avoid damage. Rewind the
cord and store to prevent a tripping hazard.

3
Model 8’~10’ 12’~13’ 14’ 16’
Parts name Quantity
Wall/
ceiling dual
bracket set
Wall/ ceiling
bracket 2 3 4 5
Retaining hex bolt 2 3 4 5
Retaining nut 2 3 4 5
3/8” washer 2 3 4 5
3/8”x4” Lag screw 4 6 8 10
3/8” Flat washer 4 6 8 10
Expansion
bolt set
Expansion bolt 4 6 8 10
Washer 4 6 8 10
Hex bolt 4 6 8 10
PACKAGE CONTENTS AND PARTS
Awning unit Qty: 1
Hand crank Qty: 1 (63 Inches Length)
Remote Control Kit*
Qty: 1
Before installation, make
certain that the package
contains all parts as listed
on this page.
Fig.3
Motor Regulator*Qty: 1
*Motorized models Include:
• 16ft power cord
• Motor Regulator
• Remote Control Kit
-Remote with cover screw
-Battery
-Wall Cradle
-Wall Mount with screws
Advaning awnings allow users
to set a customized stop with
the Motor Regulator.
Contact Advaning for custom-
ized stop setting instructions if
needed.
www.advaning.com

4
REQUIRED TOOLS
PRODUCT FEATURES
Fig.5
Fig.4
Arm shoulder
Cassette
Crank loop
Torsion bar
Roller tube
Awning fabric
Front bar
Valance
Powercord
Retractable arms
Easy PitchTM loop
Wall/ceiling bracket
Lag screw
Retaining bolt
REQUIRED TOOLS
Marker / pencil
Measuring tape
Electronic Stud nder
Chalk line / laser level
Level
3/8” socket wrench
Drill bit
Masonry drill bit
Drill with bits
Ladders (2)
Minimum 2 people to
install
Electric model only
www.advaning.com
1
1
5
6
3
6
7
2
2
4
5
4
7
8
8
9
10
12
10
10
13
14
3
11
11
1
3
6
7
2
4
5
8
9
10
11
12
13
14
1
5
6
3
7
2
4
8
9
10
9
5
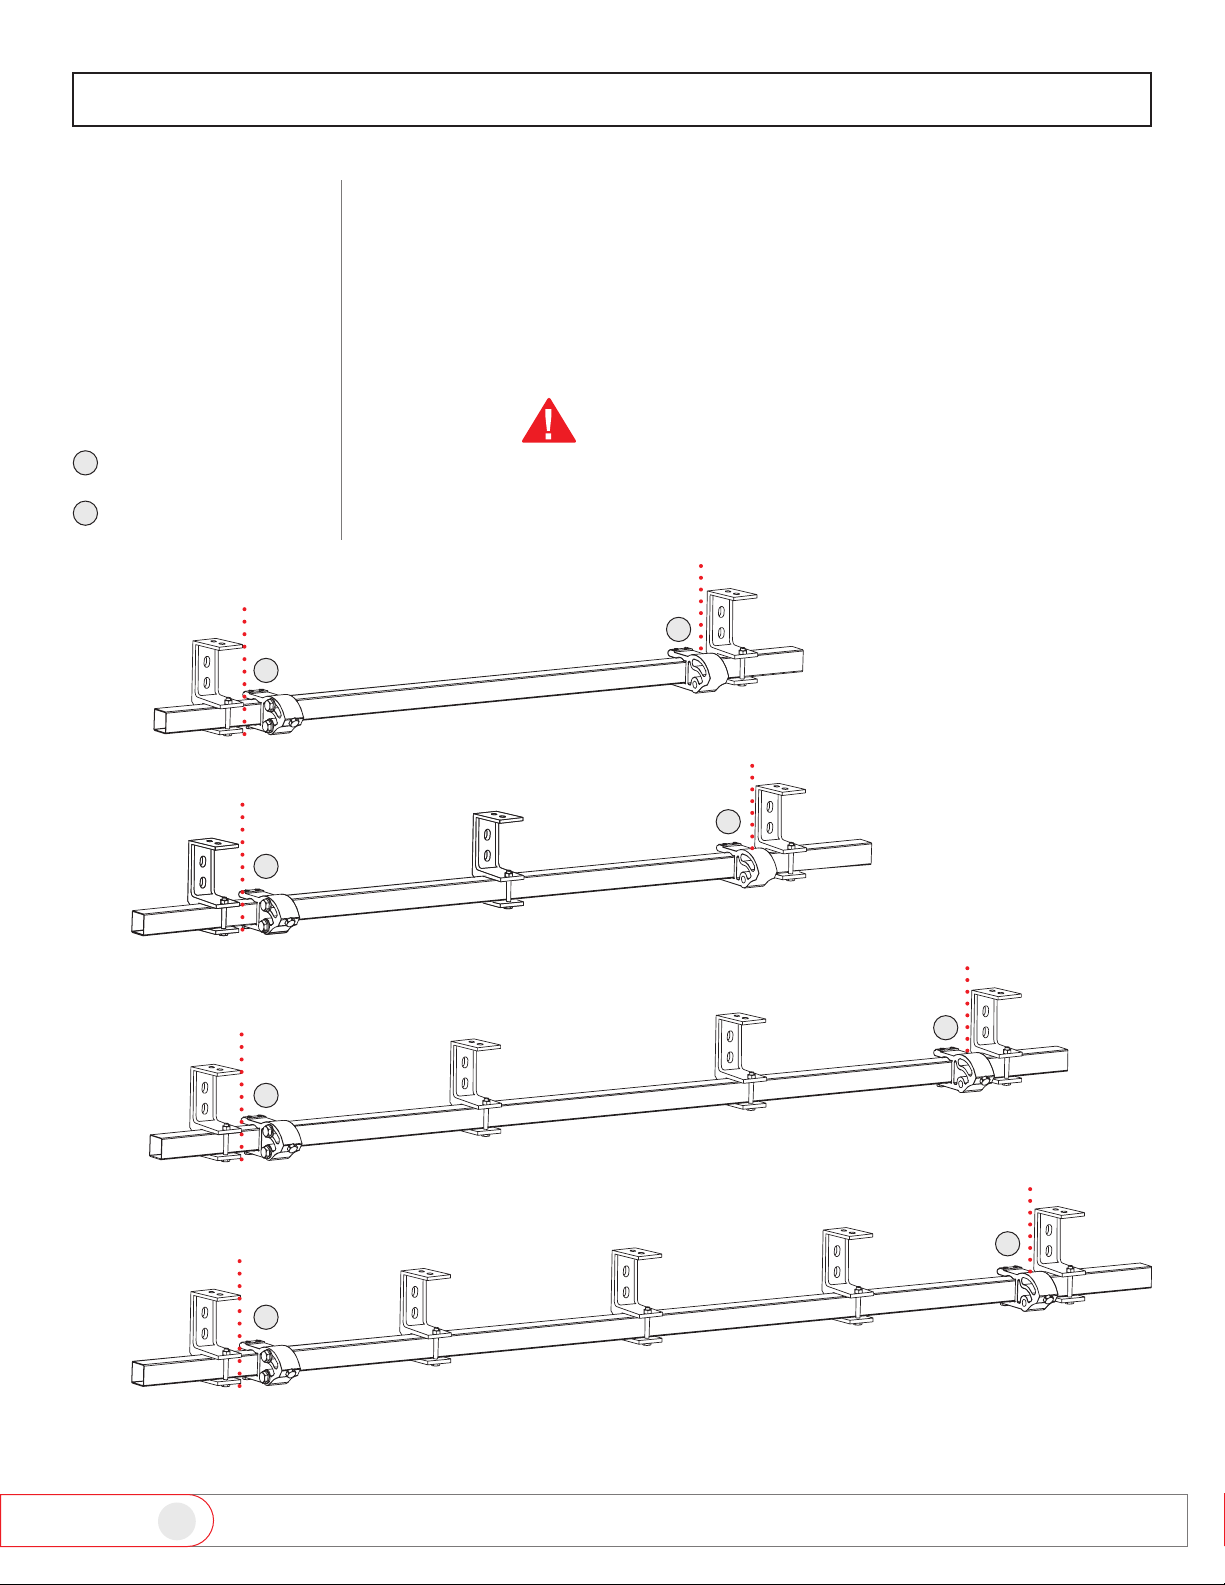
INSTALLATION
Fig.6
Left awning shoulder
Right awning shoulder
BRACKET
PLACEMENT
REFERENCE
CHART
Please use the charts for
bracket location refer-
ence.
All brackets must be mounted onto
wall studs or other major structural
supports.
Not every installation is identical, and
most studs/structural supports will
not always align.
For optimal balance of awning weight
distribution, please follow the bracket
placement illustration below.
www.advaning.com
8 ~ 10 feet awning
12 ~ 13 feet awning
14 feet awning
16 feet awning
A
B
A
A
A
A
B
B
B
B

6
INSTALLATION
Fig 7
Fig 8
Locate a position that is
Recommended 8 to
10 feet above the
ground/oor/deck.
Minimum 1 inch clear-
ance below the roof/
eave/overhang.
With at least 12 ver-
tical inch of clear
space.
Minimum 8 feet width.
The surface should be
free and clear of any
obstructions along the
entirety of the awning.
DETERMINE
WHERE TO
INSTALL YOUR
AWNING
Side view
www.advaning.com
Ground, oor or deck
Roof, eave or overhang
D
Minimum
8 feet
CMinimum 12 inch clear space
Ground, oor or deck
BMinimum 1 inch
Roof, eave or overhang
Recommended
8~10 feet
11 feet projection
Minimum 1 inch
Minimum 12 inch
clear space
A
Recommended
8~10 feet*
*Personal height and installation site specications may require
an alternate install height to the recommended 8 ~ 10 ft.
A
B
C
D

7
INSTALLATION
Fig 9
Fig 10
Fig 11 Fig 12
Standard stud
installation
INSTALLING WALL
BRACKETS
Measure and mark
where the top of your
awning bracket will
be placed.
Use a regular level
and chalk line or a
laser level, mark a
straight level line.
Locate and mark the
center of the wall
studs along this line
using a st ud nder.
*Please follow the di-
rections of your stud
nder as instructed
by the manufacturer.
Align the top of the
bracket to the chalk
line.
Align the center of
the bracket mounting
holes with the center
of the stud.
Use a level to make
sure the bracket is
straight and mark the
center of the mount-
ing holes.
Drill mounting holes
using a drill bit.
www.advaning.com
Stud nder
Level
1Minimum 1 inch
Bracket
Center of stud
Wall
3.5”
Level Chalkliner
1
Recommended
8~10 feet
2
3
4
5
67
Marker/pencil
1
2
3
4
5
6
7

8
INSTALLATION
Fig 13 Fig 14
Fig 15
Fig 16
Place brackets over
the appropriate ho-
les and use a level
to make sure the
bracket is leveled and
square to the line.
Use a washer and
lag screw to secure
all the brackets until
snugged against the
surface.
For proper installation of
brackets on uneven sur-
faces or siding, use shims
or spacers to level the
bracket.
Due to a variety of siding
nishes/materials, Ad-
vaning recommends con-
tacting the siding manu-
facture for necessary re-
quirements before using
shims, cutting or drilling
into your siding.
Masonry installation
For installing Advaning
awning onto brick or solid
concrete wall/surface.
CAUTION: Always install
brackets securely to the
brick or concrete and
not in the grout to avoid
collapse and personal
injury.
www.advaning.com
Washer
Lag screw
Shim/spacer
Siding
Wall
Bracket Bracket
washer
Lag screw
Wall
Level
8
8
9
9

9
INSTALLATION
Fig 20
Follow instructions
for standard instal-
lation step 1 and 2
(page 7).
Use the recommend-
ed bracket location
chart (page 5) to nd
bracket location for
your awning model
along the line.
Align the top of the
bracket to the chalk
line and use a level to
make sure the brack-
et is straight.
Mark the center of
the bracket mounting
holes.
Drill mounting holes
using a masonry drill
bit.
Fig 18 Fig 19
Fig 17
www.advaning.com
Wall
3.5”
Bracket Center
Bracket locations base
on your awning model
Marker/pencil
3
3
4
4
5
5
2
1
2
Other manuals for LUXURY Series
2
This manual suits for next models
6
Table of contents
Other Advaning Accessories manuals

Advaning
Advaning GA Series User manual

Advaning
Advaning SG Series User manual

Advaning
Advaning S series User manual

Advaning
Advaning S series User manual

Advaning
Advaning PA SERIES User manual

Advaning
Advaning SG Series User manual

Advaning
Advaning CLASSIC Series User manual

Advaning
Advaning CLASSIC Series User manual

Advaning
Advaning FS SERIES User manual

Advaning
Advaning SG Series User manual


