ZoroSeerus ZS-X1 User manual

instructables
ZS-X1, 3D Printed Endgame Gear XM1 Mini Guide
by ZoroSeerus
This mod uses the Logitech G305 PCB. Here are some
renders, measurements, and example of a print.
Supplies:
Patience
Basic troubleshooting steps
-G305
-3D Printer or Printed pieces
-Etsy Shop for les and prints:
https://www.etsy.com/shop/ZoroSeerus
-Etsy shop le direct link:
https://www.etsy.com/listing/1022879637/zs-x1-3d-p...
-Screwdriver
-Tape
-AAA Battery
Cables I use:
https://www.amazon.com/gp/product/B07RHVNFQ6
Battery I use:
https://www.amazon.com/gp/product/B07QW531W2
-There are likely multiple combinations of chargers and
batteries that work. These are the ones I use. The battery
matters less than the connector since they'll only vary in
weight and battery life. If you get a dierent battery
make sure it's 1.5v.
Video demonstration of rechargeability:
//www.youtube.com/embed/vPNx4j_xXlk
ZS-X1, 3D Printed Endgame Gear XM1 Mini Guide: Page 1

ZS-X1, 3D Printed Endgame Gear XM1 Mini Guide: Page 2

ZS-X1, 3D Printed Endgame Gear XM1 Mini Guide: Page 3

Step 1: Printing Instructions and Considerations
Here are the printing orientations I use. I've printed this on an Artillery Genius in PLA. My slicer is Superslic3r.
ZS-X1, 3D Printed Endgame Gear XM1 Mini Guide: Page 4

I print the top piece at a 60 degree angle. You can also use "Place on Face" and the at spot at the back.
I manually paint supports mainly, but I'm sure you can use the auto-generated ones.
Your settings may varyYour settings may vary but I have provided the settings I've sliced this at on my printer.
ZS-X1, 3D Printed Endgame Gear XM1 Mini Guide: Page 5

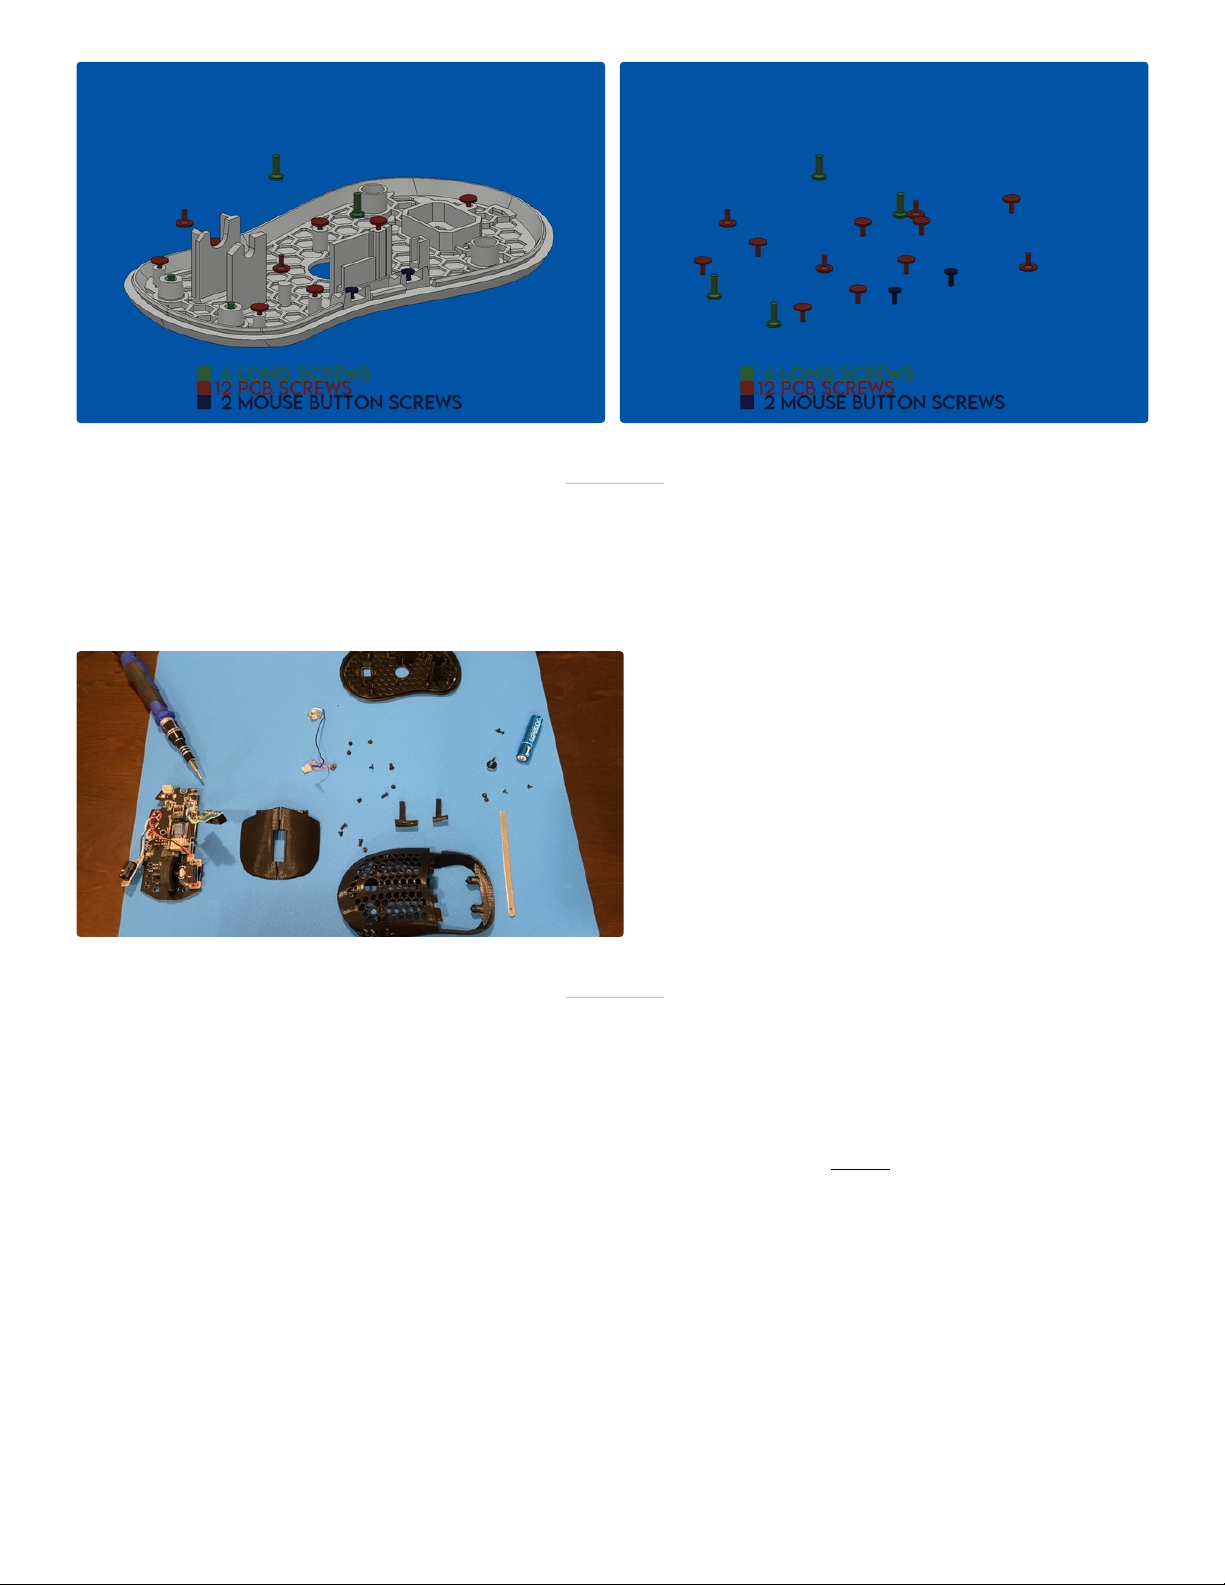
Step 2: Screws
Here are where all of the screws go.
Use the very small screws that hold in the mouse button to hold the side buttons in place.
Use the screws that hold the PCB in place in the G305 to do the same here.
Use the side button screw with the little plastic to hold them in place here as well.
ZS-X1, 3D Printed Endgame Gear XM1 Mini Guide: Page 6
Step 3: Laying It All Out
Step 4: Bottom Internals
Make sure to leave the microusb magnetic charging tip o. It's much easier to add it in later.
Slide the PCB into place. Make sure the on/o button
doesn't fall o.
Put the side buttons into place before the side button
PCB. I screw them all the way down and then back o
like 1/4 turn. Use the very small screws that hold the
G305 switches into place.
For the side button PCB you'll want to push it gently, and
mainly down at the back. DON'T push down at the front.
Screw it into place.
Slide the switches into place on the PCB. The spikes sit in
the front holes .Screw them into place. I do the back rst.
ZS-X1, 3D Printed Endgame Gear XM1 Mini Guide: Page 7

Step 5: Battery
I haven't had any issues with the battery moving but feel
free to use some tape to make absolutely sure that
neither the battery nor connectors can move.
Slide in the battery. You must insert the battery from the
bottom of the mouse. Push it in at an angle like picture 1.
Push it toward the front of the mouse and then upward.
One it's in you can slide it back into place.
I do the red wire rst. Slide the battery forward and then
push the negative terminal into place.
Slide the battery back and do the positive end now.
Compress the spring a bit and drop it into place. Slot the
end into the slit.
ZS-X1, 3D Printed Endgame Gear XM1 Mini Guide: Page 8

Step 6: Main Buttons
Line up the main buttons as much as you can. Then you'll need to push toward the back of the mouse and upward. This
can be a tight t, so don't go hulk mode on it and put the majority of the force on the area marked with an X.
I've found it helpful to hold the front together while screwing them in. Use the long screws from the bottom of the G305.
ZS-X1, 3D Printed Endgame Gear XM1 Mini Guide: Page 9

Step 7: Putting It All Together
Make sure to plug in all of your connectors now.
You're going to have to essentially hook the right side
around and then push down. Don't push down right
away when initially trying to join the two pieces. Once
you've got the right side over the PCB and line it up with
the internal ring then you can push down and snap it
into place.
The back isn't ush by design. I am aware that it looks
sort of weird, but it was too dicult to pry open before I
changed it like this. The at spot also serves as the initial
contact point for the printing bed.
Once it's shut you can test all of your buttons. If you
want to use longer or shorter click pieces now is the time
to go back and check.
Now just do the last four screws and toss some feet on it.
ZS-X1, 3D Printed Endgame Gear XM1 Mini Guide: Page 10
Table of contents


