Zeegma Puur User manual

Puur
EN DE PL IT FR
ES NL UK LT HR
Instrukcja obsługi
User Manual
Bedienungsanleitung
Manuale d’uso
Manuel de l’U lisateur
Manual de usuario
Handleiding
Посібник користувача
Vartotojo vadovas
Korisnički priručnik

EN
Introducon
Dear customer!
Thank you for placing trust in us and choosing Zeegma.
We provide you with a product perfect for everyday use thanks to
the use of high-quality materials and modern soluons.
We are convinced that they product will sasfy your requirements
as it has been designed with utmost care.
Before the rst use, please read this manual carefully.
Should you have any remarks or quesons concerning the product,
please do not hesitate to contact us:
IMPORTANT
Please read this manual before you start using the device to see
all its funcons and use them in accordance with intended use.
A failure to follow the safety instrucons or use at variance with
the manual may lead to electric shock, re or serious injuries.
Please keep this manual for further reference.
WARNING: Danger of scalding
CAUTION: Hot Surface
The device generates hot water steam. Parcular elements of
the device which have a contact with water steam become hot
as well. Please be careful when using the device to avoid burning.
1.
The device is intended for home use only. Do not use it
outdoors.

EN
2. Never leave the plugged device unaended.
3.
Before you start maintenance works or aer you nish using,
always unplug the device.
4.
This appliance can be used by persons with reduced physical,
sensory or mental capabilies or lack of experience and
knowledge if they have been given supervision or instrucon
concerning use of the appliance in a safe way and understand
the hazards involved. Children shall not play with the
appliance. Keep the appliance out of reach of children when
it is energized or cooling down.
5.
Never point the steam towards people, animals, plants or
electric devices.
6. Do not immerse the device in any liquids.
7.
Do not switch the device on if you have noced any damage;
this applies to both a cable and plug.
8.
Do not use the device when it starts acng up, has been
dropped or weed.
9.
Do not grab the cable to pull or move the device. Do not place
any items on it. Do not pull it through sharp edges of walls
and furniture and do not wrap it too ght.
10.
Unplug the device aer every use. Unplug from the socket
by grabbing a plug, never a cable.
11.
Do not use the device and do not touch the plug if your
hands are wet.
12. Do not use the device to clean oors if the material p has
not been aached.
13. Do not use the device if there is no water in the tank.
14. If you have noced any leaks, stop using the device, switch
it o and then contact the manufacturer’s service center.
15. If you switch the device on and electric fuses acvate, stop
using the product immediately.
16. Do not use the device in the inammable, explosive or toxic
atmosphere.
17. Do not use the device on the skin, wax furniture and oors,
unsecured wood or woodblock oor, synthec materials,
velvet or other steam-sensive materials.
18. Always test the device on a small and invisible piece of surface
cleaned to make sure it does not get damaged by the water steam.

EN
19. Do not use the device for other purposes than designed.
20. Keep the device away from sources of heat, high temperatures,
hot surfaces, sources of ignion, naked ame, oils and sharp edges.
21. To ll the tank, use demineralized water only. Do not use the
tap water because it may lead to accumulaon of scale and
in eect damage.
22.
Do not add any an-rust agents, an-odor substances, alcohol
and detergents to the tank as they may damage the tank.
23. Before the use, clean strong dirt from the surface cleaned.
DEVICE OUTLINE
Main elements
A. Handle
B. Main body
C. Tube
D. Steam head
E. Microber sheath
F. Carpet slip
G. Window-cleaning sheath
H. Small brush
I. Large brush
J. Angle nozzle
K. Scraper
L. Accessories adapter
M. Texle sheath
EN
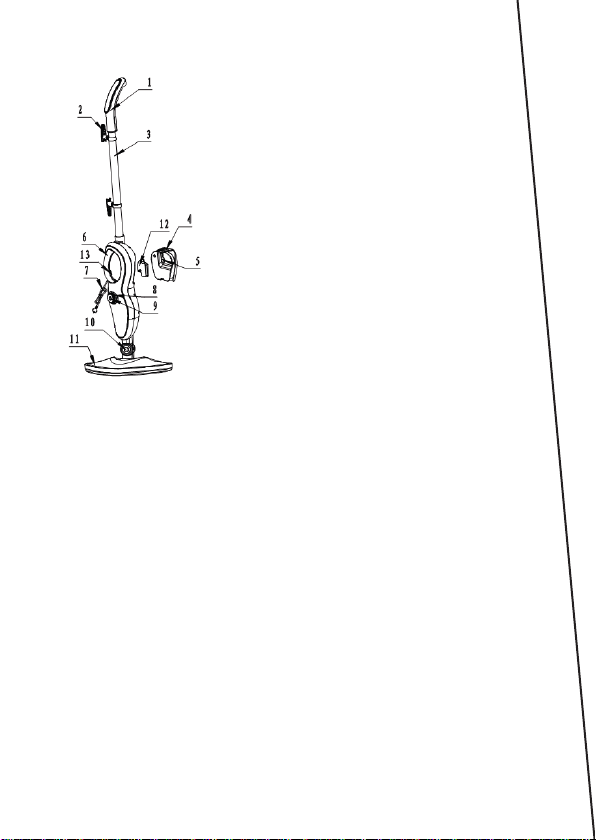
Detailed elements
STEAM MOP ASSEMBLY
Note: every steam mop is tested before it is packed in the factory.
You may see water remains in the tank before you use the product
for the rst me.
Warning: before you start assembling, make sure the device has
been switched o , unplugged, cooled and that water tank is empty
or water level is minimum.
Water tank assembly
1. Place the water tank (4) in the main body of the device (B).
2. To remove the tank, press the protec on key located in the
main body above the tank.
Handle assembly
1. Press the tube (C) into the handle (A), adjust it un l you can
hear a dis nc ve click.
2. Press the tube with handle into the main body (B), adjust it
un l you can hear a dis nc ve click.
1. Handle
2. Hook
3. Tube
4. Water tank
5. Water tank cap
6. Grip
7. Feeder cable
8. Steam adjustment knob
9. On/o switch
10. Head rota ng unit
11. Steam head
12. Water lter
13. Steam key

EN
3. To remove the handle, press the protecon key.
Steam head assembly
1. Insert the lower part of the main body (B) in the steam
head (D). Adjust unl you can hear a disncve click.
2. You can easily remove the steam head (D) by pressing the
protecon key.
Sheath assembly
The microber sheath (E) must be mounted with the use of
Velcro. All you need to do is put the sheath on the ground and
press the steam head (D) against the sheath.
Carpet slip assembly
Put the steam head (D) with a pad aached on the carpet slip.
D

EN
HOW TO USE
1. Pour water into the tank:
NOTE: To ll the tank, use demineralized water only. Do not use
tap water because it may lead to accumulaon of scale and in
eect damage.
NOTE: Rell the tank with water when the device is inacve and
unplugged!
• Take the tank (4) out of the main body (BS).
• Remove the cap from the water tank (5).
• Pour water into the tank (4).
• Close the cap.
• Put the tank back into the body.
2. Insert the device plug into the socket.
3. Switch the device on with the on/o switch (9). Red light
around the knob (8) shows that the steam mop is heang
up.
4. When it is hot, the light will turn blue.
5. The steam head can rotate at various angles thanks to
which you can clean corners and low areas.
NOTE: The surface of the steam head may be hot during and
immediately aer use.

EN
6. Use a knob (8) to adjust the amount of steam. Knob
clockwise to increase the amount and an -clockwise to
reduce the amount. Two indicators under the knob indicate
the amount of steam generated.
USE AS MANUAL STEAM WASHER
NOTE: Before you start assembling the mop as a manual steam
washer and before you replace accessories, switch the device o
and unplug. Make sure the device is not hot.
1. Remove the tube (C) from the main body (B).
2. Remove the steam head (D) from the main body (B).
3. Insert the accessories adapter (L) into the main body.
4. Choose relevant accessories and put the adapter as
showed by the arrow. Turn right to secure it.
5. To generate steam, press the grip key (13).
Accessories
NOTE: The steam mop/washer is not intended for all kinds of
surfaces and materials. Pay a en on to safety guidelines in this

EN
manual and surface/material guidelines. Always test the device
on a small and invisible piece of surface cleaned to make sure it
is not damaged by the water steam.
Accessories Suggested use
Window-
cleaning
sheath
Shower cubicle door,
mirrors – to remove
soap remains and other.
Clothes, drapes,
tablecloths – to remove
creases.
Small and
large brush
Ovens, microwave
ovens, kitchen tops,
showers, bathtubs, tap
ngs, les, grouts,
toys, refrigerators, etc.
Angle nozzle Cooker tops, tap edges,
grouts, microwave
ovens, sinks, dicult-to-
access spots, etc.
Scraper Scraping o burnt food,
dirt and fat. Removing
dirt and deposits from
such surfaces as tops
and stoves.
Texle
sheath
The sheath intended
for clothes, drapes,
tablecloths, etc.
Microber
sheath
Intended to clean dirty
ooring and refresh
carpets.

EN
MAINTENANCE AND CLEANING
NOTE: Make sure the device is inacve and unplugged before you
start performing maintenance works.
To ll the tank, use demineralized water only. Do not use tap water
because it may lead to accumulaon of scale and in eect damage.
1. Pour water out of the tank aer every use.
2.
Microber sheaths may be washed at the temperature of 30°C.
Use so detergents. Do not use bleaches and soeners. It is
advisable to dry in the room temperature in the lying posion.
3. To clean accessories, use water, never detergents.
4.
Clean the main body, tube and head with a so and dry cloth.
Storage
1. Aer the use, switch the device o and then unplug.
2. Take the water tank out, empty it and dry.
3. When all elements of the device have cooled, you can clean
them.
4.
Clean the microber sheath to make it ready for another use.
5. Keep the device in a dry place and out of reach of children.
The product complies with requirements of EU direcves. Pursuant to the Direcve
2012/19/EU, this product is subject to selecve collecon. The product must not be
disposed of along with domesc waste as it may pose a threat to the environment
and human health. The worn-out product must be handed over to the electrics and
electronics recycling center.
The pictures and diagrams are for reference only. The real design of the products may
dier from the pictures and diagrams presented.
Table of contents
Languages:
Other Zeegma Steam Cleaner manuals


