YOWHICK GDP1B User manual

LCD VIDEO PROJECTOR
USER MANUAL
GDP1B

THANKS FOR YOUR PURCHASE
Thank you very much for choosing the GDPIB LCD Video Projector. And thanks
for your trust in us. We are a team full of innovation and passion, with an
enterprising heart. We hope that this product will bring you the most conve-
nient and enjoyable experience. If you have any questions or feedback on the
product just contact our customer support team at 1-866-606-9133 or by email:

CONTENTS
- 01 -
NOTICE
PACKING LIST
SAFETY PRECAUTIONS
REMOTE CONTROL
PROJECTOR OVERVIEW
OPTICAL ADJUSTMENTS
CONNECTIONS
MENU SETTINGS
SCREEN MIRRORING
PROJECTOR INSTALLATION
TECHNICAL SPECIFICATIONS
02
03
03
04
05
08
09
14
16
22
25

NOTICE
1. Not recommended for Powerpoint, Excel, Word presentations.
2. Change your PC/laptop screen resolution to 1920*1080 for the best clarity.
3. Please note that it is suitable for home use in less bright environments.
4. Projector adopts Miracast co-screen protocol, if your phone does not support Miracast, you cannot mirror the phone
with the projector, such as Google Pixel/Motorola mobile phone.
5. Due to copyright issues, the projector can not stream Netflix or Amazon Prime Video through your phone. Please use
a TV stick or Roku to watch Netflix or Disney.
6. When you uses USB, it supports up to 64G storage devices in FAT32 format, and mobile hard drives support 2T devices.
FCC Statement
This device complies with part 15 of the FCC rules. Operation is subject to the following two conditions:
(1) this device may not cause harmful interference, and (2) this device must accept any interference received,
including interference that may cause undesired operation. The manufacturer is not responsible for any radio or
interference caused by unauthorized modifications or changesto this equipment. Such modifications or changes could
void the user's authority to operate the equipment. This equipment has been tested and found to comply with the limits
for a Class B digital device, pursuant to part 15 of the FCC Rules. These limits are designed to provide reasonable
protection against harmful interference in a residential installation. This equipment generates uses and can radiate radio
frequency energy and, if not installed and used in accordance with the instructions, may cause harmful interference to
radio communications. However, there is no guarantee that interference will not occur in a particular installation. If this
equipment does cause harmful interference to radio or television reception, which can be determined by turning the
equipment off and on, the user is encouraged to try to correct the interference by one or more of the following
measures: Reorient or relocate the receiving antenna. Increase the separation between the equipment and receiver.
Consult the dealer or an experienced radio/TV technician for help with important announcements. Consult the dealer
or an experienced radio/TV technician for help.RF Warning statement: The device has been evaluated to meet the
general RF exposure requirement. The device can be used in portable exposure conditions without restriction.
-Reorient or relocate the receiving antenna.
-Increase the separation between the equipment and receiver.
-Consult the dealer or an experienced radio/TV technician for help with important announcements.
-Consult the dealer or an experienced radio/TV technician for help.
RF Warning statement:
The device has been evaluated to meet general RF exposure requirements. The device can be used in portable
exposure conditions without restriction.
- 02 -

PACKING LIST
SAFETY PRECAUTIONS
1.Please read the user manual carefully before using the projector.
2.Only use the power cordsupplied with this product with an electrical socket that is earthed properly.
3.Please use the same power voltage as marked on the projector.
4.Please do not disassemble the projector by yourself, otherwise it will void your warranty.
5.Please do not look into the lens directly while the projector is turned on, it may cause damage to your eyes.
6.DO NOT block the air vents during the use.
7.Please keep the projector away from water or any other liquid as it is not waterproof.
8.Please do not put the projector in wet or moist conditions to prevent electric shock.
9.Please switch off and unplug the appliance when it is not in use for a long time.
10.Please use the original packaging foam or other anti-shock material when relocating the projector.
11.Please contact theYOWHICKcustomer support team if you encounter any problem with the projector.
12.This projector is covered by theYOWHICK24-month warranty.
Please contact us if you want to know more about the warranty. (The user manual and packaging are not covered by
the warranty)
- 03 -
100 inch
Projection
Screen

1. Power On/Off 2. Pause/Play
3. Rewind 4. Mute
5. Fast Forward 6. Left/Right/Up/Down
7. Confirm 8. Return
9. Menu 10. Signal
11. Volume- 12. Volume+
Tip:In screen projection mode, press and hold “ ”1.5 seconds
and release the button then can return to the main menu.
- 04 -
REMOTE CONTROL
Caution
1. Do not submerge the remote control in the water.
2. Do not expose the remote control to the outdoors, liquid, moisture, excessive heat, or fire.
3. Do not use old and new batteries together in the remote control.
4. Please take the batteries out if not using the remote control for a long time to avoid battery Leakage.
5. The remote control must be held perpendicular to the projector's IR remote sensor to function correctly.

- 05 -
PROJECTOR OVERVIEW
Signal Source
Enter/Play/Pause
Up/Down/Left/Right
Menu
Focus Key
Keystone Correction
USB2
USB1
AV HDMI 1
HDMI 2
Audio
Output
ON/OFF
S
M
Adapter Interface
VGA
IR Remote Sensor
IR Remote SensorSupport frame

S
M
S
M
- 06 -
1. Connecting the projector to power
A. Plug the power cord to the projector.
B. The power indicator on the projector lights up after the power cord has been connected.
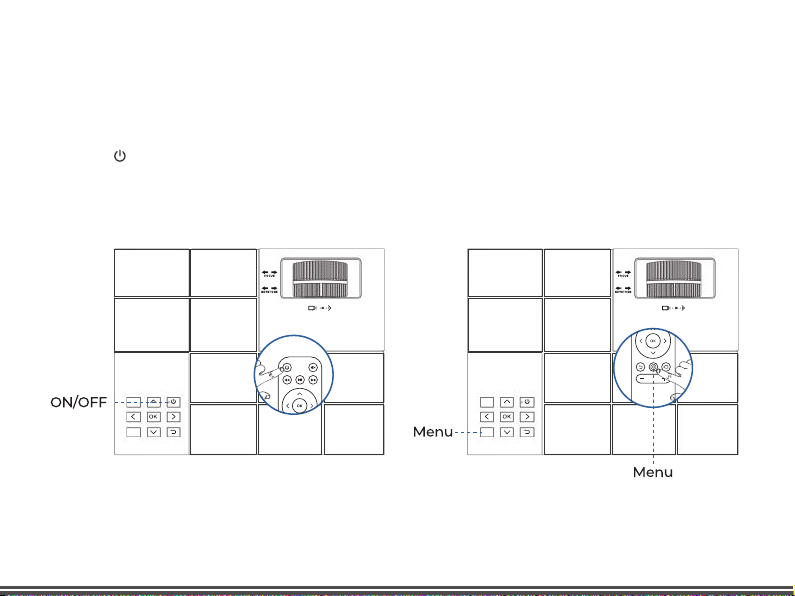
2.Power ON/OFF
Press the " " button on the projector or on the remote control to power it on.

- 07 -
3. Multimedia boot screen
The multimedia screen will be displayed in 10-20 seconds after you press the power button.
4. Focus & Keystone correction
A. If the image is displayed as a trapezoid shape, turn the keystone correction knob on the upper surface of the
projector until the projected image becomes rectangular to correct the keystone issue.
B.Make sure the projector is horizontal to the projector screen and rotate the focus ring to sharpen the projected image.
HOME
HDMI 1
HDMI 2
AV
USB
WiFiAbout Us BT
VGA
Screen Mirroring
Setting

- 08 -
OPTICAL ADJUSTMENTS
The projector corrects the image deformation by the optical keystone correction.
See the example below:
HOME
HDMI 1
HDMI 2
AV
USB
WiFiAbout Us BT
VGA
Screen Mirroring
Setting
Table of contents
Other YOWHICK Projector manuals