
YEYIAN Agile NL User manual


WELCOME TO YEYIAN
A NEW LEVEL OF WORLD GAMING
PRODUCT REGISTRATION
You’re one of the millions of gamers. You can be the socially engaged, the sport
fun, the explorer, the soldier, the builder or the strategist. All require sobrenatural
reexes, powerful machines, consistency and a strong tolerance for suffering
hundreds of defeats at the hands of other players before the fun kicks in. But there is
something unique required in a game, disruptive and exciting; a moment that allows
you to control what happens next; the millisecond you feel intimidated, the move
that will set you apart from the rest. Your decision in that moment, your condence,
your passion, and your determination to win, will take you to the monumental Victory.
Informatio n
and releases
Promotions
and update s
Giveaways
and gift s
Choose big, don’t settle and always keep going.
Be part of the game.
Thank you for choosing us and welcome to our family.
Registering your products, you can enjoy exclusive news, contest, and giveaways.
USA: www.yeyian.us I MX: www.yeyian.mx IES: www.yeyian.es

SPECIFICATIONS
Polar pattern Cardioid
Sensitivity (dB) (Mic) -33 ± 2dB (1.5V, 680K Ω;0dB = 1V/Pa, 1KHZ)
Response Frequency 80Hz - 20000Hz
Impedance (ohms) < 68 Ω
Signal to Noise Ratio > 68 dB
Max SPL 110 dB
Sampling Rate 192KHZ / 24 Bits
Connector USB

TYPICAL FREQUENCY RESPONSE CURVE
POLAR RESPONSE

FEATURES
Microphone setup
MIC/MUTE
GAIN
VOLUME
Power indicator light
Mute Switch
(Short press to switch silent mode)
Microphone Volume
(Rotate from left to right as volum
e
control buttons)
Computer Volume
Adjust the real-time monitoring volume

Microphone setup
1. Plug one of the USB cable into the power socket in the microphone, and connect
the other end to computer.The power indicator light wil turn blue if it is working
properly.
2. Plug the end of a earphone into the earphone socket in the microphone.
(Support two audio output at the same time
POWER REQUIREMENTS
1.The microphone is powered by your device’s USB port, meaning that in most
instances you can just plug the microphone in and get started right away. For non-
standard USB ports, a powered USB hub may be required.
2. It is a Plug & Play USB device, compatible with both Windows and Mac
computers .Placement of the microphone and relative to the vocalist may be varied
on several factors including room acoustics, the vocal performance, and whether
the vocalist has a high or deep voice.

GENERAL OPERATION CONT
15cm (6”)
Diagram 4 - Positioning the microphone for vocals
Microphone placement:
Placement of the microphone and relative to the vocalist may be varied on several
factors including room acoustics, the vocal performance, and whether the vocalist
has a high or deep voice.
An ideal starting point for the reference is to place microphone directly in front
of the lead singer.15 cm (6”) distance. Moving the vocalist a little closer will make
the vocal sound more intimate and full, while moving the vocalist back will give
the vocal a little more ‘air’ or room sound, and will reduce the proximity effect
(increased bass or low frequency response when the sound source is very close).
Experimentation should be made with the angle from which the microphone is
addressed, as different results can be achieved when the vocalist is ‘off-axis’ to the
microphone (and the gold dot
Setting your input level:
15 CM

The microphone has been set to an ideal internal gain setting, without the
need for physical level adjustments on the microphone body. Any necessary
level adjustments to set the ideal recording level can be made from within your
recording program, or via your computer’s system preferences.
To manually adjust your input level via your computer’s system preferences, use the
following instructions relevant to your device platform/operating system.Connect
the other end to computer.The power indicator light will turn blue if it is working
properly.
Adjusting the input level on a Mac OS computer:
1. Click on the Apple symbol at the top left of your screen, and select System
Preferences.
Diagram 6-1 - Accessing Mac OS System Preferences
2. Click on ‘Sound’ to open the sound options.
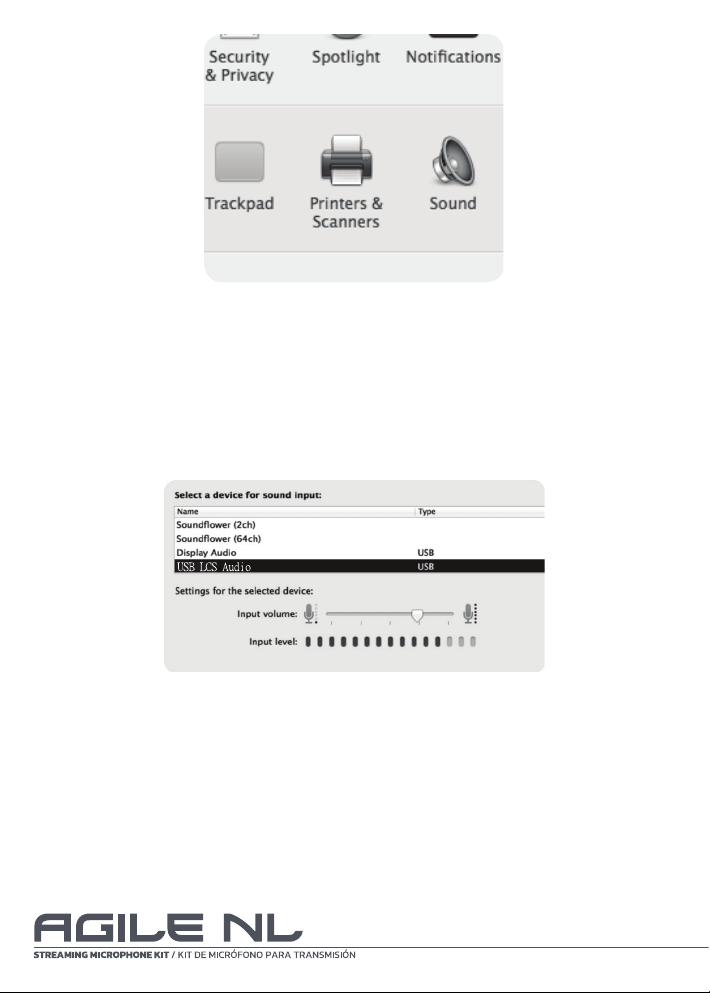
Diagram 6-2 - Opening ‘Sound’ options
3. Open the ‘Input tab’.
4. From here, select the ‘USB LCS Audio’ from the list of devices, and adjust the
input level using the slider.
Diagram 6-3 - Adjusting microphone input level

Adjusting the input level on a Windows computer:
1. Choose open sound settings. (Or open the start menu and click on “Control
Panel”, then, open the “Sound” preferences)
Diagram 8-1 Accessing Windows Control Panel
2. Open the “Recording” tab and double click on “USB LCS Audio” form the list of
devices.
Diagram 8-2 Selecting the microphone input device
Table of contents
Languages:


