Wyse C90LEW User manual

Installation Guide
Wyse®C Class and Wyse®R Class
Flash Upgrade Option Kit
Products: C30LE, C50LE, C90LE, C90LEW, C90LE7,
R50L, R50LE, R90L, R90LE, R90LW, R90LEW, R90L7, R90LE7
Issue: 030111
PN: 883884-14LRev. A

Copyright Notices
© 2011, Wyse Technology Inc. All rights reserved.
This manual and the software and firmware described in it are copyrighted. You may not reproduce, transmit,
transcribe, store in a retrieval system, or translate into any language or computer language, in any form or by any
means, electronic, mechanical, magnetic, optical, chemical, manual or otherwise, any part of this publication
without express written permission.
End User License Agreement (“License”)
A copy of the Wyse Technology End User License Agreement is included in the software and provided for your
reference only. The License at http://www.wyse.com/license as of the purchase date is the controlling licensing
agreement. By copying, using, or installing the software or the product, you agree to be bound by those terms.
Trademarks
The Wyse logo and Wyse are trademarks of Wyse Technology Inc. Other product names mentioned herein are for
identification purposes only and may be trademarks and/or registered trademarks of their respective companies.
Specifications subject to change without notice.
Restricted Rights Legend
You acknowledge that the Software is of U.S. origin. You agree to comply with all applicable international and
national laws that apply to the Software, including the U.S. Export Administration Regulations, as well as end-user,
end-use and country destination restrictions issued by U.S. and other governments. For additional information on
exporting the Software, see http://www.microsoft.com/exporting.
Ordering Information
For availability, pricing, and ordering information in the United States and Canada, call 1-800-GET-WYSE
(1-800-438-9973) or visit us at http://www.wyse.com. In all other countries, contact your sales representative.

Contents
1 Introduction 1
Kit Warranty 1
Kit Contents 1
Overview 1
Wyse Technical Support 2
Related Documentation and Services 2
Wyse Online Community 2
2 Installing C Class Flash 3
Requirements 3
Procedures 3
What’s Next 4
3 Installing R Class Flash 5
Requirements 5
Procedures 5
Installing R50L, R90L, R90LW, or R90L7 Cloud Client Flash 6
What’s Next 7
Installing R50LE, R90LE, R90LEW, or R90LE7 Cloud Client Flash 8
What’s Next 9
4 Installing Firmware 11
Requirements 11
Procedures 12
Troubleshooting 17
USB Keys - Troubleshooting Boot Issues 17
SanDisk Cruiser Flash Drives - Troubleshooting Partition Issues 17

iv Contents
This page intentionally blank.

1Introduction
This guide provides step-by-step instructions to upgrade flash in the following products:
•C Class:
·C30LE
·C50LE
·C90LE
·C90LEW
·C90LE7
•R Class:
·R50L
·R50LE
·R90L
·R90LE
·R90LW
·R90LEW
·R90L7
·R90LE7
Kit Warranty
The warranty on this kit assumes the remaining months of warranty of the cloud client in
which it is installed, or for 90 days, whichever is greater. Installation of this kit will not void
the factory warranty, however the user will be responsible for damage due to improper
installation.
Kit Contents
The kit includes a Flash module.
Overview
To upgrade flash:
1. Perform a hardware installation (install new flash) by completing one of the following
(depending on your cloud client class):
• "Installing C Class Flash"
• "Installing R Class Flash"
2. Complete "Installing Firmware."

2Chapter 1
Wyse Technical Support
To access Wyse technical resources, visit http://www.wyse.com/support. If you still have
questions, you can submit your questions using the Wyse Self-Service Center (on the
Wyse.com home page, go to Support > Knowledge Base > Home tab) or call Customer
Support at 1-800-800-WYSE (toll free in U.S. and Canada). Hours of operation are from
6:00 A.M. to 5:00 P.M. Pacific Time, Monday through Friday.
To access international support, visit http://www.wyse.com/global.
Related Documentation and Services
Fact Sheets containing the features of hardware products are available on the Wyse Web
site. Go to http://www.wyse.com/products/hardware/index.asp, click the link for your
hardware product, and then click the link for the Fact Sheet.
Administrator and other documentation for your cloud client model are available at:
http://www.wyse.com/manuals.
Wyse Online Community
Wyse maintains an online community where usersof our products can seek and exchange
information on user forums. Visit the Wyse Online Community forums at:
http://community.wyse.com/forum.

2Installing C Class Flash
This chapter contains information for C30LE, C50LE, C90LE, C90LEW, and C90LE7
cloud client users who must install new flash.
Requirements
• Small Phillips screwdriver
• Needle-nose pliers
• (Optional) Plastic alignment tools or equivalent for prying
Warning
Flash modules may be susceptible to damage by Electro-Static Discharge
(ESD). All industry-standard cautions should be followed to avoid ESD.
Before you remove or install a module, touch any metal part of the chassis
and keep that contact with the chassis during the installation process.
Procedures
Caution
Follow all precautions listed in the Quick-Start Guide that came with your
cloud client for disconnecting and reconnecting the cloud client.
1. Perform a proper shutdown of the cloud client by closing all files and ending your
session, and then press the power button to turn off the cloud client.
2. Unplug the power cord and power adapter, remove all of the cables from the rear of the
cloud client, and then detach any support feet.
3. Position the cloud client horizontally, remove the screw from the back of the cloud
client using a small Phillips screwdriver, and then use a plastic alignment tool to pry
and loosen the top cover as shown in Figure 1.
Figure 1 Removing the top cover

4Chapter 2
4. Lift the top cover to remove it and expose the main board as shown in Figure 2. Notice
that the rear of the cloud client is positioned at the bottom of the photo.
Warning
Flash modules may be susceptible to damage by Electro-Static Discharge
(ESD). All industry-standard cautions should be followed to avoid ESD.
Before you remove or install a module, touch any metal part of the chassis
and keep that contact with the chassis during the installation process.
5. Note where the connector of the flash module is located in Figure 2. Remove the
existing flash module. Use needle-nose pliers to squeeze the plastic standoff lock as
you rock the flash module back and forth to remove it from the socket.
Figure 2 Removing the existing flash module
6. Install the new flash module in the reverse order of removing the original flash module.
Carefully press the flash module onto the standoff lock and connector, making sure to
lock it into place.
7. Replace the top cover in the reverse order of removing it as described in steps 4 and 3.
8. Attach any support feet.
9. Reconnect the video display, keyboard, mouse, and power adapter to the cloud client
before connecting to an electrical outlet.
Caution
Do not turn on the cloud client. The cloud client is ready to re-image,
however the flash module does not contain an operating system. Turning on
power to your cloud client without firmware will display the error message
“NO OPERATING SYSTEM FOUND.”
What’s Next
Continue with "Installing Firmware."

3Installing R Class Flash
This chapter contains information for R50L, R50LE, R90L, R90LE, R90LW, R90LEW, and
R90L7 cloud client users who must install new flash.
Requirements
• Small Phillips screwdriver
• Needle-nose pliers
• (Optional) Container for holding screws
Warning
Flash modules may be susceptible to damage by Electro-Static Discharge
(ESD). All industry-standard cautions should be followed to avoid ESD.
Before you remove or install a module, touch any metal part of the chassis
and keep that contact with the chassis during the installation process.
Procedures
Perform a hardware installation (install new flash), by completing one of the following
(depending on your cloud client class):
• "Installing R50L, R90L, R90LW, or R90L7 Cloud Client Flash"
• "Installing R50LE, R90LE, R90LEW, or R90LE7 Cloud Client Flash"

6Chapter 3
Installing R50L, R90L, R90LW, or R90L7 Cloud Client Flash
Caution
Follow all precautions listed in the Quick-Start Guide that came with your
cloud client for disconnecting and reconnecting the cloud client.
1. Perform a proper shutdown of the cloud client by closing all files and ending your
session, and then press the power button to turn off the cloud client.
2. Unplug the power cord and power adapter, remove all of the cables from the rear of the
cloud client, and detach the vertical foot.
3. Position the cloud client horizontally, and then remove the screws from the top and
bottom of the cloud client using a small Phillips screwdriver as shown in Figure 3.
Figure 3 Removing the top and bottom screws
4. Slide the left side cover toward the rear of the device and remove it to expose the main
board as shown in Figure 4. Notice that the rear of the cloud client is positioned at the
bottom of the photo.
Warning
Flash modules may be susceptible to damage by Electro-Static Discharge
(ESD). All industry-standard cautions should be followed to avoid ESD.
Before you remove or install a module, touch any metal part of the chassis
and keep that contact with the chassis during the installation process.
5. Note where the connector of the flash module is located in Figure 4. Use needle-nose
pliers to squeeze the plastic standoff lock as you rock the flash module back and forth
to remove it from the socket.
This manual suits for next models
12
Table of contents
Other Wyse Computer Hardware manuals
Popular Computer Hardware manuals by other brands

EMC2
EMC2 VNX Series Hardware Information Guide

Panasonic
Panasonic DV0PM20105 Operation manual

Mitsubishi Electric
Mitsubishi Electric Q81BD-J61BT11 user manual

Gigabyte
Gigabyte B660M DS3H AX DDR4 user manual

Raidon
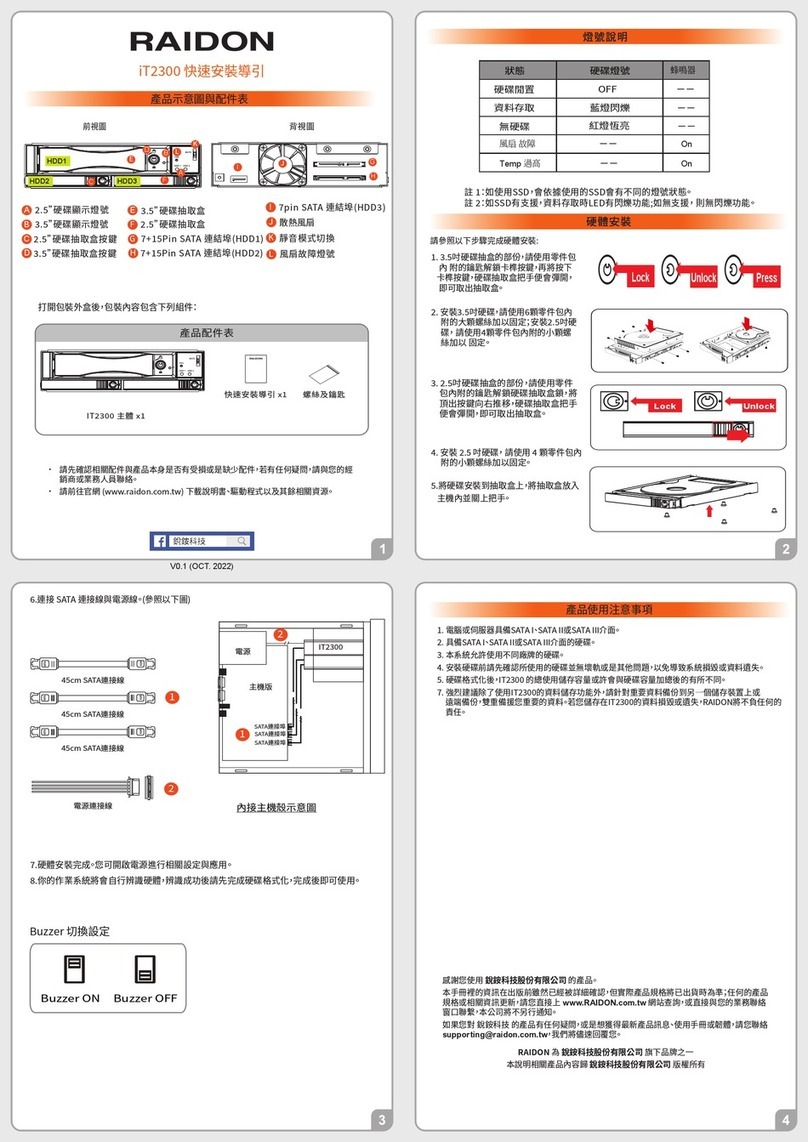
Raidon iT2300 Quick installation guide

National Instruments
National Instruments PXI-8186 user manual