Wood’s DS-40FS User manual

DS-40FS
LUFTAVFUKTARE
MANUAL
Grattis! Till köpet av en kvalitetsavfuktare från Wood’s! Wood’s avfuktare
är inte bara Skandinaviens mest sålda avfuktare, utan också det
avfuktarmärke som har flest ”Bäst-i-test”-utmärkelser på marknaden.
SÄKERHETSINFORMATION
1. Vänligen läs denna manual innan du använder avfuktaren för första
gången. Spara den sedan för framtida referenser.
2. Ställ aldrig ner avfuktaren i vatten eller andra vätskor.
3. Om strömsladden är skadad, så måste den bytas av en
auktoriserad hantverkare eller liknande för att personskador ska
undvikas
4. Denna produkt får endast repareras av en fackman, icke utbildad
servicepersonal kan skada sig själva vid oaktsamhet.
5. Barn får endast handskas med denna produkt i sällskap av en
vuxen.
6. Drag ur kontakten förH det att avfuktaren flyttas, rengörs eller före
det att en service ska utföras.
7. Ställ inget tungt på maskinen
8. För att minska risken av spill, töm vattenbehållaren innan deW att
maskinen flyttas.
9. Tippa inte avfuktareQ då behållaren innehåller vatten. Vattnet kan
skada och förstöra maskinen.
10. Om strömsladden förstörs/blir skadad så måste den bytas av en
utbildad fackman. Om detta görs av en outbildad person så kan det
leda skada.
11. Denna maskin ska ställas minst 50cm från väggen eller andra
hinder som kan begränsa luftgenomströmningen.
1
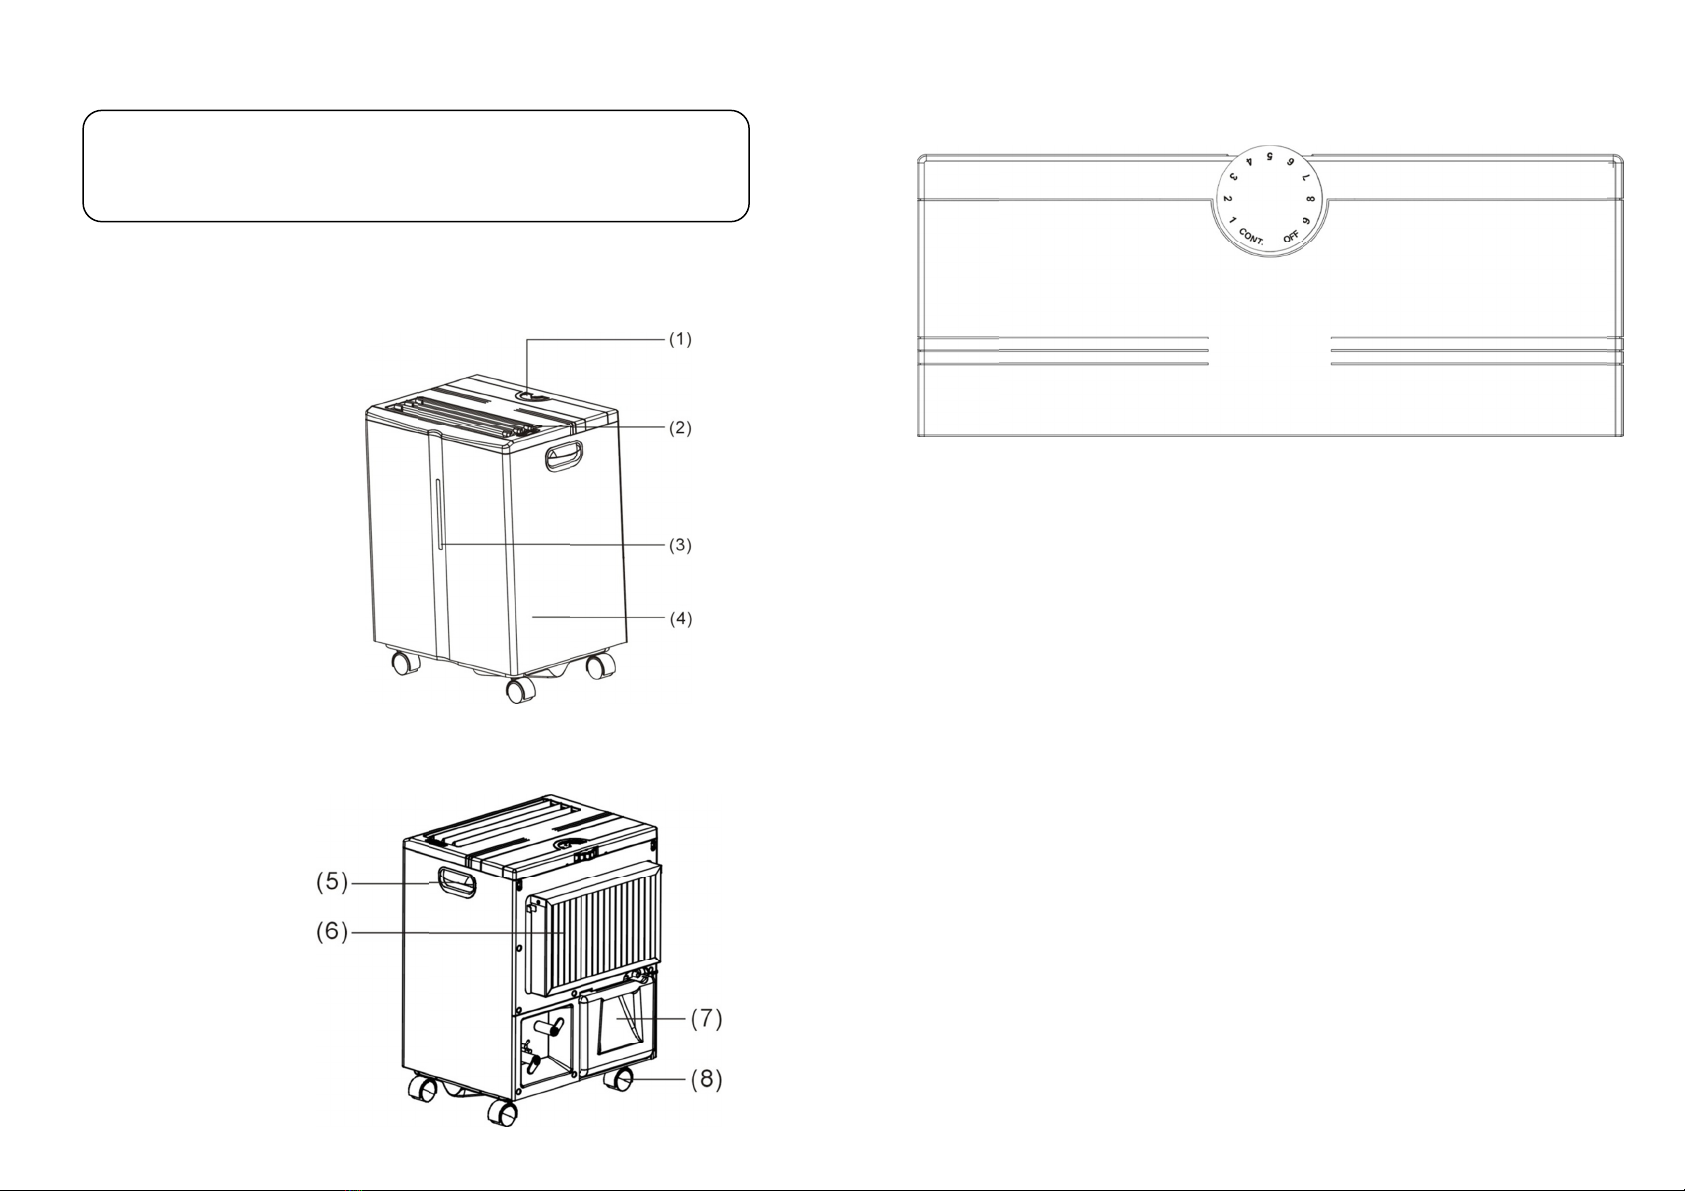
ANVÄNDARINSTRUKTIONER
1. Luf tfuktighetsinställning
2. Luf tutblås
3. Indikatorlamp a
4. Panel
5. Hand tag
6. Luf tfilter
7. V attentank
8. Hjul
VARNING!
INNAN DU STARTAR MASKINEN
ÖPPNA LOCKET TILL UTBLÅSET HELT
KONTROLLPANELSFÖRKLARING
DRIFTSINSTRUKTIONER
Starta avfuktaren
1. Först, vrid hygrostaten till “OFF”-läget.
2. Sätt i strömsladden.
3. Vrid hygrostaten till höger för att starta och titta vart du vill ha din önskade
luftfuktighet. (position 6 håller i regel 60% relativ fuktighet.
Stänga av maskinen
1. Vrid hygrostatvredet till “OFF”-läget. Då kommer maskinen att stängas av.
2. Om inte avfuktaren skall användas på ett längre tag, drag i så fall ut
kontakten från vägguttaget.
Upplysning
1. Avfuktaren skall inte vara i driftsläge om det önskade/inställda värdet är
högre än omgivningens fuktighetsnivå.
2. Om vattenbehållare används så är avfuktaren utrustad med
översvämningsskydd. När behållaren är full så tänds en röd lampa på
maskinens framsida. Töm tanken och sätt tillbaka den, så startar
avfuktaren och lampan skiftar från rött till blå.
3. När avfuktaren stannar så måste du vänta i minst 3 minuter innan du
återstartar avfuktareQ. Detta för att undvika kompressorskada.
3
2

Fuktighetsnivå samt inställning på kontrollpanelen:
NOTERA:
o
2. Om avfuktaren inte startar (driftslampan inte tänds) eller om avfuktaren
slutar att fungera av okänd anledning, vänligen kontrollera att kontakten
är i och att strömförsörjningen är som den ska. Om detta är i sin ordning,
vänligen vänta i 10 minuter och återstarta sedan avfuktaren. Om
avfuktaren ändå inte startar, vänligen kontakta din återförsäljare.
3. När avfuktaren är i drift så kommer kompressorn att avge värme, vilket
kommer att höja rummetstemperatur. Detta är normalt. Dessutom avges
ca 800W i värme per liter vatten som avfuktas
KONTROLLPANEL
SPOSITION NO.
UNGEFÄRLIG
FUKTIGHET
9 90﹪
7 70﹪
5 50﹪
3 30 ﹪
1 10 ﹪
ANVÄNDNING AV VATTENTANKEN
2. När tanken är full, så kommer indikatorlampan att lysa och maskinen
stängs av.
3. Sätt tillbaka den tomma vattentanken och ta bort proppen. Maskinen
1. Driftstemperaturen är mellan 5-35
5
4
4. Avfrostningslampan lyser för att indikera att avfrostningen har startat.
Fläkten börjar gå och kompressorn stängs av.
1. Ta bort proppen innan du startar maskinen (se fig. 01)
Sätt i proppen i avloppsslangen innan du tar ut vattentanken
och tömmer den (se fig. 02).
kan nu fortsätta arbeta.
C.

7
6
SLANGANSLUTNING
Nä r du vill anvä nda den hä r funktionen, ta bort gummiproppen
och koppla på avrinningsröret$QYlQGHQPPYDWWHQVODQJ.
FILTERINSTRUKTIONER
Vid normalt inomhusbruk bör filtret bytas en gång om året.
1) Ta försiktigt bort locket enligt bilden.
2) Dra ut filtret enligt bilden.
3) Sltt i det nya filtret enligt bilden.
4) Sltt tillbaka locket enligt bilden.
under tiden maskinen arbetar.
UNDERHÅLLSINSTRUKTIONER
2. Stick aldrig in vassa eller hårda föremål in I maskinen då
det kan skada den.
3. Koppla från maskinen från eluttaget när du stänger av
maskinen eller då du inte tänker använda maskinen under
en längre tid.
4. För att öka avfuktarens prestanda, placera maskinen i
ett öppet utrymme och se till att inget blockerar luften.
nU
.
1. Undvik att placera maskinen på mjuka eller ytor för oj mna
att inte orsaka oljud, vibrationer och el- och vattenläckage
ä
5. 9DUQRJDPHGDWWE\WDILOWUHWUHJHOEXQGHWPLQVWJnQJSHU

SPECIFIKATION
MODELL
SPECIFIKATION DS-40FS
Elnät 220-240V~50Hz
KAPACITET (30℃ & 80%RF) 40 liter/dygn
MÅTT(MM) (B)400x(D)310x(H)540
DRIFTSTEMPERATURER 5℃~35℃
TANKSTORLEK 8L
(CE) N 842/2006:
Köldmedia R410A is a kind of fluorinated greenhouse gases covered by
the Kyoto Protocol.
Its total global warming potential (GWP) is 1975
NETTOVIKT 21.2Kg
8
This marking indicates that this product should not be disposed with other
household wastes throughout the EU. To prevent possible harm to the
environment or human health from uncontrolled waste disposal, recycle
irresponsibly to promote the sustainable reuse of material resources. To
return your used device, please use the return and collection systems or
contact the retailer where the product was purchased. They can take this
product for environmental safe recycling.
7 00W
MAXEFFEKT (EN60335)
DS-40FS
DEHUMIDIFIER
USER MANUAL

SAFETY INFORMATION
1. Please read the operating instructions carefully before using your
dehumidifier for the first time and keep them in a safe place.
2. Never immerse the appliance in water or other liquids.
3. Never operate the appliance if a cable or connector has been
damaged, after appliance malfunction or if the appliance was
dropped or otherwise damaged.
4. Electric appliances may only be repaired by qualified personal,
improper repair work can be a source of considerable danger for
the users.
5. Children are not aware of the hazards of electric appliance.
Therefore, never allow children to manipulate electric appliance
unless properly supervised.
6. Disconnect the appliance from its main power whenever it is not in
use, before relocating it, and before cleaning,
7. Operate the appliance only at the voltage specified on the type
plate.
8. Use the appliance only in the household, and only for the purpose it
was designed for.
9. Do not place heavy objects on the appliance.
10. To prevent spillage, empty the water tank before relocating the
appliance.
11. Do not tip the appliance to any side as escaping water could
damage the appliance.
12. When the supply cord is damaged, it must be replaced by the
manufacturer, its service agent or similarly qualified persons in
order to avoid a hazard.
1
13. This appliance is not intended for use by persons (including
children) with reduced physical, sensory or mental capabilities, or
lack of experience and knowledge, unless they have been given
supervision or instruction concerning use of the appliance by a
person responsible for their safety. Children should be supervised
to ensure that they do not play with the appliance.
14. The devices should be installed at minimum distant of 50CM from
the wall or other obstacle.
15. Unplug the appliance before cleaning.
CAUTION!
BEFORE POWER ON
PLEASE OPEN THE AIR-OUTLET COVER COMPLETELY
2

OPERATING INSTRUCTIONS
1. Humidity control switch
2. Air outlet
3. Indicator lamp
4. Panel
5. Handle cover
6. Air filter
7. W ater tank
8. Wheel leg
3
CONTROL PLATE DESCRIPTION
OPERATION INSTRUCTION
Starting the unit
1. Firstly, turn the humidity control switch to the “OFF” position.
2. Plug in the dehumidifier.
3. Turn on the humidity control switch(to right side) and turn the same switch
to the reading of the desired humidity(60% in general as shown on
position”6”).
Turning off the unit
1. Turn the humidity control switch to the left side to the “OFF” position and
the power supply is cut off and the unit stops in operation.
2. If the dehumidifier is not in use for a long time, please disconnect the
power cord plug from the outlet.
PRECAUTIONS
1. The dehumidifier shall not operate if the humidity setting is higher than the
ambient humidity.
2. Drain the water in the water storage tank when the water in the tank is full
and the water level indicator lamp illuminates red. Reinsert the
empty water tank back to its position, so the unit can continue its operation
and the indicator lamp illuminates blue.
3. When the unit stops, you have to wait for 3 minutes before you can restart
the unit to protect the compressor from damage.
4

CONTROL SWITCH
POSITION NO.
APPROXIMATE
HUMIDITY SETTING
9 90﹪
7 70﹪
5 50﹪
3 30 ﹪
1 10 ﹪
PRECAUTIONS
1. The operational temperature range for this unit is 5-35 .℃
2. If the dehumidifier does not start (the operational light does not
illuminate) or the dehumidifier stop operating for unknown reasons,
please check the plug and power supply for poor connection. If the plug
and power supply are in normal condition, wait for 10 minutes and
restart the unit (NOTE: It takes about 10 minutes to reposition). If the unit
still does not start after 10 minutes, please contact your local distributor
service station for repair.
3. When the dehumidifier is in operation the running compressor will
produce heat, resulting in a higher room temperature. This is a normal
condition.
5
4.The humidify and its related position number on the humidity control switch:
this operation mode, the compressor will be switched off and the air motor
4. The defrost light indicates that the operation of defrost is starting. During
will be turned on.
6
USE OF WATER STORAGE TANK
1. Please unplug the stopper before starting the unit.( See Fig.01)
2. When the water tank is full, the water lever indication lamp will illuminate
and the unit will stop working. Please plug the drain hose stopper first
and then take out the water tank to empty the water.(See Fig.02)
3. Install the empty water tank back to its position and unplug the stopper.
Then the unit can continue its operation.

7
CONTINUOUS DRAINAGE
When you want to use this function, please take out the rubber
drain stopper and insert the discharge water pipe. Use a 10mm water hose.
INSTRUCTION OF THE FILTER
Under normal indoor usage, the filter should be changed once a year.
1) Take the top cover of filter carefully as the picture.
2) Take the filter out as the picture.
3) Change the new filter as the picture.
4) Put the top cover of filter back as the picture.
8
MAINTENANCE INSTRUCTION
1. The unit is not allowed to be placed on surface which is soft or not flat to
avoid the unit to cause noise, vibration, and water or electricity leakage
when operating.
2. Never insert any slim rod or hard things into the unit to avoid damaging the unit.
3. Please disconnect the power cord to the power supply when you turn off
the unit or intend to stop using it for a long time.
4. In order to improve the performance of dehumidifier, please keep the unit
in an open place and away from barriers that blocks the air.
5. Make sure to replace the filter regurarly, at least once a year. atst once a yea
℃

MODEL
SPECIFICATION DS-40FS
POWER SUPPLY 220-240V~50Hz
7 00W
MOISTURE REMOVAL (30℃ RH 80%) 40 litres/day
CABINET DIMEMSION(MM) (W)400x(D)310x(H)540
TEMP. RANGE FOR USE ℃ 5℃~35℃
WATER TANK CAPACITY 8L
NET WEIGHT 21.2Kg
9
(CE) N 842/2006:
R410A is a kind of fluorinated greenhouse gases covered by
the Kyoto Protocol.
Its total global warming potential (GWP) is 1975
This marking indicates that this product should not be disposed with other
household wastes throughout the EU. To prevent possible harm to the
environment or human health from uncontrolled waste disposal, recycle
irresponsibly to promote the sustainable reuse of material resources. To
return your used device, please use the return and collection systems or
contact the retailer where the product was purchased. They can take this
product for environmental safe recycling.
SPECIFICATIONS
RATED INPUT POWER (EN6 0335)
DS-40FS
DÉSHUMIDIFICATEUR D’AIR
MANUEL D’UTILISATION
Table of contents
Languages:
Other Wood’s Dehumidifier manuals

Wood’s
Wood’s MRD9 User manual

Wood’s
Wood’s DS12F User manual

Wood’s
Wood’s DSC95 User manual

Wood’s
Wood’s WCD2 Pro User manual

Wood’s
Wood’s LD48PRO+ User manual

Wood’s
Wood’s DSC95 User manual

Wood’s
Wood’s WLD1 User manual

Wood’s
Wood’s DSC-70ES User manual

Wood’s
Wood’s WCD8HG User manual

Wood’s
Wood’s MRD20 Silent User manual

Wood’s
Wood’s MDK21 User manual

Wood’s
Wood’s LD40PRO User manual

Wood’s
Wood’s MRD22 User manual

Wood’s
Wood’s DS12 User manual

Wood’s
Wood’s MDX14 User manual

Wood’s
Wood’s DSC-90ES User manual

Wood’s
Wood’s M10G User manual

Wood’s
Wood’s WPF100 User manual

Wood’s
Wood’s MRD25G User manual

Wood’s
Wood’s AD series User manual


