Winget 200T Instruction manual

WORKSHOP MANUAL
200T
MIXER
WINGET LIMITED
PO BOX 41
EDGEFOLD INDUSTRIAL ESTATE
PLODDER LANE
BOLTON
LANCS
BL4 OLR
Tel:- ++ 44 (0) 1204 854650
www.winget.co.uk
FROM 2011
SERIAL No 1333 ONWARDS
ISSUE 72018

WORKSHOP MANUAL
Winget Hand Fed Mixers
Models: 200T
From 2011
CONTENTS
Section 1 Introduction
Section 2 Repair and Service Procedures
Section 3 General Arrangement Dimensions
Section 4 Service Schedules
Section 5 Lubrication Diagram
Section 6 Wiring Diagrams
Section 7 Noise Levels
Section 8 Special Tools
Section 9 Parts Listings

WORKSHOP MANUAL
Winget Hand Fed Mixers
Models: 200T
From 2011
Introduction
It is assumed that Personnel involved in either the Assembly or repair of Winget Mixers
will be familiar with the product, either through the operation of, or previous repair and
maintenance work. It is not intended to be used by Personnel who are neither familiar
with the product or mechanically inexperienced.
It is also assumed that personnel are aware of the Health and Safety Regulations, which
should be applied to all working practices, but the following should act as a reminder.
Ensure all work tools are in good condition.
Always wear Safety Spectacles when using soft or hard faced hammers, chisels or
when using air tools. Wear safety spectacles or goggles when cleaning hardened
concrete or mortar off components.
Do not misuse Air Lines and be aware of the damage compressed air can cause if
misused.
Always make sure lifting equipment is in good condition and the Safe Working Loads
exceed the weights of the components to be lifted.
Oils, fuels, silicone sealer and open gear lubricants can cause skin diseases if allowed
to contaminate the skin. Always apply barrier creams, wear suitable protective clothing
or when contamination is unavoidable clean the area with soap and water as soon as
possible. Do not use thinners or other solvents to clean skin.
Health and Safety is a matter of common sense. If common sense is applied correctly
Health and Safety can be improved upon and the risk of accidents reduced.
L/H and R/H views are taken when standing directly behind and facing the engine
housing.
Whilst every effort is made to ensure the contents of this manual are accurate, Winget
Limited accept no responsibility for errors or omissions and reserve the right to alter
specification without prior notification and certain sections may then no longer apply.

WORKSHOP MANUAL
Winget Hand Fed Mixers
Models: 200T
From 2011
Repair & Maintenance Procedures
The following procedures are based in part on the procedures issued to Distributors and
the instructions should be used in conjunction with the appropriate Parts and Operators
Manual or Parts CD. Reference should also be made to the Parts Listings in Section 9
for a guide to the correct sequence for assembling components and sub assemblies.
1) Clean any paint or debris from bores and shaft surfaces. Threaded holes should
preferably be cleaned out using the correct sized tap
2) All sealed for life bearings should be packed with a good quality grease
prior to installation. Carefully remove a seal, pack the bearing with grease and
refit the seal ensuring it is correctly seated.

WORKSHOP MANUAL
Winget Hand Fed Mixers
Models: 200T
From 2011
Lifting Points
Lifting points capable of supporting the weight of the mixer are incorporated into the
trunnion below the drum.
This lifting points are highlighted with an ISO ‘Hook’ symbol adjacent to the point and to
use them it is necessary to rotate the drum and trunnion through 180o and to lock in
position using the locking plunger at the tiltwheel.
Solid Rubber Wheel Replacement.
The rubber or steel wheels are secured to the axle stub shafts using a flat washer and
split pin. To replace a wheel jack up and support the axle adjacent to the stub shaft,
bend back the split pin, close and remove, slide off the washer followed by the wheel.
Reverse the procedure to replace a wheel not forgetting to lubricate the stub shaft and
bore of the wheel with grease prior to assembly and to fit a new split pin.
Front Axle Removal.
Using suitable lifting equipment lift and support the mainframe.
The front axle is retained in the front leg of the mainframe via a spirol pin. Before
removing the axle it is advisable to reduce the weight by first removing the wheels and
drawbar as described above and below. Support the axle and using a suitable drift and
hammer knock the spirol pin through the axle pivot, remove the axle support and
manoeuvre the axle clear of the front leg. Reverse the procedure to refit not forgetting to
coat the axle pivot pin with anti-seize compound and fit new split pins to the wheels.
Lower the mainframe and allow to stand back on the wheels, remove the lifting
equipment.
Rear Axle.
The Rear axle is a welded component of the mainframe and cannot be removed.
Drawbar-Standard
The standard drawbar is attached to the front axle via two split pins and flat washers to
remove simply bend back the and close the split pins and remove. Slide off the flat
washers and lift the drawbar clear. Reverse the procedure to refit, not forgetting to fit
new split pins.

WORKSHOP MANUAL
Winget Hand Fed Mixers
Models: 200T
From 2011
Drum Removal
Attach suitable lifting equipment through the drum blades. Knock back the tabs on the
tabwasher securing the drum shaft setscrews below the trunnion. Remove the setscrews
and washers securing the shaft and flange. With the drum mouth upright
lift the drum assembly clear of the trunnion. It may be necessary to rock the trunnion via
the tiltwheel to free the drum shaft from the trunnion. Take care as the drum shaft may
suddenly release and come free allowing the drum to move without warning.
In exceptional circumstances it may be necessary to use a Two-Leg Puller/Pusher Tool
to assist in pushing the Drum Shaft through the Trunnion. When using such tools follow
the manufacturers instructions and take care as the drum shaft may suddenly release
allowing the drum to move without warning.
Replacement of Drum Shaft, Bevel Gear and Bearings
Remove the drum as described previously and turn upside down so that the assembly
stands on the open mouth of the drum. Before removing the bevel gear from the drum
base use suitably sized circlip pliers and remove the large circlip retaining the lower
shaft bearing into the gear.
Remove the setscrews securing the bevel gear and shaft assembly to the drum base,
use two of the setscrews as jacking as screws utilising the threaded holes in the bevel
gear and jack the assembly out of the base.
With the assistance of suitable lifting equipment lift the assembly onto a suitable
supporting surface and using a soft faced hammer or mallet knock the shaft back
through the bevel gear. Support the shaft in a suitable soft jawed vice and remove the
smaller circlip from the end of the shaft retaining the upper drum bearing, using a
suitable drift or puller remove both bearings from the shaft. Clean all the components.
Before fitting new bearings carefully remove the seals from the bearings and pack the
bearings with good quality grease, refit the seals, do not completely fill the bearings with
grease leave some room for expansion as the grease warms up in service.
Fit the new bearings to the shaft and retain the upper smaller bearing using a new
circlip. Clean out the drum centre shaft housing and smear a little anti-seize compound
round the circumference of the upper bearing seat within the housing.
Place the bevel gear on the drum base and loosely retain with the setscrews and
washers, apply threadlock to the screw threads before inserting, smear a little anti-seize
compound round the circumference of the lower bearing seat in the bevel gear.
Lower the shaft through the bevel gear and using a suitable mallet or soft faced hammer
knock the shaft fully home, fit the large retaining circlip and fully tighten the setscrews.

WORKSHOP MANUAL
Winget Hand Fed Mixers
Models: 200T
From 2011
Once the setscrews are tight it may be necessary to give the shaft end a sharp tap to
fully seat the bearings. Coat the teeth of the bevel gear with an open gear lubricant
Drum Cone Replacement.
Clean hardened concrete or mortar from around the drum clip and the bolts securing the
drum blades. Remove the bolts securing the blades to the drum cone and slacken the
bolts through the base. Due to the corrosive action of concrete and
mortar it may be necessary to cut through the old bolts using oxy-acetylene equipment.
Be aware that hot concrete can “explode” violently spitting concrete - wear suitable eye
protection and protective clothing.
Cut through the drum clip and remove. Lift off the drum cone using suitable lifting
equipment. If necessary clean out the drum base. Clean any old silicone sealer and
hardened concrete from around the drum flange.
Run a generous bead of silicone sealer around the flange of the drum base and inside
the new drum clip. Leave the last 150mm of each end of the clip free from sealer.
Using suitable lifting equipment lift the new drum cone in place lining up the holes in the
cone with those in the blades. Loosely refit in the bolts, nuts and washers. Fit the new
drum clip around the circumference of the two halves of the drum tapping in place over
the flanges using a soft faced hammer.
Attach the special drum clip tool placing the pins on the tool into the holes in each end of
the clip.
Using a suitable spanner tighten the drum clip to the drum until it is secure. Do not
overtighten the clip or the pins in each end of the tool will shear off. Slip the bridge
piece over the remaining gap in the drum clip and weld in place. Remove the tool. Fully
tighten the drum blades.
Run the mixer, tilting the drum via the tiltwheel making sure that the drum, clip or bridge
piece do not foul the mainframe or guards.
Stop the engine, clean any excess silicone off the drum or clip.
Drum Blade Replacement
It is unlikely that drum blades will require replacement separately to the drum cone.
However in the event that it should prove necessary, clean any hardened concrete or
mortar from around the bolts securing the blades. Remove the bolts and blades. Due to
the corrosive action of concrete and mortar it may be necessary to cut through the old
bolts using oxy-acetylene equipment. Be aware that hot concrete can “explode” violently
spitting concrete - wear suitable eye protection and protective clothing.

200T DRUM CLIP FIXING
AFTER COATING THE MATING FACES OF THE DRUM
BASE AND CONE WITH SILICONE SEALER FIT THE
CLIP AROUND THE DRUM AS SHOWN. RUN A BEAD
OF SEALER INSIDE THE DRUM CLIP PRIOR TO
FITMENT LEAVING APPROXIMATELY 6’’ (I50mm)
EACH END OF THE CLIP CLEAR OF SEALER. CLAMP
THE CLIP IN PLACE USING THE SPECIAL TOOL
NUMBER 513204000. FIT THE BRIDGE PIECE IN
PLACE OVER THE GAP LEFT IN THE CLIP AND WELD
IN PLACE

WORKSHOP MANUAL
Winget Hand Fed Mixers
Models: 200T
From 2011
Attach the new blades into the drum assembly finger tighten the bolts until all the bolts
are in place. Tighten the bolts.
The bolts should go into the drum from the outside and only round or dome headed bolts
should be used.
Bevel Gear Guard Replacement
Remove the drum assembly as previously described. Remove the four setscrews, nuts,
etc. holding the guard in place. Fit the new guard tighten the setscrews. Replace the
drum assembly as described in the following paragraph.
Refitting Drum Assembly
Using suitable lifting equipment lift the drum assembly, check the drum shaft is clean and
referring to the Drum Adjustment illustration coat the drum shaft (J) and trunnion with anti-
seize compound at (A). Coat the bevel gears with an open gear lubricant.
Turn the drum shaft so the threaded holes in the base of the shaft are at 90 degrees to
those in the trunnion base blocks.
Position the drum over the trunnion and lower into place making sure the bevel gear and
pinion are fully in mesh and the drum is fully seated down.
Apply anti-seize compound to the drum shaft setscrews and secure the flange to the
drum shaft not forgetting the tabwasher. Using the flange turn the drum shaft until the
remaining holes in the flange align with the holes in the base block.
Refer to the Drum Adjustment illustration and check the number of flat washers required
to fill the gap(G) between the flange and base block. Remove one washer from each
side. Apply anti-seize compound to the setscrews (H) and pass the setscrews through
the flange and flat washers, fully tighten the setscrews into the trunnion.
Check for free play between the drum bevel gear and bevel pinion (C) by gently
rocking the drum (approximately 3mm is acceptable). The backlash can be fine tuned
using a combination of the varying thickness of adjusting washers and shims. The
drum should rotate quietly, smoothly and with no vibration or undue noise. Remove the
lifting equipment.
Tilting Handwheel and Locking Plunger
The tilting wheel is secured to the tilting pinion via a steel pin and an M10 grubscrew.
With the drum in the vertical position knock out the steel pin, slacken the grubscrew and
remove the tilting wheel.
The locking plunger is held in place in the tilting wheel by a second smaller spiral pin.
Knock out this pin and remove the locking plunger and spring.
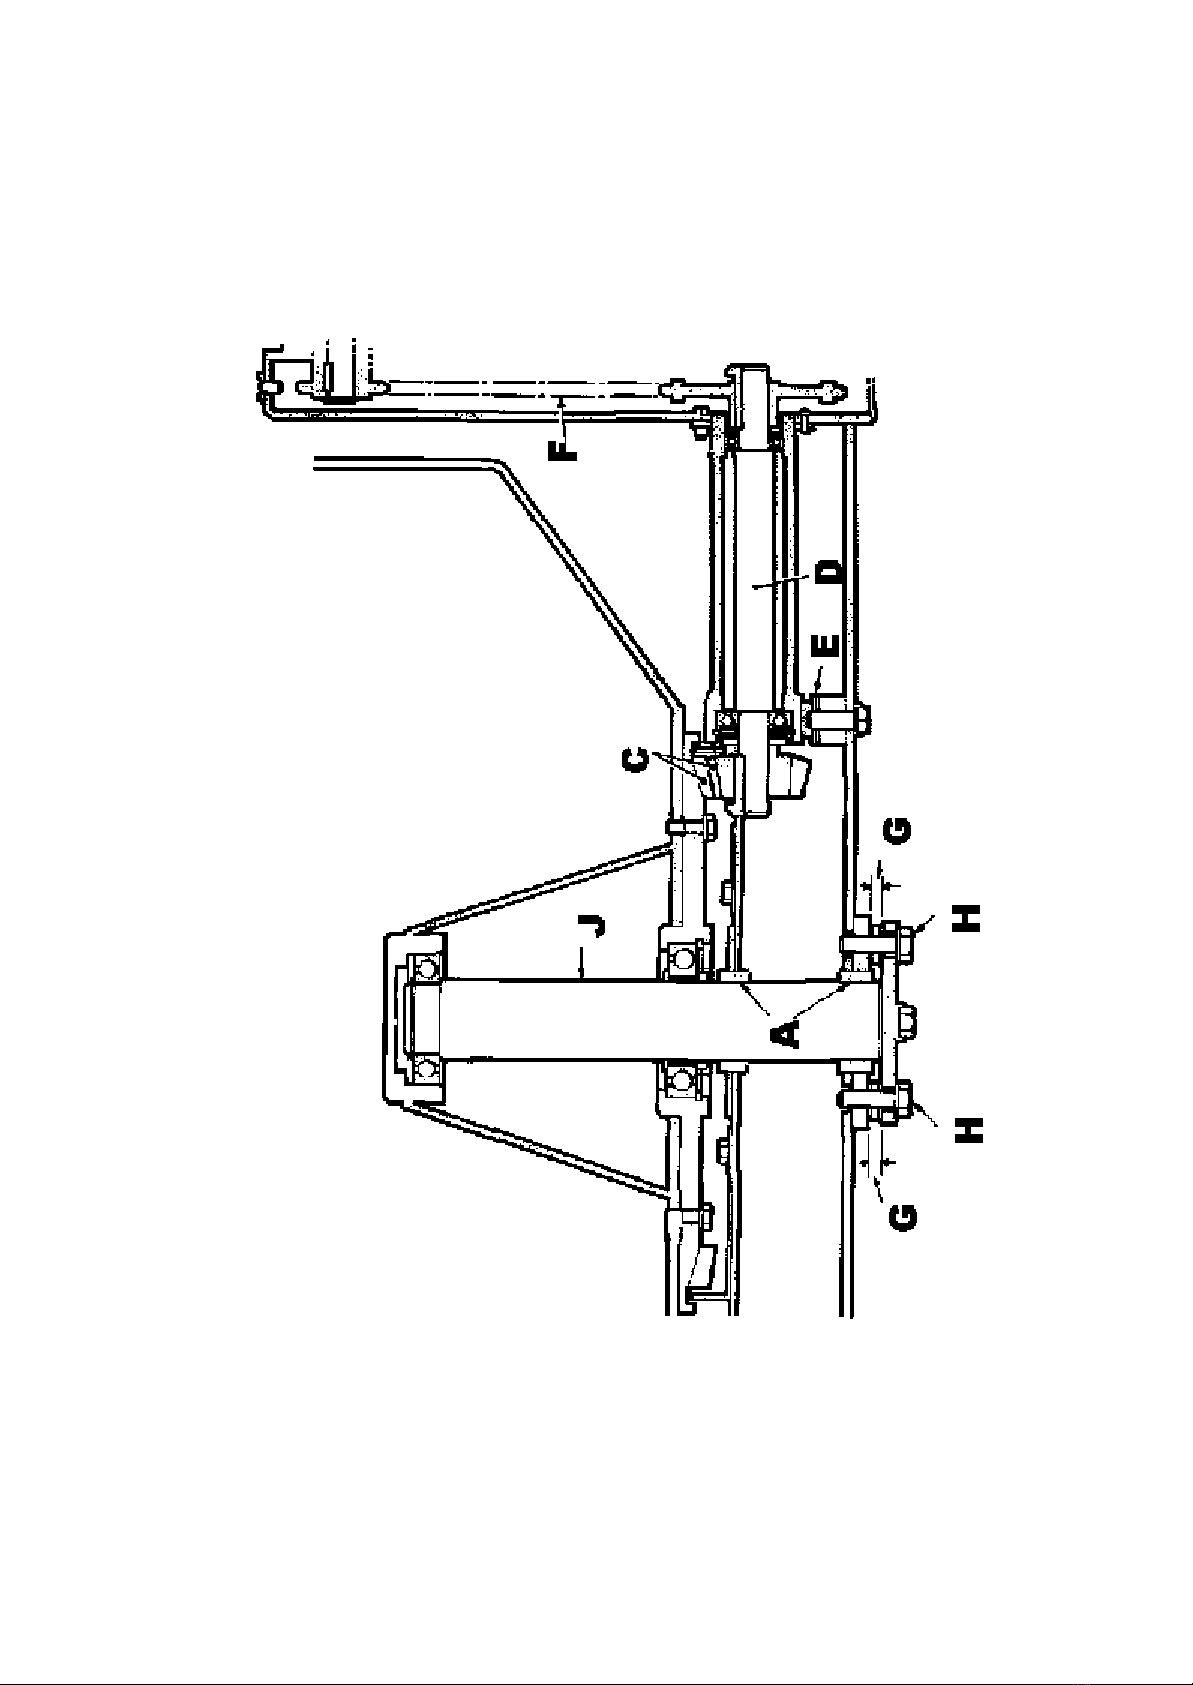
200T DRUM ADJUSTMENT
Other manuals for 200T
2
Table of contents
Other Winget Mixer manuals

Winget
Winget CUMFLOW RP100XD MK2 User manual

Winget
Winget CUMFLOW RP150XD MK2 User manual

Winget
Winget 100T Service manual

Winget
Winget Crocker RP1500XD User manual

Winget
Winget CUMFLOW RP50XD MK2 User manual

Winget
Winget Croker CUMFLOW RP100XD User manual

Winget
Winget 100T Instruction manual

Winget
Winget 500R Instruction manual

Winget
Winget 100T Service manual

Winget
Winget 100T Service manual