Voice It VT-300 User manual
Instruction Book
Voice It Personal Note Recorder
Model VT-300
2
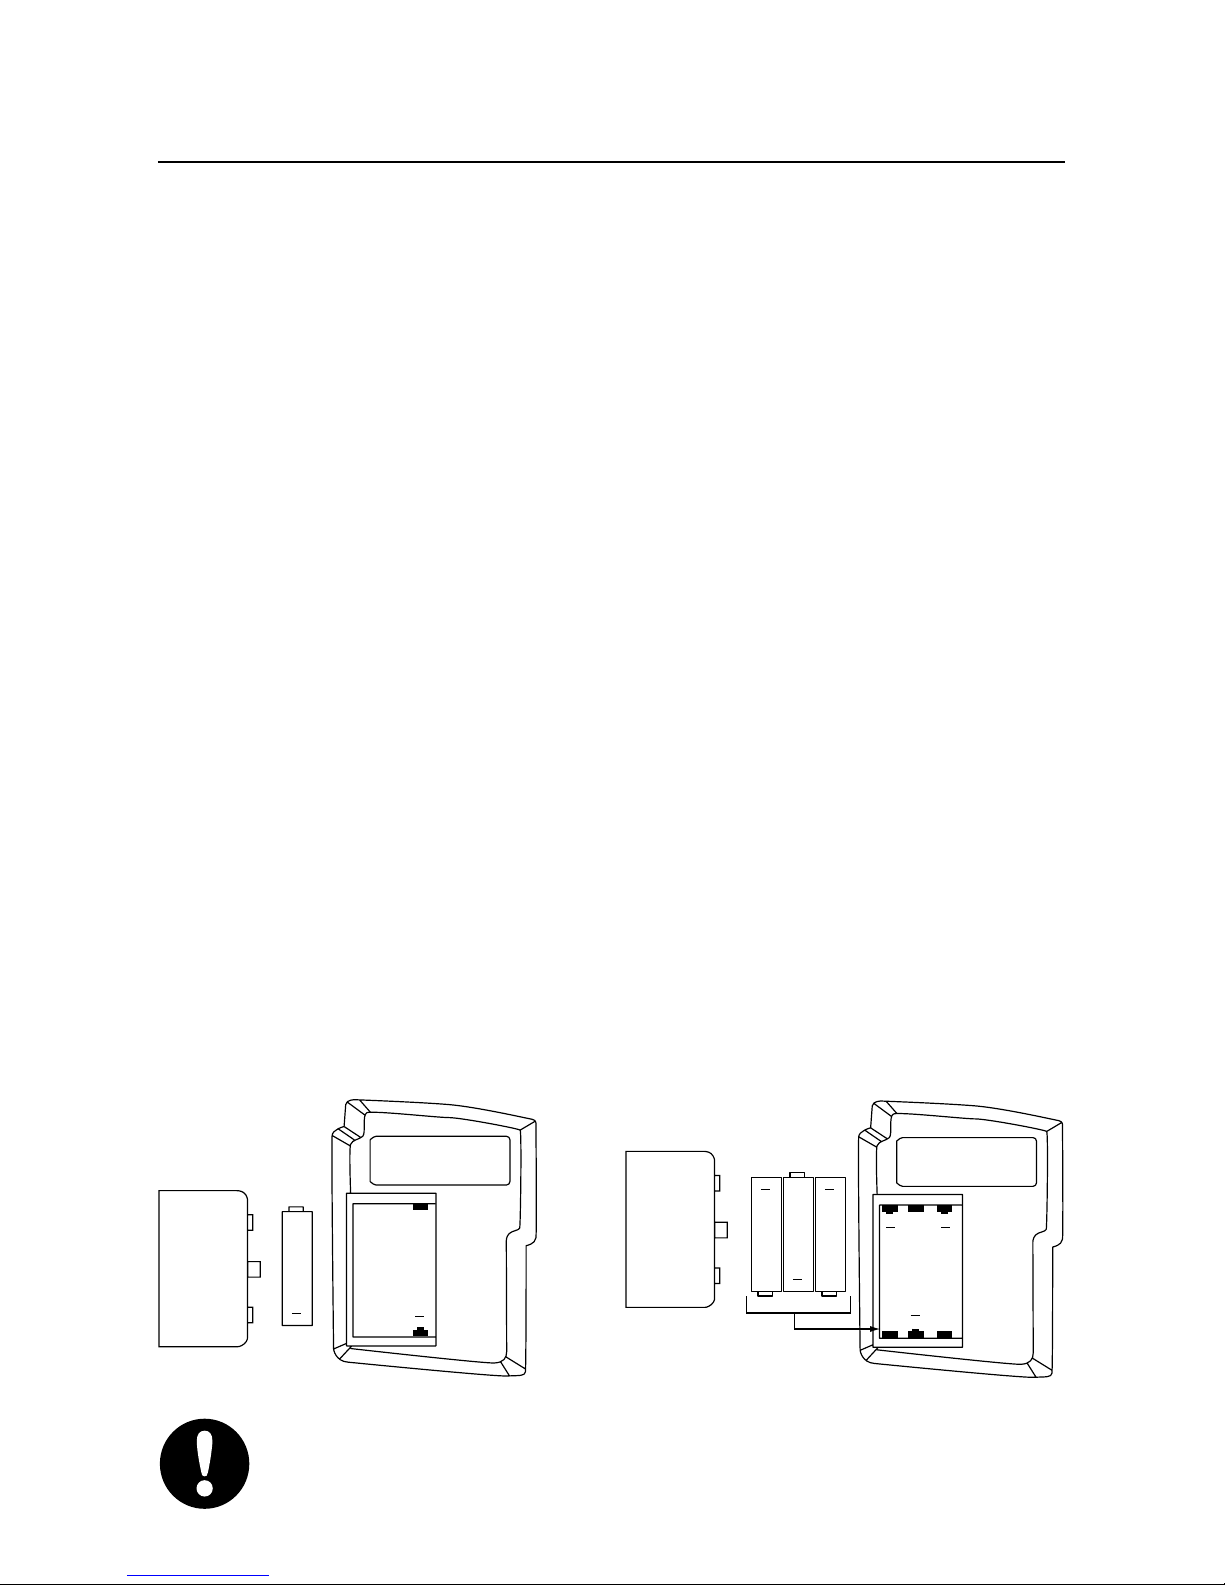
How to Load Batteries
1. Open the battery compartment on the back
of the unit by sliding the cover off. Your
VT-300 may require one AAA or three
AAAA batteries.
2. Install the battery (or batteries) with + and –
terminals oriented as shown in the figure
below. When installed properly the red and
green LEDs will flash and you will hear four
beeps. If you do not hear the four beeps you
will need to initialize the unit. To initialize
the unit press and hold the ERASE all
button for about 10 seconds until the red
and green LEDs flash simultaneously
followed by ten green flashes and beeps.
3. Replace the cover.
IMPORTANT: All messages will be erased when
you initialize the unit.
+
+
AAA
battery
compartment
cover
+
+
AAAA
+
AAAA
+
AAAA
+
+
battery
compartment
cover

3
Replacing Batteries
Batteries should last approximately three
months depending on usage. When battery
power drops below a certain level your unit will
not allow you to record or erase messages. It
will, however, allow you to play messages until
battery power is further depleted. A low battery
condition is further indicated by a short flash of
the red LED every few seconds. When this
signal occurs it is time to change the batteries.
If you cannot find AAAA batteries at retail you
may order them directly from VXI Corporation
by calling 1-800-47-VOICE (1-800-478-6423)
Note: Because this Voice It note recorder uses
flash memory, messages will remain in memory
even when batteries are removed from the unit.
Thus, you do not need to worry about losing
messages while you change batteries.
Note: Voice It note recorder uses a magnetic
speaker. Avoid placing the unit near the
magnetic strips on your credit and bank cards.

4
Selecting a Recording Speed
You may choose from three recording speeds
depending upon your needs. On speed one
(pre-set level) you will get about 3 minutes of
recording time. To increase recording time you
may choose speed two (2) (about 41/4minutes)
or speed three (3) (about 51/2minutes).
Note: you will lose audio quality when
changing from Speed 1 to Speed 2 or 3.
To change recording speed — Press and hold
the SPEED button until you hear one, two or
three beeps. One beep indicates speed one, two
beeps indicates speed two, three beeps indicates
speed three. Release the SPEED button after
you hear the number of beeps corresponding to
the speed you want.
To check recording speed — Press and release
the SPEED button. The number of beeps you
hear will indicate the speed at which the unit is
recording.

5
How to Record a Message
1. Press the RECORD button and release. A
red light indicates you are recording.
2. Hold the Voice It note recorder a few inches
from your mouth and speak.
3. Press RECORD again to stop recording.
The red light will turn off.
Tip 1: Recording too closely or too loudly
distorts the sound.
Tip 2: If the red light turns off while you’re
recording, the memory may be full or your
batteries may be depleted.
How to Play a Message
To play a message just recorded — Press play
and release.
To play messages from the beginning — Press
and hold the button until you hear two
beeps and the green LED flashes twice. Press
and release PLAY to hear messages one at a
time or press and hold PLAY for two seconds to
play all messages consecutively.

6
Using Channels
Your Voice It note recorder allows you to record
on one of four channels. One of the four
channels is the default channel. The unit is
preset at the factory to record on this channel
and after about three minutes of inactivity the
unit automatically switches to this channel.
The other three channels are accessed through
the CHAN button. You may record a name or
header for these channels such as “expenses” or
“things to do” and then store and play messages
under these headings.
To access a channel — Each time you press
and release the CHAN button you will page
through the channels. The default channel is
indicated by a low pitched beep, the three user-
named channels are indicated by the
appropriate number of quick, high pitched
beeps and a blinking green LED — one beep
and blink for channel one, two beeps and
blinks for channel two, etc.
To record a channel name — Press and
release the CHAN button until you hear the

7
number of beeps corresponding with the
channel you want to name. Then press and
hold the CHAN button until the red LED
comes on. While the red LED is on, speak your
channel name then release the CHAN button.
When you release the CHAN button the unit
will immediately play back the name you have
just recorded. If you want to change the name,
press and hold the CHAN button and record it
again.
To record a message on a channel — Press
and release the CHAN button until you hear
the name of the channel you want then use the
RECORD button as normal.
To play a message on a channel — Press and
release the CHAN button until you hear the
name of the channel you want, then use the
normal play procedure. The skip and
buttons will skip between messages in that
channel.
To erase a message on a channel — PLAY the
message you want to erase, then press and hold
Erase LAST until the red light blinks twice.

8
Tip 1: Erasing messages in a channel does not
erase the channel name.
Tip 2: If you wish to change a channel name,
simply record a new channel name by
following the procedure described above.
Tip 3: The green LED will blink to indicate
that the unit is in one of your user-named
channels. A single blink indicates channel one,
a double blink indicates channel two, a triple
blink indicates channel three. If the green LED
is not blinking it means the unit is in the
default channel. After three minutes of
inactivity, the unit automatically switches back
to the default channel.
How to Skip through Messages
Reverse: Press the button to more backward
through the queue of messages. Pressing once
skips backward one message.
Forward: Press the button to more forward
through the queue of messages. Pressing once
skips forward one message.

9
Tip 1: When using and to skip through
messages, a green light and high pitched beep
indicates progress, a red light and low pitched
beep indicates the end of the queue.
Tip 2: Pressing and while messages are
playing allows you to review messages quickly.
How to Erase Messages
To erase messages selectively — PLAY the
message you want to erase, then press and hold
Erase LAST and hold until the red light flashes
twice.
To erase all messages recorded — Press and
hold Erase ALL until the red light flashes
twice.
Using Special Features
Keypad Lock Feature: To prevent inadvertent
activation of the unit while in your pocket or
handbag you may lock the unit. Press and hold
the button for about five seconds or until
you hear five beeps accompanied by five blinks

10
of the red LED. To unlock the unit, press and
hold the button for five seconds or until you
hear a single beep accompanied by a single
blink of the green LED. The unit will be at the
first message in the default channel.
Turning Beeps On and Off: Your unit is pre-
set at the factory to emit a variety of beeps when
using various functions. If you do not wish to
hear these beeps you may turn them off by
pressing and holding the button for about
two seconds until the green LED flashes twice.
To turn beeps back on, repeat the procedure.
Two flashes of the green LED and two beeps
will indicate that the beeps are re-activated.
Troubleshooting
If your unit fails to respond as it should when
you press the buttons you should follow the
procedure outlined below to determine the
problem.
1. If none of the buttons will work check to
insure that the unit is not locked. The red
LED will flash once when any button is
Table of contents


