
Verkada AC62 User manual


Document
Document Details
Verkada Inc. 405 E 4th Ave, San Mateo, CA 94401
All specifications are subject to change without notice
Copyright © 2022 Verkada Inc. All rights reserved.
V1.1 (20221109)
(V1.0 first published 20220620)
Firmware
Firmware version can be verified on
Verkada Command command.verkada.com.
2
Levels of Access Control
●Attack Level/Grade: Level 1
●Endurance Level/Grade: Level 1
●Line Security Level/Grade: Level 1
●Standby Power Level/Grade: Level 1

Appendix
AC62 Compliance
FCC
Statement
This device complies with Part 15 of the FCC Rules. Operation is subject to the following two conditions:
(1) This device may not cause harmful interference, and (2) this device must accept any interference
received, including interference that may cause undesired operation.
This equipment has been tested and found to comply with the limits for a Class A digital device, pursuant to
part 15 of the FCC Rules. These limits are designed to provide reasonable protection against harmful
interference when the equipment is operated in a commercial environment. This equipment generates, uses,
and can radiate radio frequency energy and, if not installed and used in accordance with the instruction
manual, may cause harmful interference to radio communications. Operation of this equipment in a
residential area is likely to cause harmful interference in which case the user will be required to correct the
interference at his own expense.
FCC Caution: Any changes or modifications not expressly approved by the party responsible for compliance
could void the user's authority to operate this equipment.
IC
Statement
This device complies with ISED’s licence-exempt RSSs. Operation is subject to the following two conditions:
(1) This device may not cause harmful interference, and (2) this device must accept any interference
received, including interference that may cause undesired operation.
Le présent appareil est conforme aux CNR d’ ISED applicables aux appareils radio exempts de licence.
L’exploitation est autorisée aux deux conditions suivantes :
(1) le dispositif ne doit pas produire de brouillage préjudiciable, et (2) ce dispositif doit accepter tout
brouillage reçu, y compris un brouillage susceptible de provoquer un fonctionnement indésirable.
Note This equipment is for use in a restricted access area.
Verkada Inc. 405 E 4th Ave, San Mateo, CA 94401
All specifications are subject to change without notice
Copyright © 2022 Verkada Inc. All rights reserved.
3

Introduction
What’s in the box
Verkada Inc. 405 E 4th Ave, San Mateo, CA 94401
All specifications are subject to change without notice
Copyright © 2022 Verkada Inc. All rights reserved.
4
What you’ll need
●A working internet connection
●A smartphone or laptop
●A #2 Phillips head and power drill
●A level
Please note Two (2) person installation
recommended
Connect
Connect the AC62 to your network using the
Ethernet port located at the bottom of the
controller. Connect the AC62 power supply
into your power outlet.
Supports 110VAC to 240VAC (50-60Hz).
After connecting the AC62 to network and
power, visit: verkada.com/start
For detailed installation instructions, visit:
verkada.com/support
AC62 Door Controller Wall Mount GuideWall Mount
AC Cable 6x Plywood Screws
For materials other than plywood, ensure
proper load-bearing fasteners are used.
2x KeysScrewdriver
Introduction
Verkada Inc. 405 E 4th Ave, San Mateo, CA 94401
All specifications are subject to change without notice
Copyright © 2022 Verkada Inc. All rights reserved.
5
Lock
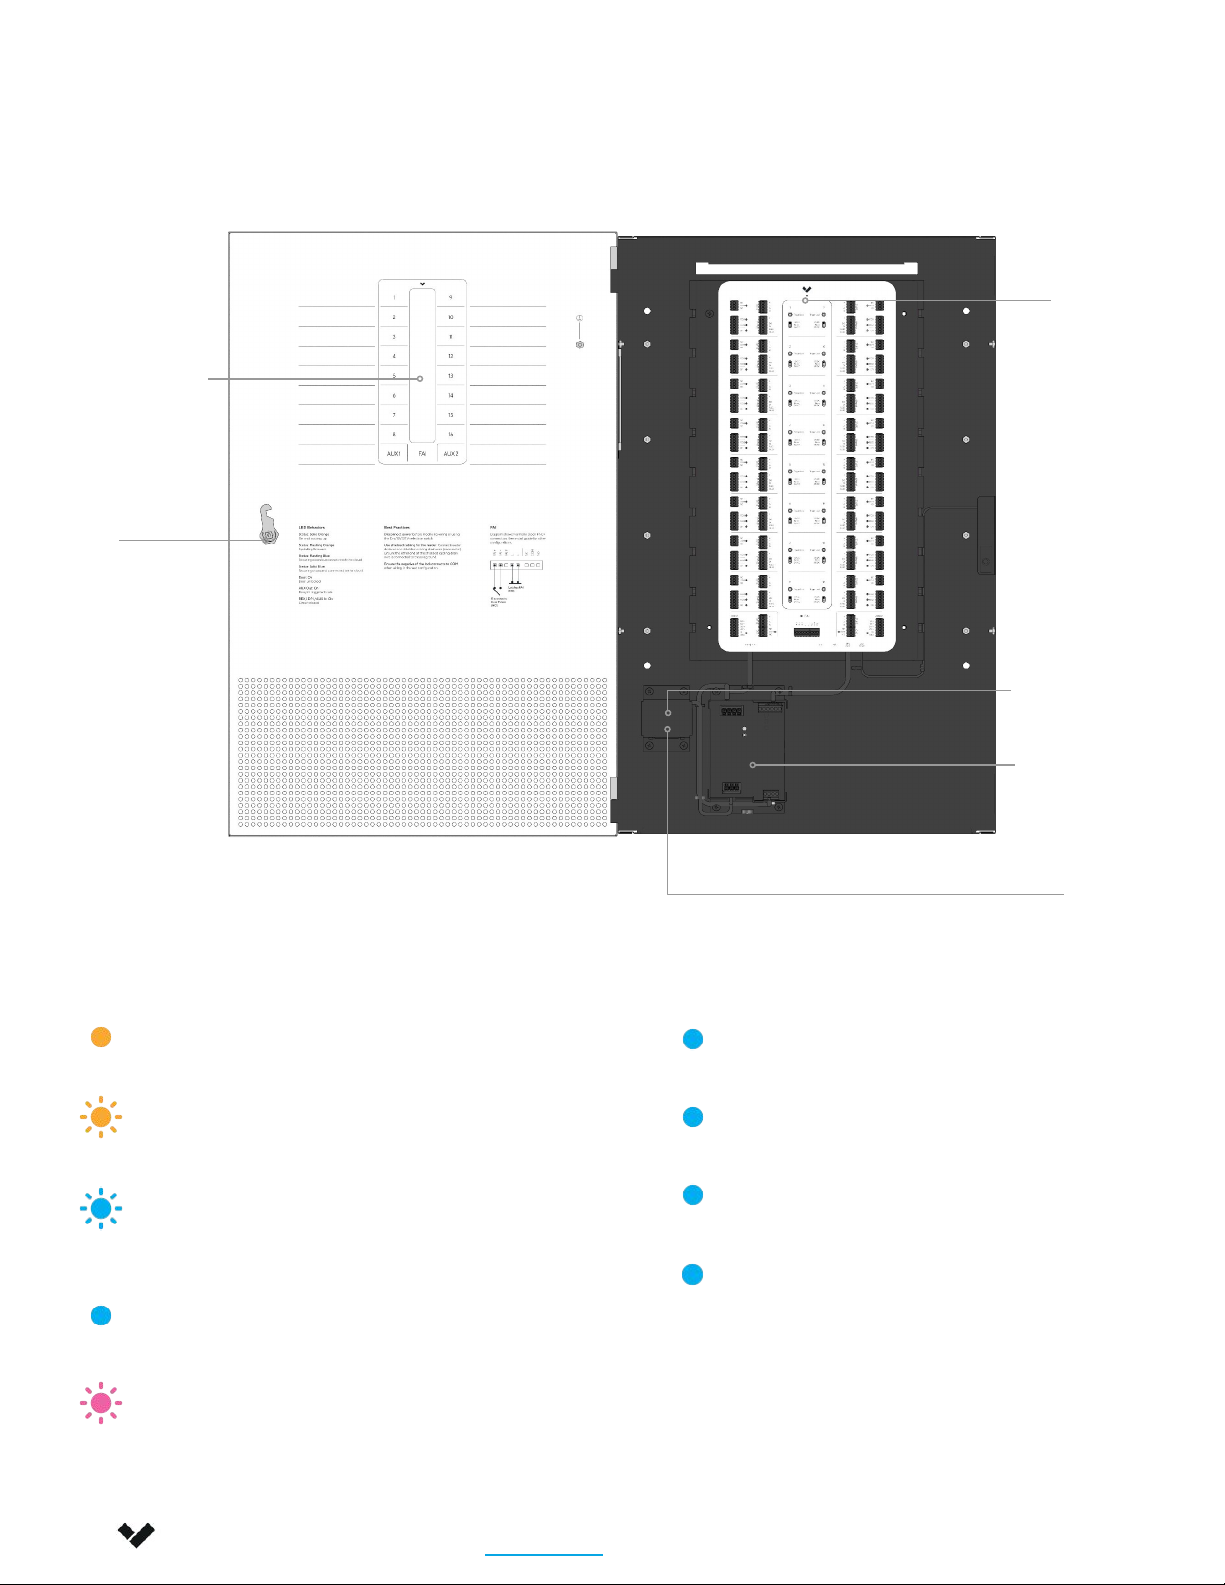
Status LED
Status LED Behavior
Solid Orange
Controller is on and booting up
Flashing Orange
Controller is updating firmware
Flashing Blue
Controller is managing doors,
but cannot reach the server
Solid Blue
Controller is managing doors
and connected to the server
Flashing Pink
Identify
Power supply
Controller
diagram
Other LED Behavior
Door: On
Door unlocked
AUX Out: On
Relay in triggered state
REX / DPI / AUX In: On
Circuit closed
FAI: On
FAI in triggered state
AC inlet
Overview 1/2
Serial Number QR
code

Introduction
Overview 2/2
Verkada Inc. 405 E 4th Ave, San Mateo, CA 94401
All specifications are subject to change without notice
Copyright © 2022 Verkada Inc. All rights reserved.
6
Controller highlights
1 Ports for: Doors 1 to 16. All door ports function the same.
2 Ports for: AUX, Fire Alarm Interface(FAI)
3 Ports for: AC, Ethernet, USB, UPS, Door Tamper
Status LED
AC Ethernet
1
2
3
USB USP Signal Door Tamper
Door 1 Ports
Same for all doors
AUX 1 Ports
FAI Port
AUX 2 Ports
1
2
3

Introduction
Recommended Testing
Verkada Inc. 405 E 4th Ave, San Mateo, CA 94401
All specifications are subject to change without notice
Copyright © 2022 Verkada Inc. All rights reserved.
7
To ensure ongoing functionality of AC62, it is recommended to check the following
interfaces every 6 months:
●Short each input to its adjacent GND port and verify that LED illuminates.
●Use multimeter to confirm expected impedance across relay outputs.
○Closed across NC and COM
○Open across NO and COM
●Use multimeter to verify correct voltage is supplied at 12V AUX outputs, 24V AUX outputs,
and reader power outputs.

Verkada Inc. 405 E 4th Ave, San Mateo, CA 94401
All specifications are subject to change without notice
Copyright © 2022 Verkada Inc. All rights reserved.
8
Introduction
AC62 Technical Specifications
Power
Consumption 350W maximum
AC Power Input 110-240VAC
50-60Hz
Inputs 2x REX dry inputs per door
1x DPI dry input per door
2x auxiliary dry inputs
Readers
1x reader port (Verkada/RS-485 or Wiegand) per door
2x auxiliary reader ports (Verkada/RS-485)
Reader current consumption must be < 250mA per reader
Note: max of 16 readers can be powered simultaneously
Relay Outputs
1x wet or dry relay per door
Wet relay switch-selectable power:
●12V operation 1A max
●24V operation 0.5A max
Dry relay max pass-through power:
●24VDC @ 2A (resistive load)
2x auxiliary dry relays
AUX Power 2x 12V @ 1A output
2x 24V @ 0.5A output
Dimensions 773mm (L) x 499mm (W) x 186mm (H)
30in(L) x 20in (W) x 7in (H)
Weight 20kg / 44lb
Operating
Temperature 0°C - 50°C 5 - 90%
Humidity
Compliance FCC Part 15 Class B, ICES-3 Class B, CE, UKCA, RCM, VCCI, UL
294, CAN/ULC 60839-11-1, UL 62368-1, CSA C22.2 No. 62368-1,
IEC 62368-1, NDAA
Connectivity Ethernet: 100/1000Mbps RJ-45 for network connection
USB 2.0
Included
Accessories Lock key and flat head screwdriver
Mounting Options Mounting plate and 6 screws (#12x1")

Installation
Unboxing
Pull the handle to lift and remove
AC62 from the box.
Please note Two (2) person installation
recommended
Verkada Inc. 405 E 4th Ave, San Mateo, CA 94401
All specifications are subject to change without notice
Copyright © 2022 Verkada Inc. All rights reserved.
9
Lay AC62 on a flat surface, open the
door and remove the cardboard.
Keep cardboard intact for next step.

Installation
Mounting 1/4
Verkada Inc. 405 E 4th Ave, San Mateo, CA 94401
All specifications are subject to change without notice
Copyright © 2022 Verkada Inc. All rights reserved.
10
Use cardboard mounting template from the previous
step to get a sense of the wall space AC62 will occupy.
Use mounting template to drill pilot holes for the mount
plate.
Use the supplied screws to install the mount plate
onto the wall. Ensure that the Verkada V is pointing
towards the floor.
The enclosure will extend down roughly 31” (~79cm),
from the top of the mount plate.
The size of the enclosure is:
31” x 20” (79 x 51 cm)
Please Note Leave at
minimum 2” clearance on the
left side of the enclosure in
order for the door to open
and close without hindrance.
Please Note The supplied screws are
intended for plywood installations.
For other wall materials, ensure proper
load-bearing fasteners are used.
Other manuals for AC62
1
Table of contents
Other Verkada Door Opening System manuals

Popular Door Opening System manuals by other brands




Normstahl
Normstahl IDO7 installation manual

Häfele
Häfele Finetta T 70 VF manual

AGS
AGS D-PL Instructions for fitting, operating and maintenance

Stanley
Stanley MA900ñ Installation and owner's manual

WITTUR
WITTUR Hydra Plus UD300 Instruction handbook

Alutech
Alutech TR-3019-230E-ICU Assembly and operation manual