VENOM VR3T Installation guide

1
Battery Box
ST. D/R
Th. Hold
TH. Trigger
TH. Trim
AUX Channel
Antenna
St. Trim
Navigation
Keys
NAVIGATION KEYS
Steering
Wheel
Thank you for purchasing the Venom VR3T 2.4 GHz
Transmitter. The VR3T 2.4 GHz Transmitter has all of
the great features of its FM predecessor including 3rd
Channel Mixing,16 Model Memory, and thumb switch
activated Programmable Steering Dual Rate, with the
stability and reliability of 2.4ghz technology. With the
freedom of 3rd Channel mixing, the VR3T 2.4 has
so many high-end features you won’t need to look
anywhere else for a 2.4ghz transmitter.
VEN-8181
NOTE: Make sure the polarity of the 8 AA Alkaline
batteries are correct when they are put into the
transmitter.
Power
Switch
1.0 STEERING TRIM
SETTING THE STEERING TRIM
Use the external trim button located above the Steering Wheel to make ne adjustments while driving your
model. During assembly of a new model or a repair use the Sub Trim feature; see section 2.3 TRIM (SUB
TRIM), to center the servo. Use the external trim button for small adjustments when operating a model.
SETTING THE THROTTLE TRIM
Use the external trim button located under the Steering Wheel to make ne adjustments while driving your
model. During assembly of a new model or a repair, use the Sub Trim feature; see section 2.3 TRIM (SUB
TRIM), to center the servo. Use the external trim button for small adjustments when operating a model.
In order for these settings to be programmed into the VR3T 2.4 the following steps must be followed.
1) All model components must be connected correctly. Starting with the receiver, servos, and power supply.
2) The steering and throttle trims on the VR3T 2.4 are set at neutral.
3) Always make sure to turn on the transmitter rst before turning on the receiver.
4) Make sure the transmitters antenna is installed for best input results.
2
2.0 MAIN SCREEN
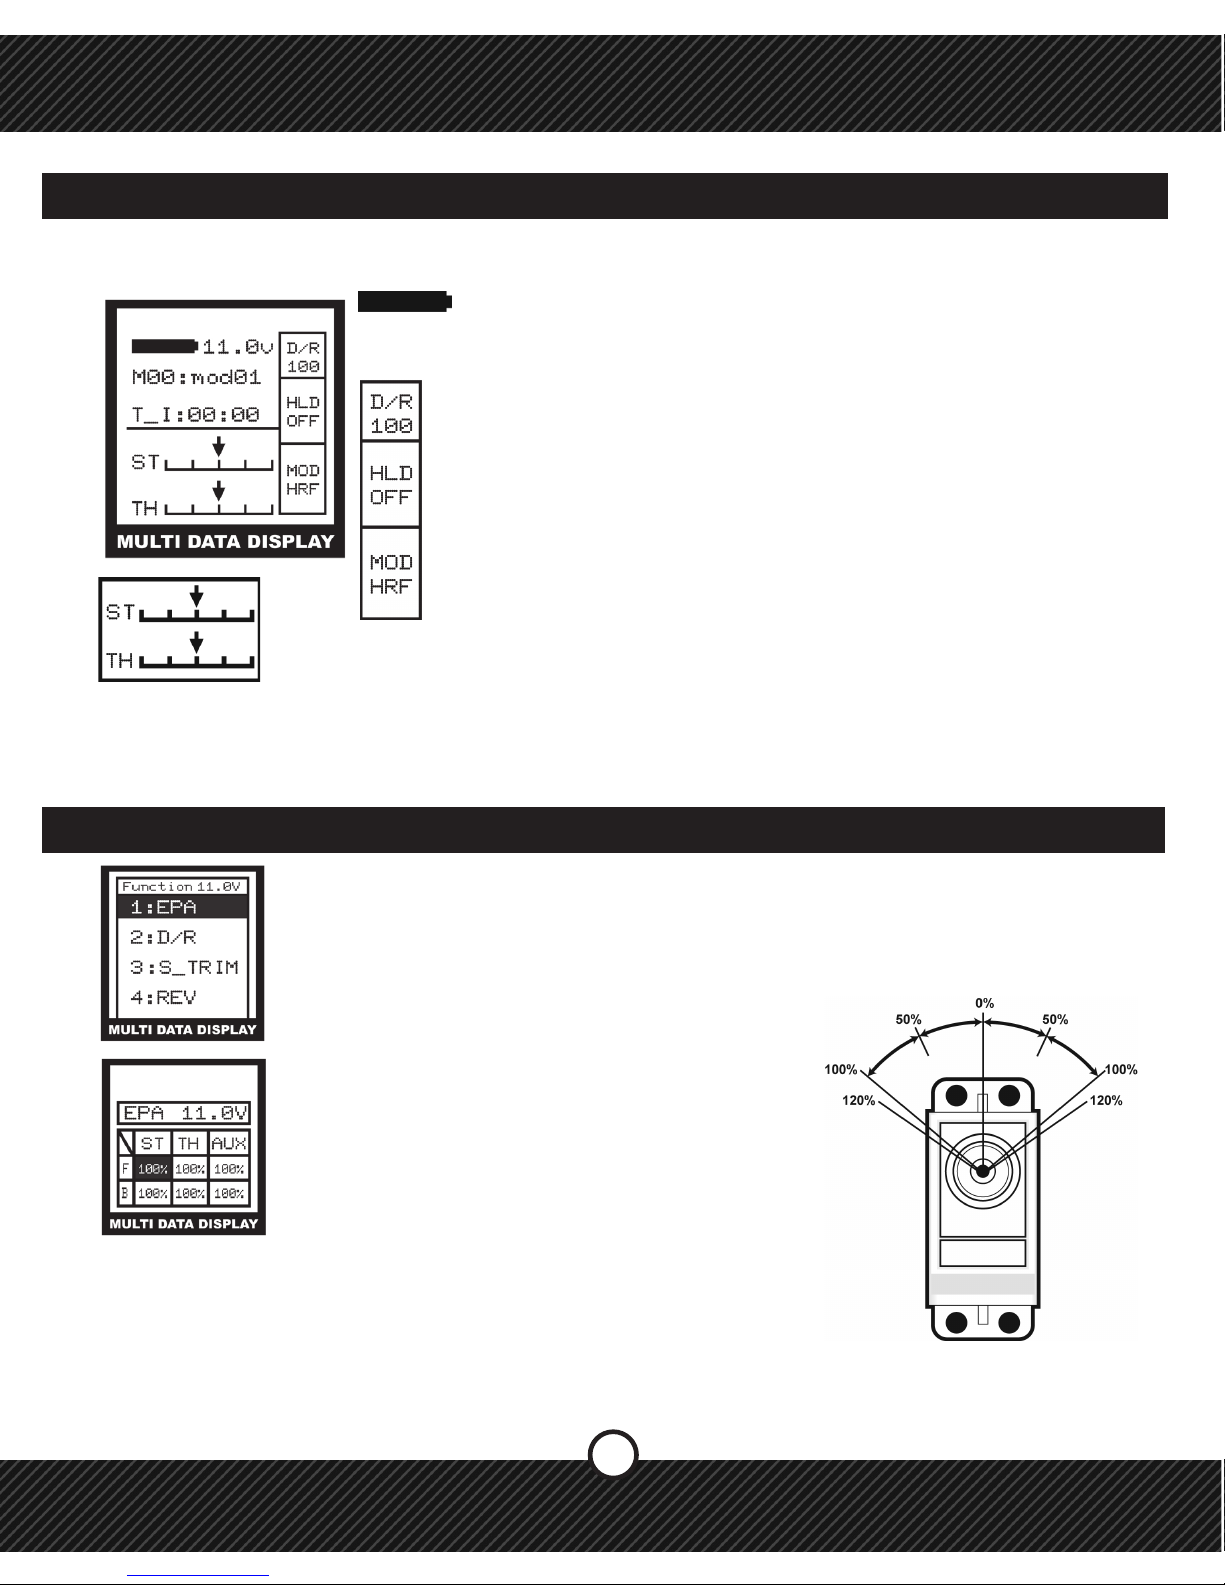
After the VR3T 2.4 has performed a system check when turned on the MAIN SCREEN will appear. This
screen displays important information about the battery voltage, settings and the model selected.
Represents a fully charged battery. This will start at 11.0 or higher depending
on the type of AA battery that is being used to power the transmitter (Alkaline/
Rechargeable NIMH). NOTE: When the battery has dropped below 8.4v an
alarm will sound.
The current position of the steering and throttle trims setting are displayed.
Displays the current Steering Dual Rate value (see 1.3 - ST D/R Steering Dual Rate)
Displays the TH HOLD status as ON or OFF
(See 2.4 SYSTEM/HOLD (TH. HOLD)
Displays the transmitting mode
(See 2.1 SYSTEM / MOD (MODULATION)
1) Press ENTER to see the FUNCTION MENU
2) Use the +/- KEYS to highlight EPA and press
ENTER.
3) Press ENTER to select a value.
4) Use the +/- KEYS to change the value.
5) Press EXIT to save and return to FUNCTION
MENU, press EXIT again to return to the
Main Screen.
NOTE: When using an electronic speed control
(ESC) set the Throttle EPA values to 120%. This
will allow the ESC to calibrate itself to the VR3T
2.4 and make the response and feel of the throttle
as smooth as possible.
End Point Adjustment (EPA) - Used to set the maximum travel of the desired function from
0-120%. Can be used to set both directions of travel (fwd/bk & lft/rt) to adjust the overall
range of movement or value. Can be used in conjunction with Dual Rate (see also Dual
Rate)
PROGRAMMING MODE
To enter programming mode from the Main Screen press the ENTER button on the transmitter. To save and
exit from the sub menu press EXIT.
2.1 FUNCTION / EPA (END POINT ADJUSTMENT)
SERVO
LEFT
BACK
RIGHT
FWD
TERMS: F-FORWARD, B-BACK, ST-STEERING, TH-THROTTLE, AUX-AUXILLIARY
3
1) Press ENTER to see the FUNCTION MENU.
2) Use the +/- KEYS to highlight D/R and press
ENTER.
3) Press ENTER to select a setting.
4) Use the +/- KEYS to change the value.
5) Press EXIT to save and return to FUNCTION
MENU, press EXIT again to return to the
Main Screen.
2.2 FUNCTION / ST D/R (STEERING DUAL RATE)
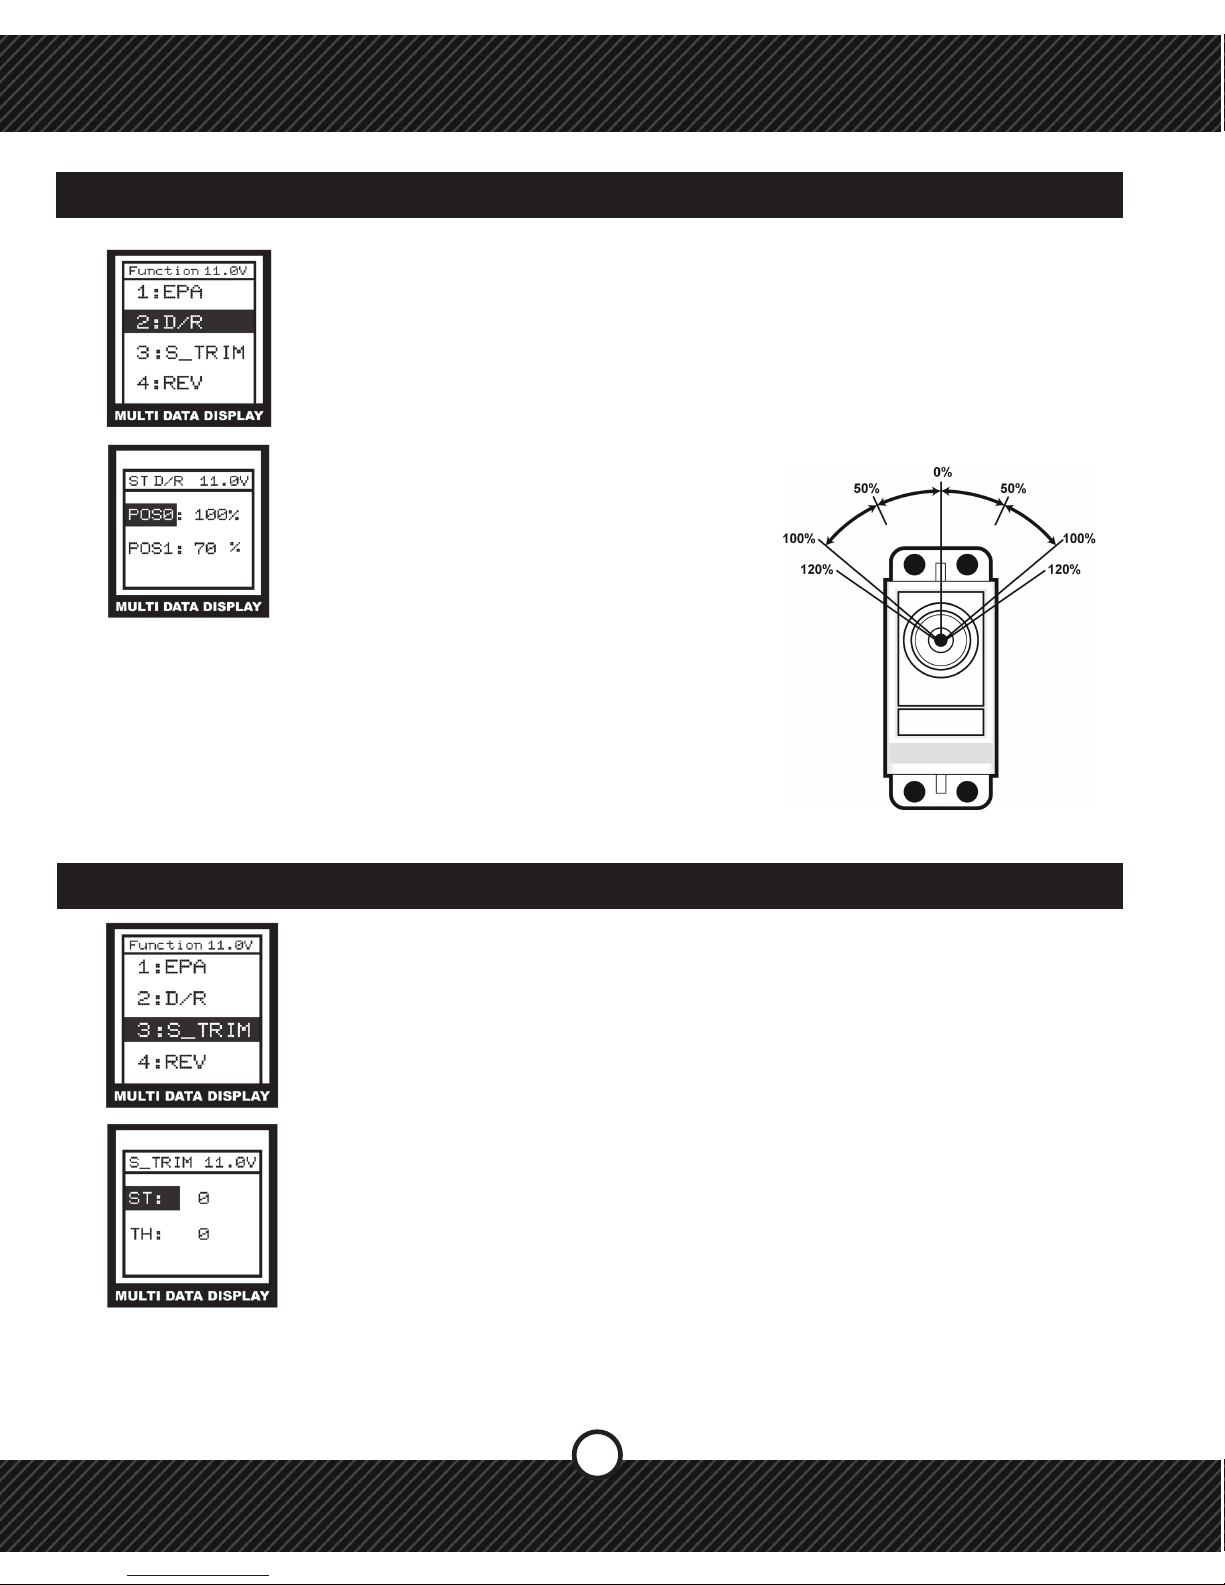
ST D/R - Steering Dual Rate (ST D/R) - Creates two overall steering travel presets. Set
the primary value POS0 to an equal or lesser percentage of the steering EPA. Set the
secondary value POS1 to a lower percentage than the primary value POS0. Use the
ST D/R button on the grip of the transmitter to select between the two preset values.
Example, if the EPA steering value is 100% then set POS0 to 100% (or less) and set
POS1 to 70%. When the ST D/R button is pressed the steering travel value changes
between 100% and 70% This allows you to change the amount of steering while
driving.
SERVO
LEFT
BACK
RIGHT
FWD
TERMS: POS- POSITION
2.3 FUNCTION / S_TRIM (SUB TRIM)
The SUB TRIM feature allows for a function to be adjusted in 1% increments from the
center of travel point which is 0%. Use this to make small adjustments and to center a
servo during assembly. While driving, using the external TRIM BUTTONS for Steering
(ST) and Throttle (TH).
1) Press ENTER to see the FUNCTION MENU.
2) Use the +/- KEYS to highlight S_TRIM and press ENTER.
3) Press ENTER to select a setting.
4) Use the +/- KEYS to change the value.
5) Press EXIT to save and return to FUNCTION MENU, press EXIT again to return
to the Main Screen.
TERMS: ST-STEERING, TH-THROTTLE.

4
2.5 FUNCTION / ST. CURV (STEERING CURVE)
STEERING CURVE (ST. CURVE) - The Steering curve is used to change the sensitivity
of the steering servo around neutral without affecting the maximum servo travel. This
feature is helpful for taming down vehicles with sensitive steering. For new vehicles start
at 0% until the driving characteristics are known.
TERMS: LINE-LINEAR, EXP-EXPONENTIAL, M-MODE, L-LOW, H-HIGH, R-RATE
1) Press ENTER to see the FUNCTION MENU.
2) Use the +/- KEYS to highlight ST CURV and press ENTER.
2) Use the +/- KEYS to change the setting.
5) Press EXIT to save and return to FUNCTION MENU, press EXIT again to return to the
Main Screen.
Note: Adjustment range is -100% ~+100%, default is 0%. For faster steering use the (+)
button, for slower steering use the (-) button.
2.4 FUNCTION / REV (REVERSE)
REV - REVERSE (REV) - This function is used to reverse the direction of movement or
action by a servo or speed control.
1) Press ENTER to see the FUNCTION MENU.
2) Use the +/- KEYS to highlight REV and press ENTER.
3) Press ENTER to select a setting.
4) Use the +/- KEYS to change the value.
5) Press EXIT to save and return to FUNCTION MENU, press EXIT again to return to the
Main Screen.
TERMS: F-FORWARD, B-BACK, ST-STEERING, TH-THROTTLE, AUX-AUXILLIARY

5
2.6 FUNCTION / TH. CURV (THROTTLE CURVE)
THROTTLE CURVE (TH. CURVE) - The Throttle Curve feature changes the response of
the throttle and the brakes. There are three different throttle curve types; EXP, VTR and
CUR. NOTE: The EXP is the only selection that creates an exponential curve for braking.
EXP Curve
This feature is a simple exponential curve. Using the EXP feature will help smooth your
throttle response for vehicles with a touchy throttle.
1) Select EXP for the throttle curve mode.
2) Select the “R” (rate) to set the throttle curve rate by pressing ENTER
3) Use the (+) to make the throttle rate more sensitive. Use the (-) to make the throttle
rate less sensitive.
Brake Adjustments
This adjustment is the same for all three Throttle Curve types.
1) Select the BR setting with the ENTER button.
2) Use the (+) button to make braking more aggressive. Use the (-) to make the
braking more mild.
3) Press the EXIT button to return to the FUNCTION menu, and again to return to the
main screen.
CUR Curve
This feature has three adjustable throttle rate points through the throttle range that can be
independently adjusted.
1) Select CUR for the throttle curve mode.
2) Select the “R” (rate) to set the throttle curve rate by pressing ENTER. This will
highlight the (1) – First point.
3) Use the +/- buttons to adjust the rst point.
4) Press enter to go to the (2) – 2nd point
5) Adjust the (2) point with the +/- buttons
6) Press enter and repeat for the (3) – 3rd point
7) Press enter and set the braking rate. Refer to the section on Brake Side
adjustments in the EXP Curve section.
VTR Curve
This Feature is enables the user to make throttle curve steeper (or milder) in a specic
range by allowing two different throttle curve rates by changing the curve switching point.
1) Change the Curve Switching Point (P) by using the +/- buttons.
2) Press ENTER to select the throttle rate. (R)
3) Use the (+) button to make the throttle response quicker. Use the (-) button to make
the throttle response milder.
4) Press EXIT to save and return to the FUNCTION menu. Press EXIT again to return
to the main menu.
1) Press ENTER to see the FUNCTION MENU.
2) Use the +/- KEYS to highlight TH. CURV and press ENTER.
3) Press ENTER to select a setting.
4) Use the +/- KEYS to change the value.
5) Press EXIT to save and return to FUNCTION MENU, press EXIT again to return to the
Main Screen

6
The ABS feature is just like a real car in that the brakes will pulse intermittently when
they are applied to reduce the chance of a skid or in the case of a 4 Wheel Drive vehicle,
it will reduce under steer. The return amount, pulse cycle, and brake duty can be adjust-
ed. The ABS effective region can be adjusted as a function of the steering mix.
1) Press ENTER to enter the FUNCTION menu
2) Use the +/- Keys to select the ABS function and press ENTER
4) Press enter to select WC value. Us the +/- to change the value. Range 0%~100%
5) Press enter to select CY value. Us the +/- to change the value. Range 0%~100%
6) Press enter to select DL value. Us the +/- to change the value. Range 0%~100%
7) Press enter to select SM value. Us the +/- to change the value. Range 0%~100%
If this value is 0%, disable the Steering Mix . (See Section 2.13)
8) Press enter to select DT value. Us the +/- to change the value. Range 0%~100%
9) Press enter to select MODE. Us the +/- to change INH, TH, AUX, TH & AUX
NOTE: In MODE, if the INH is selected, the ABS feature is disabled. If TH is selected,
braking only occurs on the Throttle brake. If AUX is selected, braking only occurs with
the AUX channel. If TH & AUX is selected, braking occurs with both the Throttle and
AUX channels.
Terms:
PT - Operation Trigger Point
WD – Brake Return Amount. Sets the rate the servo returns versus trigger operation for
brake release.
CY – Cycle Speed. The smaller the set value, the faster the pulse cycle.
DL – Delay Amount. Sets the delay from brake operation to ABS. When set to 0%, the
ABS function activates without delay.
SM – Steering Mix
DT – Cycle duty ratio. Sets the proportion of time that the brakes are being applied and
released by pulse operation.
Mode: Sets the channel(s) that the ABS feature will operate on.
2.7 FUNCTION / ABS (ANTI-LOCK BRAKE SYSTEM)
7
TERMS: F-FORWARD, B-BACK, ST-STEERING, TH-THROTTLE, AUX-AUXILLIARY
2.8 FUNCTION / MDL (MODEL)
2.9 FUNCTION / SPEED
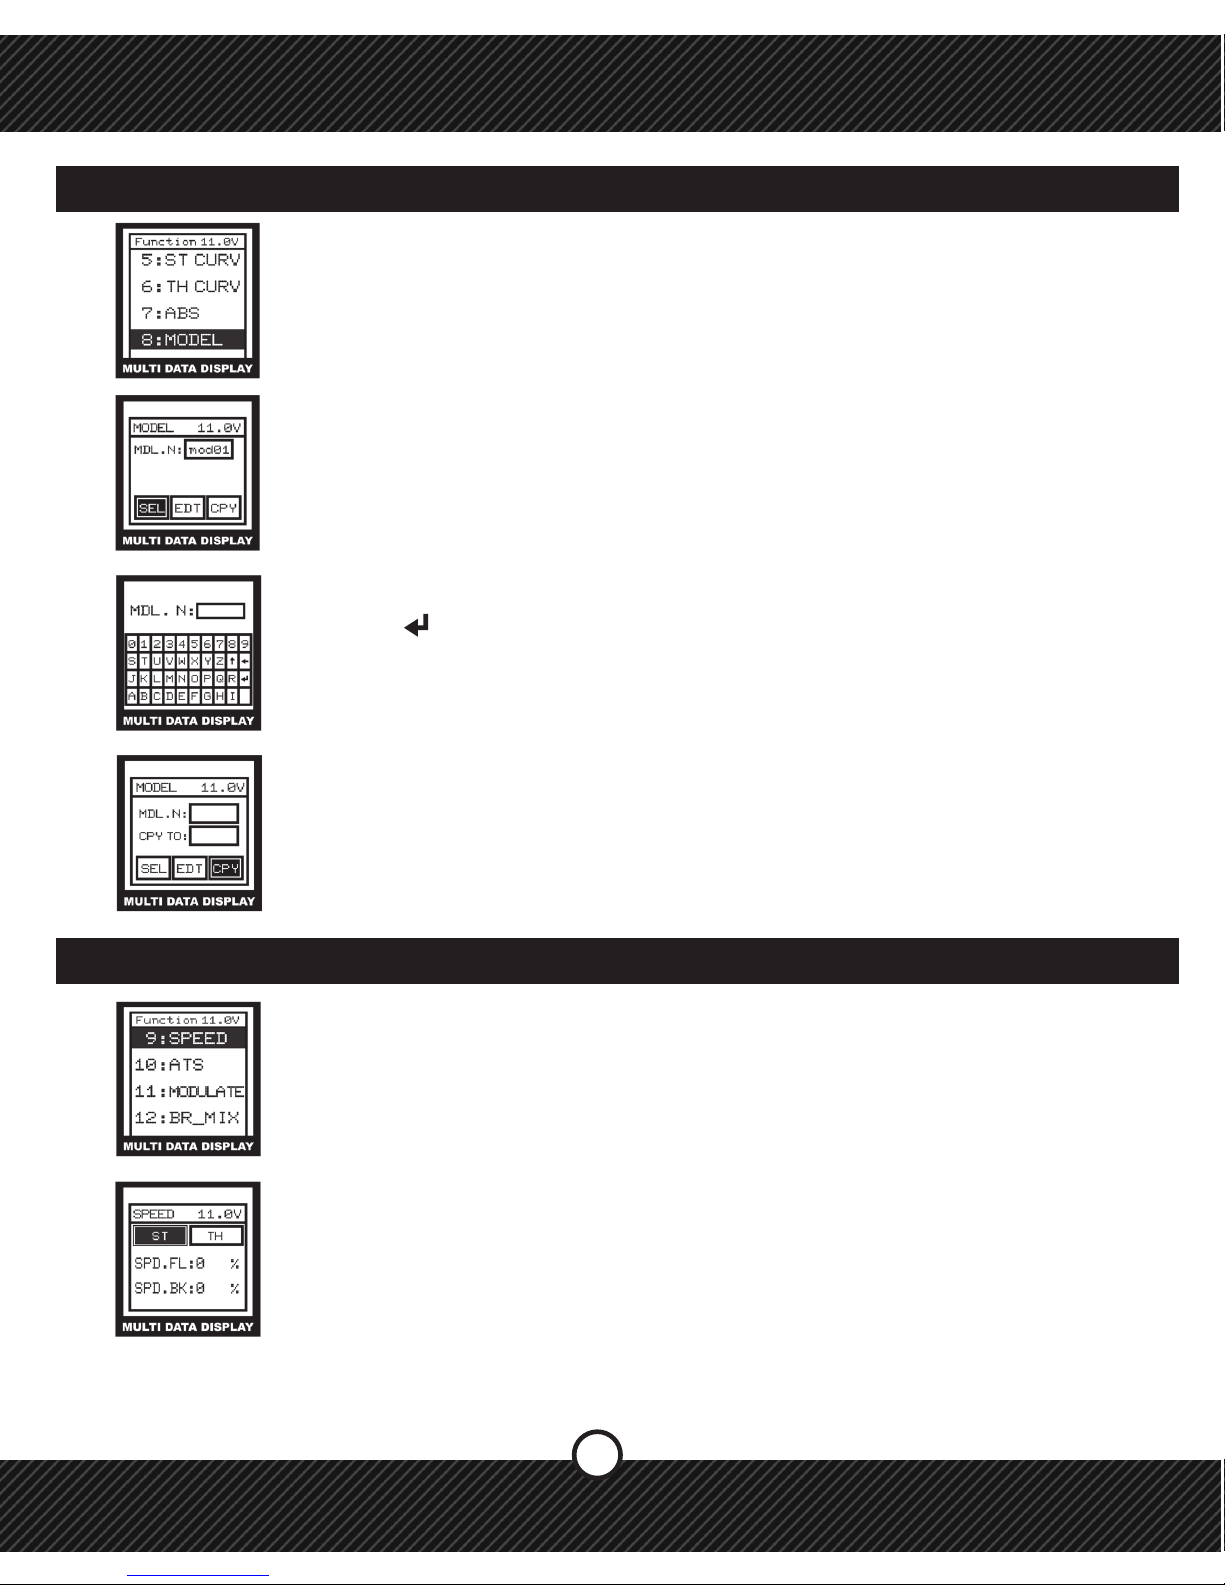
MDL - MODEL (MDL) - The Model Function used to choose one of the 16 model proles
available and create, edit and copy them as needed.
SEL - SELECT
1) Press ENTER to access the model memory.
2) Use the +/- KEYS to choose a model prole.
3) Press ENTER to save your selection.
4) Press EXIT to save and return to FUNCTION MENU, press EXIT again to return to
the Main Screen.
EDT - EDIT
1) Press ENTER to access the model prole.
2) Use the +/- KEYS to select the edit menu.
3) Use the +/- KEYS to type a new name for the prole.
3) Press to save your selection.
4) Press EXIT to save and return to FUNCTION MENU, press EXIT again to return to
the Main Screen.
CPY - COPY
1) Press ENTER to access the model prole.
2) Use the +/- KEYS to choose a model prole to copy onto another selected prole.
3) Press ENTER to save your selection.
4) Press EXIT to save and return to FUNCTION MENU, press EXIT again to return to
the Main Screen.
This function allows the speed of the Throttle Servo and Steering Servo to be set. In the
Steering Speed menu, the Turning Speed and the Return Speed can be set.
A. Steering Speed
1) Press ENTER to see the FUNCTION MENU.
2) Use the +/- Keys to select the ST function and press ENTER.
3) Press ENTER to select a setting.
4) Use the +/- Keys to change the value.
5) Press EXIT TWICE to save and return to the FUNCTION MENU, press EXIT again to
return to the main screen.
SEL - SELECT
EDT-EDIT
CPY - COPY
ST - STEERING SPEED

8
2.9 FUNCTION / SPEED (CONTINUED)
2.10 FUNCTION / ATS (AUTOMATIC START)
B. Throttle Speed
1) Use the +/- Keys to select the TH function.
2) Press enter to select SPD. FL item. (See denitions below)
3) Use the +/- Keys to change the value.
4) Press EXIT TWICE to save and return to the FUNCTION menu.
Terms:
SPD.FL – Speed Forward Delay. Range: 0%~100%, default: 0%
SPD. BK – Speed Backward Delay. Range: 0%~100%, default: 0%
If full throttle is applied when starting on a slippery track, the wheels may spin and the car
will not accelerate smoothly. When the ATS system is activated, moving the throttle trigger
slowly will cause the throttle servo to switch from the set throttle position to a preset
point so the tires do not lose their grip and the car accelerates smoothly. This feature is
only effective for the rst throttle trigger operation when starting. It has to be activated
before every start. When the throttle trigger is released even slightly, the Start Function is
automatically deactivated and returns to normal throttle trigger operation.
1) Press ENTER to see the FUNCTION MENU
2) Use the +/- Keys to select the ATS function and press ENTER
3) Press ENTER to select TRI item. Use +/- to change the value. Range -100%~+100%
4) Press ENTER to select POS item. Use +/- to change the value.
Range -100%~+100%
5) Press ENTER to select DLY item. Use +/- to change the value. Range -100%~+100%
6) Press ENTER to select MOD item. Use +/- to change INH or RDY.
7) Press EXIT TWICE to save and return to the FUNCTION menu.
Terms:
TRI – Throttle Trigger Position
POS – Preset Position
DLY – ATS Delay Time
MOD – ATS Ready Setting
TH-THROTTLE SPEED
TH-THROTTLE SPEED

9
2.11 FUNCTION / MODULATE
2.12 FUNCTION / BR_MIX (BRAKE MIX)
This is used to bind the VR3T to the 3 Ch 2.4ghz receiver.
NOTE: The Bind plug will be needed for this step.
1) Plug the Bind plug into channel 1 of the 3 Ch 2.4ghz receiver.
2) Turn on power to the 3 Ch 2.4ghz receiver.
3) Turn on the power on the VR3T transmitter.
4) Press ENTER to see the FUNCTION MENU.
5) Use the +/- Keys to select the MODULATE function and press ENTER.
6) Use the +/- Keys to select YES.
7) Press ENTER to bind the 3Ch 2.4ghz receiver to the VR3T Transmitter.
8) When it says SET OK, binding is complete.
9) Press EXIT to save and return to the FUNCTION menu.
This is used to mix a secondary braking system run off the AUX channel with the throttle
channel. When using the secondary braking system, set the BRAKE MIX value to a
percentage of the Throttle Brake. When using a secondary braking system, it will control
the rear brakes with the front brakes being controlled by the throttle brake. The TH TRIM
and TH EPA is then used to ne tune the power and balance of the overall braking
system.
1) Press ENTER to see the FUNCTION MENU
2) Use the +/- Keys to select the BK_MIX function.
3) Press enter to select a item.
4) Use the +/- Keys to change the value
5) Press EXIT TWICE to save and return to the FUNCTION menu.
Terms:
RATE – The rate of brake between the 3rd channel and the 2nd channel.
Range: 0%~120%, 0% default.
EN – Option to Enable the Brake Mix feature.
BIND SCREEN
BIND SCREEN

10
2.13 FUNCTION / MIX ( MIXING )
MIX - MIXING - used to mix between functions for greater control of the model.
1) Press ENTER to see the FUNCTION MENU.
2) Use the +/- KEYS to highlight MIX and press ENTER.
3) Press ENTER to select a setting.
4) Use the +/- KEYS to change the value.
5) Press EXIT to save and return to SYSTEM MENU, press EXIT to return to the
FUNCTION MENU, press EXIT again to Main Screen.
TERMS: EN-ENABLE, ST-STEERING, TH-THROTTLE, AUX-AUXILLIARY,
Throttle Hold allows the Throttle Servo to be set to a percentage of the total travel range.
This is an alternative to using the choke on a gas motor when starting up a model.
This function locks out the normal use of the Throttle until the TH. HOLD button on the
transmitter is pushed again. Make sure the value is only set high enough to idle the motor
during starting and warm up. NOTE: Setting the Throttle Hold value too high may
cause a run away vehicle.
2.14 FUNCTION / TH. HOLD ( THROTTLE HOLD )
1) Press ENTER to see the FUNCTION MENU.
2) Use the +/- KEYS to highlight TH HOLD and press ENTER.
3) Press ENTER to select a setting.
4) Use the +/- KEYS to change the value.
5) Press EXIT to save and return to SYSTEM MENU, press EXIT to return to the
FUNCTION MENU, press EXIT again to Main Screen.
To use this setting while running the model press
the TH. HOLD button located to the left side of
the throttle trigger once. Doing so will enable the
TH. HOLD and put the throttle at the set value. To
release the TH. HOLD press it once more giving
full function to the TH.TRIGGER.
SERVO
LOCATED ON THE RIGHT
SIDE OF THE TRANSMITTER
This manual suits for next models
1
Table of contents
Popular Transmitter manuals by other brands


Dejero
Dejero EnGo 3x manual

Rosemount
Rosemount 4600 Reference manual

Speaka Professional
Speaka Professional 2342740 operating instructions

trubomat
trubomat GAB 1000 instruction manual

Teledyne Analytical Instruments
Teledyne Analytical Instruments LXT-380 instructions

Rondish
Rondish UT-11 quick start guide