Vaughan Denmead WA0346 User manual

Care Instructions -
Read Before Installation
- This box contains fragile and valuable goods that
have been carefully packed. Please take utmost care
in unpacking the parcel as damage can occur in this
process.
- Please be sure you have received the correct
number of boxes i.e. 1 of 2, 2 of 2 etc.
- Under no circumstances should the product be
lifted out by the neck or light tting.
- If you have received any damaged goods or are
missing any part of your order, please contact our
sales oce as soon as possible
Recycling
-
Recyclable packaging used, please consult with
your local recycling centre for further information.
- Waste electrical products should not be disposed
of with conventional household waste. Please
recycle all parts when possible.
Cleaning Instructions
Brass - all types: Use a soft dry lint free cloth
Bronze, Nickel, Silver & Chrome: Use a dry cloth
only, no chemical cleaners
Glass: We recommend using a strong alcohol such as
isopropyl alcohol. Note: some modern cleaning
solutions can contain chemicals that can leave a
greasy lm on glass.
Gilt Wood: Use a dry cloth only
Ceramic: Use a damp cloth only
Wood: Wax polish i.e. Antique wax
Alabaster: Dust with a soft brush or a clean dry cloth.
Avoid water or water-based cleaners. Any marks that
cannot be removed by dusting must be cleaned by a
specialist.
Lacquered Furniture: Furniture polish
Crystal: Damp cloth
Card/Laminated Shades: Use a Feather duster only
Silk Shades: Gently tap to lift dust
Needlework: Dry-clean
-Any decorative parts made from other materials
must be removed and cleaned separately to avoid
damage - e.g. alabaster.
After choosing a suitable location that meets all the requirements of
the safety information install the unit following the steps overleaf.
- Carefully unpack all parts and check for damage or missing parts
before commencing installation.
- Installation of this product must be carried out by a qualied electrical
contractor.
- Shut o power at the fuse box or circuit breaker box.
- If necessary, remove old xture and all mounting hardware from the
junction box.
-Be sure to follow the steps in the order given.
- The supply wires must be rated for at least 90°C
-This product must be installed in accordance with all applicable
installation codes by a person familiar with the construction and operation of the product and the hazards
involved.
- Ensure that the support for the luminaire is of sucient structural strength and that any xing screws do not
interfere with the connecting cables.
- The light must be mounted on a non-ammable surface as a xed luminaire, and is not suitable for portable
use.
- The unit can get very hot during use. Ensure the unit has cooled before handling.
- Ensure adequate ventilation space is allowed between the unit and any object above, in front or to either
side of the unit. Suggested minimum space is 19½”above and 19½”on all sides.
- To prevent tarnishing, it is advisable to wear gloves at all times when handling the product.
Safety Information - Read Before Installation
VAUGHAN
Installation Guide
www.vaughandesigns.com
Denmead Lantern
WA0346

Hot = (Black)
Ground = (Green)
Neutral = (White)
LLEENN
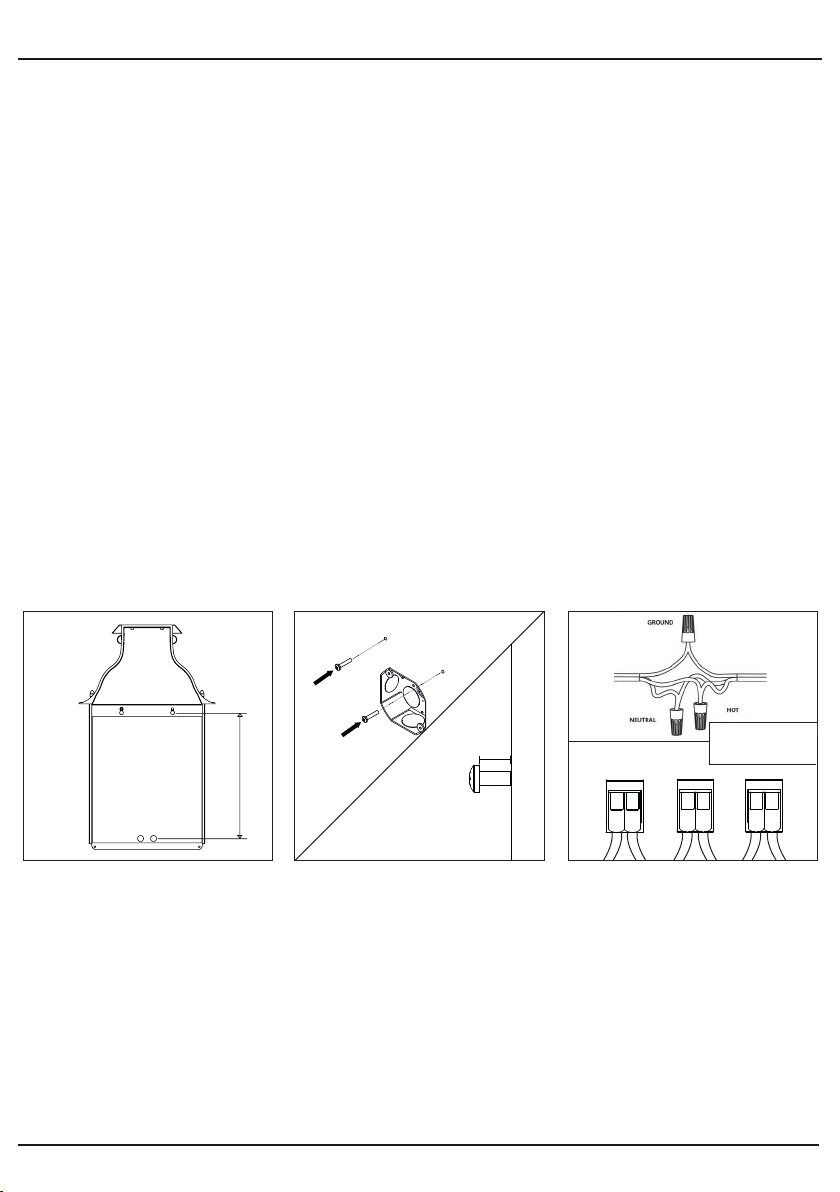
3. Having identied the house-
hold wiring, connect the building
supply and the product cables
together in the wire connectors as
shown above.
2. Measure and mark out the wall
xings prior to installation.
Position screw holes a suitable
location around the box. Screw
suitable xings to the two top
mounting locations.
8mm
1. Measure the distance between
the mounting key holes and the
product cable exit holes.
Measure
After choosing a suitable location that meets all the requirements of
the safety information install the unit following the steps overleaf.
- Carefully unpack all parts and check for damage or missing parts
before commencing installation.
- Installation of this product must be carried out by a qualied electrical
contractor.
- Shut o power at the fuse box or circuit breaker box.
- If necessary, remove old xture and all mounting hardware from the
junction box.
-Be sure to follow the steps in the order given.
- The supply wires must be rated for at least 90°C
-This product must be installed in accordance with all applicable
installation codes by a person familiar with the construction and operation of the product and the hazards
involved.
- Ensure that the support for the luminaire is of sucient structural strength and that any xing screws do not
interfere with the connecting cables.
- The light must be mounted on a non-ammable surface as a xed luminaire, and is not suitable for portable
use.
- The unit can get very hot during use. Ensure the unit has cooled before handling.
- Ensure adequate ventilation space is allowed between the unit and any object above, in front or to either
side of the unit. Suggested minimum space is 19½”above and 19½”on all sides.
- To prevent tarnishing, it is advisable to wear gloves at all times when handling the product.
Après avoir choisi un emplacement approprié qui répond à toutes les exigences des informations de sécurité,
installez l'appareil en suivant les étapes indiquées au verso.
- Déballez soigneusement toutes les pièces et vériez qu'elles ne sont pas endommagées ou manquantes
avant de commencer l'installation.
- L'installation de ce produit doit être eectuée par un électricien qualié.
- Coupez le courant au niveau de la boîte à fusibles ou du disjoncteur.
- Si nécessaire, retirez l'ancien appareil et toutes les pièces de montage de la boîte de jonction.
- Veillez à suivre les étapes dans l'ordre indiqué.
- Les ls d'alimentation doivent être prévus pour une température minimale de 90°C.
- Ce produit doit être installé conformément à tous les codes d'installation applicables par une personne qui
connaît bien la construction et le fonctionnement du produit, ainsi que les risques encourus.
- Assurez-vous que le support de la lampe est susamment solide et que les vis de xation n'interfèrent pas
avec les câbles de branchement.
- Le luminaire doit être monté sur une surface ininammable en tant que luminaire xe, et ne convient pas à
une utilisation portable.
- L'appareil peut devenir très chaud pendant son utilisation. Assurez-vous que l'appareil a refroidi avant de le
manipuler.
- Veillez à ce qu'un espace de ventilation susant soit prévu entre l'appareil et tout objet situé au-dessus,
devant ou de chaque côté de l'appareil. L'espace minimum suggéré est de 50cm au-dessus et de 50cm sur
tous les côtés.
- Pour éviter le ternissement, il est conseillé de porter des gants à tout moment lors de la manipulation du
produit.
Informations de sécurité - À lire avant l'installation
www.vaughandesigns.com
Denmead Lantern Denmead Lantern
WA0346

6. To access the inside of the
lantern. switch the product o
and allow to cool. Remove the
screws and nials from the hood
of the lantern. Lift the hood up to
gain access. Ensure the hood is
securely xed in place afterwards.
5. Secure the bottom of the
product to the wall using
mounting screws. Ensure the
product is secured to the wall.
4. Position the product onto the
wall by lining up the product's
location holes to that of the
mounting screws.
8. When the bulb has been
replaced, replace the gasket and
the glass cap ensuring the cap is
secured tightly.
NOTE: The cap must be tightly
secured, failure to secure the cap
will result in water ingress and risk
of electrical shock.
7. To replace the bulb, unscrew
the glass cap on the lamp holder
and remove the bulb.
www.vaughandesigns.com
Denmead Lantern
WA0346

1. Mesurez la distance entre les trous de la clé de
montage et les trous de sortie du câble du produit.
2. Mesurez et marquez les xations murales avant
l'installation. Placez les trous de vis à un endroit approprié
autour de la boîte. Vissez des xations appropriées aux
deux emplacements de montage supérieurs.
3. Après avoir identié le câblage domestique, connectez
les câbles d'alimentation du bâtiment et les câbles du
produit ensemble dans les connecteurs de ls comme
indiqué ci-dessus.
4. Positionnez le produit sur le mur en alignant les trous
d'emplacement du produit avec ceux des vis de
montage.
5. Fixez le bas du produit au mur à l'aide de vis de
montage. Assurez-vous que le produit est bien xé au
mur.
6. Pour accéder à l'intérieur de la lanterne. Éteignez le
produit et laissez-le refroidir. Retirez les vis et les détails de
l'embout du capot de la lanterne. Soulevez le capot pour
y accéder. Assurez-vous que le capot est bien xé en
place par la suite.
7. Pour remplacer l'ampoule, dévissez le bouchon en
verre du support de lampe et retirez l'ampoule.
8. Une fois l'ampoule remplacée, remettez le joint et le
bouchon en verre en vous assurant que le bouchon est
bien xé. REMARQUE : Le bouchon doit être fermement
xé. Si le bouchon n'est pas xé, il y aura une inltration
d'eau et un risque de décharge électrique.
Français
1. Mida la distancia entre los oricios de montaje y los de
salida del cable del producto.
2. Mida y marque las jaciones de la pared antes de la
instalación. Coloque los oricios de los tornillos en una
ubicación adecuada alrededor de la caja. Atornille las
jaciones adecuadas en los dos lugares de montaje
superiores.
3. Una vez identicado el cableado de la casa, conecte el
suministro del edicio y los cables del producto juntos en
los conectores de cables como se muestra arriba.
4. Alinee los oricios de ubicación del producto con los
de los tornillos de montaje para colocarlo en la pared.
5. Asegure la parte inferior del producto a la pared con
tornillos de montaje. Compruebe que el producto esté
asegurado a la pared.
6. Apague el producto y déjelo enfriar antes de acceder al
interior de la linterna. Retire los tornillos y los detalles de
los remates de la cubierta de la linterna. Levante la
cubierta para tener acceso y asegúrese de dejarla bien
jada en su lugar después.
7. Para reemplazar la bombilla, desenrosque la tapa de
vidrio del portalámparas y retire la bombilla.
8. Una vez reemplazada la bombilla, cambie la junta y la
tapa de vidrio y compruebe que la tapa esté bien
asegurada. NOTA: la tapa tiene que estar bien asegurada;
si no está bien jada, se producirá la entrada de agua y el
consiguiente riesgo de una descarga eléctrica.
Español
1. Messen Sie den Abstand zwischen den Befestigungsschlüs-
sellöchern und den Kabelausgangslöchern des Produkts.
2. Messen und markieren Sie die Wandmarkierungen vor der
Montage. Positionieren Sie die Schraublöcher an einem
geeigneten Ort rund um die Dose. Schrauben Sie geeignete
Befestigungen an die zwei oberen Befestigungsstellen.
3. Nach Identikation der Hausstromverkabelung verbinden Sie
die Gebäudeversorgung und die Produktkabel in den
Leitungsverbindern wie oben gezeigt.
4. Positionieren Sie das Produkt an der Wand, indem Sie die
Aufnahmebohrungen des Produkts mit denen der Befesti-
gungsschrauben ausrichten.
5. Befestigen Sie den Boden des Produkts mit Hilfe der
Befestigungsschrauben an der Wand. Stellen Sie sicher, dass
das Produkt an der Wand befestigt ist.
6. Um an das Innere der Laterne zu gelangen, schalten Sie das
Produkt aus und lassen Sie es abkühlen. Entfernen Sie die
Schrauben und Endkopfdetails von der Abdeckung der
Laterne. Heben Sie die Abdeckung hoch, um Zugang zu
erhalten. Stellen Sie hinterher sicher, dass die Abdeckung sicher
befestigt ist.
7. Um die Glühbirne zu wechseln, schrauben Sie die Glaskappe
auf dem Lampenhalter ab und entfernen die Glühbirne.
8. Wenn die Glühbirne gewechselt wurde, setzen Sie die
Dichtung und die Glaskappe wieder auf und stellen dabei
sicher, dass die Kappe fest sitzt. BEACHTEN SIE: Die Kappe muss
fest sitzen. Wenn die Kappe nicht fest sitzt, tritt Wasser ein und
es besteht das Risiko eines Elektroschocks.
Deutsche
1. Misurare la distanza tra i fori di montaggio e i buchi di uscita
per i cavi del prodotto.
2. Misurare e segnare i sostegni a parete prima dell'installazione.
Posizionare i fori per le viti a distanze adeguate intorno alla
scatola. Avvitare supporti adeguati alle due posizioni di
montaggio in cima.
3.Dopo aver individuato l'impianto elettrico domestico,
collegare l'alimentazione dell'edicio ai cavi del prodotto nei
connettori per cavi come mostrato sopra.
4. Posizionare il prodotto sulla parete allineando i fori di
posizione del prodotto a quelli delle viti di montaggio.
5. Fissare la parte inferiore del prodotto alla parete utilizzando le
viti di montaggio. Assicurarsi che il prodotto sia ssato alla
parete.
6. Per accedere all'interno della luce. Spegnere il prodotto per
permettere il rareddamento. Rimuovere le viti e gli elementi
decorativi dalla copertura della luce. Sollevare la copertura per
ottenere l'accesso. Al termine, assicurarsi che la copertura
venga ssata saldamente.
7. Per sostituire la lampadina, svitare la copertura di vetro sul
supporto della lampada e rimuovere la lampadina.
8. Una volta sostituita la lampadina, riposizionare la guarnizione
e la copertura di vetro assicurandosi che la copertura sia ssata
saldamente. NOTA: La copertura deve essere ssata saldamente,
onde evitare la penetrazione di liquidi e il conseguente rischio
di shock elettrico.
Italiano
Denmead Lantern
WA0346
WA0346_US_IG

Table of contents
Languages:
Other Vaughan Lantern manuals

Vaughan
Vaughan Powis User manual

Vaughan
Vaughan Valencay User manual

Vaughan
Vaughan CL0251 User manual

Vaughan
Vaughan Tufton User manual

Vaughan
Vaughan Bentworth CL0350 User manual

Vaughan
Vaughan Mottisfont CL0130 User manual

Vaughan
Vaughan CL0336 User manual

Vaughan
Vaughan Hawley User manual

Vaughan
Vaughan Tichfield User manual

Vaughan
Vaughan Ovington User manual