Unitech PT930SA Installation and operation manual

1
Product Reference Guide
Unitech PT930SA
Product Reference Guide
Unitech America UnitechAPAC Unitech Europe Unitech Greater China Unitech Japan
www.unitech-adc.com
P/N 400260 REV.A

2Unitech PT930SA
Chapter 1. Introduction ............................................................................. 4
Unitech PT930SA& Accessories........................................................................................6
Tour of the Unitech PT930SA..............................................................................................7
PT930SAFront and Left Side ............................................................................................7
PT930SABack ...................................................................................................................7
First Steps with the Unitech PT930SA ...............................................................................8
Installing the Battery Pack .................................................................................................8
Supplying Power to the PT930SA ......................................................................................9
Charging the Main and Backup Batteries for the First Time.................................................9
Using the Stylus ..............................................................................................................10
PCMCIAPullingTags ....................................................................................................... 10
Protective Screen Film .....................................................................................................10
First Operation of the Unitech PT930SA ........................................................................... 11
Pressing the ON/OFF Key ............................................................................................... 11
Adjusting Screen Contrast................................................................................................ 11
Calibrating the PT930SA .................................................................................................. 11
Setting Time Zone, Date, and Time ................................................................................... 11
Flash Memory ..................................................................................................................13
Chapter 2. Using the Keypad and Scanner............................................14
Keypad ............................................................................................................................14
Software Keyboard (Windows CE Keyboard) ....................................................................15
Opening the Windows CE Keyboard: ...............................................................................15
Keying-in Characters: .......................................................................................................15
International Character Support: .......................................................................................15
Moving the Keyboard:....................................................................................................... 15
Closing the Keyboard: ......................................................................................................15
Useful hotkeys .................................................................................................................15
Using the Laser Scanner ..................................................................................................16
Chapter 3. Power system...........................................................................17
Charging the Lithium-Ion Battery Pack .............................................................................17
Charging the Main and Backup Battery for the First Time ................................................. 17
Power Status Indication ...................................................................................................18
Checking Main and Backup Battery Status.......................................................................19
How to Save Battery Power.............................................................................................. 20

3
Product Reference Guide
Warm Boot / Cold Boot ....................................................................................................21
ChargingConsiderations ..................................................................................................22
Storage and Safety Precautions .......................................................................................22
Chapter 4. Communication.......................................................................23
Introduction ......................................................................................................................23
Connecting.......................................................................................................................23
ActiveSync.......................................................................................................................24
Installing MicrosoftActiveSync .........................................................................................24
Using the MobileDevices Window ....................................................................................28
Changing Communications Settings .................................................................................29
Synchronization ...............................................................................................................30
WhatGets Synchronized .................................................................................................31
Changing Synchronization Options...................................................................................32
InstallingandRemoving Software......................................................................................32
InBox ...............................................................................................................................33
Sending and Receiving E-Mail with InBox .........................................................................33
Sending Mail Remotely ....................................................................................................33
Setting Up Remote Mail ...................................................................................................34
Work Remotely ................................................................................................................34
ReceivingMessages ........................................................................................................35
Sending Messages .........................................................................................................36
RF Communication ..........................................................................................................37
Installing theWireless LocalAreaNetwork (WLAN) Card .................................................37
RF Card Cushion..............................................................................................................37
Setting Up the Wireless Card...........................................................................................37
Chapter 5. Useful Application Program ...................................................41
Bar2Key...........................................................................................................................41
BarSetup..........................................................................................................................41
AppendixA ......................................................................................................................43
Appendix B ......................................................................................................................47
Update OS via Compact Flash (ATAcard) .........................................................................47
Appendix C ......................................................................................................................49
4Unitech PT930SA
Chapter 1. Introduction
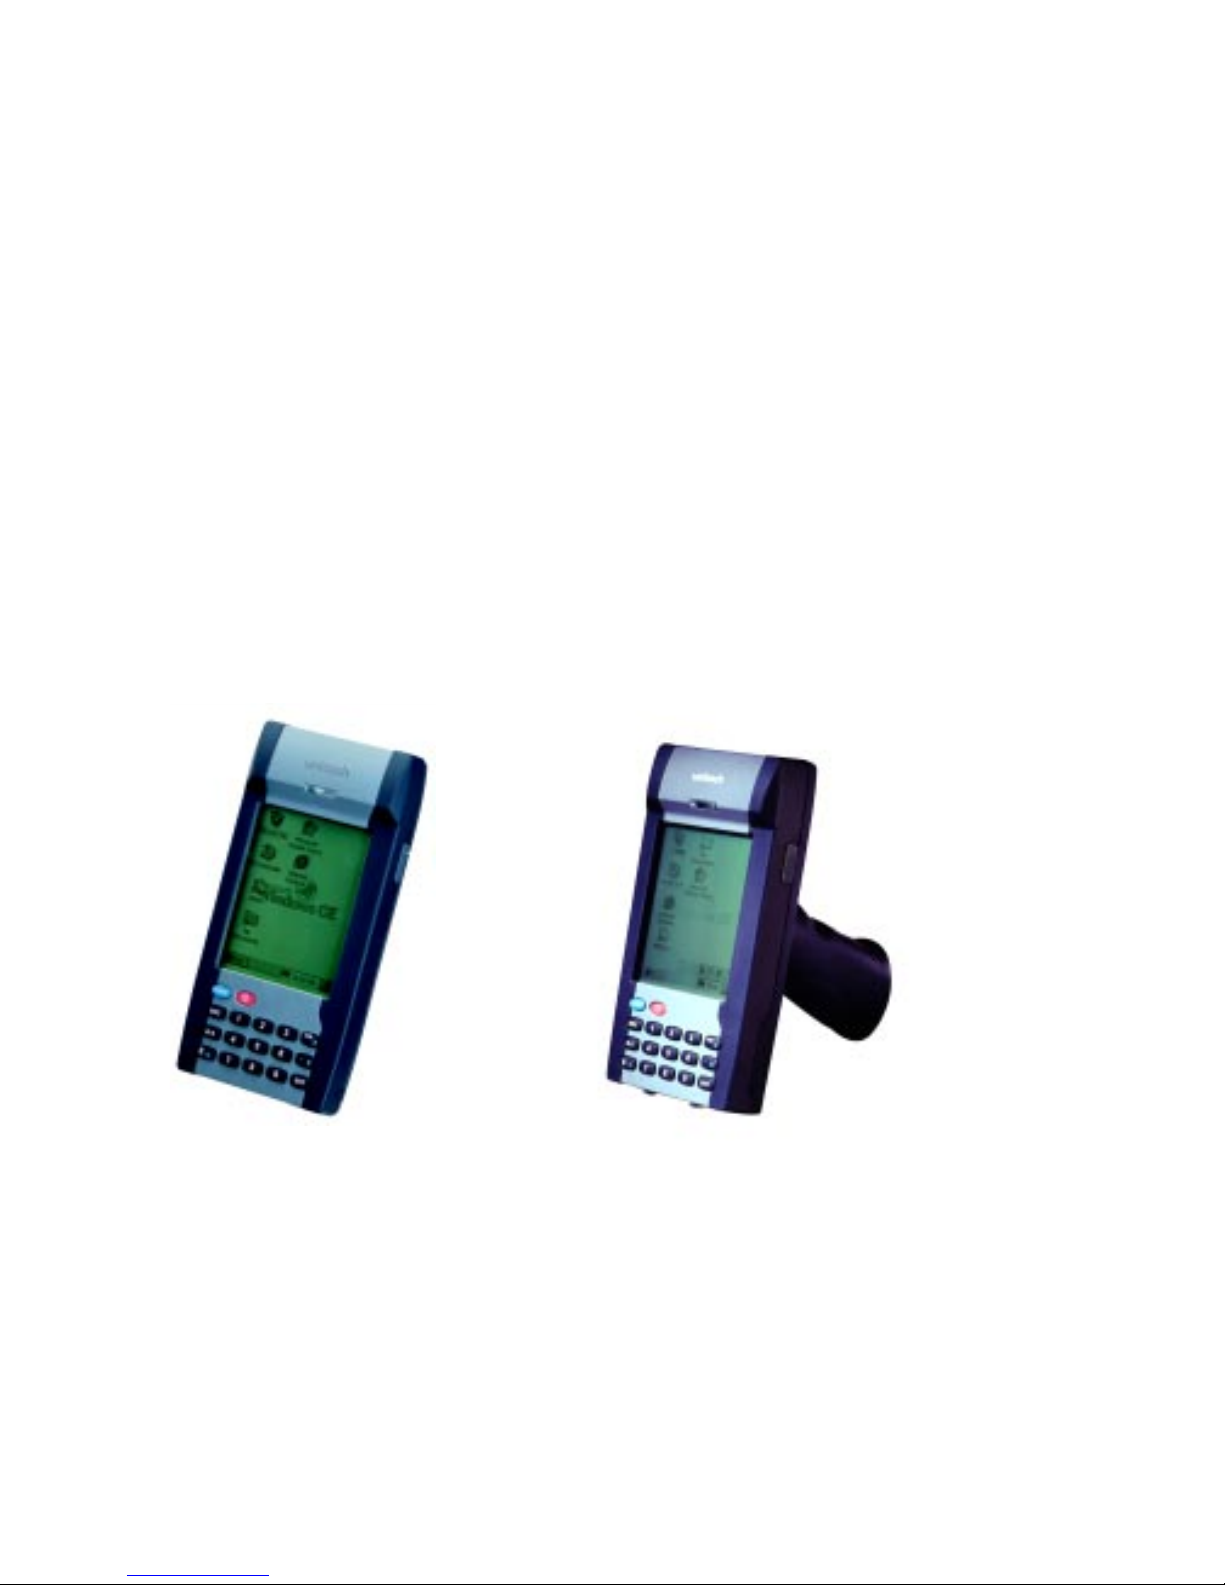
Thank you for puchaing PT930SA.
Your PT930SAseries is a rugged, compact and lightweight palm-size
computer. It utilizes the Windows CE®operating system, and incorporates an
integral bar code scanning laser device, touch screen, keypad, IrDA
interface, and wireless communication capability. It provides the user with a
standard Windows-based environment for customizing and operating the
device. The PT930SAis well suited for warehouse management,
transportation, distribution, retail logistics, asset tracking, and many other
data collection applications.
PT930SA GungripPT930SA
5
Product Reference Guide
NOTICE
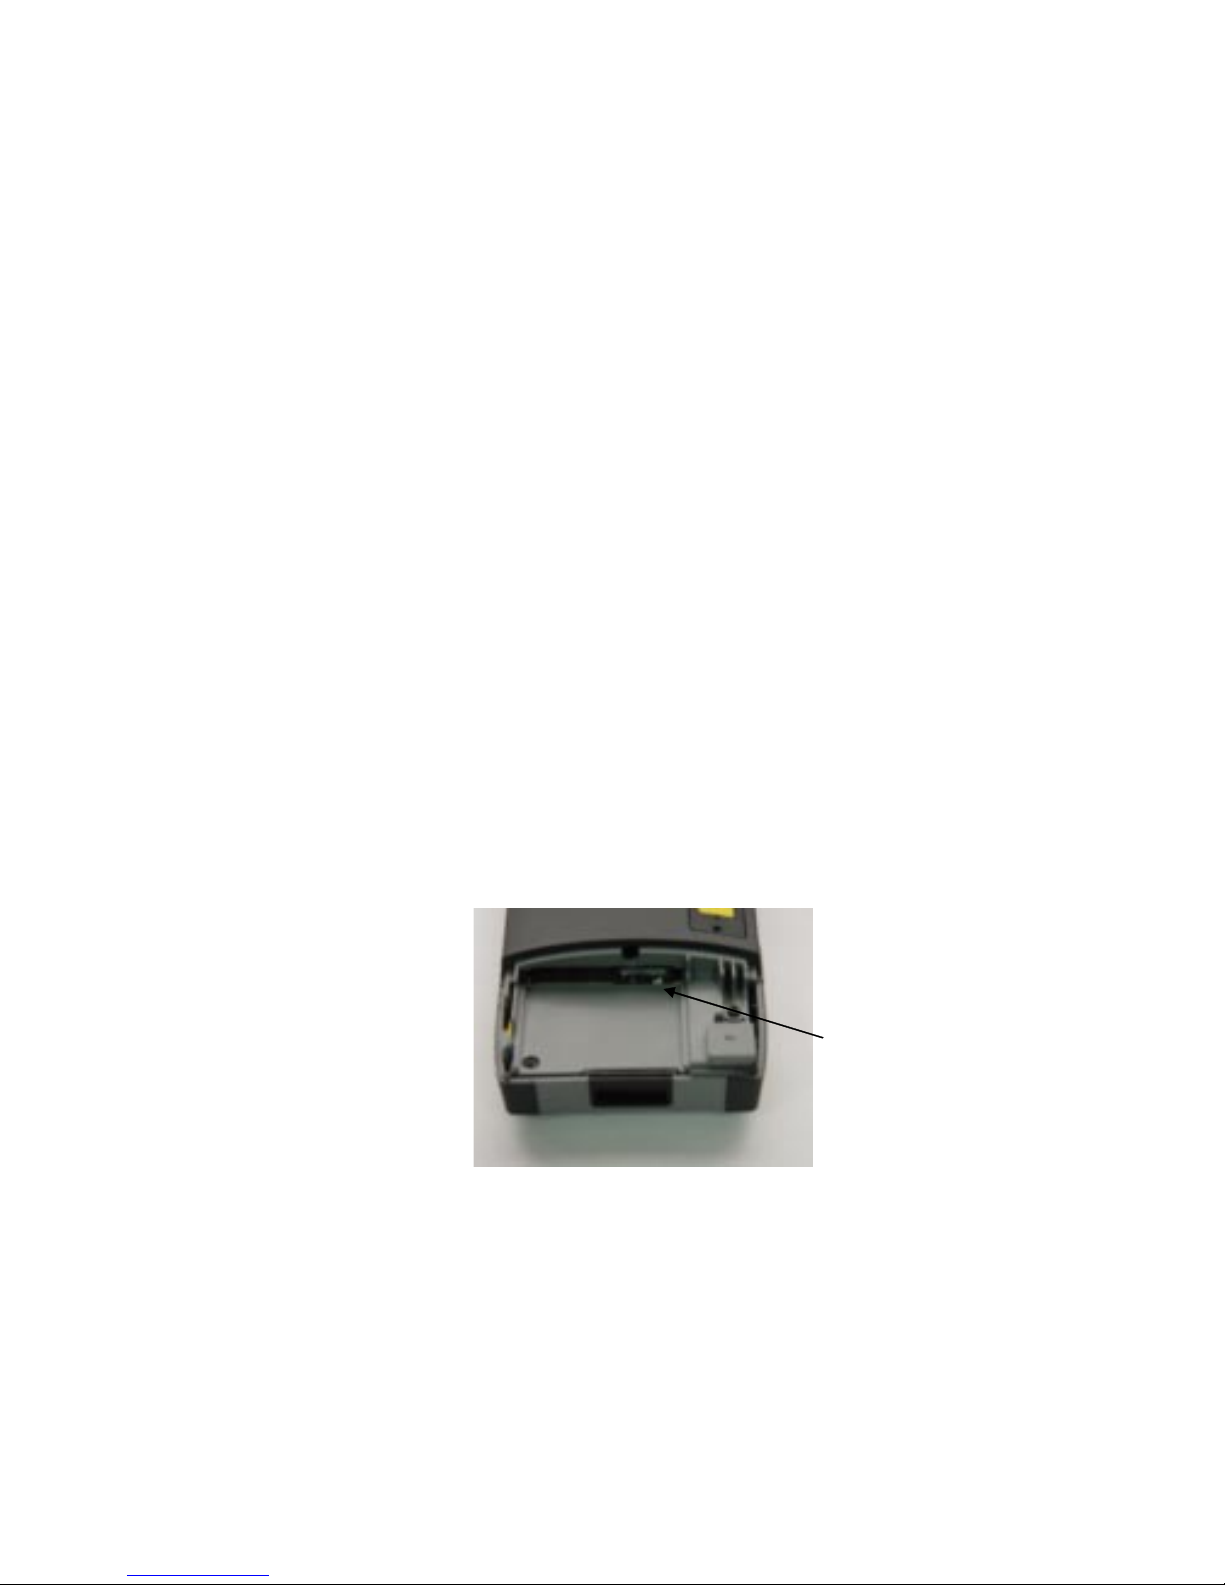
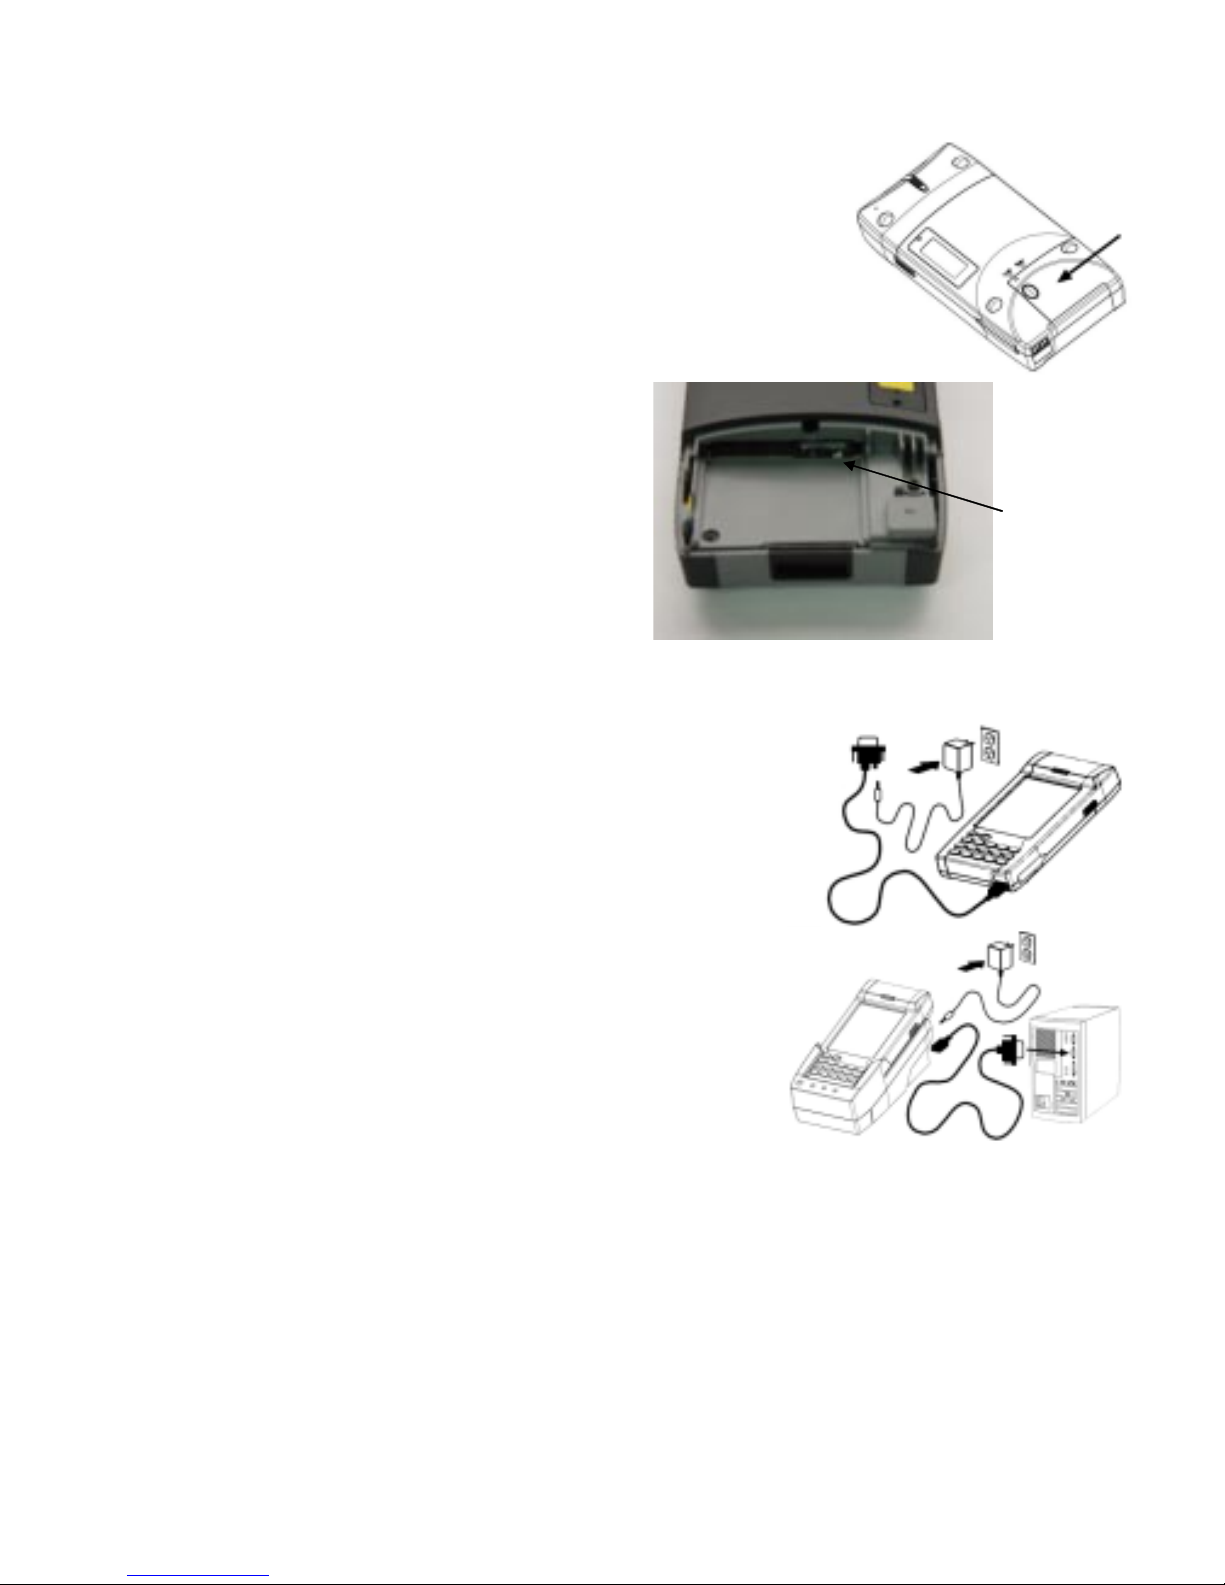
This unit is equipped with a battery pack and backup battery. Please be reminded to
turn on the backup battery underneath the PCMCIA cover before you
start to install main battery into PT930SA for the first time (as shown in
blow photo). It is possible that the Unitech PT930SA may not power-on due to battery
discharge as a result of storage.
In the above situation, plug the PT930SA to the RS232-Charging cable or put the unit into the
Unitech PT093 Cradle (with 9V/2AAC-DC adapter), and recharge the unit for 8 hours in order
to fully charge its backup battery. (It is not necessary to power on the PT930SA in order to
charge the backup battery.)
The backup battery will charge from external power or the main battery (if the main battery still
has enough power to turn on). In the event the main battery is fully charged, refrain from using
the PT930SAfor 8 hours in order for the main battery to fully charge the backup battery.
Backing-up data by backup battery only without the main battery installed in battery compart-
ment may take as long as 2 hours. Therefore, in order to prevent data protection failure due to
backupbatteryfailure,donotleavethePT930SAwithouttherechargeablebatterypackinstalled,
or without connection toAC power for an extended period of time.
6Unitech PT930SA
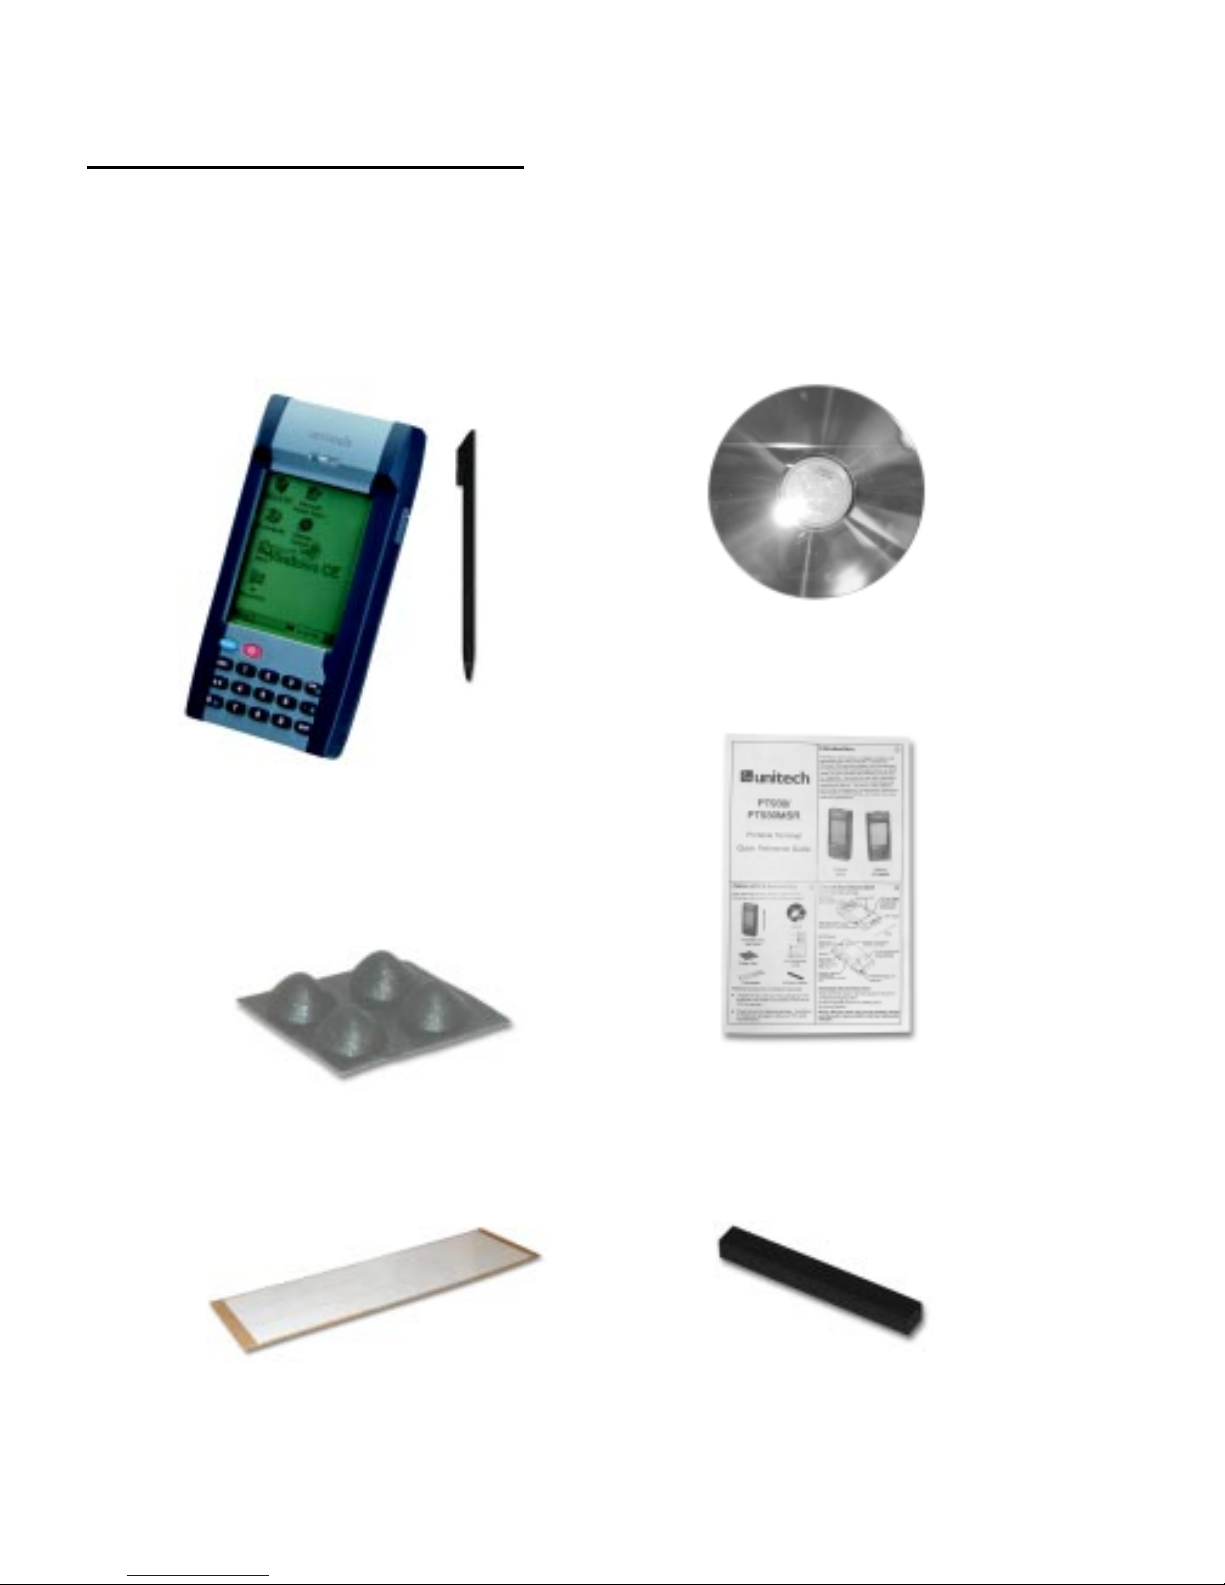
Unitech PT930SA & Accessories
After opening the box, please make sure the
following accessories for the PT930SAare present:
PT930SA Main
Body with Stylus
Rubber Feet
Pulling-tags RF Card Cushion
Unitech PT930SA
Quick Reference
Guide
PT930SA CD
7
Product Reference Guide
Tour of the Unitech PT930SA
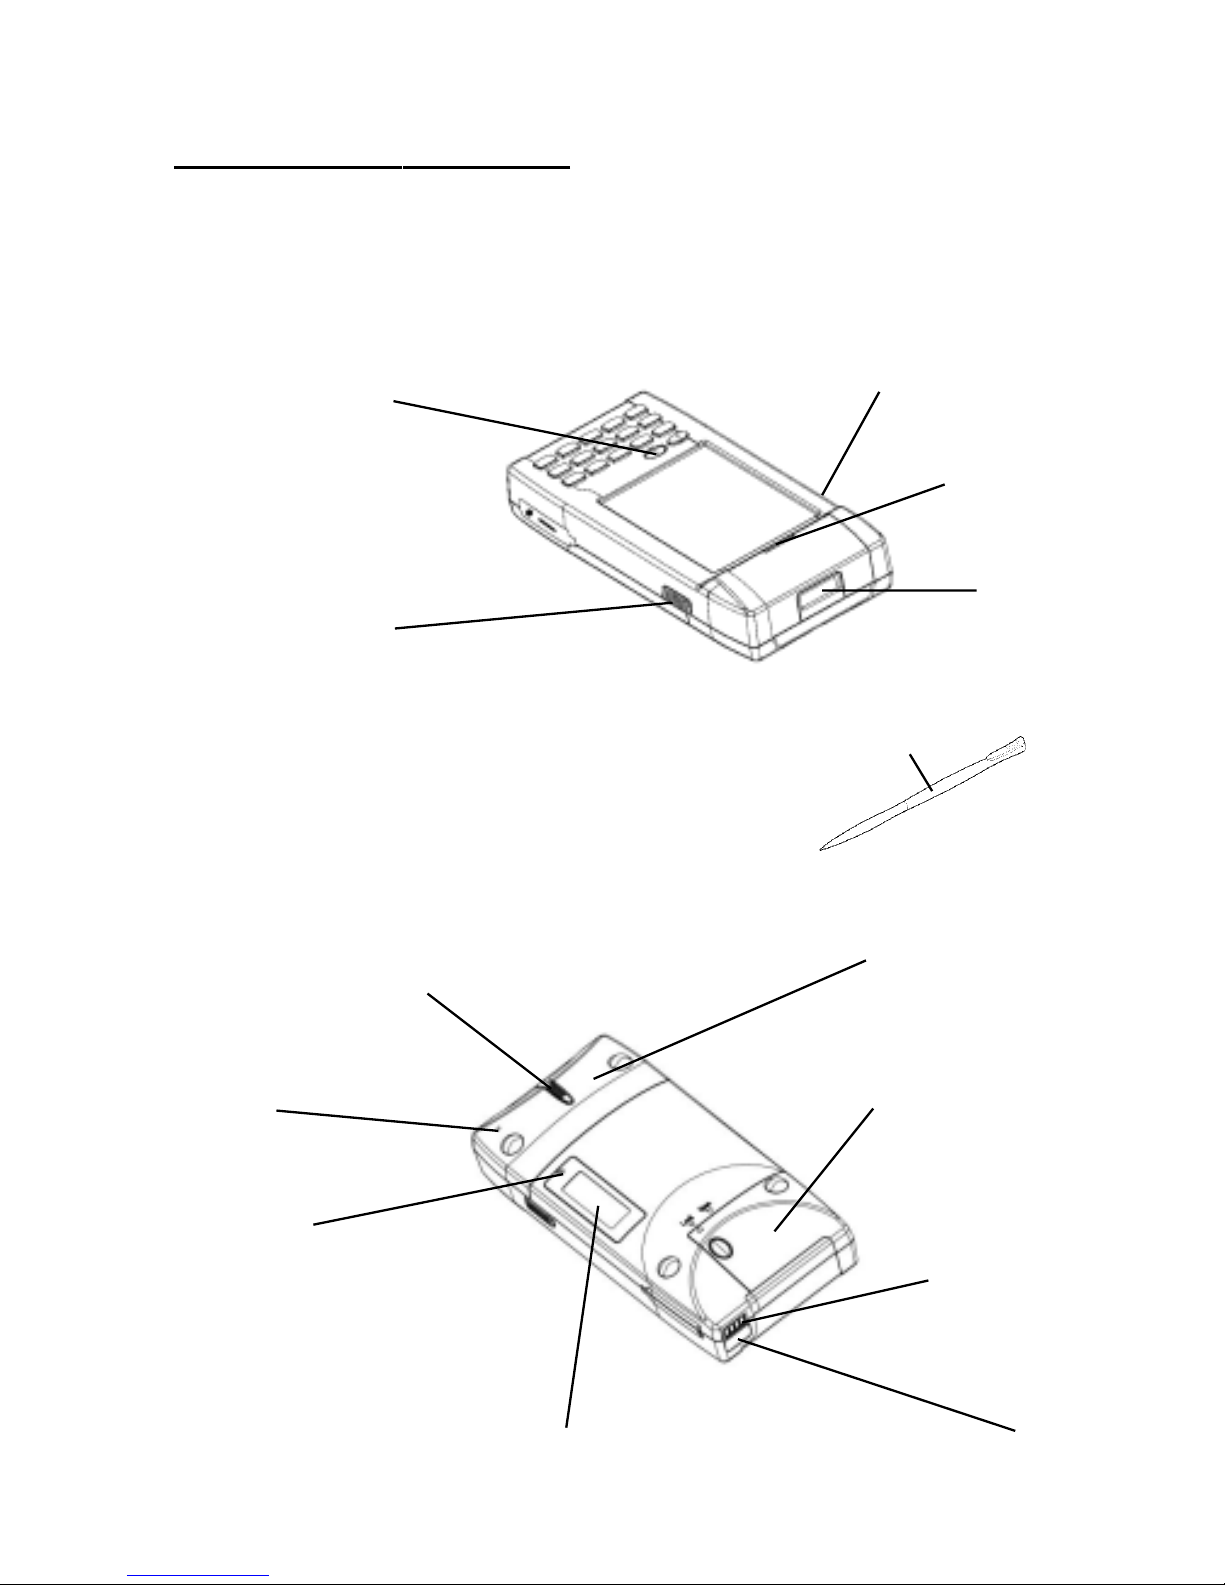
PT930SA Back
Speaker
PCMCIA compartment
Install PC card here.
Expansion Memory compartment
Battery compartment
Install Lithium-ion
battery pack here.
Stylusslot
Holds the PT930SA
stylus
RS232/Charging
port
IrDA port
Reset Hole
Push enclosed button
for system warm-start
PT930SA Front and Left Side
ON/OFF key
Press this button to turn
the PT930SA on or off
Right laser trigger
Press this button to enable laser
engine to scan barcode label.
Laser engine
Good read LED
Left laser trigger
Press this button to
enable laser engine to
scan barcode label.
Stylus
8Unitech PT930SA
First Steps with the Unitech PT930SA
There are three ways to provide power to the PT930SA:
NOTE: Data you enter may not be properly stored until the built-in backup battery
has been adequately charged. Please be remided to turn on the back up battery
before you charge the terminal.
CAUTION - Improper installation of the rechargeable battery pack can cause the
metal clips in the battery compartment to bend or break. Carefully read and follow
the procedure below for installing the battery pack.
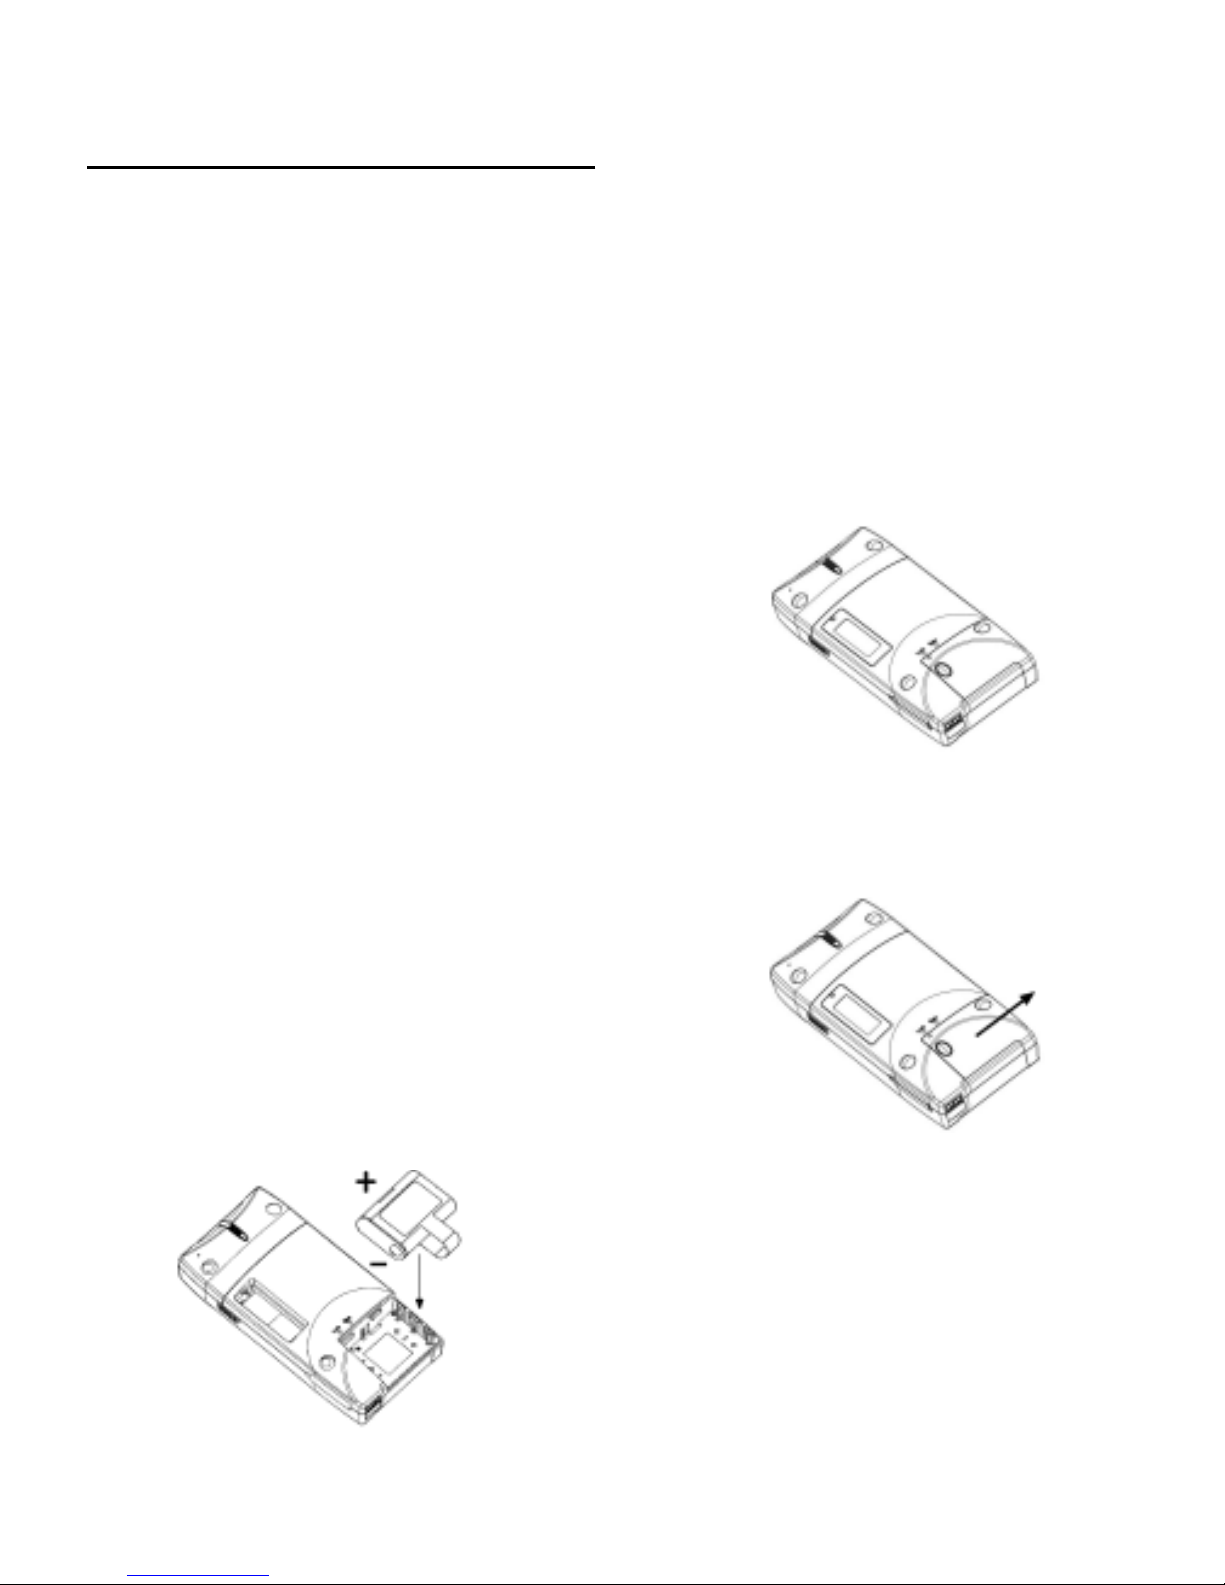
Installing the Battery Pack
1. Remove the battery compartment door (located on the
lower back side of the unit) by pressing the button in
the door and sliding the door to the side.
2.
Position the battery pack with the label side towards
you, and the battery pack strap towards the bottom of
the unit. Insert and fully seat the battery pack, making
sure the shape of the battery pack fits the shape of the
battery compartment.
Docking Station
RS232/Charging cable
Rechargeable Lithium-Ion battery pack
9
Product Reference Guide
Or place the PT930SAinto the
Docking Station (first connect
the power supply to the Docking
Station).
Connect the RS232/Charging Cable to the
PT930SA, and then connect theAC adapter to
the cable’s power jack and an electrical outlet.
Supplying Power to the PT930SA
3. Position the battery pack strap over the battery pack
and install the battery compartment door by sliding it
over the battery pack from the side of the unit. The door
should be pushed firmly into place until a click is
heard indicating that the door latch has seated itself
correctly. The battery compartment door should be
flush with the rest of the unit.
Charging the Main and Backup Batteries for the First Time
It may take up to 8 hours to fully charge the empty backup battery. The first time
charge should be for at least 8 hours to insure a proper charge.
CAUTION: Operating the PT930SA for the first time without the AC adapter,
and without fully charging the backup battery may result in loss of data
stored in RAM memory.
Caution: After install main battery,
please do not power on terminal
before you remove
PCMCIAcover and
turn on backup battery.
10 Unitech PT930SA
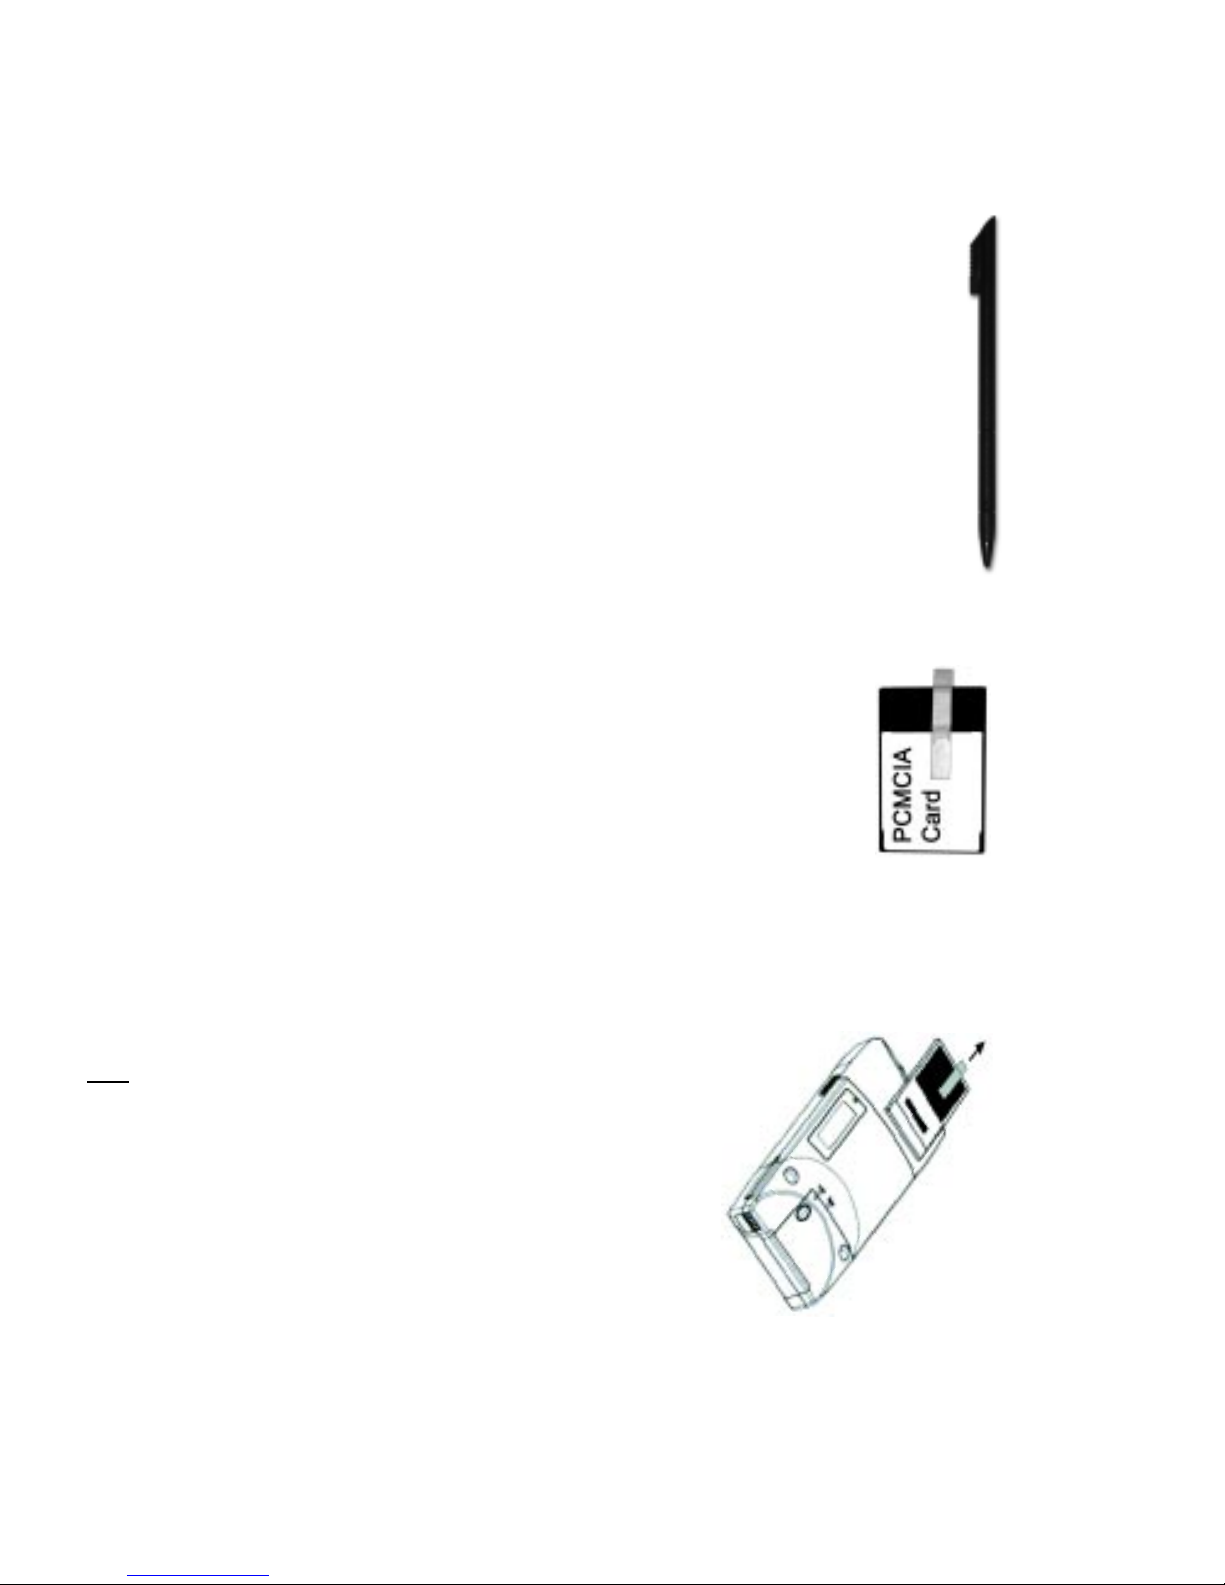
If a PCMCIA card is inserted into the PT930SA
without previously attaching a Pulling Tag, the card
can be removed by affixing a length of adhesive tape
to the surface of the card and pulling the card out by
pulling outward on the piece of tape.
PCMCIA Pulling Tags
Pulling Tags simplify the removal of PCMCIA cards from the
PT930SA. Before inserting a PCMCIA card, remove one of the
three Pulling Tags from the Pulling Tag sheet and adhere it to
both sides of the PCMCIAcard, leaving a short (approx. ½”) tab.
To remove the PCMCIA card, simply pull outward on this tab.
Protective Screen Film
The PT930SA screen ships with a protective plastic film. You may remove this if
desired by peeling from one corner. The screen will be more susceptible to
scratching without the film, but will be more readable.
Using the Stylus
CAUTION: Never use anything other than the PT930SA’s stylus on
the screen. Using another object as a stylus could cause perma-
nent damage.
To write data into a field on a form, use the stylus to print the letters
or numbers. Use very light pressure.
3.
To make a choice from a menu, lightly tap the tip of the stylus on
that choice.
2. Hold the stylus as you would a pencil.1.
Frontside of your
PCMCIA card
Table of contents
Other Unitech Handheld manuals

Unitech
Unitech PA982 User manual

Unitech
Unitech PA968 User manual

Unitech
Unitech HT660e User manual

Unitech
Unitech BD100 User manual

Unitech
Unitech PA968II User manual

Unitech
Unitech PA500 User manual

Unitech
Unitech PA730 User manual

Unitech
Unitech PA730 User manual

Unitech
Unitech PA600 II Standard User manual

Unitech
Unitech HT630 Instruction manual

Unitech
Unitech SRD650 User manual

Unitech
Unitech HT 1 User manual

Unitech
Unitech HT630 User manual
Unitech
Unitech HT1 1D Batch User manual

Unitech
Unitech PT630D Product information sheet

Unitech
Unitech PA982 User manual

Unitech
Unitech PA690 User manual

Unitech
Unitech PA726 User manual

Unitech
Unitech PA950 User manual

Unitech
Unitech PA600 User manual