Uniden TRAX4300 User manual

TRAX4300
In-Car Navigation
OWNER’S MANUAL

Page 2
Thank you for purchasing this Uniden product. Read the Quick Start Guide first and start using your
device right away. This document is the detailed description of the navigation software. You can easily
discover your device while you are using it; however, we still recommend that you read this manual to
fully understand the screens and the features of your software.

Page 3
Table of Contents
What Do I Do First? 5
Make Sure These Items Arrived in the Box 5
Plug it in 5
Hardware Keys 6
How Do I Put It in My Car? 7
Safety considerations 7
Attaching the windshield mount 7
Adjusting the windshield mount 8
Mounting on the windshield 8
1 Warnings and Safety information 9
2 Getting started 10
2.1 Startup screen: the Navigation menu 12
2.2 Hardware buttons 12
2.3 Buttons and other controls on the screen 13
2.3.1 Using keyboards 14
2.3.2 Beyond single screen tap 14
2.4 Map screen 15
2.4.1 Navigating on the map 15
2.4.2 Position markers 17
2.4.2.1 Vehimarker and Lock-on-Road 17
2.4.2.2 Selected location (Cursor) in Find on Map 17
2.4.3 Objects on the map 17
2.4.3.1 Streets and roads 17
2.4.3.2 Turn Preview and next street 18
2.4.3.3 Lane information and Signposts 19
2.4.3.4 3D object types 19
2.4.3.5 Elements of the active route 20
2.4.4 Manipulating the map 20
2.4.5 Quick menu 22
2.4.6 Checking the details of the current position (Where Am I?) 23
3 Navigating 25
3.1 Selecting the destination of a route 25
3.1.1 Entering an address or part of an address 25
3.1.1.1 Entering an address 25
3.1.1.2 Entering the midpoint of a street as the destination 28
3.1.1.3 Selecting an intersection as the destination 30
3.1.1.4 Selecting a city/town centre as the destination 32
3.1.1.5 Entering an address with a postal code 34
3.1.1.6 Tips on entering addresses quickly 36
3.1.2 Selecting the destination from the Places of Interest 36
3.1.2.1 Selecting the destination from the Places of Interest with Quick search 37

Page 4
3.1.2.2 Selecting the destination from other Places of Interest by name 39
3.1.2.3 Selecting the destination from other Places of Interest by category 41
3.1.2.4 Selecting nearby assistance from ‘Where Am I?’ 44
3.1.3 Selecting a map location as the destination 46
3.1.4 Selecting the destination from your Favourites 46
3.1.5 Selecting the most likely destination (Smart History) 47
3.1.6 Selecting the destination from the History 48
3.2 Viewing the entire route on the map 49
3.3 Checking the route parameters 49
3.4 Modifying the route 50
3.4.1 Replacing the destination of the route 50
3.4.2 Setting a new starting position for the route 51
3.4.3 Pausing the active route 52
3.4.4 Deleting the active route 52
3.4.5 Changing the route planning method 52
3.4.6 Checking the route alternatives 53
3.4.7 Changing the vehicle used in route planning 55
3.4.8 Changing the road types used in route planning 56
3.5 Adding the destination of the route to Favourites 57
3.6 Watching the simulation of the route 58
4 Reference Guide 60
4.1 Concepts 60
4.1.1 Smart Zoom 60
4.1.2 Daytime and night colour themes 60
4.1.3 Colour theme in tunnels 60
4.1.4 Route calculation and recalculation 60
4.1.5 Road Safety Cameras 61
4.1.5.1 Camera types 60
4.1.5.2 Camera directions 60
4.1.6 Speed limit warning 63
4.1.7 Battery and GPS position quality indicators 63
4.2 ‘More’ menu 64
4.3 Settings menu 65
4.3.1 Route settings 66
4.3.2 Sound settings 67
4.3.3 3D vehicle gallery 68
4.3.4 Colour themes 69
4.3.5 Set starting position 69
4.3.6 Regional settings 69
4.3.7 Content 70
5 Glossary 71
6 End User Licence Agreement 73
7 Limited One Year Warranty 77
Page 5
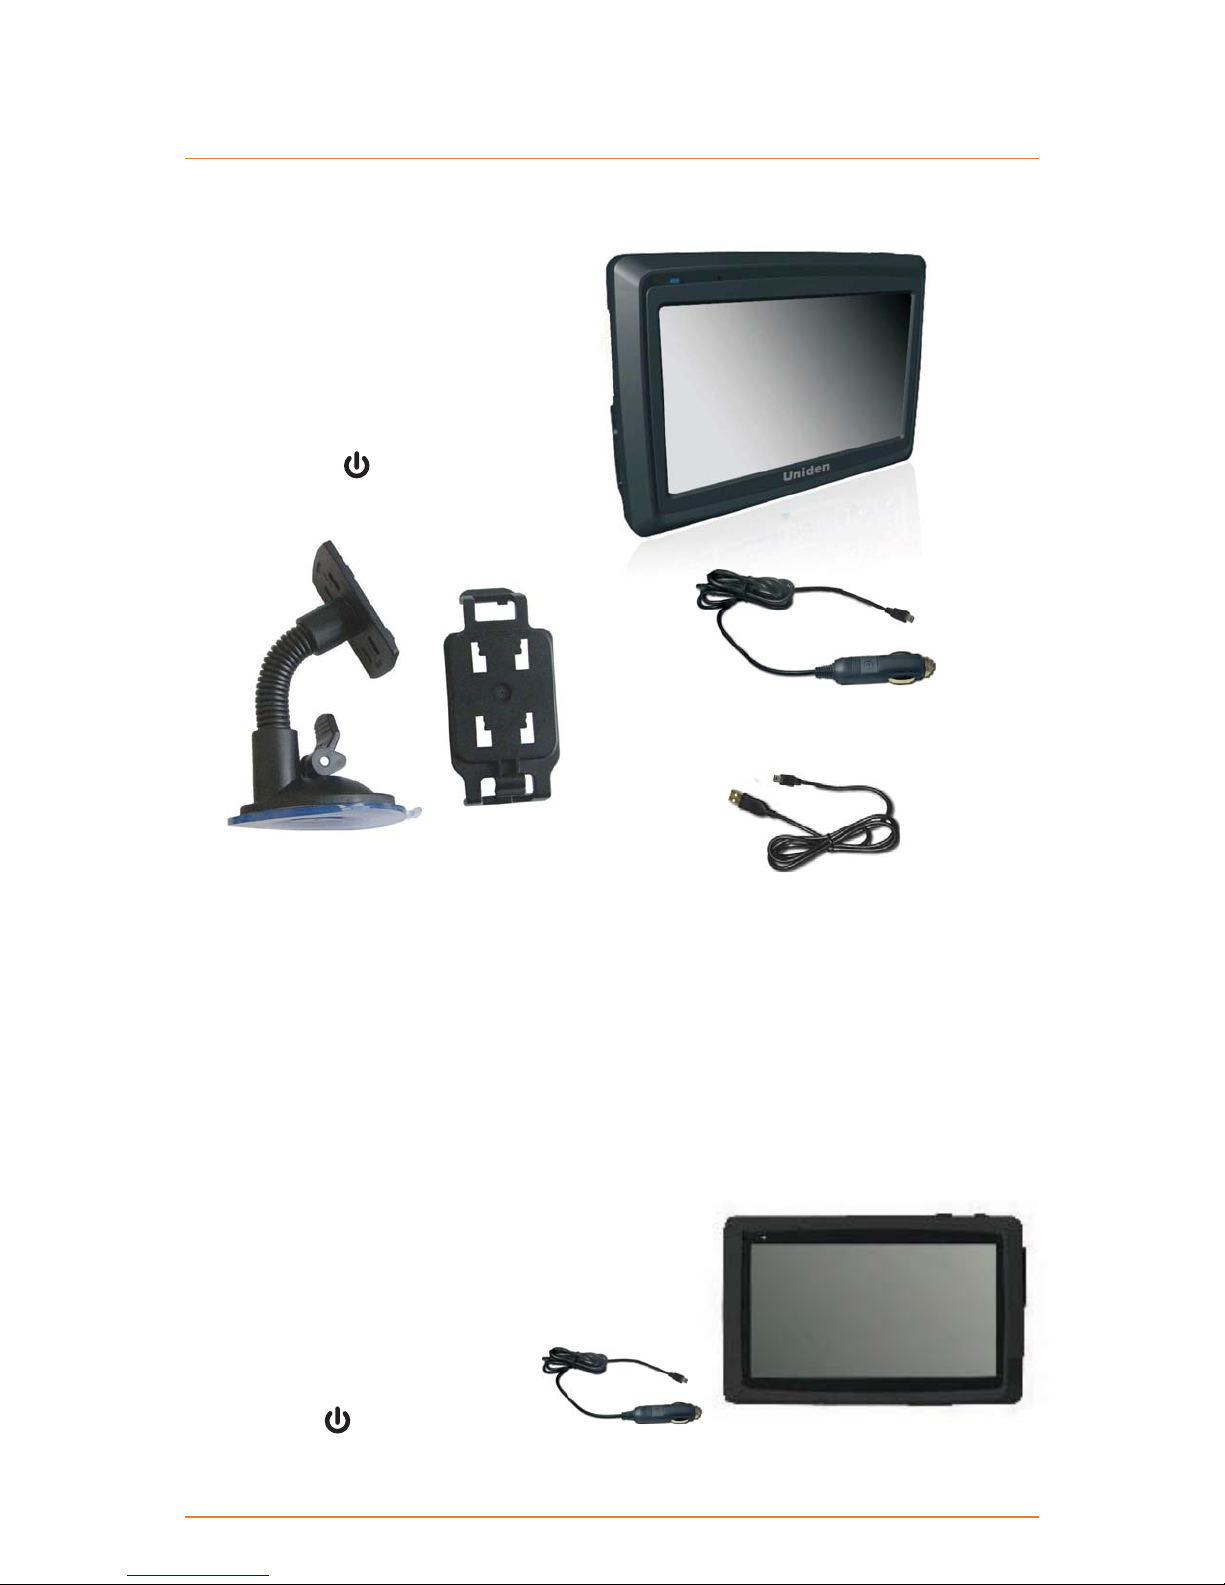
What Do I Do First?
Make Sure These Items Arrived in the Box
If anything listed here is missing or damaged,
contact your place of purchase immediately.
Plug it in
Connect the power adapter to the power connector on the lower left side of the device.►
Plug the other end into your car’s cigarette lighter (or any standard 12VDC - 24VDC outlet).►
Only use the power adapter that came with your device. Any other adapter might damage the►
device.
Whenever it senses power coming in and the power
►
switch is on, the device charges the battery.
As soon as the power stops (for example, when you
►
unplug the adapter or turn off your car), the device
automatically shuts down. If you want it to stay on,
tap cancel on the screen during the Shutting down
message.
You can put the device into sleep
►
mode anytime you want: just push
the suspend button on top of the
device.
TRAX4300 GPS navigation device►
Slide the power switch at the BOTTOM
of the device to the on position, and then
press the suspend button at the TOP of
the device to turn the navigation on or off.
Windshield Mount (2 part)►
Part 1 Part 2
OM CD-ROM►
Quick Start Guide sheet►
USB cable►
DC (car) adapter►
Page 6
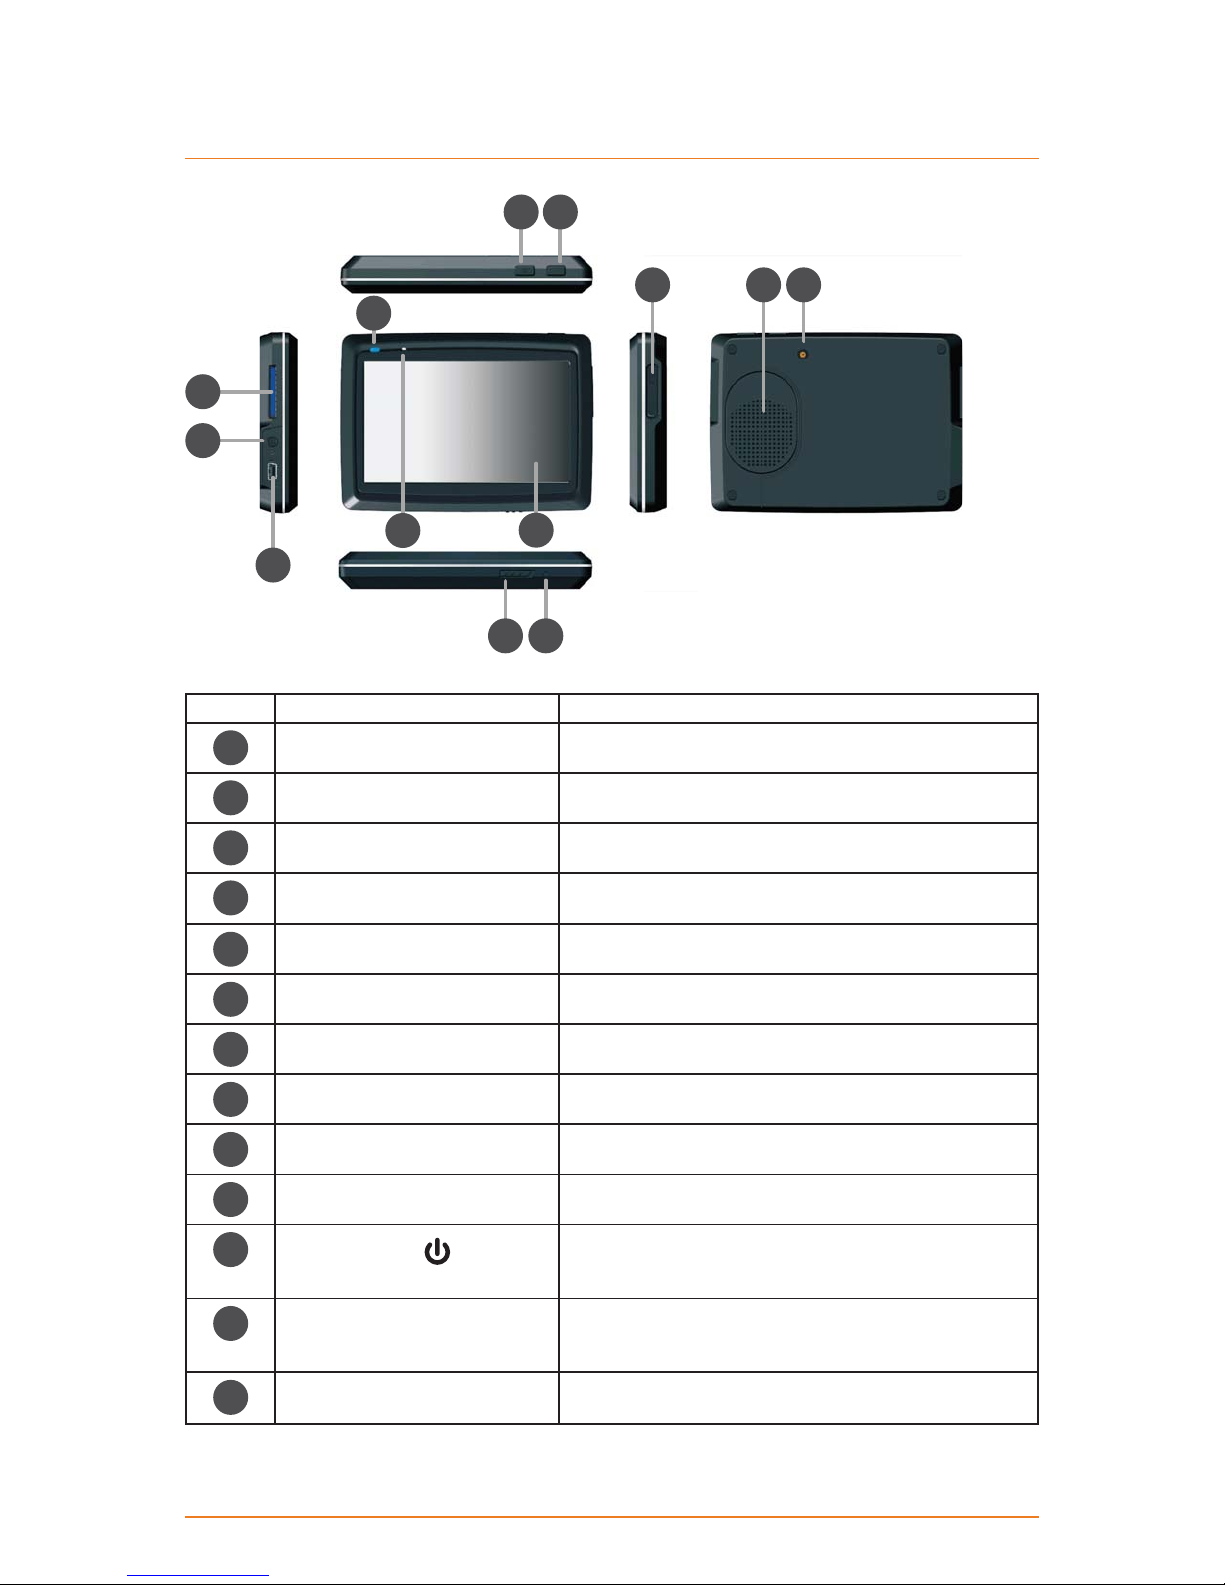
Hardware Keys
Ref Component Description
1Touch Screen Display the output on your device
2LED Blue--Charging; Off--full charged
3N/A N/A
4External GPS antenna
connector
Use an optional external GPS antenna
5Speaker Send out music, sounds, and voice
6Volume up/down button Increase or decrease the volume level
7SD card slot SD card slot
8Headphone connector Connect to stereo headphones
9Mini USB connector Connect to the charger or USB cable
10 Menu button Return to main menu
11 Suspend button When the power switch is on (see ref 13 below) press
the suspend button to enter into or exit out of sleep
mode.
12 Reset hole If the device fails to operate properly, try resetting the
device. Press the reset button by using the ball point
pen or a similar tool.
13 Power switch For intial start up, push the power switch to the on
position to power the device.
1
10
1213
11
56
7
8
4
2
9
3

Page 7
How Do I Put It in My Car?
Safety Considerations
Don’t install any device where it will block your view (including your mirrors!) while you’re driving.►
Keep your attention on the road!►Don’t try to operate or focus on any device while you’re driving.
If you have to concentrate on a device, pull off the road for a few minutes.
It’s a good idea to take valuable items with you when you leave you car—that includes GPS
►
devices. If you can’t take the device with you, lock it in the glove compartment or hide it
somewhere. And don’t forget to take down the windshield mount: you don’t want to remind any
potential thieves that you might have some valuable mobile electronics in the car.
Don’t leave the device in direct sunlight for a long period of time or where the temperature could
go above 60º C (140º F).
Attaching the windshield mount
Assemble the Windshield mount by slotting Part 2 onto Part 1.►
Part 1 Part 2
Insert the bracket hook into the►
notch at the bottom of the device.
Rotate the bracked up so
►
the head fits into the gap.

Page 8
Mounting on the Windshield
Make sure the device does not block your view of the road or your mirrors.
Once you decide where you want the device, hold the suction cup in that position, then adjust the
mount so you have the best view of the device.
Press the suction cup flat against the windshield.1)
Push the suction lock up (towards the suction cup) until it snaps into place.2)
Gently pull on the mount to make sure it is secure.3)
If you have trouble getting the suction cup to stick:
Clean the spot with an ammonia-free cleanser.
►
Dry the spot completely (use a lint-free cloth, if possible).►
Make sure the spot is smooth and flat (suction cups won’t stick well on a curved or textured►
surface).
Removing the windshield mount
When you release the suction latch, make sure you’re holding or somehow supporting the
device.
Lift the suction latch and use the plastic pull tab to pull the suction cup off of the glass.
Adjusting the Windshield Mount
Bend the windshield mount arm to a suitable angle for mounting.►

Page 9
1 Warnings and Safety information
This software is a navigation system that helps you find your way to your destination with the built-in
GPS receiver. The software does not transmit your GPS position; others cannot track you.
It is important that you look at the display only when it is safe to do so. If you are the driver of the
vehicle, we recommend that you operate your software before you start your journey. Plan the route
before your departure and stop if you need to change the route.
You must obey the traffic signs and follow the road geometry. If you deviate from the recommended
route, your software changes the instructions accordingly.
Never place your device where it obstructs the driver’s view, where it is in the deployment zone of an
airbag or where it might cause injuries in an accident.
For more information, consult the End User Licence Agreement (page 73).

Page 10
2 Getting started
The software is optimised for in-car or pedestrian use. There is no need to use a stylus. You can use it
easily by tapping the screen buttons and the map with your fingertips.
When using the navigation software for the first time, an initial setup process starts automatically. Do
as follows:
1. Select the written language of the application interface. Later you can change it in Regional settings
(page 69).
2. Read and accept the End User Licence Agreement.
3. The Configuration wizard starts in the selected language. Tap to continue.
4. Select the language and speaker used for voice guidance messages. Later you can change it in
Regional settings (page 69).
5. If needed, modify the time format, time zone and unit settings. Later you can change them in
Regional settings (page 69).
6. If needed, modify the default route planning options. Later you can change them in Route settings
(page 66).
Table of contents
Other Uniden Car Navigation System manuals

Uniden
Uniden GNS 8400 User manual

Uniden
Uniden GNS 8350 User manual

Uniden
Uniden Maptrax GPS352 User manual

Uniden
Uniden GNS 8360 User manual

Uniden
Uniden GNS8600 User manual

Uniden
Uniden TRAX350 User manual

Uniden
Uniden TRAX5000 User manual

Uniden
Uniden GPS 501 User manual

Uniden
Uniden TRAX350 User manual

Uniden
Uniden GNS8430 User manual


