Tunturi ALPHA 200 User manual

:: 1
T.I.E.
ALPHA 200
Owner's Manual :: 2-17
GB
Mode d'emploi :: 18-33
F
Manual del usario :: 34-49
E
Gebruikers gids :: 50-73
NL
583 1019 C
© TUNTURI 2002

2 ::
DEAR TUNTURI OWNER
Welcome to the world of Tunturi exercising!
Your choice shows that you really want to invest in your well-being and
condition; it also shows you really value high quality and style. With
Tunturi Fitness Equipment, you’ve chosen a high-quality, safe and
motivating product as your training partner.
Tunturi developed Interactive Electronics (T.I.E.) represent the absolute
pinnacle in exercise equipment. T.I.E. offers you a whole new kind of
meter, a user interface that combines individual, versatile and
motivational features of exercising.
Alpha 200 T.I.E. user interface is specially developed for Tunturi
ergometers to offer you many motivating forms of exercise. You can test
your fitness, design your own exercise profiles, and use e.g. constant
effort and heart-rate programs. There are also several pre-programed
exercise profiles, each with a different goal. Whatever your goal in
training, we are certain this is the training equipment to get you there.
This guide is an essential part of your exercise equipment. Start
familiarising yourself with the Tunturi T.I.E. interface by carefully
reading this manual. It offers the information you need for both the
use and maintenance of your equipment. This manual is well worth
keeping, as you may need these instructions later on.

:: 3
1. INSTALLATION ::
1.1 Turning the user interface on and off
2. KEYS ::
2.1 Function keys
2.2 Operation keys
2.3 Setting keys
2.4 Brake keys
3. HEART-RATE AND PULSE
MEASUREMENT ::
3.1 Measurement with a heart-rate belt
3.2 Measurement with an ear sensor
4. FUNCTIONS :: EXTRA
5. FUNCTIONS :: TRAINING
5.1 Training exercise
5.2 Individual displays for exercise values
6. FUNCTIONS :: COACH
6.1 Fitness Test
6.2 Exercise Profiles
7. MAINTENANCE ::

4 ::
1.1 Turning the user interface on and off
The user interface turns itself on when the device is connected to the
mains current. When the user interface has not been used for five
minutes (no heart-rate registered, no keys pressed, no pedalling), it
automatically switches itself to energy-saver state. Alpha 200 is returned
to its active state by pressing any key, starting to pedal or sending heart-
rate signals to the unit. When you restart, Alpha 200 automatically starts
from Training function.
:: Protect Alpha 200 from excess sunlight, because that may fade
the interface box and surface membrane colours. Please also be
careful not to allow Alpha 200 to come into contact with
water. A sharp blow may damage the interface.
:: You can set your language in the Extra function.
1. INSTALLATION ::
Push the T.I.E. interface module carefully into place at the top of the
handlebar support tube. The loose screws hanging from the metal
fastening plate on the bottom of the T.I.E. module must enter the holes
at the top end of the handlebar. Make sure that the module is correctly in
place and tighten the fastening screws.

:: 5
2.1 Function keys
Function keys are located above the display.
Training is the basic exercise function. Training offers three modes of
exercise suited to goal-oriented and simultaneously safe training: constant
resistance, constant effort and constant heart-rate.
Coach offers you a fitness test and pre-programmed exercise profiles. It
also helps you create and save your own exercise profiles.
Extra function is for settings and adjustments to Alpha 200 properties.
2. KEYS ::
Once you have installed Alpha 200 and connected your exercise
equipment to a power source, you can start getting to know the interface.
Please read this guide carefully, and do try experimenting to find out for
yourself what Alpha 200 can do. Feel free to try the functions and
settings - T.I.E. user interfaces are made to be used!
2.1
2.2 2.3
2.4

6 ::
2.2 Operation keys
Operation keys are used to direct a particular function and are located to
the left of the display. When an operation key is active, an info-label is
displayed to the right of the key.
2.3 Setting keys
Setting keys are situated to the right of the display. They are used to set
the values and characters on-screen. Symbols on the display for the active
arrow keys show which you can use to adjust values or navigate.
2.4 Brake keys
The brake keys (+/-) are located beneath the display. They are used to
adjust resistance during constant brake and constant effort workouts in
Training function.
:: 7
The heart-rate belt works best when the transmitter is worn against
your bare skin. If you prefer to wear it over a shirt, please moisten the
shirt well under the electrodes: the contacts must be wet while you
exercise.
Take good care of the transmitter after you exercise. This helps to
prolong the life of the electrodes and battery.
1. Wash the transmitter carefully with a mild soap-water solution.
2. Rinse with clean water.
3. Dry the transmitter carefully.
3. HEART-RATE AND PULSE
MEASUREMENT ::
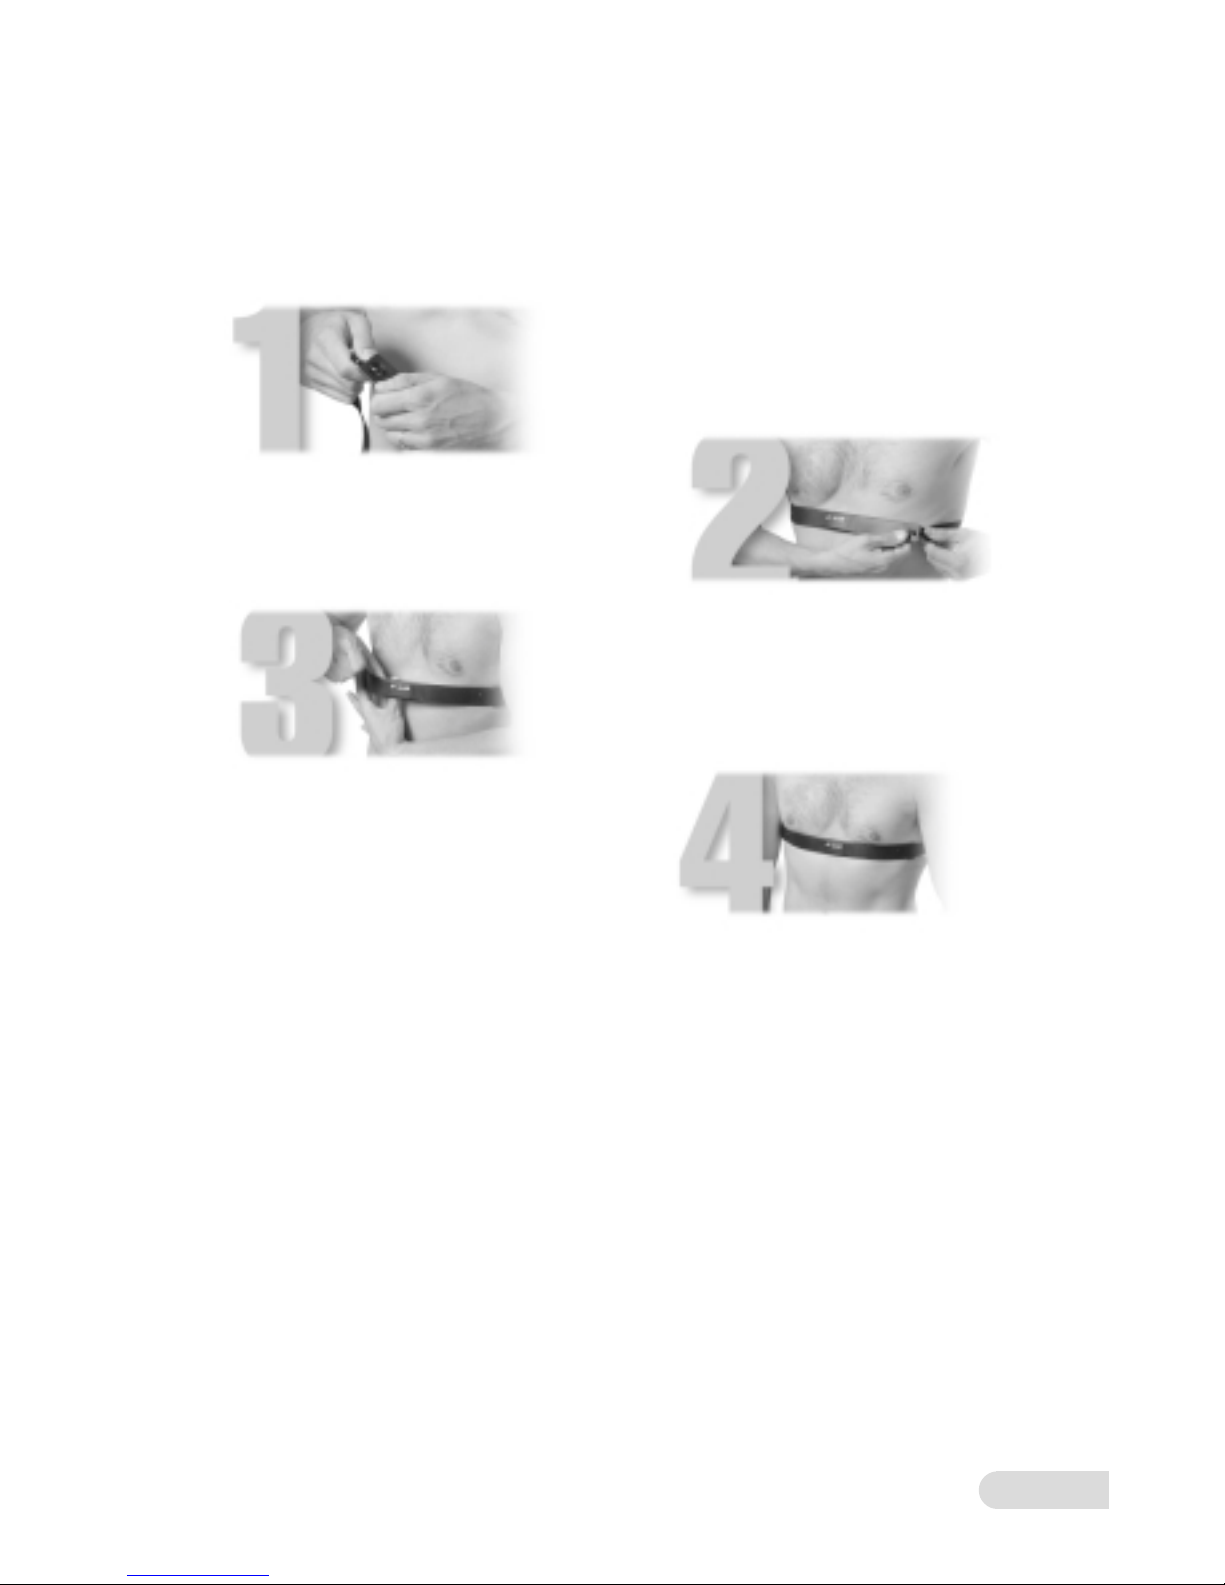
3.1 Measurement with a heart-rate belt
1. Attach the transmitter to the
elastic strap.
2. Adjust the length of the strap to fit
snugly and comfortably.
3. Pull the transmitter away from
your chest and wet the grooved
areas at its back.
4. Check the wet electrodes are
uniformly positioned next to your
skin and that the Polar logo is central
and upright.

8 ::
If there are problems in pulse measurement:
:: Check how the sensor works while not pedalling.
:: A disturbance may be caused by the physiological properties of the
earlobe. Try measuring on the inside surface of the ear or on
the tip of your finger.
:: Rub the earlobe with your fingers to quicken circulation.
:: If pulse values rise above 150 beats/min., earlobe measurement
may be affected by the faster circulation.
:: Sometimes a strong light source in the immediate vicinity of
the user may cause disturbances.
Please clean the ear sensor after use with a damp cloth. Do not use
solvents.
NOTE! Always detach the ear sensor connector from the user interface
when you use the heart-rate belt. The ear sensor disturbs heart-rate
measurement.
3.2 Measurement with an ear sensor
You can buy the ear sensor needed for pulse measurement from your
Tunturi dealer or importer as an accessory.
Measure your pulse as follows:
1. Open the cover at the back of Alpha 200 and pushing the ear
sensor connector into the interface connector. Lead the ear sensor
wire out through the hole between the cover and the box, and
close the cover.
2. Attach the ear sensor to the earlobe.
3. Attach the sensor wire to your shirt with the clip provided. This
prevents the sensor and wire from moving.

:: 9
4. FUNCTIONS :: EXTRA
The Extra function helps you make adjustments to Alpha 200 properties.
You can also update Alpha 200 software in Extra.
1. Press function key Extra.
2. Press Settings key.
:: You can select the Alpha 200 language with the left/right setting
keys. The factory default setting is English. You can proceed to the
brightness setting with the up/down setting keys.
:: Use the left/right setting keys to make any adjustment. You can
adjust display brightness on a scale 0-7, where 0 is the darkest.
:: Press OK key to confirm your settings.
3. SW key is for software updates.
:: NOTE! Do not press the SW key unless you are updating your
Alpha 200 software.

10 ::
5. FUNCTIONS :: TRAINING
Training function offers three different modes of exercise: constant
resistance, constant effort and constant heart-rate. Setting a fixed
requirement level is similar in all programs, after which your Tunturi
exercise equipment automatically ensures that the resistance level remains
as set.
The main display has two viewing options: the first option allows you to
view training duration, estimated energy consumption and distance, the
second option allows you to see values for heart-rate, rpm and watt. You
can change the view by pressing the left/right setting keys.
:: If you experience nausea, dizziness or other abnormal
symptoms while exercising, stop your workout at once and
consult a physician.
:: Constant heart-rate exercise requires your using the heart-rate
measurement system. We recommend the heart-rate belt.
5.1 Training exercise
1. Press the Training function key.
2. Select the mode of exercise with the Mode key:
:: Brake = constant resistance exercise at the same resistance
level throughout. Faster pedalling means an increase in effort.
:: W = constant effort exercise; Alpha 200 adjusts resistance
automatically so the training effort set, e.g. 100 W, remains the
same independent of pedalling rate.
:: Heart = constant heart-rate exercise; Alpha 200 adjusts effort
automatically and keeps your heart-rate at the desired level e.g.
120 beats per minute, independent of pedalling rate.
3. In constant resistance and constant effort exercises, set the
constant value with the brake keys +/-, and in constant heart-rate
exercise use the up/down setting keys.
4. Use Set key to establish target values for your exercise.
:: Select the target values set-up display with the left/right setting
keys and then press OK key. The left/right setting keys
select the Target values you want to adjust and the up/down keys
Table of contents
Other Tunturi Fitness Electronic manuals


Popular Fitness Electronic manuals by other brands

ergoline
ergoline ergoselect 150 Operator's manual

Kettler
Kettler SM3635-68 Training and operating instructions

BH FITNESS
BH FITNESS G6424i manual

BodyMedia
BodyMedia DD100 manual

Octane Fitness
Octane Fitness ZERO RUNNER ZR7000 Console Guide & Set-Up Instructions

New Balance
New Balance EX2 900 user manual


