
TOPIC-LIGHT Celeb 2 User manual

User Manual
Please read this manual carefully before using the product
Laser show projector Celeb 2/3

2
Introduction
Thank you for purchasing this product.We always try to develop our
product with high-tech and high performance to meet your
requirement and exception.
The unit is designed strictly according to the international standard.
The control way is single or master-slave in option. The manual
include the skill parameter and detail instructions. Please read this
manual carefully before using the product.
After reading it, please keep it in a safe place for future reference.
This unit has been tested at our factory before being shipped to
you, there is no assembly required.
Once after receiving this product, please take and put carefully.
And check cautiously that whether the product was damaged or not
during the transportation.
Checking parts
Please check if the following parts are included:
1 x Laser
1 x User manual
1 x Power cable
1 x Hanger
Danger Laser Radiation!
Avoid direct eye exposure!

3
Laser radiation can cause eye damage or skin damage
All protective measures for a safe operation of this laser
must be applied.
Installation
1. Please check the voltage whether is the same with the one
showed on the equipment or not.
2. It must ask for the technical person and set the light safety when
installation. And let the light beam at the suitable angle.
3. When install this equipment please make sure there's no
flammable surfaces (decorated things, etc) within at least 2.5M and
maintain minimum distance of 0.5M from the equipment to the walls.
4. Please make sure that there's no other equipment or decorating
materials obstructed the exhaust fan and the vent-pipe.
5. Products should be install immobility.
6. In case of safety, it's very important that to connect the earth with
line.
Attention
1. Please do not open the bottom cover yourself without permission.
Operate it accord the user manual. Call the technician when the
machine breaks down.
2. Please do not see the laser beam directly to avoid any damage.
3. Before connect or disconnect the power, please adjust the
luminance of the laser diode to the least to avoid any damage to the
laser diode.

4
4. This unit should be keep dry, do not use in the rain and dusty
environment. It can be use in the outdoor with the water-proof cover
protector.
5. Set the light immobility and try to avoid strong shake or hit.
6. Prevent dust into the equipment to avoid problems.
7. Please keep that there's no other equipment or decorating
materials obstructed the exhaust fan and the vent-pipe when the
equipment was working.
8. Before connect power, check the plug is immobility or not, power
line should be connect well.
9. Please do not open or close the equipment frequently that's to
avoid any affect to the life span of the laser diode, and try the best to
avoid the long time working.
10. Due to the characteristic of the laser diode, after four hours
working, it should be close at least 25 minutes until the laser diode
cooling then work again.
11. Don't touch the light or draw the power line when your hand was
wet. And do not pull the electronic power line.
12. Maintain the distance at least 3M above from the equipment to
the object.
13. This equipment does not have any parts can repair for the users,
please do not open the equipment.
14. When the laser diode became dim or damaged please contact
the dealer timely.
15. When you want to re-transfer the product, you'd better use the
original package to shockproof.
5
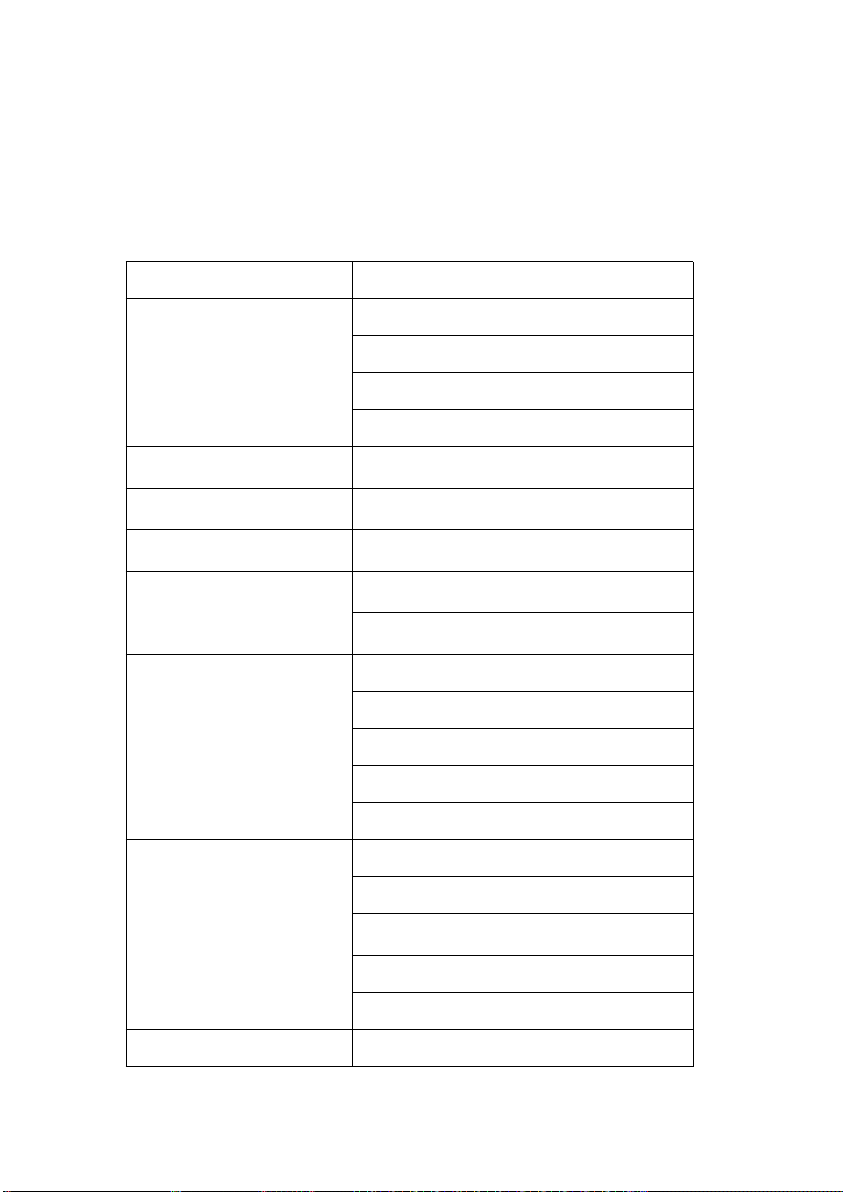
LCD display function menu
Menu Secondary menu
Operation Mode
DMX-512
Auto TRG
Music TRG
Test Mode
DMX address 1~512
Auto Trigger 1~25
Music Trigger 1~25
Test Mode Enable Laser
Test Pattern1~4
Master settings
Master Size 0~255
X Scale 0~255
Y Scale 0~255
Invert X
Invert Y
Color settings
Color Shift RGB/I
Fade 0~255
Red 0~255
Green 0~255
Blue 0~255
System Config Master/slave

6
Channel 27CH/52CH
Sound sense
Scan-safety
Easy ILDA
System Reset
Device Info
DMXADDR
T case
Swflash LF001
Hdw 5006.2.0
Ver A1.1
1. DMX setting:
Input DMX signal, and the link the DMX controller and the lights by the control
line as the following picture, you can control the lights by the controller.
When using any controller, each one must be have its own address. The fist
light address is set to 1, the second light address code is set to 28 or 53 (the first
light address code 1 plus 27 or 52 channel), the third set of lights on the 55 or
105. (This setting also need to be based on different console to set, now only by
general practice)

7
Fixture No. Address LCD display(No.)
1 1 1
2 28 or 53 028 or 053
3 55 or 105 055 or 105
┇ ┇ ┇
2. Master-slave Setting:
Link the lights as the following picture (the light which does not receive signal,
only output signal, will be the master light)
Using before please must be check power supply link with earth wire
correctly or not.
The specification of the front and rear panel:
1. Input rated voltage
2. Fuse
3. Power switch button
4. Ground marking
5. DMX IN/ DMX OUT: DMX signal output and input

8
Technical Specifications
Power input: AC100~240V, 50/60Hz
Power consumption: 100W, 200W
Laser: Single color RGB
Laser modulation: TTL Analog
Scanner: 20kpps 25kpps 30kpps
Channel: 27CH / 52CH
Control mode: sound, auto, master-slave, dmx, ilda
Cool system: forced air cooling system
Working temperature: 0℃- 35℃
N.W./G.W.: 10kg/12kg (1pc)
Package size: 60 x 35 x 28cm
DMX-512 Channel Introduction:
27CH:
Channel Value Parameter description
CH1 IPLAY mode
0~31 Black
32~63 Manual play
64~95 Auto play

9
96~128 Music play
129~255 Invalid
CH2 Dimmer 0~255 Fade 0% - 100%
CH3 Red 0~255 Fade 0% - 100%
CH4 Green 0~255 Fade 0% - 100%
CH5 Blue 0~255 Fade 0% - 100%
CH6
Page
0~255
Each 32 value be 1 page, total 8 pages(valid
for CH1=32~63)
Macro
Each 10 value be 1 macro, total 25 macros
(valid for CH1=64~128)
CH7 Cue
0~15 Black
16~255
CH1(32~63) each 12 value be 1 cue,total
20 cues
CH8 X position 0~255 Left - right movement(128 center)
CH9 X fine 0~255 X position fine movement
CH10 Y position 0~255 top - bottom movement(128 center)
CH11 Y fine 0~255 Y position fine movement
CH12 Rotation 0~255 CW rotation (0°-360°)
CH13 Fine 0~255 Fine rotation
CH14 Zoom 0~255 100% - 0%
CH15 X flip 0~255 Flip from left to right
CH16 Y flip 0~255 Flip from top to bottom
CH17 Color
0~7 Default
8~15 White
16~23 Red
24~31 Yellow
32~39 Green
40~47 Cyan

10
48~55 Blue
56~63 Purple
64~127 Each 8 value be 1 color, total 8 colors
128~255 Each 16 value be 1 macro, total 8 macros
CH18 Write in 0~255 Visible point 100%-0%
CH19 Deformation
0~15 Invalid
16~223
Each 16 value be one macro function(valid
for 14CH 25CH)
224~255 Default
CH20 Wave 0 Invalid
1~39 Each 40 value be 1 macro, total 6 macros
CH21 Write in
0 Invalid
1~42 Macro 1
43~84 Macro 2
85~126 Macro 3
Strobe 127~255 Strobe (slow to fast)
CH22 X position 0 Invalid
1~255 Each 32 value be 1 macro, total 8 macros
CH23 Y position 0 Invalid
1~255 Each 32 value be 1 macro, total 8 macros
CH24 Z rotation 0 Invalid
1~255 Each 32 value be 1 macro, total 8 macros
CH25 Zoom 0 Invalid
1~255 Each 32 value be 1 macro, total 8 macros
CH26 X invert 0 Invalid
1~255 Each 32 value be 1 macro, total 8 macros
This manual suits for next models
1
Table of contents
Other TOPIC-LIGHT Lighting Equipment manuals


Popular Lighting Equipment manuals by other brands


Qazqa
Qazqa Suplux SL 3 Black 103062 instruction manual

Commercial Electric
Commercial Electric 54568141 Use and care guide

CREE LIGHTING
CREE LIGHTING 304 Series installation instructions

Goobay
Goobay 49867 user manual

ECOMAN ITALIA
ECOMAN ITALIA LED T8 instruction manual

Alkalite
Alkalite Krypton KT-81 user manual


