THOMSON RR540CD User manual

EN

EN
Main Connections (For UK only)
CAUTION:
For UK Only
CONNECT THE MAIN LEAD INTO AC
MAINS POWER SOCKET
POWER SUPPLY 230V. It must not be
connected to D.C. mains.
Note: The mains lead of the set is fitted
with a moulded plug. If the mains
socket are not compatible or if for any
reason the plug is removed please
follow the directions below. The
moulded plug cannot be rewired and if
removed must be disposed of safely.
DO NOT under any circumstances plug
the severed plug into any mains socket
as this could result in electric shock.
Important: If the plug is removed,
rewire the new plug as follow:
The wires in the mains plug are
coloured in accordance to the following
code:
BLUE = NEUTRAL & BROWN = LIVE
If the colours of the wires in the mains
lead of this apparatus may not
correspond with the coloured markings
identifying the terminals in your plug,
proceed as follows:
Connect the
power cord into
a mains power
socket 230V
~50Hz
MAINS CONNECTIONS
MAINS OUTLET POWER SUPPLY: 230V ~50Hz
Note:
Power is fed to the unit even when it is not functioning. To
cut the power supply off, the power cable must be unplugged.
BLUE wire to the terminal coded N
(Neutral) or coloured black.
BROWN wire to the terminal coded L
(Live) or coloured red.
DO NOT make any connection to the
terminal in the plug which is marked by
the letter E or by the earth symbol
or coloured green or green and yellow.
A fused plug must be fitted with a 3A
fuse approved by ASTA or BS1362 and
fuse covers must be always be securely
replaced. If your set does not work, the
fuse may be blown.

EN
WARNING:
TO PREVENT FIRE OR ELECTRICAL
SHOCK HAZARD, DO NOT EXPOSETHIS PRODUCT
TO RAIN OR MOISTURE.
SEE MARKING ON BOTTOM / BACK OF PRODUCT
CAUTION
RISK OF ELECTRIC SHOCK
DO NOT OPEN
THE EXCLAMATION
POINT WITHIN THE
TRIANGLE IS A
WARNING SIGN
ALERTING YOU OF
IMPORTANT
INSTRUCTIONS
ACCOMPANYING
THE PRODUCT.
THE LIGHTNING
FLASH AND ARROW-
HEAD WITHIN THE
TRIANGLE IS A
WARNING SIGN
ALERTING YOU OF
"DANGEROUS
VOLTAGE" INSIDE
THE PRODUCT.
CAUTION: TO REDUCE THE
RISK OF ELECTRIC SHOCK,
DO NOT REMOVE COVER
(OR BACK). NO USER-
SERVICEABLE PARTS IN-
SIDE. REFER SERVICING
TO QUALIFIED SERVICE
PERSONNEL.
Safety Information
CAUTION!
Invisible laser radiation when open. Avoid
exposure to beam. Class 1 laser product. This
system must be opened only by qualified
technicians to prevent accidents caused by the
laser beam.
LASER λ= 780nm, P max=5 mW
Rating Information : At the bottom of the unit.
This unit complies with the existing requirements.
Please respect the environment
Before throwing any batteries away,
consult your distributor who may be
able to take them back for specific
recycling.
CAUTION – INVISIBLE LASER RADIATION
WHEN OPEN AND INTERLOCKS FAILED OR
DEFEATED. AVOID EXPOSURE TO BEAM.
ATTENTION –
RAYONNEMENT LASER INVISIBLE
DANGEREUX EN CAS D'OUVERTURE ET LORSQUE
LA SECURITE EST NEUTRALISEE.
EXPOSITION DANGEREUSE AU FAISCEAU.
VARNING–
OSYNLIG LASERSTRÅLNING NÄR DENNA DEL
ÄR ÖPPNAD OCH SPÄRRAN ÄR URKOPPLADE.
BETRAKTA EJ STRÅLEN.
VARO!
AVAT T AESSA JA SOUJALUKITUSOHITETT
AESSA
OLET AL
TTIINA NÄKYMÄTTÖMÄLLE.
LASERSÄTEILYLLE ÄLÄ KATSO SÄTEESEEN.
CLASS 1 LASER PRODUCT
LASER KLASSE 1
APPAREIL A LASER
DE CLASSE 1
LUOKAN 1 LASERLAITE
KLASS 1 LASERAPPARAT
Have a Blast-Just Not in your eardrums
Make sure you turn down the volume
on the unit before you put on
headphones. Increase the volume to
the desired level only after headphone
are in place.
In accordance with the rating plate of
the unit, this unit complies with
current standards concerning electrical
safety and electromagnetic
compatibility.
ADVARSEL!
USYNLIG LASERSTRÅLNING VED ÅBNING NAR
SIKKERHEDSAFBRYDERE ER UDE AF FUNKTION.
UNGDÅ UDSAETTELSE FOR STRÅLNING.
VORSICHT!
UNSICHTBARE LASERSTRALUNG
WENN ABDECKUNG GEÖFFNET UND SICHERHEITS–
VERRIEGELUNG ÜBERBRÜCKT.
NICHT DEM LASERSTRAHL AUSSETZEN!

EN
•Make sure that you keep
your set away from water
and high temperatures.
• Do not use your System immediately
after transporting it from a cold place
to a warm place, as condensation may
cause the system to malfunction.
• Keep your unit away from humid
areas and abnormally hot places.
• To prevent personal injury, do not
reverse any batteries.
•The use of apparatus in moderate
climates.
• The apparatus shall not be exposed to
dripping or splashing and that no
objects filled with liquids, such as
vases, shall be placed on the
apparatus.
•No naked flame sources, such as
lighted candles, should be placed on
the apparatus.
•Attention should be drawn to the
environmental aspects of battery
disposal.
•Minimum distances (2cm) around the
apparatus for sufficient ventilations.
•The ventilation should not be
impeded by covering the ventilation
opening with items, such as
newspaper, table-cloths, curtains, etc.
•The rating plate is located at the
bottom cabinet of apparatus.
Ecology
Help protect the environment
- we recommend that you
dispose of used batteries by
putting them into specially
designed receptacles.
Maintenance
Clean the unit with a soft
cloth, or a damp chamois
leather. Never use solvents.
Safety Information
Technical Specification:
Power supply - AC 230V ~50Hz
Clock backup: 3V 2 x AA/LR6/UM3
Power consumption: 11W
Your THOMSON product is
designed and manufactured
with high quality materials
and components which can
be recycled and reused.
This symbol means that
electrical and electronic equipment, at
their end-of-life, should be disposed of
separately from your household waste.
Please, dispose of this equipment at
your local community waste collection/
recycling centre.
In the European Union there are
separate collection systems for
used electrical and electronic product.
Please, help us to conserve the
environment we live in!

EN
1
Table of Contents
Safety information
Battery Back-Up Operation .......... 2
General Controls ........................... 3
Front view ........................................... 3
Bottom view ....................................... 3
Top view .............................................. 4
Side view ............................................. 4
The Display .................................... 5
Clock Display ....................................... 5
Wake 1 and Wake 2 Display ............. 5
Before You Begin .......................... 6
Automatic Time Set ........................... 6
Daylight Saving .................................. 6
Setting Time Zone .............................. 6
Setting the Clock .......................... 7
Setting Clock ....................................... 7
Operating Wake Timer ................. 8
Setting the Wake Time ...................... 8
Selectng Wake Mode ......................... 8
Waking to CD ..................................... 9
Waking to Radio .............................. 10
Waking to Alarm Tone .................... 11
Turning off Alarm ............................ 11
Operating the Radio ................... 12
Tuning the Stations .......................... 12
Automatic Radio Station Search ..... 12
Setting the Preset Radio Stations ... 13
Selecting the Preset Radio
Stations .............................................. 13
Overwriting the Preset Radio
Stations .............................................. 13
Deleting the Preset Radio Stations 13
Operating the CD Player ............ 14
Listening to Compact Disc ............... 14
Selecting Play Mode ........................ 14
Alarm Settings ............................ 15
Setting Sleep Time ........................... 15
Sleep to Radio .................................. 15
Sleep to CD ....................................... 15
Viewing Remaining Time ................ 15
Nap Mode ......................................... 16
Stopping the Nap Alarm ................. 16
Cancelling the Nap Alarm ............... 16
Snooze ............................................... 16
Auto Brightness ................................ 16
Backlight Color Select ...................... 16
Care and Maintenance ............... 17

EN
Battery Back-Up Operation
This clock radio is equipped with a
memory holding system that can be
powered with 2 “AA” batteries
(included). The power failure protection
circuit will not operate unless battery is
installed.
When normal household power is
interrupted, or the AC line cord is
unplugged, the batteries will power the
clock radio to keep track of time and
alarm settings programmed into
memory. When the battery backup
functions, the digital display will not
light, however, the function of alarm still
occurs during the power interruption if
the remaining battery power is
adequate. Normal operation will resume
after AC power is restored so you will
not have to reset the time or the alarm.
Install batteries as follow:
1. Unlock the battery compartment door
(located at the bottom of the radio) by
sliding the tab away from the door.
2. Open the battery compartment door.
3. Insert 2 “AA” batteries with polarities
matching indications.
4. Replace the compartment door and
slide the tab to lock battery
compartment.
2
The descriptions and characteristics in this owner’s manual are for the purpose of
general reference only and not as a guarantee. In order to provide you with the
highest quality product, we may make changes or modifications without prior notice.
The English version serves as the final reference on all product and operational details
should any discrepancies arise in other languages.

EN
WAKE UP CD TRACK / RADIO - sets the
wake up radio station or CD track.
CD mode - selects repeat 1 / repeat all /
shuffle / repeat shuffle in CD mode.
- skips / searches backward.
- starts / pauses CD playback.
- skips / searches forward.
- stops CD playback.
OFF - turns off the radio / alarm / CD
RECALL - recalls available preset radio
stations.
MEMO - sets and stores preset memory
in radio mode.
RADIO /BAND- turns on the radio /
changes radio band.
OPEN / CLOSE - opens / closes
the CD compartment.
General Controls
3
Front view Bottom view
TIME ZONE - Slide to select different
time zone.
DAYLIGHT SAVING TIME - Press to turn
on / off the Daylight Saving function.
CD/TRACK/RADIO
OPEN / CLOSE

EN
4
SNOOZE - turns off the alarm
momentarily.
NAP - sets the alarm to sound after a
specific period of time. (Alarm tone only)
- activates SLEEP function.
/ - change time / radio frequency /
CD track
TURNING KNOB - Rotate until the
indicator points to your selected mode.
The options are as follow (left to right):
WAKE TIME 1 - adjusts wake time 1.
WAKE TIME 2 - adjusts wake time 2.
CLOCK - adjusts clock time.
LOCK - no adjustment can be made
when in lock mode.
WAKE MODE 1 - change WAKE 1 mode.
WAKE MODE 2 - change WAKE 2 mode.
BRIGHTNESS - adjusts the brightness
level.
Top view Side view
VOLUME - adjusts the volume.
General Controls
VOL
1
T
IM
E
2
C
L
O
C
K
L
O
C
K
1
M
OD
E
2
B
R
IG
H
T
N
E
S
S
WA
KE
WA
KE
TURNING
KNOB

EN
5
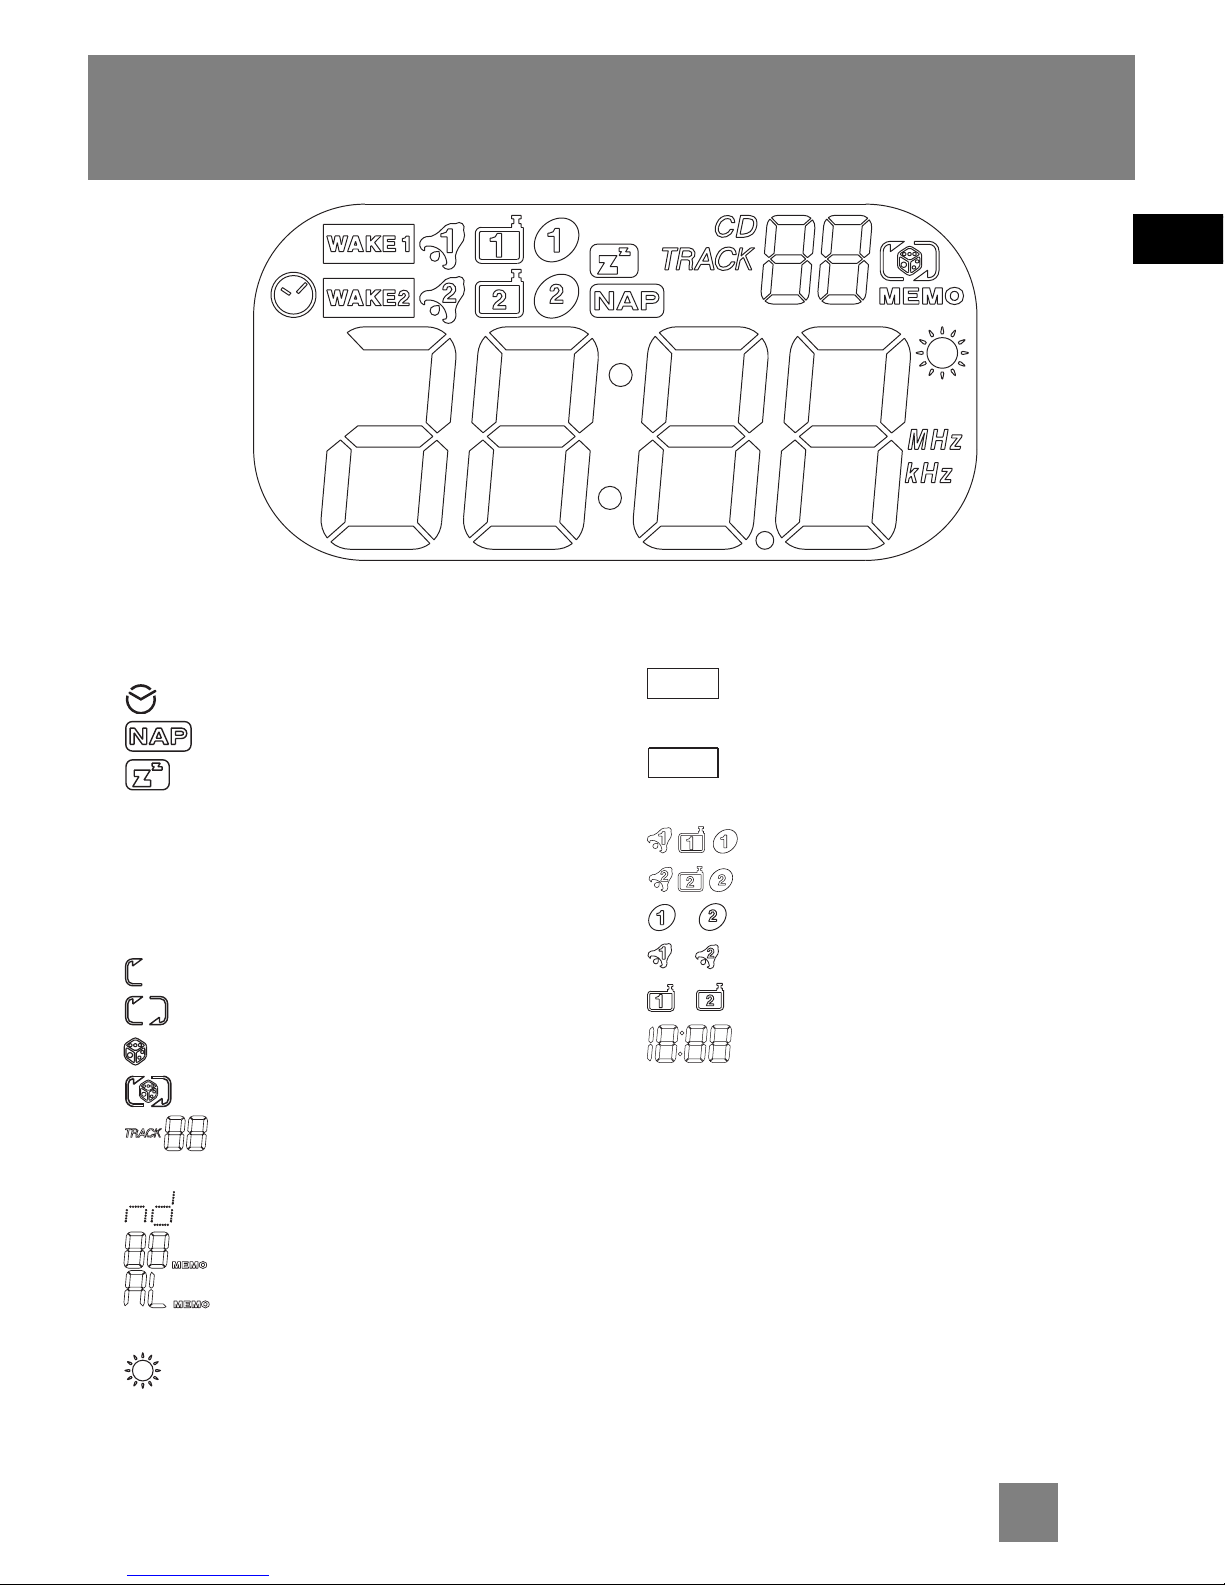
The Display
Clock Display
MW
FM
MHz/kHz
CD
Wake 1 and Wake 2 Display
WAKE 1
WAKE 2
//
//
/
/
/
In clock setting mode.
Nap activated.
Sleep activated.
In MW radio band.
In FM radio band.
Radio frequency unit.
In CD mode.
Repeats the current track.
Repeats the whole disc.
Plays tracks randomly.
Plays random track repeatedly.
In CD mode, displays track
number.
No disc detected.
In radio mode, displays
memory recall number.
Displays when the alarm radio
station is set.
Daylight saving.
In wake 1 time setting
mode.
In wake 2 time setting
mode.
Wake 1 source.
Wake 2 source.
Wake to CD.
Wake to alarm tone.
Wake to radio.
Wake or clock time.
LW
PM
AM
FM
MW

EN Automatic Time Set
You do not have to set the clock time as
a built-in automatic time set system is
equipped in this clock powered by 2 X
AA batteries (included). All you have to
do is to plug this clock for power and
current time will be shown automati-
cally.
Daylight Saving
You can press and hold DAYLIGHT
SAVING TIME at the bottom of
the unit to turn on / off the Daylight
Saving function in areas observing / not
observing such time change.
Setting Time Zone
You may slide the time
zone selector at the
bottom of the clock to
1,2,3 or 4.
Refer to the Time Zone
table below for corresponding regions.
WARNING: Please avoid playing with
these buttons after entering the
Clock/Alarm set mode.
Before You Begin
6
TIME ZONE (Table 1)
3
Eastern Europe
Finland
Greece (Athens)
1
Ireland
Portugal
UK (London)
2
Austria
Czech republic
France (Paris)
Germany
Holland
Italy
Poland
Spain
Sweden
4
Russia (Moscow)
Table of contents
Other THOMSON Clock Radio manuals

THOMSON
THOMSON CR80 User manual

THOMSON
THOMSON CR400iBT User manual

THOMSON
THOMSON CP284DAB User manual

THOMSON
THOMSON RR200PLL User manual

THOMSON
THOMSON RR550CD User manual

THOMSON
THOMSON RR60 User manual

THOMSON
THOMSON RR640CD User manual

THOMSON
THOMSON CR221I User manual

THOMSON
THOMSON RT304 User manual

THOMSON
THOMSON RR96L User manual

THOMSON
THOMSON CL300P User manual

THOMSON
THOMSON RR95 User manual

THOMSON
THOMSON RR520U User manual

THOMSON
THOMSON RT554 - annexe 1 User manual

THOMSON
THOMSON CT400i User manual

THOMSON
THOMSON CR50 User manual

THOMSON
THOMSON CR50DAB User manual

THOMSON
THOMSON RR420CD User manual

THOMSON
THOMSON CP280 User manual

THOMSON
THOMSON CT390 User manual