TetraLite TetraMouse TMXS Manual

MODEL TMXS

CONTENTS
Set Up
Articulated Arm Mounting System 1
Mounting the TetraMouse 2
Positioning the TetraMouse 3
Features
Overview of the TetraMouse 4
The Right Joystick 5
The Left Joystick 6
Programming
Programming Overview 7
Speed Channel Selection 8
Speed Channel Programming 9
Channel Memory Configurations 10
Recalling Memory Configurations 10
Storing Memory Configurations 11
Resetting the Factory Defaults 11

CONTENTS (Continued)
Software Options
Button Remapping in Windows 12
Button Remapping on a Mac 13
Typing with an On-screen Keyboard 13
Operating Options and Tips
Knob Options 14
Tips and Techniques 14
Mouse Pointer Speed 14
Developing Your Skills 15
Web Browsing 15
Other Applications 16
Cleaning the TetraMouse 16
Warranty and Support
30-day Satisfaction Guaranty 17
Lifetime Repair or Replace Warranty 17
Customer Support 17
Disclaimer 17
Page 1
If you ordered TetraMouse Mounting System with
your TetraMouse, follow these instructions for
mounting. If you will be using another mounting
system please refer to the documentation for that
system. The size 1/4”-20tpi threaded stud that
protrudes from the back of the TetraMouse is used
for mounting. If using the TetraMouse Mounting
System, the Mouse Mounting Stud is tightened
firmly onto the threaded stud on the TetraMouse.
The Base Clamp mounts to a flat surface or a
tubular object. Either Universal End of the
Articulated Arm is then attached to the Base Stud.
The TetraMouse is then attached to the other
Universal End of the Articulated Arm using the
Mouse Mounting Stud.
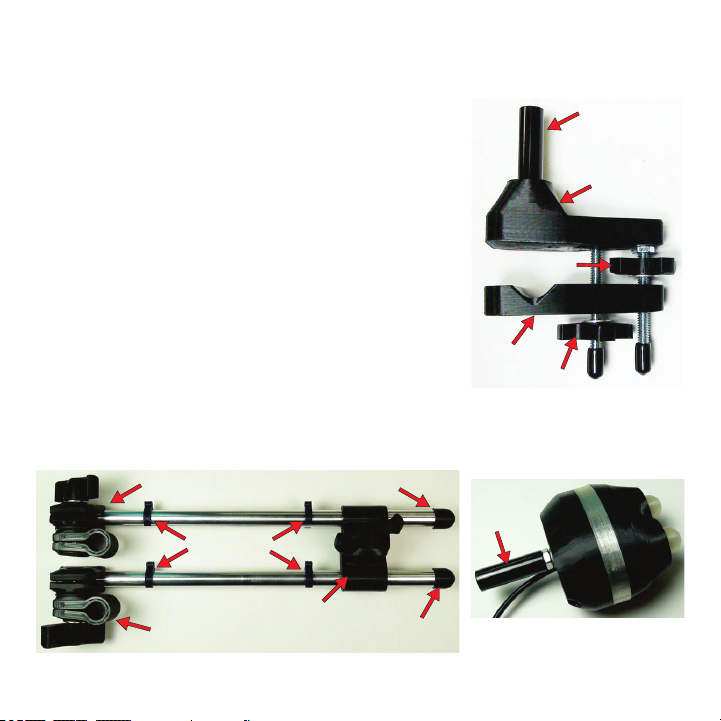
ARTICULATED ARM MOUNTING SYSTEM
SET UP
BASE STUD
JAW
UPPER KNOB
LOWER KNOB
BASE
BASE CLAMP
ARTICULATED ARM
UNIVERSAL END
CABLE CLIPS
UNIVERSAL ELBOW
UNIVERSAL END
TUBE CAP
TUBE CAP MOUSE
MOUNTING
STUD
TETRAMOUSE

Page 2
MOUNTING THE TETRAMOUSE
These instructions use the terminology for the various parts
as shown in the illustrations on the previous page. These
terms are capitalized in the following instructions. “Up” and
“Down” references are relative to the image of the Base
Clamp on the previous page.
The Base Clamp is mounted to a desktop or tubular frame of
bed, wheelchair, etc., using the Lower Knob and Upper Knob
to tighten and hold the clamp securely. To mount to a desktop
or tubular object, first turn the Upper Knob up until it is loosely
against the nut at the bottom of the Clamp Base, then turn the
Lower Knob until the Jaw can be moved down far enough to
accommodate the thickness of the mounting surface or
diameter of the tubular object. Next, turn the Lower Knob
back up to bring the Jaw up against the mounting surface or
tubular object and tighten it firmly until the Base Clamp is held
to the surface. Then turn the Upper Knob to bring it down onto
the top of the Jaw and tighten it firmly.
Loosen the Universal Ends and Universal Elbow to allow
mounting the arm to the Base Stud on one end, and mounting
the TetraMouse with the Mouse Mounting Stud on the other
end.

Loosen the knobs on the Universal
Ends and Universal Elbow on the
Articulated Arm just enough to allow
repositioning of the TetraMouse, but
tight enough to stay where it is put.
When the TetraMouse is in the desired
position and the user finds it
comfortable to operate without
straining or reaching, the joints may be
tightened more firmly to better hold it
in position.
The TetraMouse should ideally be
positioned as in the above illustration
Page 3
POSITIONING THE TETRAMOUSE
(mounting arm not shown). The user should be in a comfortable position
looking straight ahead at the computer screen. The TetraMouse is then
brought into position so that the lips or chin are in contact with the knobs on
the joysticks. Some users prefer to use the area between the chin and lower
lip to move the joysticks, while others prefer using the lips.
It is important that the TetraMouse be brought into position without the user
having to "reach" for it. If the user has to change position or strain to reach the
TetraMouse, he or she will be more likely to experience fatigue or muscle pain
after a period of use.
CAUTION: Prolonged use of the TetraMouse, as with any mouse, can result
in muscle pain, fatigue or even repetitive stress injury. The user should take
periodic breaks, as is recommended for all mice and keyboards.

Page 4
FEATURES
OVERVIEW OF THE TETRAMOUSE
The TetraMouse connects to the
computer using any available USB
port. You may connect one or more
other mice to the computer if desired
(recommended if a helper or other
person will also be using the same
computer).
The 1/4"-20 male threaded stud
protrudes from the center of the back
of the unit to provide for mounting the
TetraMouse.
BLUE, GREEN, YELLOW AND RED
INDICATOR LIGHTS SHINE THROUGH
THIS SEMI-TRANSPARENT BAND
LEFT JOYSTICK RIGHT JOYSTICK
MOUNTING STUD
(1/4”-20)
USB CONNECTOR
AND CABLE
The four indicator lights show the various
states and settings of the TetraMouse
while it operates in Mouse Mode or
Program Mode. In Mouse Mode the color
coded indicators show which speed
channel is active. In Program Mode they
give various indications depending on the
operation (as explained later).
The left and right joysticks allow the user
to move the mouse pointer, perform
clicking, drag and drop, scrolling,
programming the pointer speeds and
speed memory configurations.
REAR VIEW
Page 5
R
R
R
RR
RRR
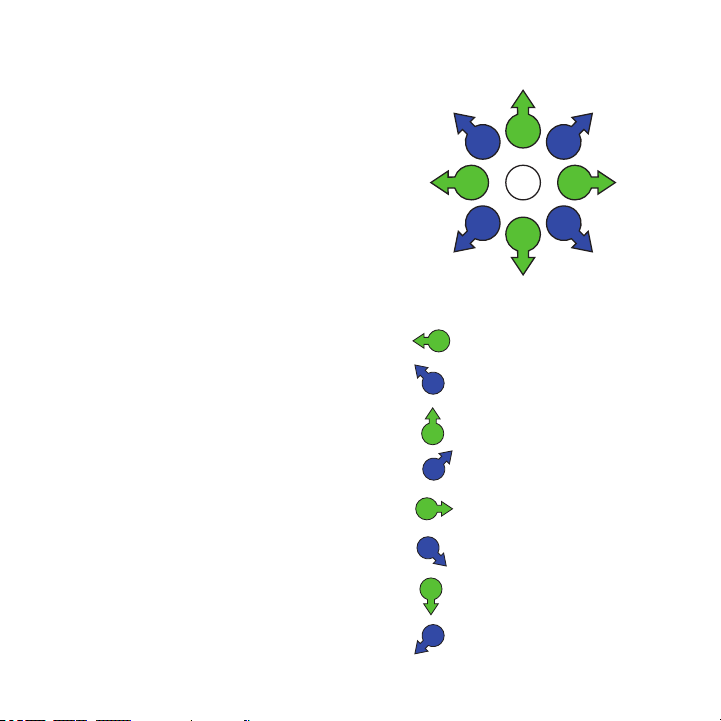
UP
LEFT RIGHT
DOWN
UP &
LEFT UP &
RIGHT
DOWN &
LEFT DOWN &
RIGHT
Push the right joystick in any of the
eight directions illustrated to move
the mouse pointer on the computer
monitor in the corresponding
direction.
The mouse pointer moves at the
speed setting of the currently
selected Speed Channel (see
details on selecting Speed Channels
in the Programming section). The
pointer stops moving when you
release the right joystick.
In Program Mode, the right joystick
is used to change the speed setting
of the currently selected Speed
Channel, to select any of four
memory locations for storing and
recalling speed setting configuration
combinations, or for resetting the
TetraMouse to its factory default
settings.
The section about Programming has
complete details of the right joystick
functions in Program Mode.
R
R
R
R
R
R
R
R
MOVE LEFT
MOVE UP & LEFT
MOVE UP & RIGHT
MOVE UP
MOVE RIGHT
MOVE DOWN & RIGHT
MOVE DOWN & LEFT
MOVE DOWN
Push the right joystick left
Push right joystick up & left
Push right joystick up & right
Push the right joystick up
Push the right joystick right
Push right stick down & right
Push right joystick down & left
Push the right joystick down
THE RIGHT JOYSTICK

Page 6
THE LEFT JOYSTICK
L
L
L
L
L
L
L
L
L
L
L
L
LEFT CLICK
LEFT CLICK & HOLD
RIGHT CLICK & HOLD
SPEED / PROGRAM
BUTTON 4 CLICK
BUTTON 6 CLICK
SCROLL DOWN
BUTTON 5 CLICK
BUTTON 7 CLICK
BUTTON 8 CLICK
SCROLL UP
RIGHT CLICK
MIDDLE CLICK
Push left, then release
Push left, then down & release
Push right, then down & release
Push up & release to select
Program Mode
Push up, then left, & release
Push down, then left & release
Left then up - hold for repeat
Push up, then right & release
Down, then right & release
Push down, then right,
then up, then release
Right then up - Hold for repeat
Push right, then release
Push down, then release
(See Programming details)
L
The LEFT JOYSTICK is used to perform all eight
mouse button clicks, left and right click-and-hold (drag
and drop), scrolling, and to enter Program Mode.
Use movements as shown on the right to perform the
various functions. Left, right and middle button clicks,
and entering Speed/Program Mode are simple straight
movements. Buttons 4 through 8, click & holds and
scrolls use combination moves (or gestures). As an
example of a combination move gesture, a left click &
hold is performed by pushing the left joystick left, then
while still holding to the left, pull the joystick down, then
release. With a little practice, the “gesture” moves can
be done in one smooth, arcing movement, first pushing
the joystick in the first direction, then the other
direction, then releasing.
The blue indicator light blinks while a left click & hold is
active. The red indicator light blinks while a right click &
hold is active. Release a left click & hold with a normal
left click. Release a right click & hold with a normal right
click. A context menu may pop up onscreen when
releasing a right click & hold. The context menu may be
acted upon with a left click on any of the menu options,
or dismissed with a left click outside of the menu.
In program mode you can select a Speed Channel,
change the speed setting of the current Speed
Channel, store up to four Speed Channel
configurations to one of four memory locations, recall
any of the four Speed Channel configurations or reset
all memory and speed settings to the original factory
defaults. See the Programming section for complete
details.

Page 7
PROGRAMMING
PROGRAMMING OVERVIEW
The left and right joysticks perform different functions when the
TetraMouse is in Program Mode. When the TetraMouse is powered up, it
starts in Mouse Mode. To enter Program Mode, the user pushes the left
joystick up, then releases the joystick. All four indicators blink once, then
all indicators go off to indicate the change to Program Mode.
In Program Mode, the user can select any of the four Speed Channels or
change the pointer speed settings for each of the four Speed Channels
to any one of 16 speeds. Each of the 16 speed settings are indicated by
a unique pattern of the four indicator lights during the programming
operation (see diagram in the Speed Channel Programming section).
Also, in Program Mode, the user may store and recall four different
custom Speed Channel memory configurations consisting of the four
speed settings for each of the Speed Channels, or reset all the speed
and memory settings to the factory defaults.
All programmed settings that have been stored in memory by the user
are retained in memory in the TetraMouse even if it is disconnected or
when the computer is turned off.
Important Note: Speed changes to the Speed Channels not stored in
memory by the user will be lost if the TetraMouse is disconnected or the
computer is turned off.
Details of changing speeds and performing memory operations are given
on the following pages.
Table of contents
Other TetraLite Video Game Controllers manuals


