Temperature@lert TM-WIFI220 User manual

1 |
WiFi Edition
User Guide
Model TM-WIFI220

2 |
User Guide
Thank you for choosing Temperature@lert to protect your highly valuable
belongings from unexpected changes in temperature. We hope that you will
find our products and services the simplest and most reliable wireless
temperature monitoring system available.
Copyright
2010 Temperature@lert
This user’s guide and the software described in it are copyrighted with all
rights reserved. No part of this publication may be reproduced, transmitted,
transcribed, stored in a retrieval system, or translated into any language in any
form by any means without the written permission of Temperature@lert.
Notice
Temperature@lert reserves the right to change specifications without prior
notice.
While the information in this manual has been compiled with great care, it
may not be deemed an assurance of product characteristics.
Temperature@lert shall be liable only to the degree specified in the terms of
sale and delivery.
The reproduction and distribution of the documentation and software
supplied with this product and the use of its contents is subject to written
authorization from Temperature@lert.

3 |
Contents
Contents ................................................................................................................. 3
About Temperature@lert ...................................................................................... 5
User Guide .............................................................................................................. 6
WiFi Edition at a Glance .................................................................................. 6
What’s Included .......................................................................................... 6
Jacks and Connectors .................................................................................. 7
Indicator Lights ............................................................................................ 8
Connectivity Requirements ............................................................................. 9
Turning on the Hardware ................................................................................ 9
Connecting to the Web Based Admin Interface .............................................. 9
Default IP Address ....................................................................................... 9
Default Username and Password ................................................................ 9
Configuring the Device .................................................................................. 10
Status Page ................................................................................................ 10
Logging In .................................................................................................. 11
Alarm Settings Page .................................................................................. 12
Network Settings Page .............................................................................. 14
Preferences Page ....................................................................................... 18
Help Page................................................................................................... 20
Restoring Factory Defaults ............................................................................ 21
Operating Guidelines .................................................................................... 21
Placement .................................................................................................. 21
Using the External Sensor ......................................................................... 21
Preserving the Temperature Log ............................................................... 21
Wireless Reception .................................................................................... 22
Powering the Unit ..................................................................................... 22

4 |
Specifications ....................................................................................................... 23
Troubleshooting ................................................................................................... 25
Unit Does Not Power On ............................................................................... 25
Cannot Connect to the Web Admin Interface ............................................... 25
Check Power Connections ......................................................................... 25
Check the Computer's Ethernet Settings .................................................. 25
Cannot Send Email ........................................................................................ 25
Check Internet Connectivity ...................................................................... 25
Check DNS and Gateway Settings ............................................................. 25
Verify Credentials ...................................................................................... 26
Check Your Junk or SPAM Folder .............................................................. 26
Cannot Connect to a Wireless Network ........................................................ 26
Check SSID ................................................................................................. 26
No Temperature Reading .............................................................................. 26
Ensure the Device has Started Up ............................................................. 26
Check Sensor Connections ........................................................................ 26
No Humidity Reading .................................................................................... 27
Humidity Sensors are Sold Separately ...................................................... 27
Perform the Steps for No Temperature Reading ...................................... 27
Temperature Reading is 0.00000 .................................................................. 27
Reseat the Sensor ...................................................................................... 27
Temperature Reading is a Few Degrees Warmer than it Should Be ............. 27
Check Sensor Position ............................................................................... 27
Comparing Apples to Apples ..................................................................... 27
Temperature Reading is Wildly Inaccurate ................................................... 28
Contact Support ........................................................................................ 28
Obtaining Service and Support ............................................................................ 29

5 |
About Temperature@lert
Our device helps to alert you when slight changes in the environment are
detected. We believe in the simplicity of our device – in design, set-up, and
operation.
We have a long history of designing devices to measure environmental
changes. Our line of monitoring devices takes environmental monitoring to
the next level by allowing for customized timing of monitoring efforts and
customized methods of alert notifications.

6 |
User Guide
WiFi Edition at a Glance
The Temperature@lert WiFi Edition measures the temperature or relative
humidity (with the optional humidity sensor)of the environment surrounding
the remote sensor(s). If the temperature or humidity goes too high or too low,
the unit will alert you via email. (Visit
http://www.temperaturealert.com/dashboard to view Internet based
monitoring options for use with your WiFi Edition sensor.)
What’s Included
The Temperature@lert WiFi Edition includes the following items:
7 |
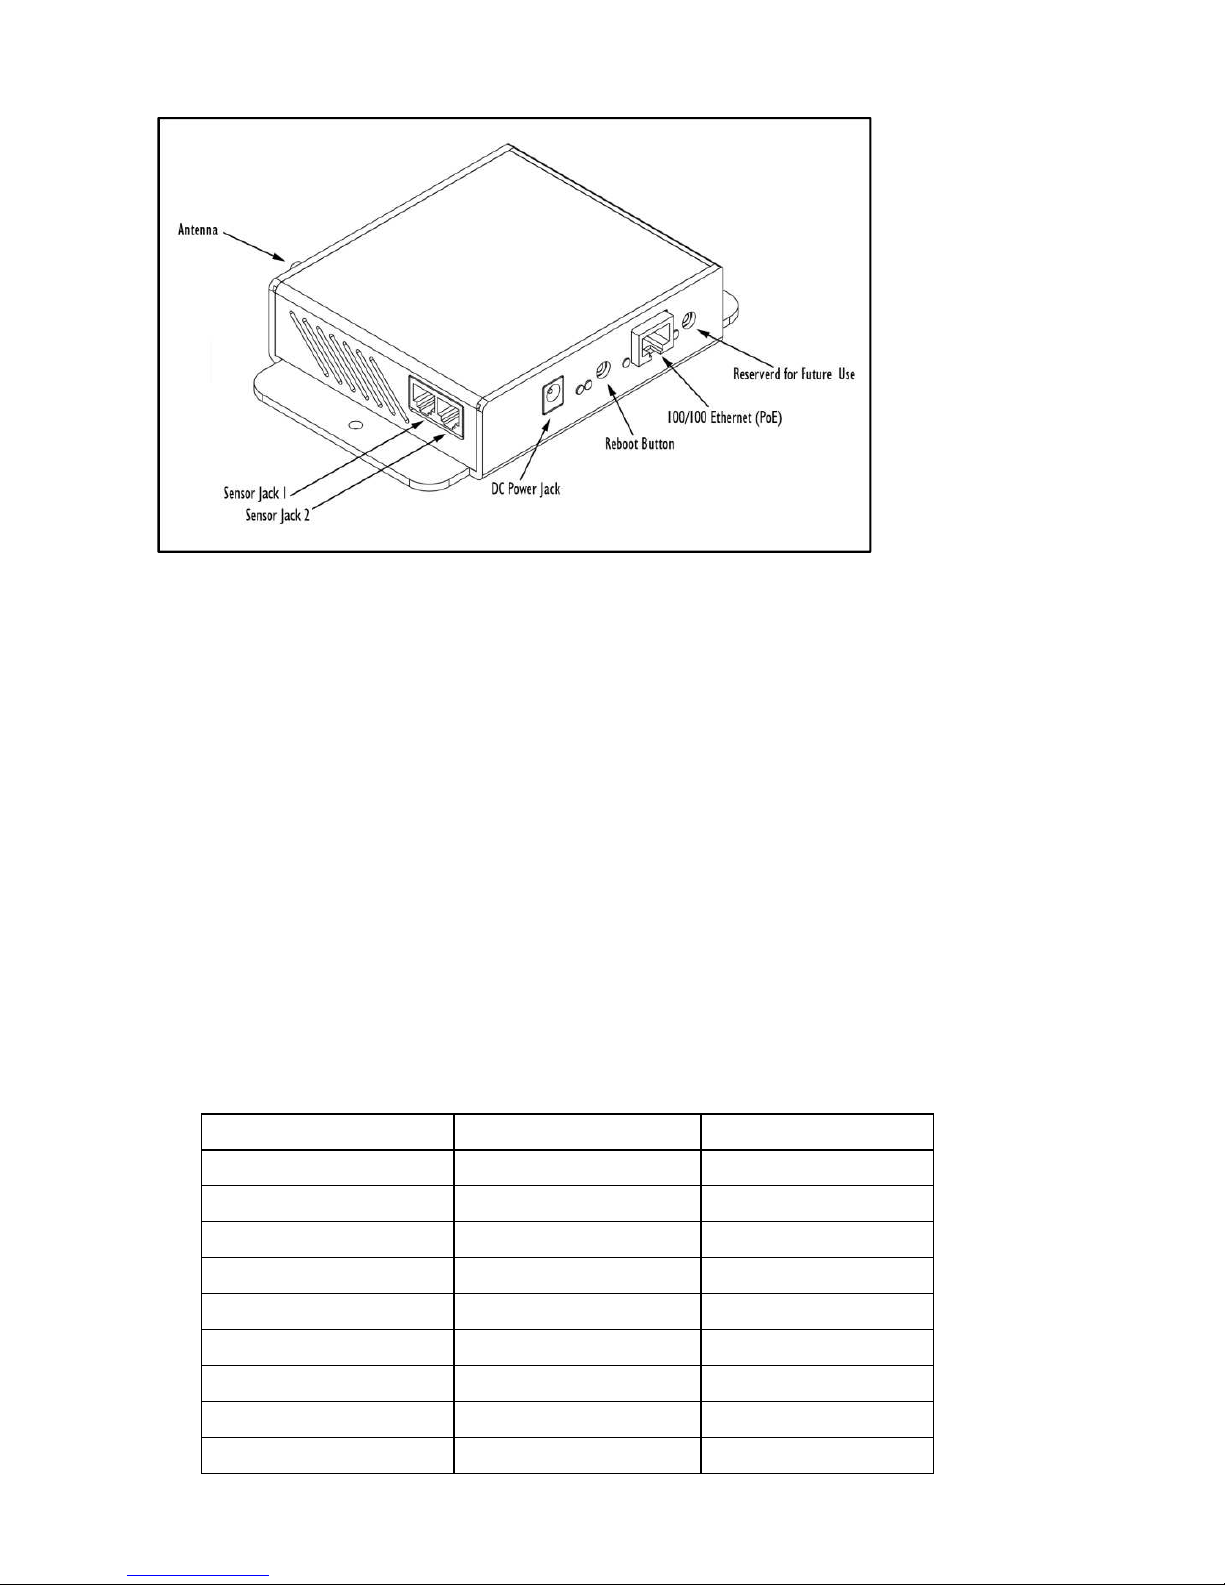
Jacks and Connectors
Figure 1
Sensor Jack 1 - Accepts any sensor made for the Temperature@lert WiFi
Edition Model TM-WIFI220.
Sensor Jack 2 - Accepts any sensor made for the Temperature@lert WiFi
Edition Model TM-WIFI220.
DC Power Jack - Temperature@lert WiFi Edition can be powered by
connecting a 9-48V power supply (one is included with your device) to the DC
Power Jack or via Ethernet (PoE) by using a power injector (sold separately).
Insertion of power supply connector disconnects Ethernet power feed line.
Power jack accepts DC 2.1/6.3mm coaxial power connectors in the following
configurations:
Voltage
Idle, A/W
Full Load, A/W
9V
0.50A / 4.5W
0.94A / 8.5W
12V
0.38A / 4.6W
0.70A / 8.4W
15V
0.30A / 4.5W
0.56A / 8.4W
18V
0.26A / 4.7W
0.48A / 8.6W
24V
0.19A / 4.6W
0.36A / 8.6W
30V
0.16A / 4.8W
0.29A /8.7W
36V
0.13A / 4.7W
0.25A / 9.0W
40V
0.12A / 4.8W
0.23A / 9.2W
48V
0.10A / 4.8W
0.19A / 9.1W

8 |
Reboot Button - Restarts the device when pressed and released.
10/100 Ethernet Port - Provides wired Ethernet connectivity.
Reserved Button - Button used for custom applications. Can be user
programmed from within the device's operating system.
Indicator Lights
Figure 2
Power - Indicates the unit is receiving power properly.
Aux I - Light used for custom applications at the operating system level. Can be
programmed from the device's operating system.
Aux 2 - Light used for custom applications at the operating system level. Can
be programmed from the device's operating system.
100 Mbit – Indicates 100 Mbit Ethernet connection / activity.

9 |
Connectivity Requirements
In order to operate properly and send email alerts when the temperature (or
other sensor readings) falls below or rises above your acceptable range,
Temperature@lert WiFi edition requires Internet access via either a wireless
or wired Ethernet connection.
Turning on the Hardware
Connect one or two sensors to either jack on the side of the device (see figure
1) Note: The device does not have any built in sensors.
Plug the AC adapter into a wall outlet and connect the power to the device.
Please wait about 60 seconds for the device to finish booting up. Your device is
now ready to connect to your PC.
Connect an Ethernet cable to your computer and to the Ethernet jack of the
Temperature@lert WiFi unit.
Connecting to the Web Based Admin
Interface
If your computer’s Ethernet adapter is set to acquire an IP address, via DHCP,
the WiFi device will assign it an address. Otherwise, you will need to configure
a static IP address on the same subnet as the WiFi device (such as 10.99.99.2).
The default IP/subnet of the device is 10.99.99.1 / 255.255.255.0
Open a web browser and browse to http://10.99.99.1/.
Default IP Address
10.99.99.1
Default Username and Password
Username: admin
Password: password

10 |
You will see the current sensor reading along with a graph. This page will
automatically refresh itself every few minutes. If you do not see a temperature
reading or the temperature reading is 0.00000, please see the Obtaining
Service and Support section of this document.
It is highly recommended that you click on the Preferences tab and set a new
administrative password.
Configuring the Device
Status Page
Figure 3
Other manuals for TM-WIFI220
1
Table of contents


