TEFAL VITAMIN PLUS STEAMER User manual


Time saving appliance.
There’s no longer any need to supervise the cooking. The cooker will
turn off automatically and switch to keep-warm mode, so the food cooks
gently during your absence with perfect results!
A single appliance,
two cooking modes:
Steam Cooking: Natural steam cooks the food while
preserving the flavour, colours, vitamins and minerals. Your
appliance is fitted with a Vitamin+ touchpad which reduces
the cooking time and helps retain vitamins.
Slow Cooking: for all types of dishes that require a longer
cooking cycle (stews, casseroles, curries, soups and steamed
puddings). Natural steam heats up in the cooking chamber and
the food simmers slowly in the slow cooking bowl without risk
of burning.
2
S
t
e
a
m
c
o
o
k
i
n
g
p
.
8
S
l
o
w
c
o
o
k
i
n
g
p
.
1
4
D
e
l
a
y
e
d
c
o
o
k
i
n
g
p
.
1
8
Steam cookingSlow cookingDelayed cooking
After use and cleaning Preparation

3
20
21

1. Lid handle
2. Lid
3. Steam vents
4. Slow cooking bowl also used as rice
bowl
5. Clip-on handle
6. Upper steam basket No 2
7. Removable base (only on basket No 2)
8. Lower steam basket No 1
9. Steam channel
10. Juice collector
11. Exterior water filling inlet
12. Water switch® (2 positions:
steaming or slow cooking )
13. Removable turbo ring/descaling system
14. Heating element
15. Water level indicator
16. Water tank (1.3L capacity)
17. Electronic programmer with integrated
Vitamin+ and slow cooking touchpads
18. Slow cooking touchpad: to start the
slow cooking mode
19. Steaming touchpad: to start the
steaming mode and vitamin+
function
20. Steam vent
21. Condensation tray
Appliance description
This appliance complies with the safety regulations
and conditions in effect and with the following:
- Household appliance directive 89/336/CEE
modified by directive 93/68/CEE
- Low Voltage Directive 72/23/CEE modified
by directive 93/68/CEE.
• Check that the power supply voltage corresponds
to that shown on the appliance (alternating
current).
• Given the diverse standards in effect, if the
appliance is used in a country other than that
in which it is purchased, have it checked by an
approved service centre.
• Do not place the appliance near a heat source or
in a hot oven, as serious damage could result.
• Use on a flat, stable, heat-resistant work surface,
away from any water splashes.
• Never leave the appliance in operation unattended.
Keep away from children.
• Do not leave the cord hanging.
• Always plug the appliance into an earthed
socket.
• Do not unplug the appliance by pulling on the
cord.
• Do not use the appliance if:
- the appliance or the cord is damaged.
- the appliance has fallen or shows visible
damage or does not work properly.
In the event of the above, the appliance must
be sent to an approved Service Centre.
• If the power supply cord is damaged, it must
be replaced by the manufacturer, the aftersales
service or a similarly qualified person in
order to avoid any danger.
• Burns can occur by touching the hot surface
of the appliance, the hot water, the steam or
the food.
• Always unplug the appliance:
- immediately after use,
- when moving it,
- prior to any cleaning or maintenance.
• Never immerse the appliance in water !
• Do not place the appliance near a wall or a
cupboard - the steam produced by the
appliance can cause damage.
• Do not move the appliance when it is full of
liquids or hot foods.
• This appliance is designed for domestic use
only. In case of professional use, inappropriate
use or failure to comply with the instructions,
the manufacturer accepts no responsibility
and the guarantee does not apply.
• Do not touch the appliance while it is producing
steam and use a cloth or oven gloves to remove the lid,
rice bowl and steam bowl.
Safety instructions
Your appliance is designed for many years use. However, when you decide to replace
your appliance, do not forget that you can contribute towards protecting the environment
by disposing of it at your local waste disposal centre (for appliances fitted with an
electronic programmer).
Protect the environment
4
Read the instructions for use and carefully follow the directions for use.
This appliance produces boiling hot steam.
Prior to use
Do not
immerse the water
tank in water when
cleaning.
The battery
must be changed by
an approved service
agent (battery lifetime
is approximately
5 years).
You need to
set the time before
programming.
After 30
seconds without
action the appliance
displays the set time.
If you make a
mistake and if the
appliance displays Pro
press the OFF button.
• Using warm soapy water, wash all the
removable parts and the inside of the
water tank.
• Rinse and dry.
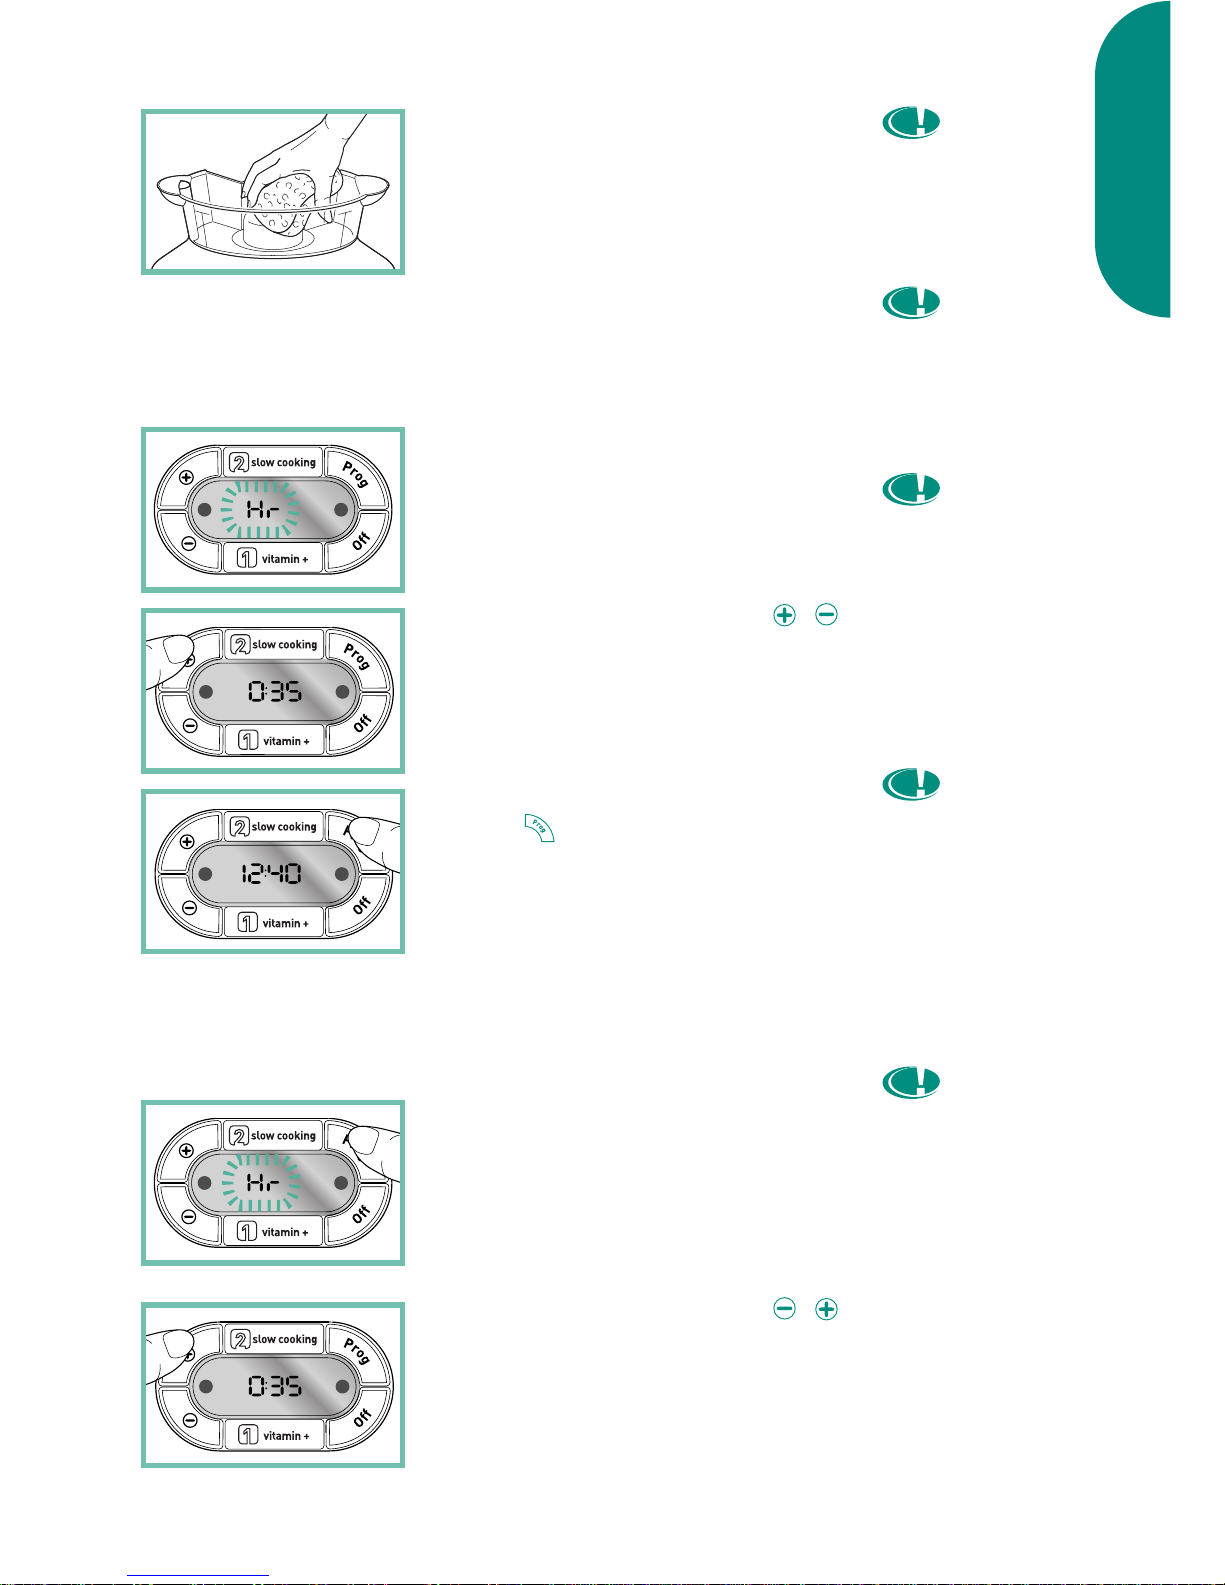
Setting the clock
• Plug in the appliance.
a) The first time you use it:
• For 30 seconds, the display flashes
alternately (kr and 00 :00).
• Set the desired time using the /
buttons.
• Check the setting by pressing the
PROG or wait.
b) To reset the time or if the
display no longer flashes
• Press on PROG until kr and the pre-
vious time registered before flash
alternately.
• Set the desired time using the /
buttons.
5
Preparation

Preparation
After 10
seconds without
action, the appliance
automatically displays
the set time.
Keep away
from any objects which
could be damaged by
the steam.
The turbo
ring must always be in
place before filling the
water tank with water.
Do not put
water into the steam
channel.
Do not use
seasoning or any liquid
other than fresh water
in the water tank.
Make sure
there is water in the
tank prior to use.
• Check the setting by pressing the
PROG button or wait.
To install the turbo ring
• Place the cooker on a flat, stable, heat
resistant surface.
• Place the turbo ring around the heating
element, in the direction indicated in
the diagram.
Filling the water tank
• Pour the water directly into the water
tank up to the maximum level as well
as into the turbo ring.
• Place the juice collector on the tank
until firmly in place.
• If the juice collector does not fit into
place, check the position of the turbo
ring. It may be the wrong way up.
• Use fresh cold water with each use.
6
Preparation

Description of functions
A- Display Clock/Timer (max 45 min for
steam cooking function and max
12hr for slow cooking function)
B- Touchpad : adjustment touchpad +
C- Stay warm light (Green)
D- Touch pad : adjustment touchpad –
E- Vitamin+ touchpad: to start the
steaming and for extra fast cooking
and more vitamin retention.
F- Add water symbol .
G- Touchpad OFF: stops the appliance
and cancels a program.
H- In-use light (red).
I- Touchpad PROG:
- short press: allows you to program a
delayed start according the selected
cooking mode.
- long press: allows you to set the
time.
J- Keep warm symbol .
K- Slow cooking touchpad: to start the
slow cooking function
7
Preparation
Make sure
that the condensation
tray is empty before
each use and empty it
regularly during cooking
if necessary.
• The juice collector is fitted with a
cooking mode selector. Make sure
that it indicates the right cooking
mode before using your appliance:
for steaming and for slow
cooking.
• Fit the condensation tray into the back
of the appliance.

Steam cooking
To prepare
The lower
steam basket 1 is fitted
with a fixed base.
Only use the
clip-on handle on the
upper steam basket 2.
When you
use the clip-on handle
with a basket, do not
clip the base into that
basket, simply lay the
base in the basket in
order to remove it
more easily.
Make sure
that the handle clips
are properly in place.
Positioning the
removable bases
• The upper steam basket 2 is fitted with
a removable base for easy cleaning. It
can be removed to obtain a cooking
space (eg if steaming puddings in a
basin or to cook larger food.)
• To position the base:
- Place the basket on the table.
- Hold the base right side up (hooks
toward the bottom).
- Gently push down on the edges of
the base until it clicks and locks into
place.
• To remove the base, gently pull away
the sides of the basket from the base
and push up from underneath.
Your steam cooker comes with a clip-on
handle which makes it easy to remove
the cooked food from the basket
without damaging it (fish, asparagus
tips, etc).
• Clip the tips of the clip-on handle onto
the base.
• Squeeze the tips of the handle to
unclip it.
Steam cooking
8

If steam is
escaping between the
baskets or between
the juice collector and
the baskets check that
the baskets are
correctly fitted in place
and are in the right
order.
For best results,
do not put too much
food in the baskets.
So as not to
scald yourself with
steam escaping from
the lid, if possible
place the steam vents
towards the back.
Positioning the
baskets
• Place the food in the basket.
• Always place the lower steam basket 1
on the juice collector.
• Then place the upper steam basket 2
fitting it correctly onto basket 1.
• Put the lid on. The lid fits on both
baskets.
To cook hard or soft boiled eggs
• Place the eggs in the built-in egg
holders in the base of the baskets.
To cook a whole fish
• Place the fish in the upper steam
basket 2 and the vegetables in the
lower steam basket 1.
Steam cooking
9
Make sure
the water switch is in
the correct position for
steaming.
You can stop
the function vitamin+
by pressing the
touchpad.
There is no
need to press the
vitamin+ touchpad
again during the
cooking time. One
press at the start of
cooking is sufficient
unless the lid is
removed.
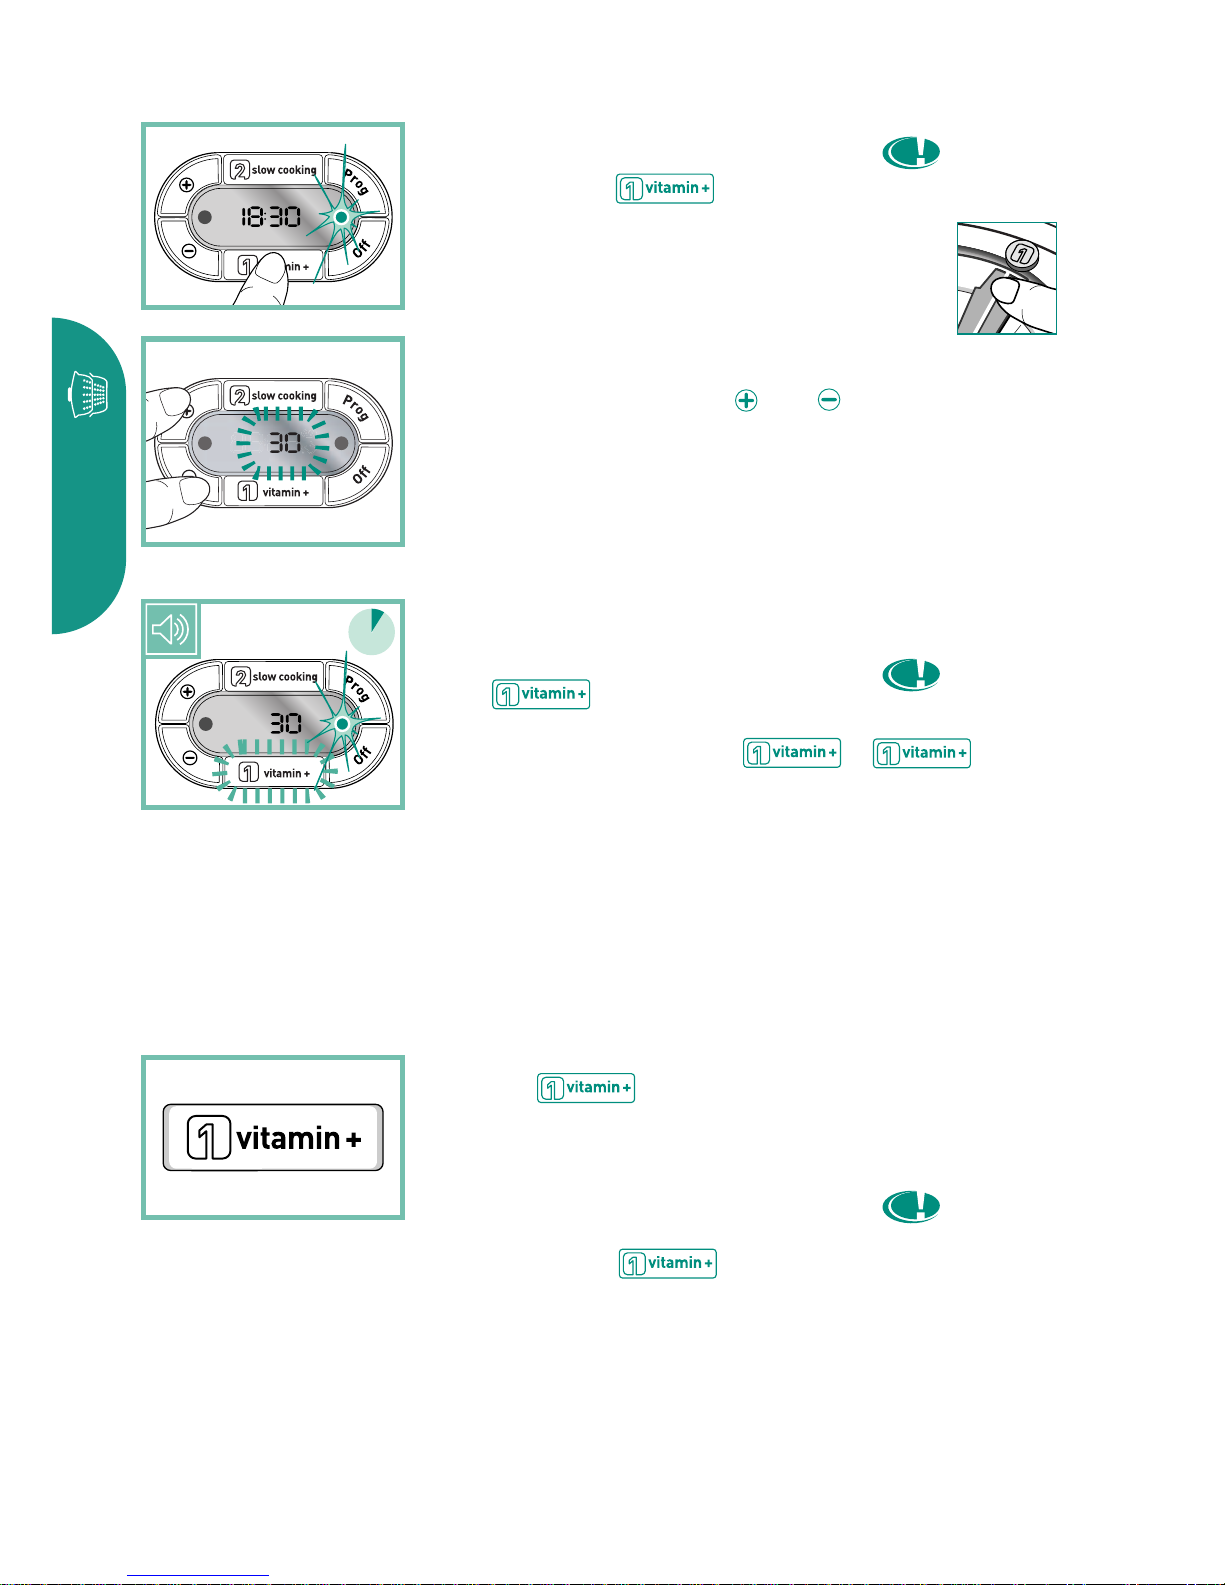
To start cooking
• Plug the appliance in.
• To select the steam cooking mode,
press on the touchpad.
Make sure the water switch is set to
the correct position : steam cooking.
• The display flashes (30).
• Set cooking time using the and
buttons. The adjustment can be made
in 5 minute intervals for cooking times
longer than 20 minutes.
• Wait for 2 seconds a signal sounds,
the cooking starts.
• The touchpad switches on
automatically at the beginning of
each cooking cycle. The
touchpad light comes on.
Reduce cooking times with
the vitamin+ touchpad
• Exclusive : your appliance is fitted
with a touchpad which
reduces cooking times by up to 50%
and helps retain vitamins.
• Once the ideal temperature is
reached, the touchpad
light goes out automatically.
10
s
e
c
o
n
d
e
s
2
Steam cooking
Table of contents


