TCP Smart TBUWTRVZIG User manual

GB. TCP Smart Instructions
Radiator Valve & Hub
- Quick Start Guide
TCP hereby declares that the device is in compliance
with the essential requirements and other relevant
provisions of directives 2014/53/EU, 2009/125/EC
and 2011/65/EU.


Thank you for purchasing this TCP Smart Radiator
Valve and Hub.
This is a quick start guide to install and get your device
connected to our App and your home network.
Before you get started you will need the following:
• Smart device such as mobile phone or tablet
• Access to the Google or Apple App store, log on
and passwords
• The name and password of your WiFi network
• Conrm your home WiFi router is running on 2.4
GHz and not 5 GHz. (If you are unsure, please
consult your broadband provider such as Virgin
Media, BT or Skype for details on how to change
the settings)
• Turn off any WiFi extenders during set up
• Check you do not have any limitations on the
number of devices with your broadband provider
PLEASE NOTE: Our products do not work on 5 GHz
only 2.4 GHz.
For more detailed instructions on how to connect to
Amazon Alexa / Google Home or use the different
functionality such as setting schedules and scenes,
changing colour (if applicable) please visit:
https://www.tcpsmart.eu/

Overview
Radiator Valve, uses AA batteries so no need for
wiring.
The TCP Smart Radiator Valve is used to control the
temperature of warm water radiators, to provide the
desired temperature in individual rooms and to save
energy on your bills.
This product has a built in Zigbee ® wireless
communication module with low power and LCD
display screen. It can be used individually and can be
added to the TCP Smart App to make it an intelligent
thermostat. After joining the TCP Smart system, you
can select the mode, set the temperature, set the child
lock and set the window detection function inside the
TCP Smart App. Any operation at the device side will
also be synchronized to App such as manually setting
the temperature.
Features
- 3 Mode settings;
- Automatic mode
- Manual mode
- Eco mode.
- Temperature setting range 5˚ C and 35˚
- With LCD display screen and big characters,
easy to see.
- 2 x AA batteries (included).
- Zigbee ® wireless communication protocol, safe,
reliable and convenient.
- Uses the same App as all other TCP Smart
devices.

TCP Smart Radiator
Valve
1. LCD Screen
2. Twist ring
a. Press: Setting mode
b. Rotate: Adjusting
temperature
3. LED
4. Interface nut
LCD Screen
1. Fault
2. Low battery
3. Temperature you set
4. Window detection
5. Automatic mode
6. Manual mode
7. Installation mode
8. Networking
9. Child lock
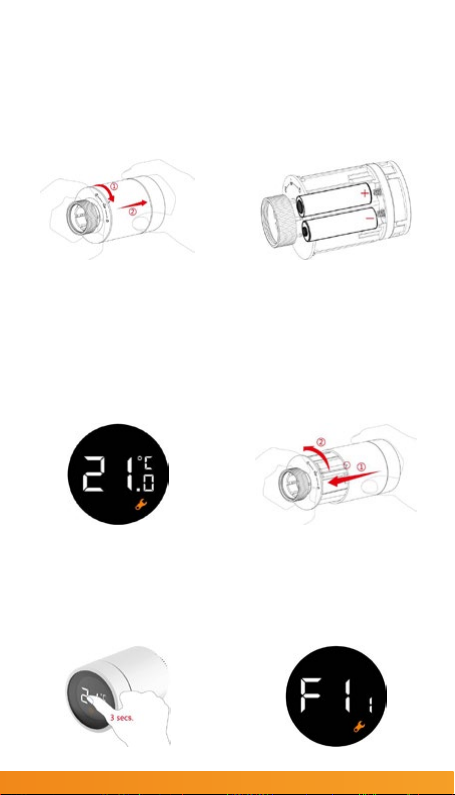
1. Twist the bottom of the
Radiator Valve towards
the unlock symbol and
pull the outer case off to
reveal the battery holder.
4. Replace the outer case
and twist towards the lock
symbol.
3. Once the batteries
have been installed the
LCD screen will light
up with the current
temperature and a
wrench symbol will be
displayed.
2. Insert 2x AA batteries.
(Note that rechargeable
batteries cannot be used).
5. Press and hold down
the screen for 3 seconds
to start the setup process.
6. The Radiator Valve
will start to vibrate until
it is ready to be installed.
When ready the F1 screen
will show.
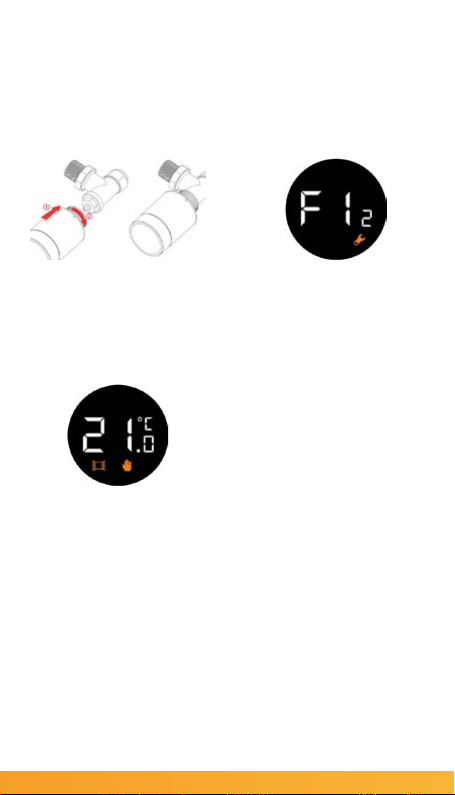
7. Attach the Radiator
Valve to your radiator by
screwing to the top of the
valve and tighten the nut
until it is secure.
8. Press down on the LCD
screen once and F2 will
appear on the screen.
9. After about 10 seconds,
the wrench symbol
will disappear and the
current temperature will
be displayed.
When the thermostat is
installed, the Radiator
Valve will be adjusted
automatically according
to your heating system.
During this process,
you may nd that the
Radiator Valve is slow at
responding or self heating
/ self cooling. This is
normal and is a necessary
part of the installation
process.
The Radiator Valve will
close the valve at a
specic time, and then
open it again to detect
the exact opening
position of the valve.
The automatic detection
function will make the
radiator valve as efcient
as possible and will
control the temperature
more accurately.
If necessary, please
reload the batteries,
activate the installation
mode and manually run
the automatic detection
function.
11 Once the app has
downloaded select
Register from the opening
screen. You will then be
presented with a Privacy
Policy.
Please read and agree if
you are happy to proceed.
If you already have the
TCP Smart App installed
skip to step 16.
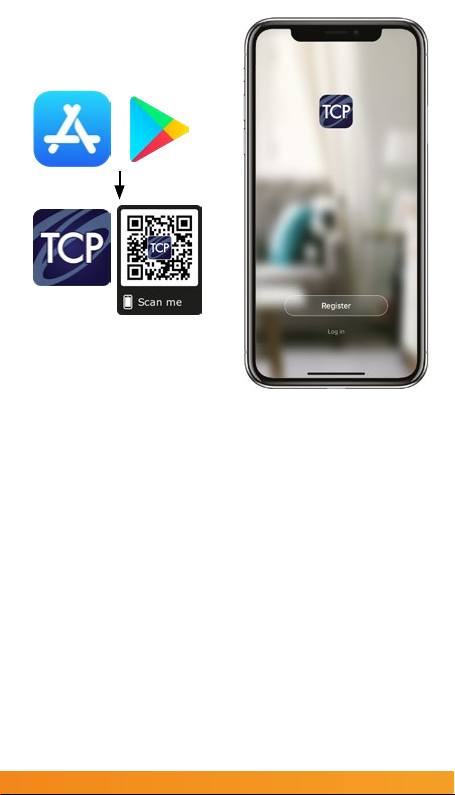
10. The Radiator Valve is
now ready to connect to
the TCP Smart App.
Download the TCP Smart
App from the Apple App
store or from Google Play
store.
Search for “TCP Smart”.
The app is free to
download.
If you have a QR scanner
on your phone please
Scan the QR code above.
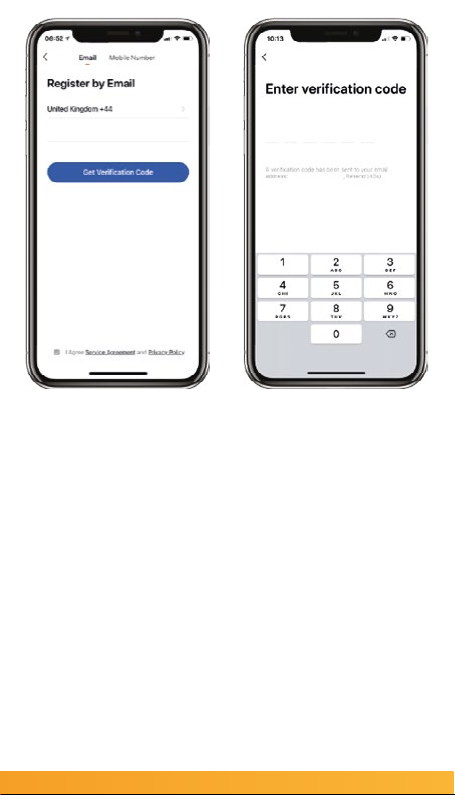
12 On the registration
page, at the top you
can choose to register
with either your email or
mobile number.
Once you have entered
your details press the
obtain verication code
button. Ensure the service
agreement box is ticked.
13 You have 60 seconds
to enter the verication
code which would have
been sent to your email or
mobile phone.
If this time expires go back
to the registration page
and re-enter your details.
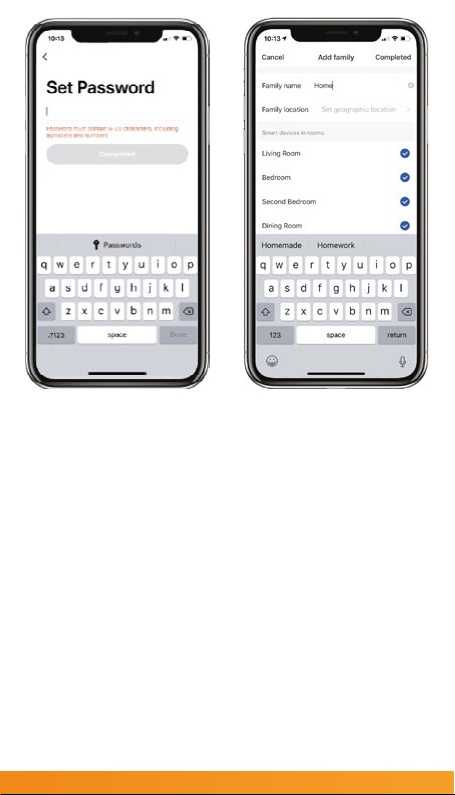
15 Create a family for
your devices, this can be
anything you wish. You
can select rooms you wish
to have in your family.
You can also enable your
location which is useful for
location apps.
Press completed in the
right hand corner.
14 Set a Password. This
password must contain
6-20 characters, and
include a combination of
letters and numbers.
Once entered press
complete.


