Summer Bentwood User manual

Before each use, inspect the high chair for damaged hardware, loose joints, missing parts, or sharp edges.
Do not use high chair if any parts are missing or broken.
To clean high chair frame:
Use only household soap and warm water. Never use bleach or detergent.
To clean seat pad:
• Remove seatpad from high chair seat, and remove harness restraint straps.
• Seat pad/insert: machine wash in cold water, gentle cycle, no bleach, hang to dry.
• High chair Tray: Dishwasher safe, top rack only.
22180
bentwood
high chair
INSTRUCTION MANUAL
www.summerinfant.com
Colors and styles may vary.
Please retain information
for future reference.
MADE IN CHINA.
11/12
Manufactured by
Summer Infant, Inc.
1275 Park East Drive
Woonsocket RI 02895 USA
1-800-268-6237
www.summerinfant.com
cleaning and maintenance:
www.summerinfant.com
We LOV E our consumers!
Get to know us at:
Summer Infant stands behind all of its products.
If you are not completely satisfied or have any questions,
please contact our Consumer Relations Team at
1-800-268-6237
or
www.summerinfant.com/contact
(For Europe call +44 (0)208 420 4429 or
connect with us:
8
reassembling child restraint harness
Note: Child restraint harness and straps come pre-assembled. Once disassembled for washing, please
follow these steps to re-assemble straps:
Reposition seat pads on seat.
1. Slide folded ends of seat back pad through top slots located on seat back.
2. Slide folded ends of shoulder restraint straps through either middle slots located on seat back.
3. Slide folded ends of waist straps through lower slots located on seat back.
4. Slide folded end of crotch restraint and seat pad into slots on seat base.
5. Pull up to ensure all straps are secured in slots. Secure 5-point harness to lock as shown on page 6.
shoulder
seat back pad
waist
back view front view
1
3
2
seat pad
crotch
restraint
4
under seat
Tools required: Phillips head screwdriver (not included).
For Technical Support please contact our Consumer Relations Team at 1-800-268-6237
or email at www.summerinfant.com/contact
This high chair is recommended for children up to 3 years or 50 lbs. max.
Please read the following instructions and warnings carefully BEFORE assembly
and USE of the high chair. Keep this instruction manual for future reference.
consumer information
For Technical Support Call
1-800-268-6237 or contact us at
www.summerinfant.com/contact
Colors and styles may vary.
WARNING:
Adult assembly required. Exercise care
when unpacking and assembling product.
Keep small parts out of child’s reach.
Never leave child unattended.
Never adjust seat height or recline positions while child
is
in high chair.
Do not use high chair in upright position until child can
sit upright unassisted.
The child should be secured in the high chair at all times
by the restraining system, either in the reclining or the
upright position. The tray is not designed to hold the
child in the chair.
!
Prevent serious injury
or death from falls or sliding out. Read all instructions
before using high chair.
Always secure child in the restraint.
WARNING:
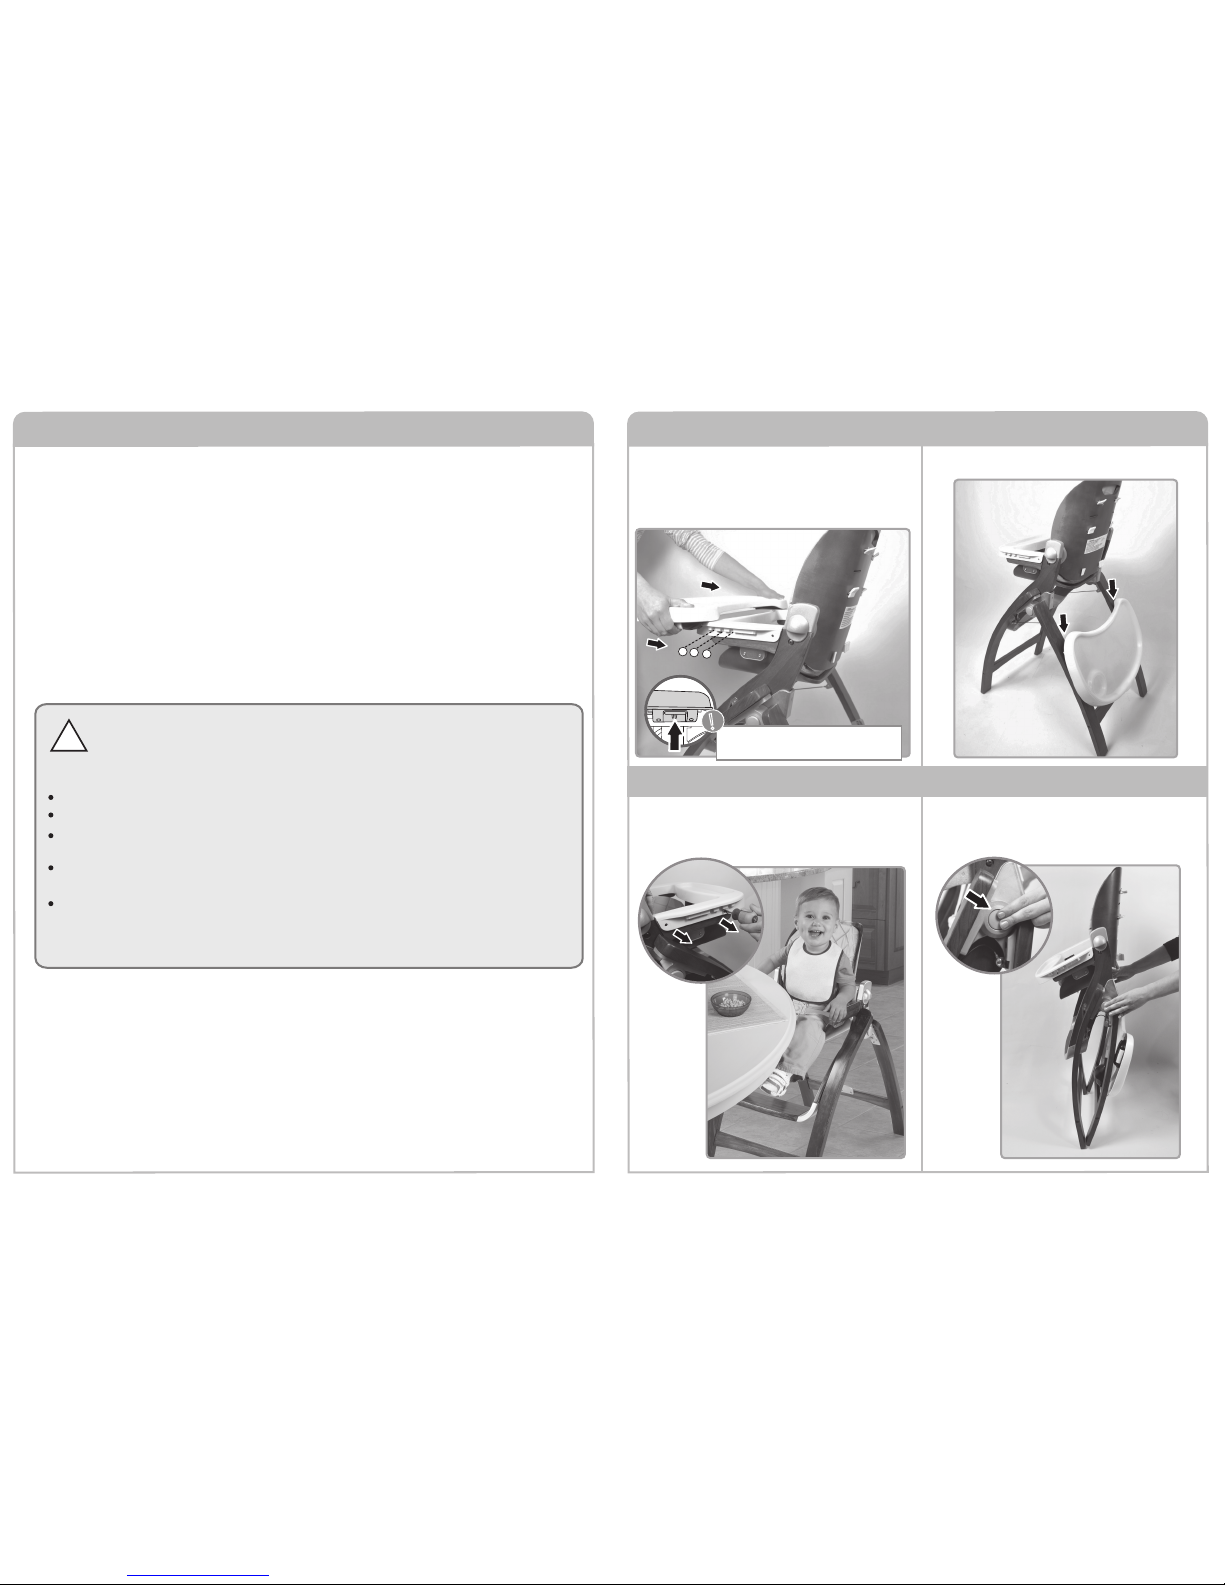
toddler mode:
adjusting tray: storing tray:
to fold high chair:
Your high chair has 3 tray positions.
Pull the release handle forward and slide the tray into the
desired position. The tray will lock in position with a “click”
sound OR pull side latches, then slide into position.
You can store your tray when not in use by sliding it onto
the clips on the back legs as shown.
Remove snack tray by removing two mounting screws on
each side.
Adjust seat to the lowest position. Slide up to the table.
ALWAYS use safety harness.
Press both side buttons in and swing the rear legs forward to
fold your high chair. The legs will lock into the folded position
with a “click” sound.
Attach the tray to the clips on the back legs.
NOTE: Do not use tray and insert without the snack tray
attached. The tray will not fit without the snack tray attached.
click!
click!
123
clip!
clip!
!
Always lock the tray into position using the
single front handle or the double side handles.
Ensure the tray is in a locked position.
7
2
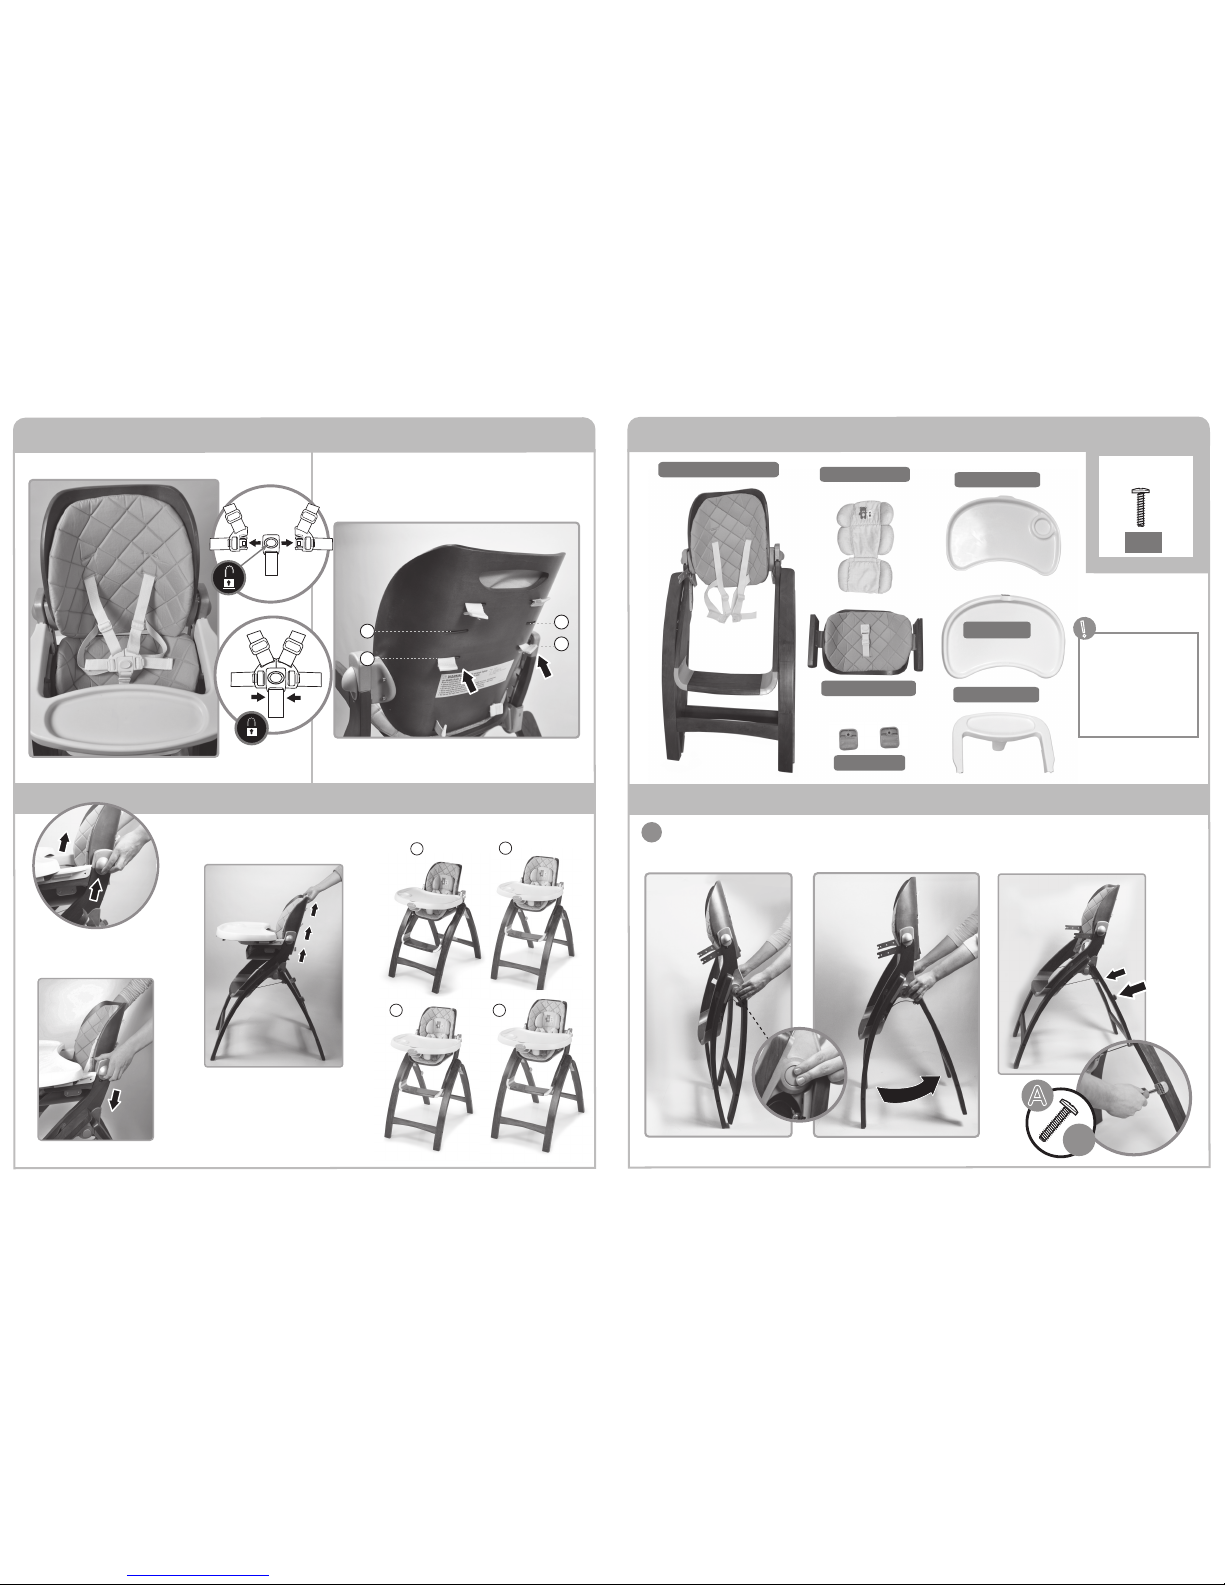
high chair assembly:
IMPORTANT: Before
assembly, inspect this
product for damaged
hardware, loose joints
or missing parts. Never
use if any parts are
missing or damaged.
!
snack tray
tray insert
tray
high chair assembly
seat and seat pad
Press side buttons in and flip rear legs out to unfold. You will hear a “click” sound when the legs
reach the open position. Secure 2 tray hangers with screws to back legs, facing out as shown.
Note: When opening the high chair, ensure that your child and other children, are at a safe distance.
newborn insert
1
5-point harness: adjusting shoulder straps:
adjusting seat height:
Shoulder straps can be adjusted to two dierent
height positions as child grows.
1
2
12
34
A
x12
components: hardware:
3
6
Grasp seat back handle, and raise
to the desired height. The seat will
automatically lock into each position
with a “click” sound as you raise it up.
NOTE: Do not adjust the seat
height while the highchair is in use.
click!
Adjust the seat height by
pulling up on the two
side buttons.
Slide seat down to
lowest position and
release side buttons.
Your highchair has 4 height positions.
seat back pad
22180-03
harness
22180-06
seat pad
22180-02
22180-04
22180-05
1
2
tray hangers
x 2
A
24
x 6
A
x 4
A
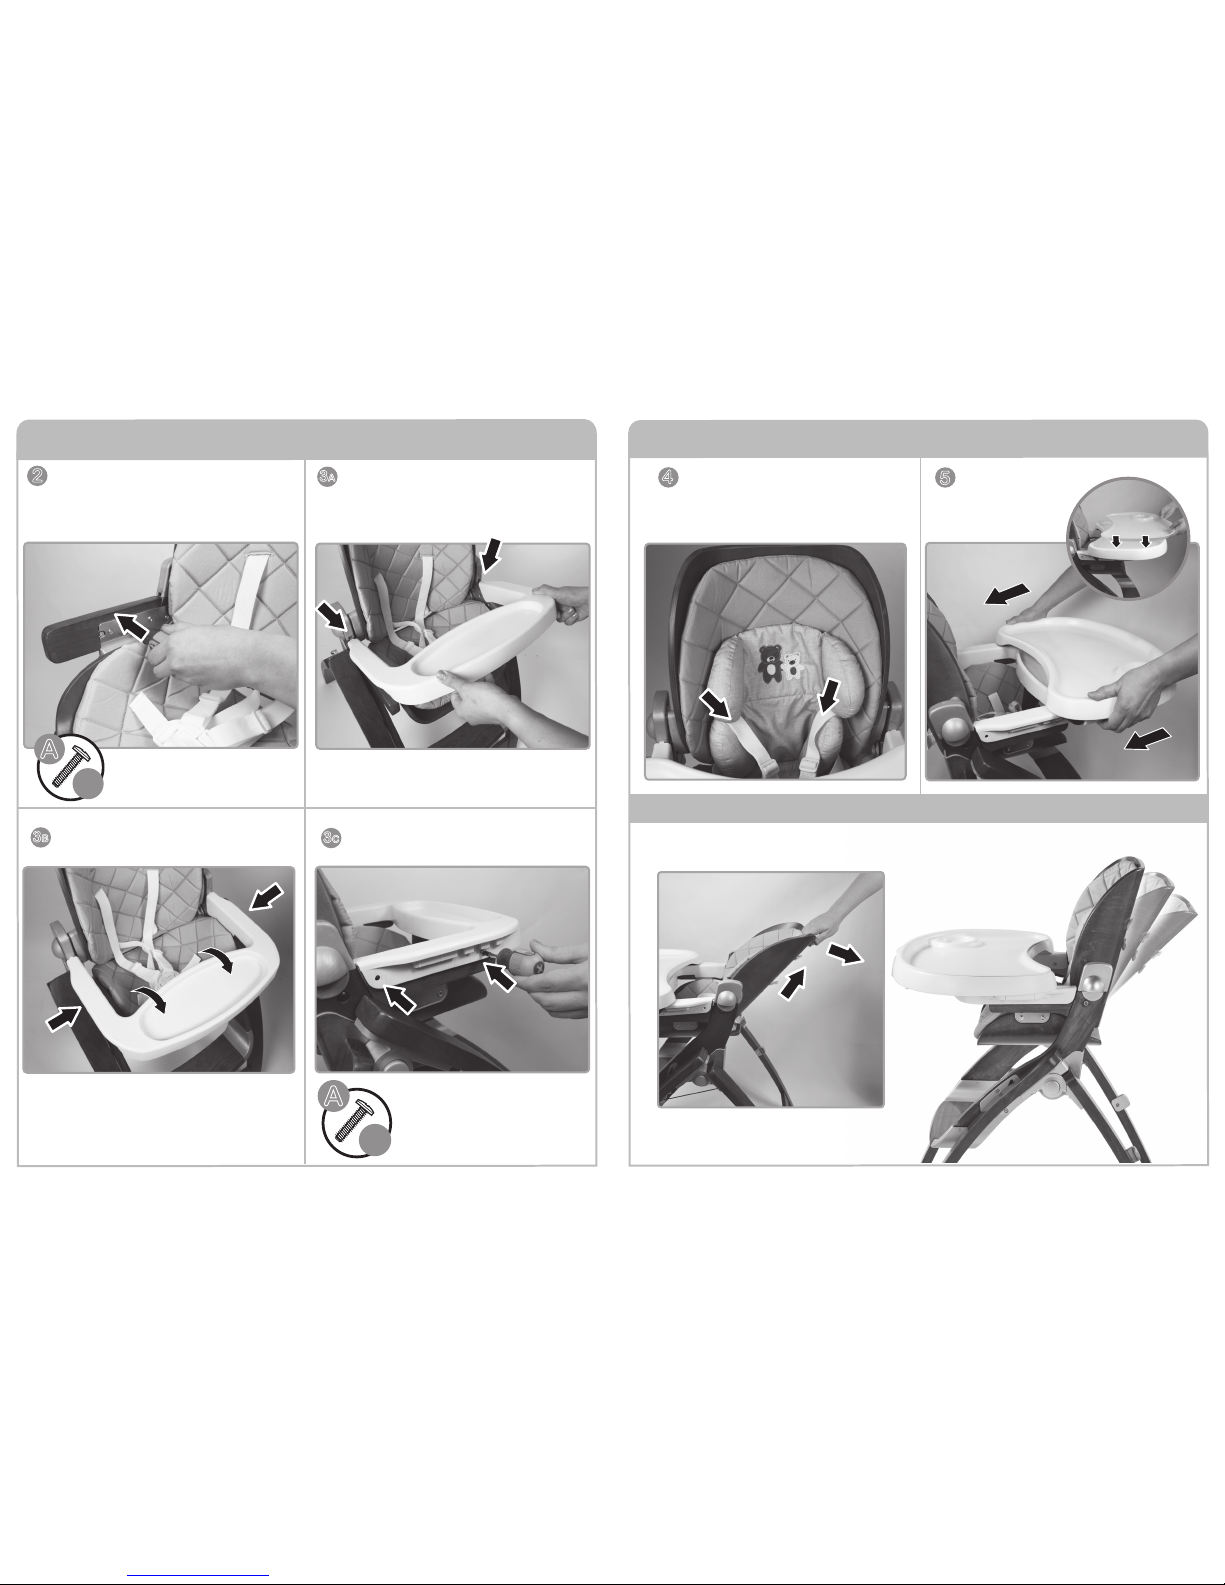
high chair assembly: attach tray:
3A5
newborn insert:
Slide the snack tray tabs into position as shown.
Secure snack tray in place with 4 screws (2 screws on
each side.)
Position the seat assembly as shown. Line up the screw
holes on the wooden side rails with the holes on the
metal brackets and secure in place with 6 screw
(3 on each side). Double check that the seat is secure.
Tighten screws as needed.
Position the infant insert as shown. Thread webbing
in between the openings of padding between the
head and torso support sections.
Slide tray into position.
Snap the tray insert
into the tray.
reclining seat:
Your high chair has 3 recline angles. Lift the seat back up, rotate and release to adjust the angle.
NOTE: Do not recline the seat back while the high chair is in use.
5
4
Push wood arm rest in to align with snack tray, then
rotate snack tray down into position as shown.
3B3C
Other Summer High Chair manuals


