STC Ecomposter Guide

Assembly Manual and User Guide
Ecomposter Sphere, Standard Base and Optional Base
Shown With Optional Base
System Trading Corporation
450 7th Avenue, Suite 2809, New York NY 10123

www.ecomposter.net
TABLE OF CONTENTS
2
3
4
5-6
7
7
8
9
10
11
12
12-13
14
14-15
16
16
16
16
17
17
17
18
18
18
Ecomposter Assembly
Step 1: Unpack
Ecomposter Sphere ...................................................................................
Step 2: Prepare One Sphere Panel ......................................................................................
Step 3: Prepare One Half Sphere .......................................................................................
Step 4: Assemble One Half Sphere ...............................................................................
Step 5: Install Air Tubes .......................................................................................................
Step 6: Assemble Other Half Sphere ..................................................................................
Step 7: Assemble Center Ring ............................................................................................
Step 8: Install Center Ring ..................................................................................................
Step 9: Attach Top Sphere ..................................................................................................
Step 10: Install Lids .............................................................................................................
Standard Base Assembly
Step 1: Unpack Standard Base ............................................................................................
Step 2: Assemble Standard Base ...................................................................................
Optional Base Assembly
Step 1: Unpack Optional Base ............................................................................................
Step 2: Assemble Optional Base ...................................................................................
Ecomposter User Guide
About the Ecomposter Design ...........................................................................................
How the Ecomposter Works ...............................................................................................
How to Use the Ecomposter.................................................................................................
Before You Begin .................................................................................................................
Filling Your Ecomposter........................................................................................................
What Materials to Compost ...............................................................................................
Monitor Your Compost ......................................................................................................
When the Compost is Done ...............................................................................................
Composting Tips .................................................................................................................
Warranty ..............................................................................................................................
BEFORE YOU BEGIN, MAKE SURE YOU CAREFULLY READ
AND UNDERSTAND THE INSTRUCTIONS IN THIS MANUAL.
Please follow the instructions in the order presented in this
manual and be sure to observe all warnings and cautions.
Allow at least two hours to assemble the Ecomposter. If you
have any questions or problems, please contact Customer
Service at (800) 293-2923 or customerservice@ecomposter.net.
!
1 of 18

S1 x 16
Sphere Panel
S4 x 48 (+2)
Green Side Tabs
S2 x 192 (+12)
Rivets S8 x 192 (+12)
Pins
www.ecomposter.net 2 of 18
Unpack Ecomopster Sphere
Step 1:
S5 x 2
Collar
S7 x 16
LG Air Tube
S6 x 16
SM Air Tube
CR1 x 4
Center Ring
CR2 x 4
M5 Screw CR3 x 4
M5 Nut
S3 x 32 (+2)
White Mid Tabs
L1 x 2
Outer Lid
L2 x 2
Inner Lid
L3 x 1
Key
Unpack your Ecomposter and make sure you have the following components to assemble the sphere.
If you are missing any components, please contact Customer Service at (800) 293-2923.
Phillips Screwdriver
COMPONENTS:
TOOLS NEEDED: RECOMMENDED TOOLS:
Hammer Gloves Rubber Mallet
NOTE: We have included extra pieces for some of the smaller parts.

Components:
S1 x 1
Sphere Panel
S4 x 3
Green Side Tabs
S2 x 3
Rivets S8 x 3
Pins
www.ecomposter.net
view from outside
With inside panel facing down, insert
three green S4 side tabs into slots on
the right side.
Place three S2 rivets into the holes in the
panel and the side tabs to hold in place.
Place an S8 pin into the hole in the center
of each rivet. The pin will slide half way
into the rivet. Insert the other two S8 pins.
Use a rubber mallet (or block of wood)
to create a brace. Hammer pin into each
rivet until ush.
Adjust mallet and hammer the other pins
into rivets until ush.
Prepare One Sphere Panel
NOTE: Green S4 side tabs are the same on both sides.
A
B
C
D
E
Inside of rivet expands
when pin is inserted.
view from inside
NOTE: Hammer pin until it is ush with the top of the
rivet and the rivet is ush with the hole in the panel.
Step 2:
3 of 18

Fit the side tabs of the rst panel into the
slots on the left hand side of a second panel.
Repeat Step 2 to prepare seven more sphere
panels. You now have eight sphere panels
with three side tabs attached to the right sides.
Prepare One Half Sphere
A
B
C
D
NOTE: You will hammer pins
into all the rivets in Step 4E.
Step 3:
Place three S2 rivets into the holes in the
panel and the side tabs to hold in place.
Repeat steps B and C to connect the next six
panels.
Components:
S1 x 7
Sphere Panel
S4 x 21
Green Side Tabs
S2 x 21
Rivets S8 x 21
Pins
IMPORTANT: DO NOT connect the rst panel
to the last panel. LEAVE ONE SIDE OPEN.
!
www.ecomposter.net
Do NOT connect the rst panel
to the last panel. Leave one side
open. You will connect it in Step 4C.
4 of 18

The collar ts on the inside of the top of the sphere.
Gently pull the sphere apart to t the collar UNDER
the top of the panel.
Assemble One Half Sphere
A
B
C
Step 4:
S5 x 1
Collar
Components:
S2 x 19
Rivets
S8 x 40
Pins
Starting with an open panel, place S2 rivets into
holes in the top panel and collar to hold in place.
Line up the holes in the collar with
the holes in the top of the panels.
Continue to line up the holes in the panels
with the holes in the collar and place rivets
to hold in place. ONLY attach half of the
panels to the collar in this step.
Go back to the sides and slide the side tabs into the
slots in the last panel and hold in place with three
rivets. Finish lining up the holes in the panels with the
collar and placing rivets to hold in place.
Wear gloves. The edges of the collar are sharp.
!
www.ecomposter.net 5 of 18

Place two S8 pins in the center of the two rivets in
the top of each panel. Hammer the pins until ush
and the collar is secured to the panels.
Place S8 pins in the center of the three rivets along
the left side of each panel and hammer until ush.
Turn the half sphere over.
Assemble One Half Sphere (Continued)
D
E
F
NOTE: Hammer pin until it is ush with the top of the
rivet and the rivet is ush with the hole in the panel.
NOTE: Hammer pin until it is ush with the top of the
rivet and the rivet is ush with the hole in the panel.
Step 4:
www.ecomposter.net 6 of 18

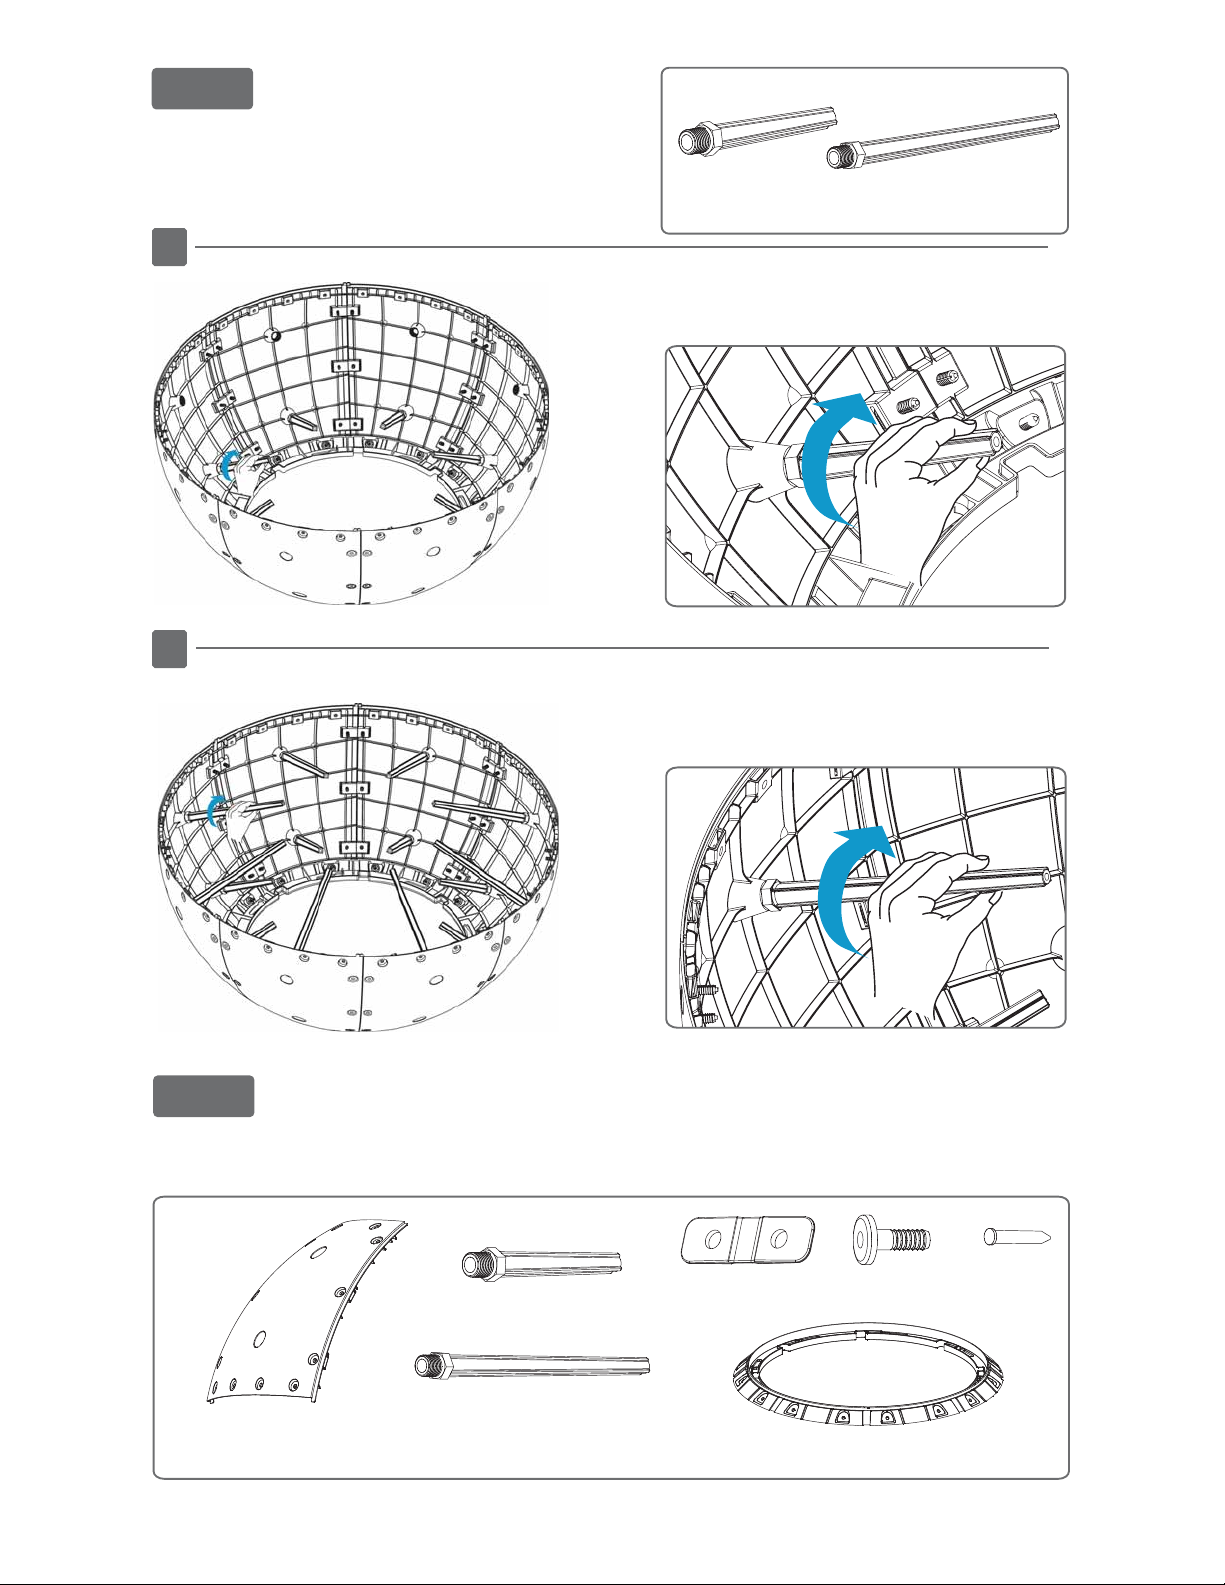
Screw eight S7 LG air tubes along the inside.
With the large opening of the half sphere
up, screw eight S6 SM air tubes along the
inside near the collar.
Repeat Steps 2 through 5 to assemble the other half sphere.
Install Air Tubes
A
B
Step 5:
Assemble Other Half Sphere
Step 6:
Components:
S7 x 8
LG Air Tube
S6 x 8
SM Air Tube
S7 x 8
LG Air Tube
S6 x 8
SM Air Tube
Components:
S1 x 8
Sphere Panel
S4 x 24
Green Side Tabs
S2 x 64
Rivets
S5 x 1
Collar
S8 x 64
Pins
www.ecomposter.net 7 of 18

B
Fit the ends of each piece together, lining up the holes. Using a Phillips screwdriver, secure
the pieces together with a CR2 screw and a CR3 nut.
Lay the four CR1 center ring pieces in position.
A
Assemble Center Ring
Step 7:
CR1 x 4
Center Ring
CR2 x 4
M5 Screw
CR3 x 4
M5 Nut
Components:
www.ecomposter.netwww.ecomposter.net 8 of 18

Place white mid tabs into slots
in panels in one half sphere.
Place rivets into holes in mid tabs
and panels to hold tabs in place.
Install Center Ring
A
Step 8:
S3 x 32
White Mid Tabs S2 x 32
Rivet
Components:
When placing center ring, turn ring so that
all indents on the side line up with the seam
where two panels are joined.
All white mid tabs t through openings in
the center ring.
B
Position the center ring so the indents on the side line up with
the seams where the panels are joined together. Make sure
the white mid tabs fit through the openings in the center ring.
!
www.ecomposter.net
NOTE: You will hammer S8
pins into rivets in Step 9C.
9 of 18
Table of contents
Popular Lawn And Garden Equipment manuals by other brands

Vertex
Vertex 1/3 HP Maintenance instructions

GHE
GHE AeroFlo 80 manual

Millcreek
Millcreek 406 Operator's manual

Land Pride
Land Pride Post Hole Diggers HD25 Operator's manual

extraspace
extraspace GardenStore Assembly instructions

Yazoo/Kees
Yazoo/Kees Z9 Commercial Collection System Z9A Operator's & parts manual