
SpeechEasy CIC Maintenance manual

Care and Maintenance Manual

Congratulations!
We wish you every success with your new fluency tool and feel confident in the knowledge
that its effects will dramatically improve your life.
Please keep this manual in a safe place and refer to it often as questions arise on the use
and care of your SpeechEasy®device
Your new SpeechEasy device will require attention in order to keep it in top working
condition. The device is designed and manufactured to provide you with many years of
superior performance, but only with proper care and maintenance. The information in this
booklet will help you to care and maintain your SpeechEasy and ultimately extend the life
of your new investment. Please take the time to read this manual and familiarize yourself
on the use and care of your new SpeechEasy device.
CONTENTS
Getting Familiar 2
Battery Information 6
Operating Your SpeechEasy 10
Insertion and Removal 12
Daily Cleaning and General Care 15
Tips and Hints 23
Troubleshooting 28
Customer Support 30
1
2
3
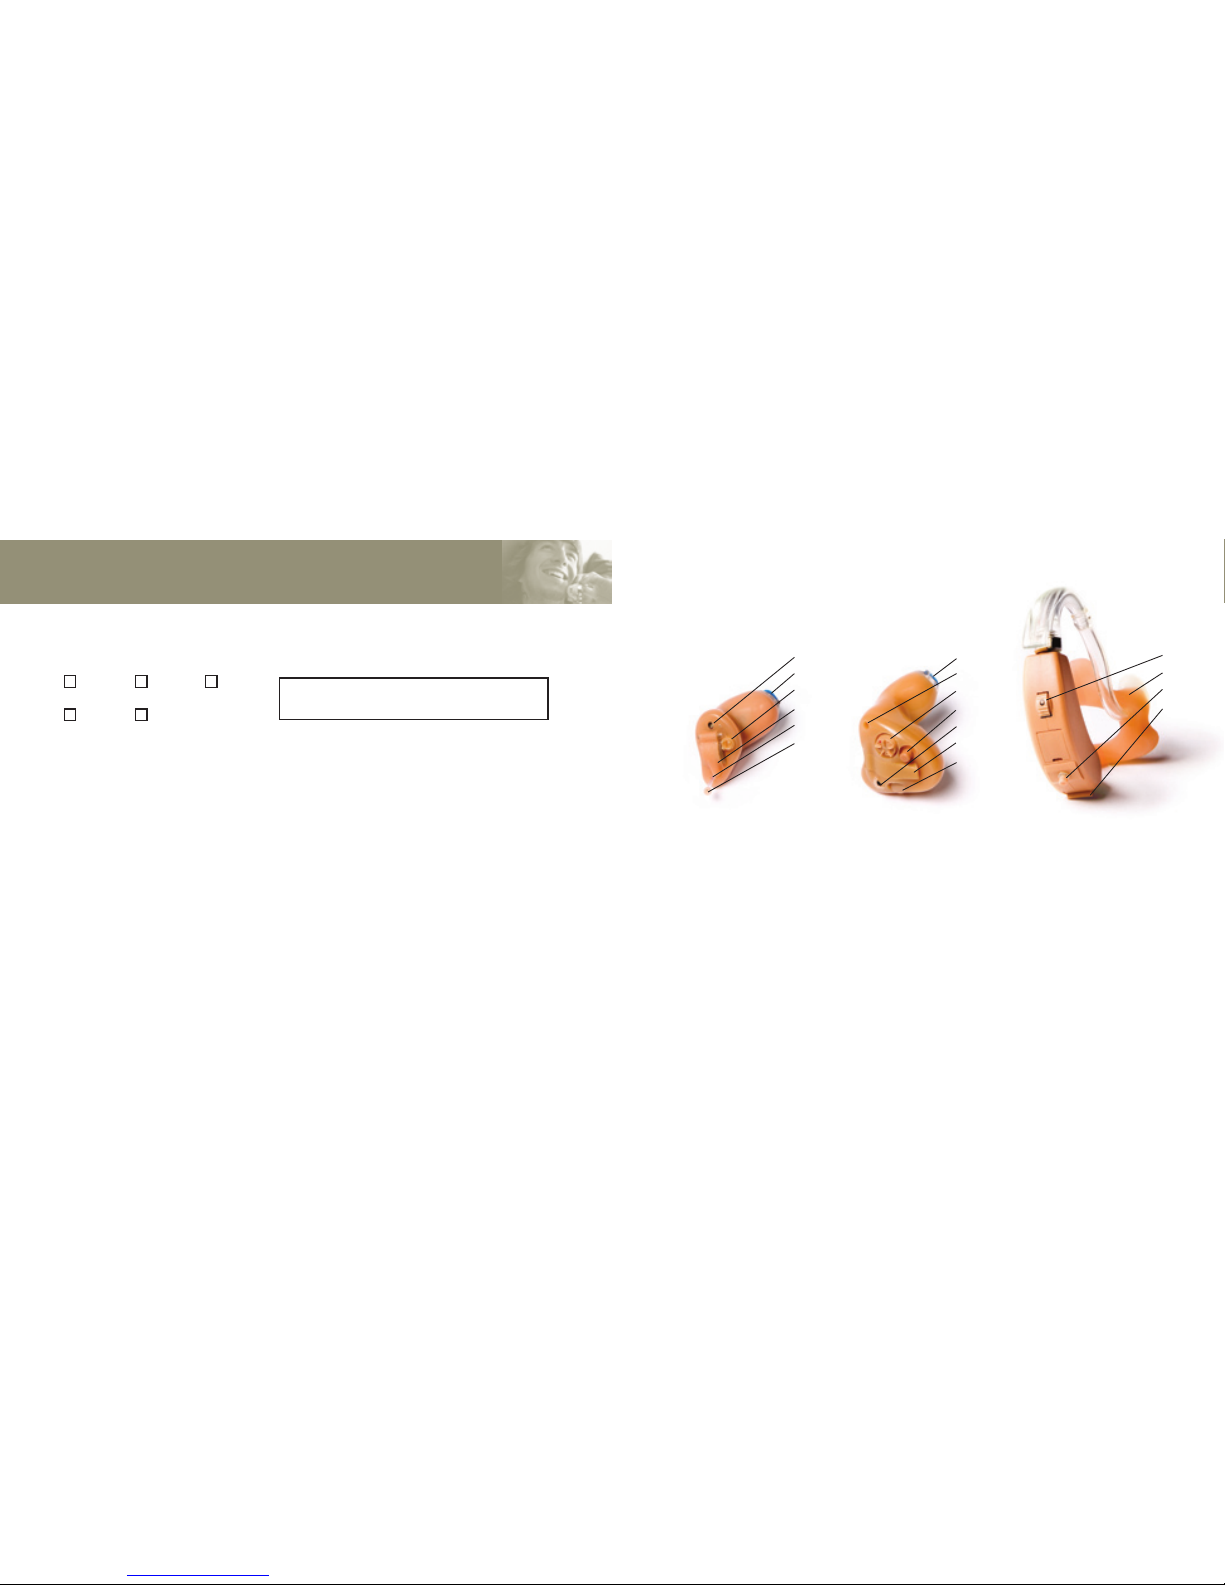
Completely in Canal (CIC)
1. Microphone
2. Wax Guard
3. External Volume
Control (optional)
4. Battery Door
5. Vent
6. Extraction Cord
Every SpeechEasy device is unique and can be identified by its serial number. The location
will differ depending on the type of device you have. For CIC and ITC devices the number
will be imbedded in the custom acrylic shell—BTE serial numbers will be placed inside the
curve of the battery door. This serial number is specific to you and your device only and
allows us to track problems or repairs. Please take a moment and enter this serial number
in the area provided above for future reference.
Getting Familiar
In the Canal (ITC)
1. Wax Guard
2. Vent
3. Volume Control
4. Dual Memory
Pushbutton
5. Microphone
6. Battery Door
7. Programming Port
(with port cover)
Behind the Ear (BTE)
1. Volume Control
2. Custom Earmold
(optional)
3. Dual Memory
Pushbutton
4. Battery Door
Your Device
1
2
3
4
5
6
7
SERIAL NUMBER
CIC ITC BTE
LEFT RIGHT
1
2
3
4
5
6
1
2
3
4

4
5
YOUR KIT WILL ALSO INCLUDE A FOUR PACK OF BATTERIES, A VENT TOOL
(IF DEVICE IS EQUIPPED WITH A VENT TUBE), AN EAR IMPRESSION/CLEAR
SILICONE INVESTMENT (CIC/ITC ONLY) AND TWO MAGNETIC WANDS (CIC ONLY).
Your SpeechEasy is supplied with a Care and Maintenance Kit to aid in the daily
cleaning and care of your device. If your kit is lost or you require additional pieces
contact your SpeechEasy Provider or Janus Development Group to purchase another.
Your Care and Maintenance Kit
Getting Familiar continued
NOTE:
YOUR DRY AID KIT WILL REQUIRE OCCASIONAL HEATING TO REMOVE MOISTURE
THAT ACCUMULATES IN ITS DESICCANT PILLOW. TO DO SO, PUT THE DESICCANT
PILLOW ONLY IN THE MICROWAVE. MICROWAVE THE PILLOW IN THIRTY SECOND
INTERVALS UNTIL FIVE TO TEN PERCENT OF THE BEADS ARE BLUE.
MICROWAVING FOR AN EXTENDED PERIOD MAY CAUSE DAMAGE TO THE
DESICCANT PILLOW. USE CAUTION WHEN REMOVING AS IT MAY BE HOT.
NEVER PUT YOUR SPEECHEASY IN THE MICROWAVE. THIS WILL CAUSE IRREPARABLE
DAMAGE TO THE DEVICE.
DRY AID KIT
KEYCHAIN BATTERY HOLDER
SPEECHEASY POCKET CASE
WAX BRUSH AND WIRE PICK

6
7
Battery sizes
All batteries are zinc-air type, and come in color-coded packaging. When
purchasing new batteries make sure to buy the size and color that correspond
with your device.
ATTEMPTING TO CLOSE THE BATTERY DOOR WITH THE BATTERY INSERTED
INCORRECTLY WILL DAMAGE YOUR SPEECHEASY DEVICE. NEVER FORCE THE DOOR
CLOSED! SEVERE DAMAGE WILL OCCUR FROM IMPROPER INSTALLATION.
CIC = 10 (yellow) *ITC = 312 (brown) BTE = 13 (orange)
Installing the battery
• Unlike normal alkaline batteries, zinc-air batteries must be activated before use.
• Remove the colored adhesive tab from the battery and set aside.
• Open the battery compartment by holding the device firmly between your thumb
and forefinger while using a fingernail to ease the battery door open.
• Match the plus sign (+) on top of the battery with the plus sign on the edge of
the battery compartment. Slide the battery into the compartment (note that the
battery will only fit one way) and close the door slowly.
• If the door does not close smoothly, check and insure that the battery is
inserted properly
Battery Information
*PLEASE NOTE: SOME ITC DEVICES MAY USE SIZE 10 BATTERY.

Battery Information continued
Battery notes
• The adhesive tab should be removed from the battery ten to twenty seconds
prior to installing into the device.
• Store batteries in a cool, dry place. Do not refrigerate.
• Do not carry loose batteries in your pocket or purse. Contact with other metal
objects may short out the batteries.
Battery warnings
• Keep your batteries out of reach of small children and pets.
• Never change batteries in front of small children.
• Never let children play with batteries.
• Dispose of batteries immediately in a receptacle that is inaccessible to children.
• Never incinerate batteries.
• Never put batteries in your mouth for any reason.
• Always check medication before swallowing; batteries have been
mistaken for tablets.
IF A BATTERY IS SWALLOWED, IMMEDIATELY CONTACT THE NATIONAL BUTTON
BATTERY INGESTION HOTLINE AT (202) 625-3333 FOR COUNSEL ON TREATMENT.
98

10
11
Operating Your SpeechEasy
Turning device on and off
For ITC and BTE devices:
• Turn on by rotating volume control forward (towards your face).
• Turn off by rotating volume control backwards until it clicks into the off position.
For CIC devices:
• CIC devices cannot be turned off via the volume control.
• To turn on insert a battery in the door and close the compartment.
• To turn off the CIC device open the battery door (the battery may remain
inserted in the door).
Operating the Dual Memory Feature
Your SpeechEasy comes equipped with a dual memory feature. This allows your
device to store two separate DAF and FAF settings that can be switched with
either a pushbutton or magnetic wand.
For CIC devices:
• Using the magnetic wand that came with your device, tap the faceplate near the
battery door to switch to the second set of DAF/FAF settings.
• Repeat to return to your primary settings.
• Extra magnetic wands can be ordered from Janus Development Group for a
small fee.
For ITC and BTE devices:
• Press the pushbutton on the faceplate (below the volume control for the BTE) to
switch to the second set of DAF/FAF settings.
• Repeat to return to your primary settings.
Before placing your SpeechEasy device in your ear ensure that the battery is
inserted properly and the door is firmly closed.

12
13
Insertion and Removal
ITC
To insert, hold the device between your thumb and forefinger with the volume control
toward the top of your ear. Gently insert the device into your ear canal until it fits snugly
and securely.
To remove, use one of two methods. First, you may simply reach into your ear with
your thumb and forefinger and gently pull the device out. However, you may find it
easier to gently massage the area behind your ear lobe to slide the device out of your
ear canal.
CIC
To insert, hold the device with the extraction cord between your thumb and forefinger
with the microphone opening at the top of the device. From here simply guide the
device into your ear canal until you feel resistance. From this point you may let go of
the cord and push the device with your finger until it fits comfortably inside your ear
canal. To ease insertion you may want to pull down on your ear lobe with your other
hand as you push.
To remove, slowly pull the extraction cord outward.
BTE
To insert, hold the soft custom earmold on the outer side near the tubing with your
thumb and forefinger. Insert the canal tip of the earmold into your ear canal. Gently
press the earmold into place with your finger. Complete the process by placing the
BTE device behind your ear with the plastic tubing wrapped over the top.
To remove, take the device from behind your ear and pull the earmold outward. Pulling
down on the ear lobe with your other hand may help ease removal of the earmold.

15
Your SpeechEasy is a precision instrument and regular care will reduce the need
for service or repair. Make a habit of cleaning your device on a daily basis to keep
it operating in optimum condition. At the end of each day you should:
•
Clean the device over a soft cloth laid on a table or desk. This will reduce the risk
of damage should you drop the device.
• Using the small wax brush provided in your Care and Maintenance Kit gently
brush away any wax or other particles that may have accumulated around the
canal, microphone inlet, volume control, dual memory pushbutton or battery door.
• Wipe the acrylic shell with a soft cloth or facial tissue.
• Clean the wax guard as directed below (depending on how your device is
equipped).
• Open the battery door and store your SpeechEasy overnight in the Dry Aid Kit
included in your Care and Maintenance Kit. This will draw out any moisture that
has accumulated over the day’s usage.
Insertion and Removal continued
NOTE:
• NEVER USE THE BATTERY DOOR TO REMOVE ANY DEVICE FROM YOUR EAR.
IT IS NOT DESIGNED FOR THIS AND DAMAGE MAY OCCUR.
• IF YOUR DEVICE IS NOT PROPERLY INSERTED WHISTLING (FEEDBACK)
AND/OR DISCOMFORT MAY OCCUR.
• SHOULD YOU FEEL UNDUE PRESSURE OR DISCOMFORT AFTER PROPERLY INSERTING
YOUR DEVICE, PLEASE CONTACT YOUR LOCAL SPEECHEASY PROVIDER.
• WEARING AN IMPROPERLY FITTED DEVICE MAY LEAD TO MORE
SERIOUS COMPLICATIONS
14
Daily Cleaning and General Care

16
17
Cleaning devices with a Vent Tube
Using the Vent Tool provided in your kit, clean the vent tube (if equipped—size
restrictions will apply) by sliding the tool gently from the vent hole on the top of
the device (as shown above) and exiting out the vent hole near the wax guard. This
will free any accumulated wax from the vent tube.
Cleaning devices with a Flip-Top Wax Guard
A Flip-Top Wax Guard is a red or blue hinged door fixed to the end of the device.
The wax guard covers the sound outlet of your instrument. This allows wax to
accumulate on the underside of the door while restricting wax from entering the
speaker and damaging components. On a daily basis:
• Open the guard with your fingernail or the wire end of your wax brush.
• While supporting the guard with your fingertip (as shown above) gently brush
away any accumulation from the underside of the guard.
• Be sure that you are brushing wax away from outlet rather than into it.
• Once clean, close the wax guard gently until it clicks.
•
If your wax guard becomes damaged promptly contact your SpeechEasy Provider.
Daily Cleaning and General Care continued
NEVER USE ALCOHOL, WATER OR SOLVENTS TO CLEAN YOUR SPEECHEASY!
REMEMBER, YOUR SPEECHEASY REQUIRES DAILY CLEANING TO STAY OPERABLE.
THE NUMBER ONE CAUSE FOR FAILURE IN SPEECHEASY DEVICES IS DIRECTLY
RELATED TO THE LACK OF DAILY CLEANING AND REMOVAL OF WAX. WAX AND
MOISTURE ACCUMULATION WILL LEAD TO THE EVENTUAL DAMAGE OF THE
INTERNAL COMPONENTS OF YOUR DEVICE. HOWEVER, THIS DAMAGE IS RELATIVELY
EASY TO PREVENT. BY PERFORMING THESE CLEANING STEPS EVERY DAY, YOU CAN
DRAMATICALLY EXTEND THE LIFE OF YOUR DEVICE.
This manual suits for next models
2
Table of contents


