Sowa WA18 User manual

WA18
Baby stroller
INSTRUCTION MANUAL

1
WARNING:Don't carry additional children, bags, goods or accessories in the stroller
except those recommended by the manufacture.
WARNING:To avoid injury ensure that your child is kept away when unfolding
and folding this product.
WARNING:Never leave your child unattended.
WARNING:Do not let your child to play with this product.
WARNING:Before making adjustments to the stroller, ensure that the child's body is
clear of any moving parts.
WARNING:Always use the restraint system.
WARNING:Child may slip into leg openings and strangle. Never use in reclined
carriage positions.
WARNING:Do not allow the child to stand up on the seat.
WARNING:This stroller is designed for one child only.
WARNING:Any load attached to the handle and/ or on the back of the backrest and/
or on the sides of the vehicle will affect the stability of the vehicle.
WARNING:Do not use on escalators or stairs. Fold the stroller and carry it by hands.
WARNING:Check that the pram body or seat unit or car seat attachment
devices are correctly engaged before use.
WARNING:This product is not suitable for running or skating.
WARNING:Always activate the brakes when stop the stroller, put or take off any
accessories.
WARNING:Ensure that all the locking devices are engaged before use.
WARNING:Any goods carried in the basket should not exceed 3 kg;
WARNING:Do not overload as the stroller may become unstable. Maximum weight
must not exceed 22kg in the seat unit.
WARNING:Do not add additional mattress thicker than 20mm.
WARNING:This seat is suitable for children from 6 to 36 months.
Maximum weight of the child :22kg.
WARNING:Use a harness as soon as your child sit unaided..
WARNING:Do not use the stroller near open fire, exposed flame, barbecue or heater.
WARNING:Do not use the stroller if any screws, nuts, bolts, etc. are missing or any
component is damaged.
WARNING This seat unit is not suitable for children under 6 months.
WARNING:Do not lift the stroller by the bumper bar it may disengage.
WARNING:Note that the fabric patterns and stroller accessories in this instruction
may vary from the one you have purchased.
WARNING:Only replacement parts supplied or recommended by the
manufacturer/ distributor shall be used.
WARNING:Always apply the brakes when the pushchair is stationary,and when
placing and removing children.
WARNING:The chassis is suitable for 0 month seat unit, 6 month seat unit, 2in1 seat
unit, car seat and carry cot.
Important:Keep these instructions for future reference.
This product complies with EN 1888-2:2018.

Instructions
Schematic diagram of frame parts
15
10
15
2
1.Handle grip
2.Adjustable handle
3.Safety latch release button
4.Handle tube
5.Main connector
6.Supporting tube
7.Brake and release pedal
8.Auto lock
9. Rear wheel
10.Wheel cap
11.Crossbars
12.Rear leg tube
13.Front wheel
14.Front wheel directional
lock
15.Footrest
16.Front wheel socket
17.Quick release button
of the front wheel
18.Front leg tube
19.Folding lever
20.Quick release of the
rear wheel

Instructions
3
Schematic diagram of seat unit parts
21.Seat unit upper
22.Canopy holder
23.Connectors of seat unit
24.Safety bar button
29.Safety front bar
30.Canopy frame
31.Footrest adjustment
buttons
24
26
25
25.Seat unit adjustment
button
26.Seat unit release catch
27.Seat unit base
28.Seat unit bottom
27
21
23
24
25
26
27
31
28
29
30

4
To open the stroller
Front wheel Installation
Gently prise open the safety catch and lift the handle of the pram until
the chassis clicks into place.
Installation: insert the front wheel axles into the connect hole until you hear
a click sound, make sure it's installed in place.Repeat thisprocess for both
swivel wheels.
Instructions

Push in the upper part of the direction lock to lock the front wheel (as A shows),
push up the button to achieve 360degree rotation (as B shows).
AA
BBA
B
Press down the quick release button of the front wheels to release the front wheel.
Instructions
The front wheels directional use
Remove the front wheels
5

Instructions
6
Adjust the direction of the rear axle, make sure you have correctly lined up the
flat edge on the axle with the flat edge of the hole. Then push the rear axle
into the hole, until you hear a click sound. Ensure that it is engaged
before use.
Rear wheel assembly
Pull the tab as shown in the below image whilst removing the wheels.
Remove the rear wheels

Instructions
Canopy release
7
AB
To use brakes
WARNING: Please ensure the brakes are always applied when the stroller is
not in use.
1.Step down the brake pedal until you hear a click sound to engage brake
mechanism(A).
2.Lift up the brake pedal to unlock the brakes(B).
A
A
Fix the attachment brackets of the canopy to the metal construction (Point A).

Instructions
8
Canopy release
Pull the brackets of the canopy off the metal construction to release.
Position the seat unit connectors above the connection points on the
chassis and press down until you hear a clicking sound.
The seat unit can be parent facing or world facing.
Mounting Seat Unit

Press in the release buttons on each side of the seat unit, and lift the seat
unit off the chassis.
Release Seat unit
Instructions
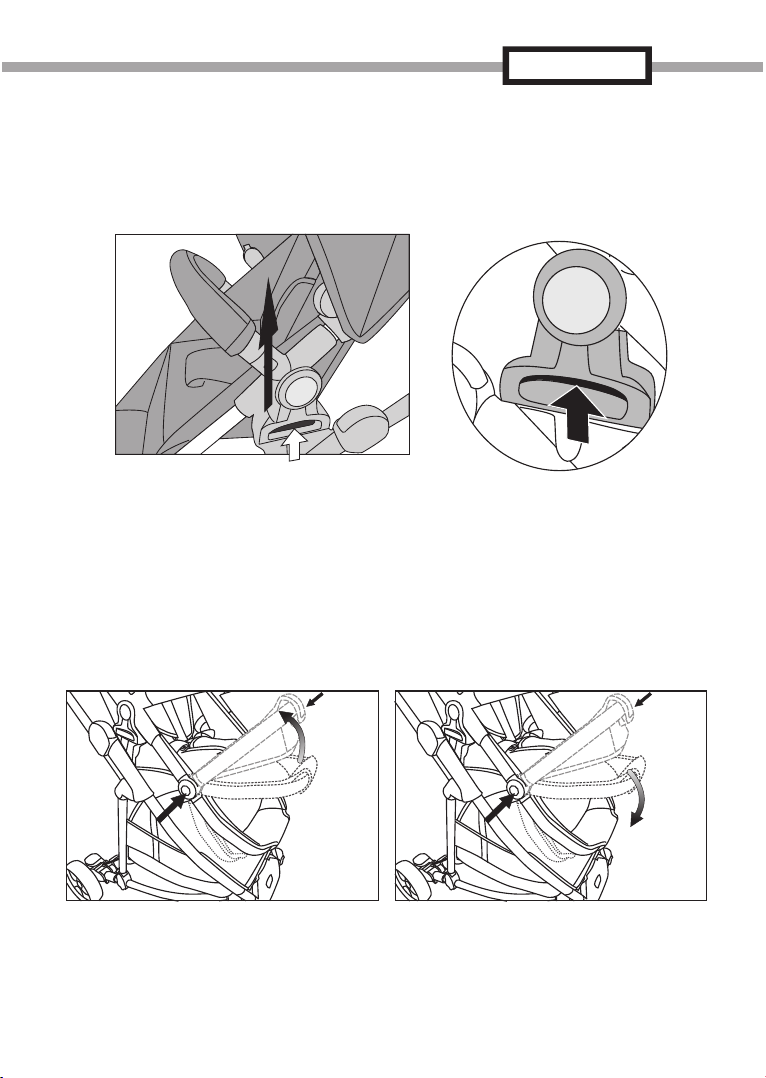
Leg rest adjustment
1.Press the adjustable button both sides at the same time to push it up.
2.Press the adjustable button both sides at the same time to push it down.
9
Table of contents
Other Sowa Stroller manuals