Sony ICF-SW7600 User manual

SONY
LW/MW/SW/FM Stereo
PLL Synthesized Receiver
3-75M55-2a ( )
ICF-SW7600
Operating Instructions page 2
Before operating the unit, please read this manual thoroughly and
retain it for future reference.
Owner’s Record
The model number is located on the front panel and the serial
number is under the rear stand. Record the serial number in the
space provided below. Refer to these numbers whenever you call
upon your Sony dealer regarding this product.
Model No. ICF-SW7600 Serial No..
Mode d’e ploi
PROPERTY Cf lui
NATiOKAL TECHNICAL DEPT.
page 36
Avant de faire fonctionner cet appareil, prière de lire attentivement
ce mode d'emploi et de le conserver à titre de référence ultérieure.
FILE СОРУ
© 989 by Sony Corporation

WARNING
To prevent fire or shock hazard, do not expose
the unit to rain or oisture.
To avoid electrical shock, do not open the
cabinet. Refer servicing to qualified personnel
only.
INFORMATION
This equipment generates and uses radio frequency energy and if
not installed and used properly, that is, in strict accordance with the
manufacturer’s instructions, may cause inteference to radio and
television reception. It has been type tested and found to comply
with the limits for a Class B computing device in accordance with the
specifications in Subpart J of Part 5 of FCC Rules, which are
designed to provide reasonable protection against such interference
in a residential installation. However, there is no guarantee that
interference will not occur in a particular installation. If this
equipment does cause interference to radio or television reception,
which can be determined by turning the equipment off and on, the
user is encouraged to try to correct the interference by one or more
of the following measures:
Reorient the receiving antenna
Relocate the equipment with respect to the receiver
Move the equipment away from the receiver
Plug the equipment into a different outlet so that equipment and
receiver are on different branch circuits.
If necessary, the user should consult the dealer or an experienced
radio/television te^nicpn additional suggestions. The user may
fiitftl^ fCIc^ng ^klel; prepared by the Federal Communications
Cc^ml|sl^\ljslpf|4 .1 i
to Identify and Resolve Radio-TV Interference Problems”. This
booklet is available from the U.S. Government Printing Office,
Washington, DC 20402, Stock No. 004-0004X»45-4.
Table of Contents
Features .................................................................
Precautions..............................................................
Location and function of controls
............................
Power sources
.......................................................
Batteries .............................................................
House current
......................................................
2 V car battery
...................................................
How to set the clock
................................................
How to change the MW channel step
.....................
Direct tuning
............................................................
Manual tuning..........................................................
Scan tuning
............................................................
Preset tuning ..........................................................
How to preset a station .......................................
To tune in a preset station
...................................
How to tune in precisely
..........................................
How to tune in SSB trsmsmissions
.........................
Having the radio turned on automatically................
How to set the sleep timer.......................................
How to use the su):^ijed SW compact antenna
How to use an optional antenna..............................
Using the supplied antenna connector
................
For FM reception
................................................
For AM reception ................................................
Recording radio programs.......................................
To start recording at a desired time
.....................
Specifications .........................................................
Troubleshooting guide.............................................
For the custo ers in Canada
This apparatus complies with the Class B limits for radio noise
emissions set out in Radio InterfererKe Regulations.

• An LW/MW/SW/FM stereo receiver with wotid-wide band coverage.
• Quartz controlled PLL (Phase Locked Loop) synthesizer system
using a microcomputer for easy pinpoint tuning. The tuned
frequency is digitally displayed.
• Fine tuning control for precise tuning
• SSB (Single side band) can be received # .
• Provided with a recording output and a remote control jack.
Connecting the unit to the optional Sony TCM-27 cassette-corder
using these jacks, you can start recording programs at a desired
time #.
• Various ways of tuning
Direct tuning ... Tuning in the station by inputting the frequency of
the station directly #
Manual tuning .. Even if you don’t know the frequency of the
station, you can tune in the station precisely %
Scan tuning . . . . An automatic searching of a station #
Preset tuning . Up to 0 stations can be preset for button-touch
tuning 0
• Other features
Ti er standby . The function to receive a desired station at a
desired time #
Sleep ti er .... Turning the radio off automatically In 65 minutes
•
Power sources . Three different power sources: internal batteries,
house current, car battery #
For battery operation, use four size AA (R6) batteries.
For AC operation, use the AC power adaptor supplied with this
unit; do not use any other type.
For car battery operation, use the car battery cord recommended
for this unit; do not use any other type.
• Do not leave the unit in a location near heat sources, or in a place
subject to direct sunlight, excessive dust, or mechanical shock.
• Use the unit within a temperature range of 0®C to 40®C (32®F to
04®F). If it is used in temperatures outside this range, there may
be trouble with the frequency and clock display. If it is used in
temperatures lower than this range, the displayed numbers may
change very slowly. This is not an internal malfunction. The display
will recover when the unit is used within the recommended
temperature.
• Should any solid object or liquid fall into the unit, remove the
batteries, and have the unit checked by qualified personnel before
operating it any further.
• Since a strong magnet is used for the speaker, keep personal
credit cards using magnetic coding or spring-wound watches away
from the unit to prevent them from possible damage caused by the
magnet.
• Reception around .8 MHz and 3.6 MHz may be difficult because
of internal spurious signals generated by the built-in oscillators.
• When the casing becomes soiled, clean it with a soft cloth
dampened with mild detergent solution. Never use abrasive
cleansers or chemical solvents, as they may mar the casing.
If you have any question or problem concerning your unit that is not
covered in this manual, please consult the nearest Sony dealer.

Location and Function of Cont rols
Refer to the pages Indicated in • for details.
[T] Display window
ri TUNE (tuning) indicator
Lights up when a station is tuned in.
[y| SLEEP (sleep timer) button •
in ON/OFF (power) button
[5] POWER/LOCK switch
Set this switch to POWER, then press the ON/OFF button to turn on
the radio. Set the switch to LOCK when carrying the radio. When this
switch is set to LOCK, the power will not be turned on even if you
press the ON/OFF button.
[i] KEY PROTECT»-, button •
[7] SCAN TUNING START STOP/STANDBY button # #
[|] MANUAL TUNING/SET button # # #
[9] BANDfALARM (alarm set) button # # #
[lS ENTERITIME (time set) button • 0
ITT] Telescopic antenna
[m SENS DX* - LOCAL (FM/AM sensitivity) selector #
R3I EXT ANT (external antenna) jack
0 TAPE REMOTE jack #
5 TAPE REC OUT jack #
a (headphones) jack
[[3 DC IN 6 V ®-<S-Q (external power input) jack
LIGHT button
Press to illuminate the display window for about 5 seconds.
¡Tl PRESET/DIRECT TUNING buttons ee
H FM/EXECUTE button 0
ilj AM/EXECUTE button •
I2I Speaker

Location and Function of Controls
HH FINE TUNING control • •
m AM MODE selector • •
m] TONE selector •
MUSfC; for Ustening to mush
NEWS: for listening to news
!ii VOLUME control
ItI stand
lail MW CH STEP (MW channel step) selector •
|2^ Battery compartment

Power Sources
Before installing the batteries, be sure to check that tne MW CH
STEP selector is set correctly (see page #). For the custo ers In the U.S.A.
Use the supplied AOD4M AC power adaptor.
1to DC IN 6 V
For the custo ers in Canada
Use the supplied AC-240 AC power adaptor. The adaptor operates
on either 0 (99- 2 )* *, 20 ( 08- 32), 220 ( 98 - 242), or 240 V
(2 6 - 264 V) AC, 50/60 Hz.
* Range of voltage allowable shown in parentheses.
1Before connecting the adaptor to a wall
outlet, check to see that the input
selector is correctly set to your local
Battery replace ent
Replace all the batteries with new ones when the sound becomes weak or
distorted.
Do it within ten minutes since the preset statior« and the current time will be
erased when more than ten minutes have passed.
If they are erased, preset the stations and set the time again.
Notes
• Keep the batteries installed for the built-in computer back-up even if you
use the external power sources, if you don't, the preset stations and current
time will be erased.
• The irttemal batteries are automatically disconnected when the AC power
adaptor or the car battery cord is connected to the DC IN 6 V jack.

Power Sources How to Set the Clock
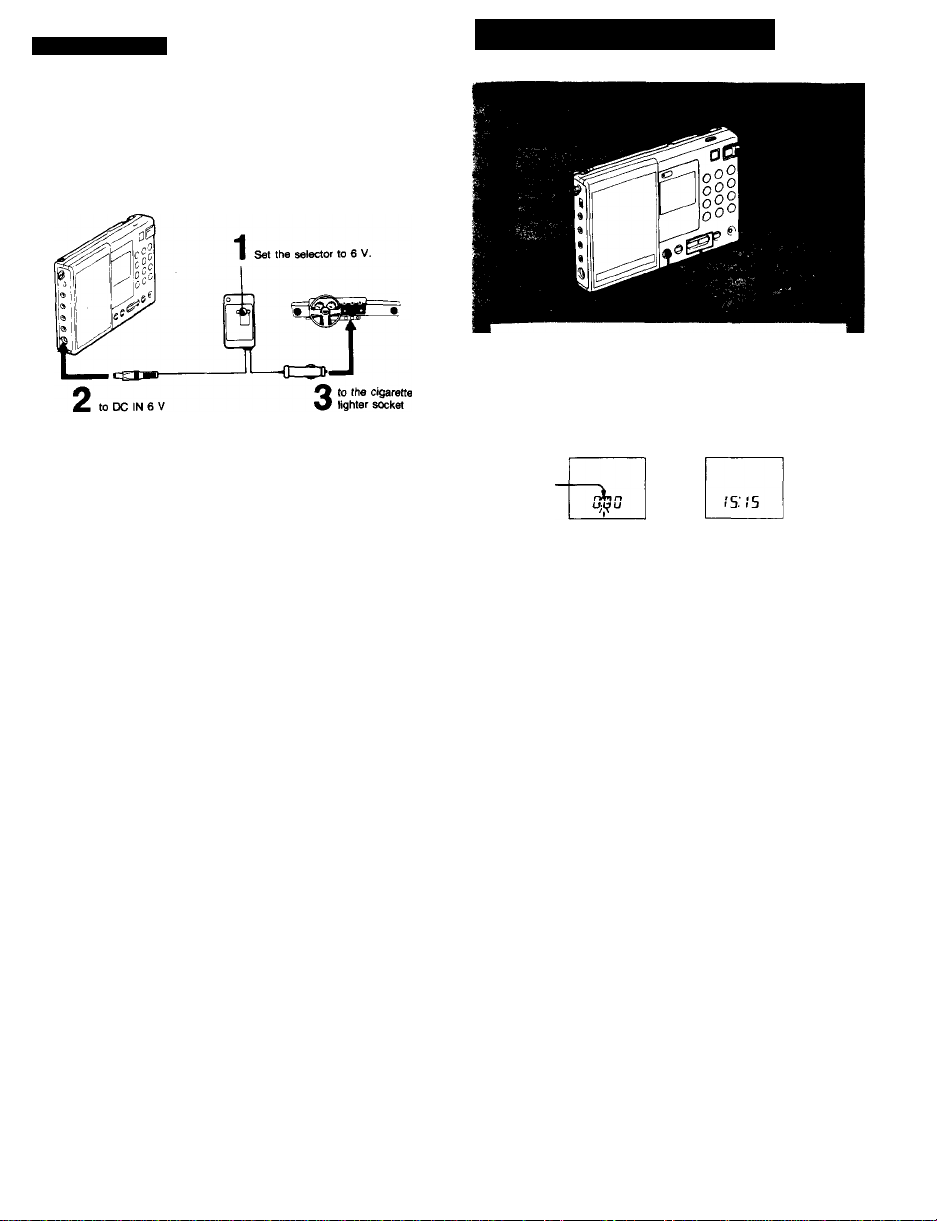
For use on 2 V car battery, connect the Sony DCC- 27A car
battery cord (optional) to the DC IN 6 V jack.
Note
Use only the recommended AC power adaptor or car battery cord
manufactured by Sony. Polarity of the plugs of other manufacturers may be
different.
1 Set POWER/LOCK to POWER.
2 Press SET while keeping TIME pressed to adjust
the clock to the current time.
Each press on SET advances the time digit by one.
To advance the time digits rapidly, keep SET
pressed.
Current time
Blinking
3 Release TIME.
The clock will begin to operate.
Polarity ol the Sony plug
Setting the clock while listening to the radio
You cannot set the clock while you are listening to the radio. Be sure to
press ON/OFF to turn the radio off and set the clock.
The display when the radio Is turned off
The current time is displayed.
Zero second adjust ent
if you want to adjust the time exactly to the second with a telephone time
signal, proceed as in the following example.
Example; To set to 5: 5
Adjust the time indication to 5: 5 and keep TIME pressed.
2 Release TIME simultaneously with the telephone time signal.
The clock will then begin to show the precise time.

How to Change the MW Chan nel Step I
i?» >ij:jJW3WO«fle8 t
■ - } t
The MW channel step is factory-set to 9 ( 0) kHz to
match the frequency allocation system of the country. If
you use the radio where the frequency allocation system
is based on a 0 (9) kHz interval, set the MW CH STEP
selector in the battery compartment to 0 (9) kHz.
1 Set POWER/LOCK to LOCK.
2 open the battery compartment and take out the
batteries.
3 Change MW CH STEP.
4 Install the batteries and close the battery
compartment.
5 Set POWER/LOCK to POWER.
The frequency allocation of the area
Area Frequency allocation system
North America, South America 0 kHz step
Other countries 9 kHz step
Notes
Change the MW CH STEP within 10 inutes
If more than 0 minutes have passed after batteries were removed, the
current time will be erased. In this case, set the time again.
The preset stations will be erased
When you change the MW channel step, the preset stations will be erased.
In such a case, preset the Nations again.

Direct Tuning —when you know the freq | ^
To i prove receiving condition
if you input a wrong frequency
Press FM/EXECUTE or AM/EXECUTE again and input the correct frequency.
if you do not press RM or AM/EXECUTE within 5 seconds after
you Input a fr^uency
The frequency indicatitm turns to the previous one and you will hear the
station of its frequency.
When the frequency near the input frequency is displayed
The frequencies which this radio receives are allocated in the following
intervals depending on the broadcast band.
If you input a frequency that does not match these intervals, the frequency
just below the one that you input will be tuned in and will be displayed.
FM 0.05 or 0. MHz SW 5 kHz
MW 0 kHz* LW 3 kHz
* Possible to change to 9 kHz depending on the country where used (see.
page#).
H TRY AQAINI Indication appeata
If you input the frequency outside the frequency rar>ge. TRY AGAIN! blinks.
When you press FM/EXECUTE or AM/EXECUTE again, this indication will
disappear. If you do not press the button, it will disappear after 5 seconds
and the frequertcy of the previousiy tuned station will appear.
When the sound is distorted
Normally set SENS to DX, however, when the sound is distorted set it to
LOCAL.
When you are listening to the news
Set TONE to NEWS. Human voice will be heard more clearly. When you are
listening to music, set it to MUSIC.

Manual Tuning—if yo
the frequency of a desired station Scan Tuning
------
To have a station scanned auto atically
1 Set POWER/LOCK to POWER.
2 Press ON/OFF.
The radio is turned on.
3 Press MANUAL TUNING (+ or -) repeatedly while
keeping BAND pressed to search for the
approxi ate frequency of a desired station.
The lowest frequency of each band or the meter band
of SW appears iri the display.
If you keep MANUAL TUNING pressed, the band
changes continuously.
4 Press MANUAL TUNING (+ or -) repeatedly to
search for a desired station.
'.iei.
-
--------
it. -------...j
To prevent accidental change of the receiving station
Press KEY PROTECT. The mark appears in the display window and all
the buttons on the front panel will not work.
To release the KEY PROTECT function, press KEY PROTECT again.
When the station is tuned in
The TUNE indicator lights up.
Frequency band changes continuously
If you keep MANUAL TUNING ( + ) pressed, the frequency band being tuned
in will change from LW to MW. SW, FM and then back to LW.
What is eter band?
SW is devided into 3 bands by the wave length (meter).
Each band is called meter band (see page #).
4
t
i
НП
-p
1 Set POWER/LOCK to POWER.
2 Press ON/OFF.
3 Receive a broadcast band by pressing MANUAL
TUNING while keeping BAND pressed, or by pressing
PRESET/DIRECT TUNING. (Refer to the table on the
right page for the frequency range of each broadcast
band.)
4 Press SCAN TUNING START/STOP.
Within the frequency range of the table on page #,
scan tuning will begin and stop automatically for .5
seconds when a station is received and then the
tuning indicator lights up.
5 Press SCAN TUNING START/STOP again to listen to
the station being received.
e Tune in the station ore precisely by MANUAL
TUNING (+ or -), if necessary.
Other manuals for ICF-SW7600
5
Table of contents
Other Sony Stereo Receiver manuals

Sony
Sony STR-DE425 - Fm Stereo/fm-am Receiver User manual

Sony
Sony STR-DA6400ES - Multi Channel Av Receiver User manual

Sony
Sony STR-D311 User manual

Sony
Sony STR-DA5600ES - Multi Channel Av Receiver User manual

Sony
Sony STR-D311 User manual

Sony
Sony STR-DE675 - Fm Stereo/fm-am Receiver User manual

Sony
Sony STR-DE305 User manual

Sony
Sony ST-RDE597 User manual

Sony
Sony STR-DE805G - Fm/am Stereo Receiver User manual

Sony
Sony STR-DB798 User manual