Smarti Duo User manual

Duo
Vehicle Accident Camera
with 120° Wide Angle Lens and Additional
Rear View Internal Camera
User Manual
Version 1
HD
Supports
up to 32GB Wide-Angle
Lens G-Sensor Night
Operation
16.9
2” TFT LCD
HD Screen
2.0 Interface
USB
Video
1280x720 Mac/Windows
Compatible IR Night
Vision
120º
G
150° Second
Camera

Contents
1. Product Overview ........................................................................ 3
1.1. Product Features ............................................................. 3
1.2. What’s in the Box ............................................................ 3
1.3. Button Functions ............................................................. 4
1.4. Installation ....................................................................... 6
2. Installation ................................................................................... 9
2.1. Rear View Camera Installation ........................................ 10
3. Operation Instructions ................................................................ 11
3.1. Automatic Recording ....................................................... 11
3.2. Manual Record ................................................................ 11
3.3. Photographic Mode ......................................................... 11
3.4. Movement Detection ....................................................... 11
3.5. Display Invert & Non-invert ............................................. 12
3.6. G-Sensor ......................................................................... 12
3.7. Video Locking .................................................................. 12
3.8. Date / Time Setting .......................................................... 12
3.9. Audio On / Off by One Button .......................................... 13
3.10. U Flash Mode ................................................................ 13
3.11. Playback ........................................................................ 13
4. OSD Functions ............................................................................ 14
4.1. Resolution ....................................................................... 15
4.1.1. Resolution .......................................................... 16
4.1.2. Recording Time ................................................. 16
4.2. Picture Settings ............................................................... 16
4.2.1. Megapixel .......................................................... 16
4.3. General Settings .............................................................. 16
4.3.1. Brightness .......................................................... 16
4.3.2. Exposure ........................................................... 17
4.3.3. Colour ................................................................ 18
4.3.4. Watermark ......................................................... 18
4.3.5. Audio .................................................................. 18
4.3.6. Auto Record ....................................................... 19
4.3.7. Language ........................................................... 19
4.3.8. Frequency .......................................................... 19
4.3.9. IR LED ............................................................... 20
4.3.10. Shutdown Time ................................................ 20
4.3.11. Key Tone .......................................................... 20
4.3.12. Auto Backlight Off ............................................ 21
4.3.13. G-Sensor ......................................................... 21
4.3.14. TV Out ............................................................. 21
4.3.14. Date Set ........................................................... 22
4.3.15. Format ............................................................. 22
4.3.16. System Information .......................................... 22
4.3.17. Default Set ....................................................... 22
5. Specifications .............................................................................. 23
Thank you for purchasing the Smart-i Duo Vehicle Accident Camera.
The camera features a 120° wide-angle lens to capture the driver’s view and evidence of what
really happened. The Smart-i Duo records road events in HD (720P) to help drivers provide clear
evidence and protect against false claims. The unit also includes a Rear View Internal Camera
for help when reversing and to watch the rear area of the vehicle.
The recorder is equipped with a built-in microphone/speaker to record sound and to listen to
recorded sound on the recorder.
The Smart-i range of Vehicle Accident Cameras are designed to offer crystal clear images and
represent amazing value for money.
1. Product Overview
1.1 Product Features
Supports 720P & VGArecording
Built-in Microphone / Speaker
Quick Recording Open / Close Choice
Compatible with Windows & Mac
Supports up to 32GB Micro SD Card
G-Sensor files, preserving evidence
Recorder charges while in recording function,
video loop and seamless coverage video.
3
1.2 What’s in the Box
Smart-i Duo Vehicle Accident Camera
Additional Rear View Camera
1x Windscreen Bracket & 3M Pad
1x User Manual
1x Suction Windscreen Mount
1x USB Cable
1x Cigarette Lighter Adaptor
Supports
up to 32GB
Video
1280x720 Wide-Angle
Lens
120º
16.9
2” TFT LCD
HD Screen IR Night
Vision HD Screen
150° Second
Camera

1.3 Button Functions
4
External Camera Input
AV-OUT
Reset Button
Power Button
USB
Mounting Frame
Display
Camera Direction Indication
System Working Indicator
Charge Indicator
REC Indicator
MIC Button
REC Button
Speaker
Camera
Micro SD Card Slot
Video Lock Button
Camera Button / Playback Mode
Menu Button

Power Button
• To power the device, press the Power Button for 3 seconds. Video recording
will be automatically activated after the device is switched on if there is a Micro SD card
present.
• To turn the device off, press the Power Button for 3 seconds. The last video will have
been saved before device is switched off.
Menu Button/Display Control Button
• Function 1: Display On/Off
The display can be switched on and off by pressing the Menu button for 3 seconds.
Switching the display on or off does not affect video recording.
• Function 2: Enter Menu
To enter the menu, press the menu button under standby mode. Then, press the page up/down
buttons for selecting. Press the camera button to confirm. To exit, press the menu button again.
Please Note: It is the same process to enter Menu Setting under Video Mode, Photo Taking
Mode and Play back mode.
Camera Button/Playback Button
• Function 1: Photo Taking
To enter the photographic mode, press the camera button under standby. Press the
same button to take photos.
• Function 2: Playback
To enter playback mode, press the camera button for 3 seconds. Press the page
up/down to select images and video and then, press the camera button again to play the
selected video. To exit playback mode press the camera button for 3 seconds.
• Function 3: Play/Pause
Under playback mode, press the camera button to play/pause a video.
5

1.4 Installation
6
To Install the Smart-i Duo in your car, please follow the steps below:
1. Firstly, take out the Smart-i Duo and the Windscreen Mount.
2. Attach the Windscreen Mount to the unit.
5. Position the Smart-i Duo at the front of the car. Please note that the recorder should be
placed behind the rear view mirror to comply with regulations.
3. Insert the Micro SD Card (if purchased) into the unit. To insert, place the card in the slot
(shown below) until you hear a slight click sound confirming the card has been placed
successfully.
6. Take out the ‘USB to Cigarette Lighter Adaptor’
7. Connect the USB end of the Cigarette Lighter Adaptor to the Smart-i Duo and the other end to
the Cigarette Lighter Power Socket.
8. Turn on the ignition to power the unit.
9. Finally, press the ‘Power On’ to turn the unit on.
4. Plug in the additional camera by inserting the Phono cable from the additional camera into
the Phono Socket of the Smart-i Duo.

Emergency Video Lock Button
• Function 1: Video Locking
If there is an incident during recording, press the video lock button to protect valuable video
evidence. Previous footage will be saved and extended for an extra 3 minutes recording. To
unlock the video, press the video lock button again.
Please Note: This video will not be overwritten during loop recording
• Function 2: Movement Detection On/Off
To switch on movement detection, press the video lock button for 3 seconds under standby.
Press it again for 3 seconds to turn off the movement detection.
• Function 3: Confirmation
Press the video lock button to use as a confirm/ok button under the menu interface.
• Function 4: Switch of Cameras
When a second camera has been connected to the recorder, press the video lock button to
switch between cameras.
REC/Page Up
• Function 1: Activate Video Recording
To start video recording, press the REC button under standby mode. Press it again to stop the
video recording.
• Function 2: Page Up
REC button functions as page-up button under the menu and the playback interface.
• Function 3: Non-Invert Display
To non-invert the display, press the REC button under power on status for 3 seconds.
MIC/Page Down
• Function 1: Audio Recording On/Off
To stop recording audio in videos, press MIC button. To record audio, press the MIC button
again.
7

8
• Function 2: Page Down
MIC button functions as page-down button under the menu and the playback interface.
• Function 3: Invert Display
To invert the display, press the MIC button under power on status for 3 seconds.
Reset Button
If you experience any issues with your device, please restart device by pressing the reset
button.

9
2. Installation
1. Turn the car off.
2. Insert the micro SD Card into the slot of the device.
[Caution] We suggest using a class 6 or above micro SD Card and memory no less than
512MB. The device supports a maximum 32GB micro SD card.
3. Stick the DVR mounting frame on front window.
Caution: Please clean the windscreen before sticking the mounting frame. To adjust the
mounting frame position, please use the attached cotton thread and place at the edge between
sticker and window. Then pull the recorder from left to right and right to left until the sticker has
been removed.
4. Plug in the car charger into the car cigarette lighter.
5. Connect the car charger to the Recorder USB input with charging Cable.
6. Place the external camera at the back of the car. The cable can be laid across the seats
to the recorder at the front. Connect the external camera by plugging the camera AV
cable into the AV-IN port on the Smart-i Duo.
7. Adjust camera position; ensure the line of sight is perpendicular to the ground.
8. When starting engine, check the recorder has been installed correctly.
Please Note: If the recorder has been installed correctly, the device will be entering the video
recording mode automatically when engine starts. Please check the screen display, if it is
upside down, invert the display using the REC/MIC button.
10
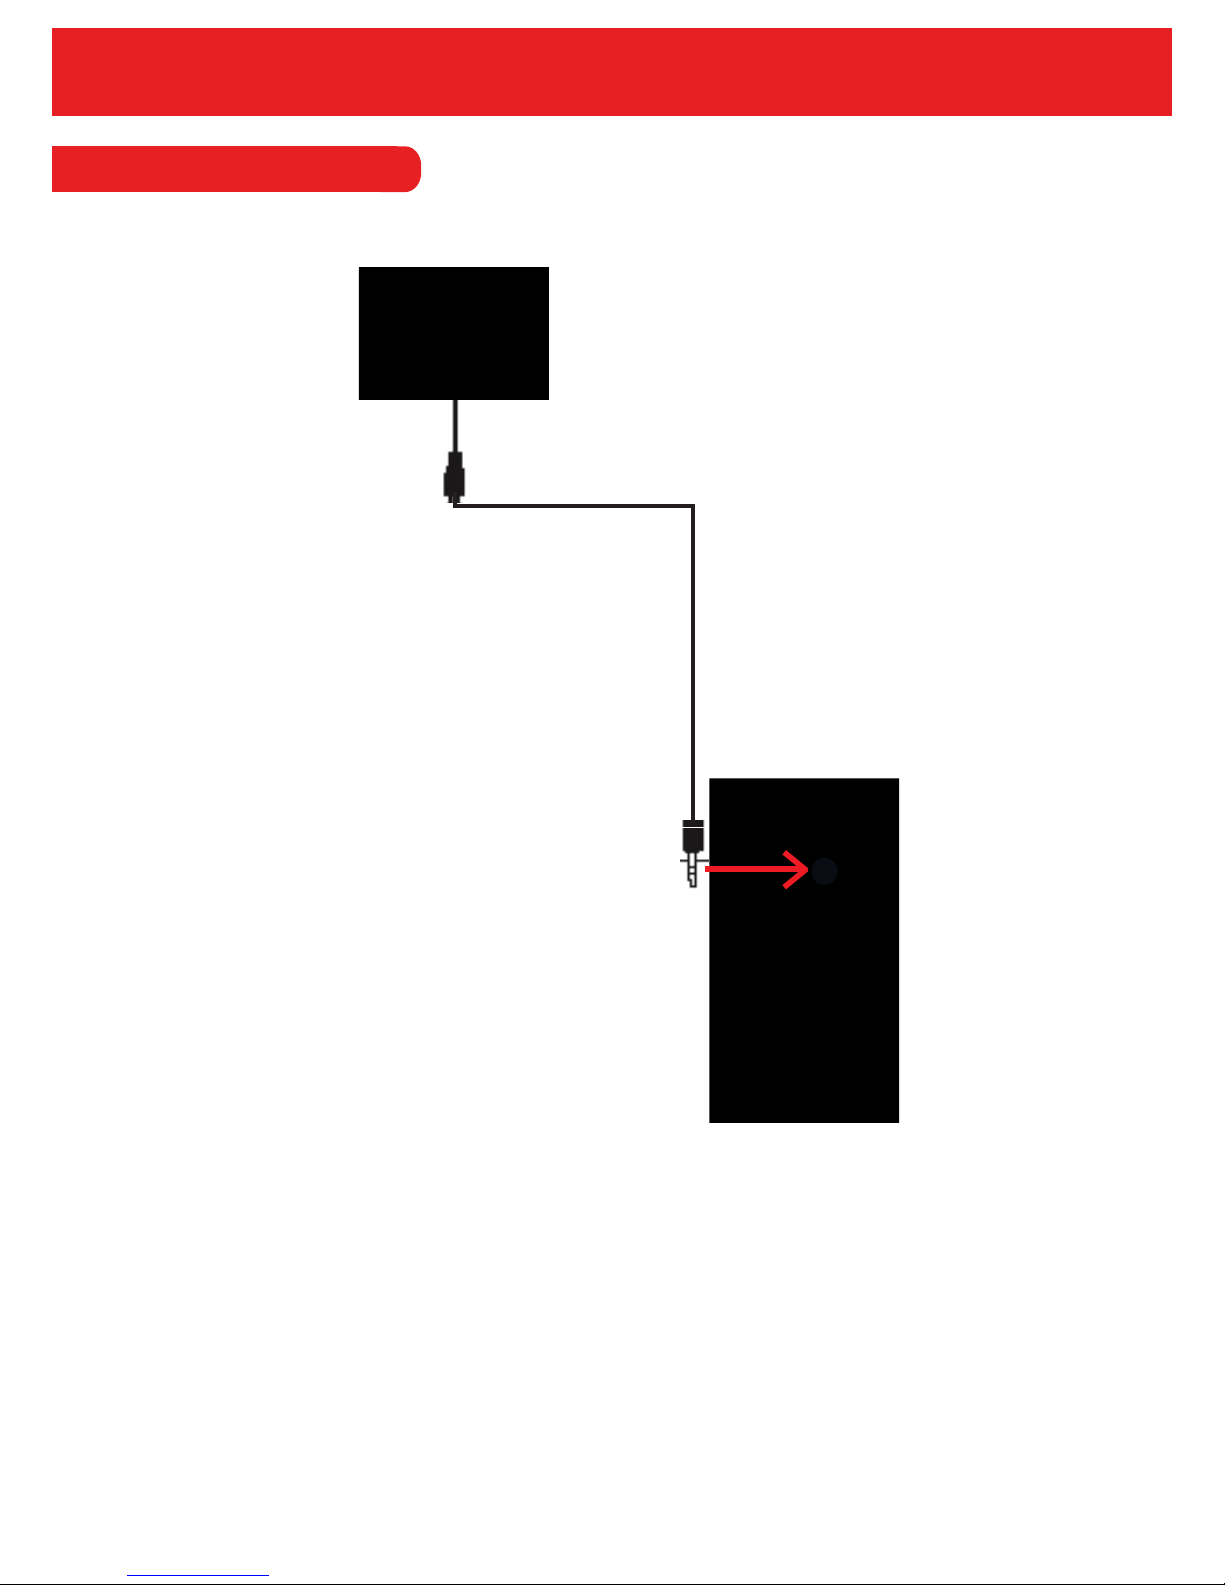
2.1 Rear View Camera Installation
Rear View Camera
To connect the rear view camera, simply plug into the ‘camera in’ connection (as pictured above).
Once plugged in, the cameras image will show on the Duo LCD along with the main image from
the Duo.
Please note that the AV OUT on the Duo is only used for playback on a larger screen. However,
you can playback on the Duo itself rather than through an external monitor.
Table of contents
Other Smarti Dashcam manuals


