Singer QUANTUM STYLIST 9960 User manual

INSTRUCTION MANUAL
9960

2
INSTRUCTION MANUAL
This sewing machine is intended for household use.
This sewing machine is not intended for use by young children or infirm persons without
supervision.
IMPORTANT SAFETY INSTRUCTIONS
When using a sewing machine, basic safety precautions should always be followed,
including the following.
Read all instructions before using.
DANGER - To reduce the ri k of electric hock:
Never leave unattended when plugged in. Always unplug this machine from the electric
outlet immediately after using and before cleaning.
- To reduce the ri k of burn , fire, electric hock,
or injury to per on :
WARNING
1. o not allow to be used as a toy. Close attention is necessary when this sewing
machine is used by or near children.
2. Use this sewing machine only for its intended use as described in this manual. Use only
attachments recommended by the manufacturer as contained in this manual.
3. Never operate this sewing machine if it has a damaged cord or plug, if it is not working
properly, if it has been dropped or damaged, or dropped into water. Return the sewing
machine to the nearest authorized dealer or service center for examination, repair,
electrical or mechanical adjustment.
4. Never operate the sewing machine with any air openings blocked. Keep ventilation
openings of the sewing machine and foot controller free from the accumulation of lint,
dust, and loose cloth.
5. Never drop or insert any object into any opening.
6. o not use outdoors.
7. o not operate where aerosol (spray) products are being used or where oxygen is being
administered.
8. To disconnect, turn the power switch to the off position (symbol “O”), then remove plug
from outlet.
9. o not unplug by pulling on cord. To unplug, grasp the plug, not the cord.
10. Keep fingers away from all moving parts. Special care is required around the sewing
machine needle.
11. Always use the proper needle plate. The wrong plate can cause the needle to break.
12. o not use bent needles.
13. o not pull or push fabric while stitching. It may deflect the needle causing it to break.
14. Switch the sewing machine off (symbol “O”) when making any adjustments in the
needle area, such as threading needle, changing needle, threading bobbin, or changing
presser foot.
15. Always unplug sewing machine from the electrical outlet when removing covers,
lubricating, or when making any other user servicing adjustments mentioned in the
instruction manual.
16. Handle the foot controller with care and avoid dropping it on the floor. Be sure not to
place anything on top of it.
17. Use only the handle to lift and move the machine.
18. o not expose the machine or machine case to sunlight directly. Also, do not keep it in a
very warm or damp place.
SAVE THESE INSTRUCTIONS
Servicing should be performed by an authorized service representative.
SINGER is a registered Trademark of The Singer Company Ltd.

3
CONTENTS
IMPORTANT SAFETY INSTRUCTIONS ............ 2
MO EL 9960 ...................................................... 4
FOR EUROPEAN AN SIMILAR TERRITORIES: ...... 4
MAIN PARTS ...................................................... 5
ACCESSORIES .................................................. 6
UST COVER .................................................... 6
EXTENSION TABLE ........................................... 7
a. REMOVING THE EXTENSION TABLE .................................. 7
b. OPENING THE ACCESSORY CASE ..................................... 7
CHANGING THE PRESSER FOOT ................... 7
A. Changing the presser foot ....................................................... 7
B. Removing the presser foot holder ........................................... 7
INSERTING THE NEE LE ................................. 8
FABRIC, THREA AN NEE LE TABLE .......... 8
CONNECTING THE MACHINE .......................... 9
FOOT CONTROLLER ........................................ 9
FUNCTION OF EACH PART ............................ 10
A. START/STOP BUTTON ........................................................ 10
B. REVERSE STITCH BUTTON ............................................... 10
C. NEE LE UP- OWN / SLOW BUTTON ............................... 10
. SPEE CONTROL BUTTON ............................................... 10
E. PRESSER FOOT LIFTER .................................................... 10
F. THREA CUTTER BUTTON ................................................ 11
G. ROP FEE LEVER ............................................................ 11
H. THREA CUTTER ................................................................ 11
I. TOP COVER ......................................................................... 11
J. HAN WHEEL ...................................................................... 11
EXTRA WI E TABLE ....................................... 13
CONTROL PANEL ............................................ 12
A. L.C. . ISPLAY .................................................................... 12
B. L.C. . CONTRAST CONTROL ............................................ 12
C. PATTERN CHART ................................................................ 12
. IRECT STITCH SELECTION BUTTONS ........................... 12
E. UTILITY STITCH BUTTON ................................................... 12
F. ECORATIVE & LETTER STITCH BUTTON ....................... 12
G. FUNCTION BUTTONS ......................................................... 12
H. E IT BUTTON ...................................................................... 12
I. CLEAR BUTTON .................................................................. 13
J. SCROLL BUTTONS ............................................................. 13
K. CURSOR BUTTONS ............................................................ 13
L. TACK BUTTON ..................................................................... 13
M. TWIN NEE LE BUTTON ...................................................... 13
TO TURN OFF THE AU IBLE BEEP ............... 13
BOBBIN SETTING ............................................ 14
A. REMOVING THE BOBBIN .................................................... 14
B. SETTING SPOOL OF THREA ON SPOOL PIN ................ 14
C. WIN ING THE BOBBIN ....................................................... 14
. INSERTING THE BOBBIN .................................................... 15
THREA ING THE MACHINE ........................... 16
A. PREPARING TO THREA MACHINE ................................. 16
B. SETTING SPOOL OF THREA ON SPOOL PIN ................ 16
C. THREA ING THE UPPER THREA ................................... 16
. THREA ING THE NEE LE EYE ......................................... 17
E. RAWING UP THE BOBBIN THREA ................................ 17
STARTING TO SEW ......................................... 18
A. START AN EN OF SEAM ................................................ 18
B. REVERSE STITCHING ........................................................ 19
C. AUTO TACK STITCH ........................................................... 19
. TURNING CORNERS ........................................................... 20
E. SEWING HEAVY FABRIC .................................................... 20
F. SEWING OVER OVERLAPPE AREAS .............................. 20
G. WI TH OF SEAM ALLOWANCE ......................................... 20
THREA TENSION .......................................... 21
SELECTING UTILITY STITCH PATTERN ....... 22
A. IRECT STITCH PATTERN ................................................. 22
B. SELECTING OTHER UTILITY STITCH PATTERNS ........... 22
C. MIRROR/REVERSE STITCH ............................................... 22
. ELONGATION ...................................................................... 23
E. SETTING STITCH WI TH AN LENGTH ........................... 23
WHERE TO USE EACH STITCH ..................... 24
STRAIGHT STITCH SEWING .......................... 25
A. Straight Stitch ........................................................................ 25
B. Straight Stitch With Auto-lock Stitch (Pattern No. 3, 4) ......... 25
BASTING .......................................................... 26
A. ATTACHING THE ARING/ EMBROI ERY FOOT ............. 26
B. BASTING .............................................................................. 26
ELASTIC STITCH SEWING ............................. 27
QUILTING ......................................................... 27
A. Joining the pieces of fabric ................................................... 27
B. Quilting .................................................................................. 27
C. Hand Look Quilting Stitch (No. 8) ......................................... 27
ZIGZAG STITCH SEWING ............................... 28
MULTI-STITCH ZIGZAG ................................... 28
FREE ARM SEWING ........................................ 28
OVERCASTING-OVERLOCKING .................... 29
A. USING THE OVERCASTING FOOT .................................... 29
B. USING THE GENERAL PURPOSE FOOT ........................... 29
C. NOTE: .................................................................................... 29
BLIN HEM STITCHING .................................. 30
PATCH WORK .................................................. 31
APPLIQUE ........................................................ 31
INSERTING ZIPPERS
CENTERE INSERTION .................................. 32
LAPPE INSERTION ....................................... 33
To stitch around the zipper tab: ( iagram A) .............................. 33
BUTTONHOLE SEWING .................................. 34
BOUN BUTTONHOLE ................................... 36
EYELET ............................................................ 37
AUTOMATIC BAR-TACK AN ARNING ....... 38
SEWING ON BUTTONS ................................... 39
A. Thread Shank ....................................................................... 39
NARROW HEMMING ....................................... 40
COR ING ......................................................... 40
A. SINGLE COR ING ............................................................... 40
B. TRIPLE COR ING ............................................................... 40
CONTINUOUS ECORATIVE PATTERN ........ 41
A. SEWING THIN FABRICS ..................................................... 41
USING THE EVEN-FEE FOOT ...................... 41
A. ATTACHING THE EVEN-FEE FOOT ................................ 41
B. SEWING ............................................................................... 41
ARNING/FREE-HAN EMBROI ERY .......... 42
A. ATTACHING THE ARING/ EMBROI ERY FOOT ............. 42
B. ARING ................................................................................ 42
C. FREE-HAN EMBROI ERY ................................................ 42
. After darning or free-hand embroidery .................................. 42
TWIN NEE LE SEWING .................................. 43
ECORATIVE & LETTER STITCH SEWING ... 44
A. SELECTING ECORATIVE & LETTER STITCH (selecting
mode) .................................................................................... 44
B. SHIFTING THE CURSOR .................................................... 44
C. TO CHECK SELECTE PATTERNS ................................... 45
. INSERTING PATTERN ......................................................... 45
E. TO ELETE PATTERN ........................................................ 45
F. E ITING OF EACH PATTERN ............................................. 46
G. TO RECALL THE SELECTE PATTERNS .......................... 47
H. SEWING THE SELECTE PATTERNS ............................... 48
I. TO SEW PATTERN FROM BEGINNING ............................. 48
ECORATIVE AN LETTER STITCH CHART 49
A JUSTING THE FORWAR AN REVERSE STITCHES
49
MAINTENANCE ................................................ 50
CLEANING ........................................................ 50
HELPFUL HINTS .............................................. 51
Messages on LC ............................................ 52

4
MODEL 9960
PREFACE
Thank you for your purchase of this sewing
machine.
This machine intended for household use will
provide you with excellent performance in sewing
from light to heavy material.
Please refer to this booklet for proper use and
optimum service. To get the most out of your
sewing machine, read the entire instruction
manual before attempting to operate the machine.
Then familiarize yourself with the machine by
following the instruction manual page by page.
To ensure that you are always provided with the
most modern sewing capabilities, the
manufacturer reserves the right to change the
appearance, design or accessories of this sewing
machine when considered necessary without
notification or obligation.
Copyright © 2010 THE SINGER COMPANY
All Rights Reserved Throughout The World.
FOR EUROPEAN AND
SIMILAR TERRITORIES:
This product is suppressed for radio and television
interference with the International Electrotechnical
Commission requirements of the CISPR.
The wires in this mains lead are colored in
accordance with the following code.
Blue: neutral (N) Brown: live (L)
As the colors of the wires in the mains lead of this
appliance may not correspond with the colored
markings identifying the terminals in your plug,
proceed as follows:
The wire which is colored blue must be connected
to the terminal which is marked with the letter N or
colored black. The wire which is colored brown
must be connected to the terminal which is
marked with letter L or colored red. If a 13 Amp.
(BS 1363) plug is used, a 3 Amp. Fuse must be
fitted, or if any other type of plug is used, a 5 Amp.
fuse must be fitted either in the plug or adaptor or
at the distribution board.
Neither cord is to be connected to the earth
terminal of a three-pin plug.
EU only
1. This appliance is not intended for use by
persons (including children) with reduced
physical, sensory or mental capabilities, or lack
of experience and knowledge, unless they have
been given supervision or instruction
concerning use or the appliance by a person
responsible for their safety.
2. Children should be supervised to ensure that
they do not play with the appliance.

5
MAIN PARTS
1.Handle
2.Top Cover
3.Thread Take-Up Lever (Inside)
4.Face Plate
5.Thread Cutter Button
6.Speed Control Button
7.Needle Up- own / Slow Button
8.Reverse Stitch Button
9.Start/Stop Button
10.Extension Table (Accessories)
11.Presser Foot Lifter
12.Forward / Reverse Adjusting Screw
(underneath machine)
13.Foot Controller
14.Power Line Cord
15.Hand Wheel
16.Power Switch
17.Terminal Box
18.Controller Jack
19. irect Stitch Selection Buttons
20.E IT Button
21.Tack Button
22.Twin Needle Button
23.Utility Stitch Button
24. ecorative Stitch & Letter Button
25.Liquid Crystal isplay (L.C. .)
26.Function Buttons (F1 - F5)
27.Clear Button
28.Scroll Buttons
29.Cursor Buttons
30.Thread Cutter
31.Buttonhole Lever
32.Needle Threader Lever
33.Needle Threader
34.Presser Foot Thumb Screw
35.Presser Foot Holder
36.Presser Foot
37.Fabric Feed ogs
38.Needle Clamp Screw
39.Needle Thread Guide
40.Needle
41.Bobbin Cover Latch
42.Bobbin Cover
43.Needle Plate
44. rop Feed Lever
45.Pattern Chart
46.Thread Guide
47.Thread Guide
48.Bobbin Winder Thread Guide
49.Thread Tension Regulator
50.Spool Stand
51.Felt Washer
52.L.C. . Contrast Control
53.Auxiliary Spool Holder
54.Bobbin Winder Shaft
55.Bobbin Winder Stop
1
2
7
5
6
4
3
8
9
10
11
12
14
13
15
16
17
18
19 20 21 22 23 24
25
26
27
28
29
30
31
32 41
40
33
34
38
35
36
37
42
43
44
45 46
39
47 48
49 50 51 52 53 5554

6
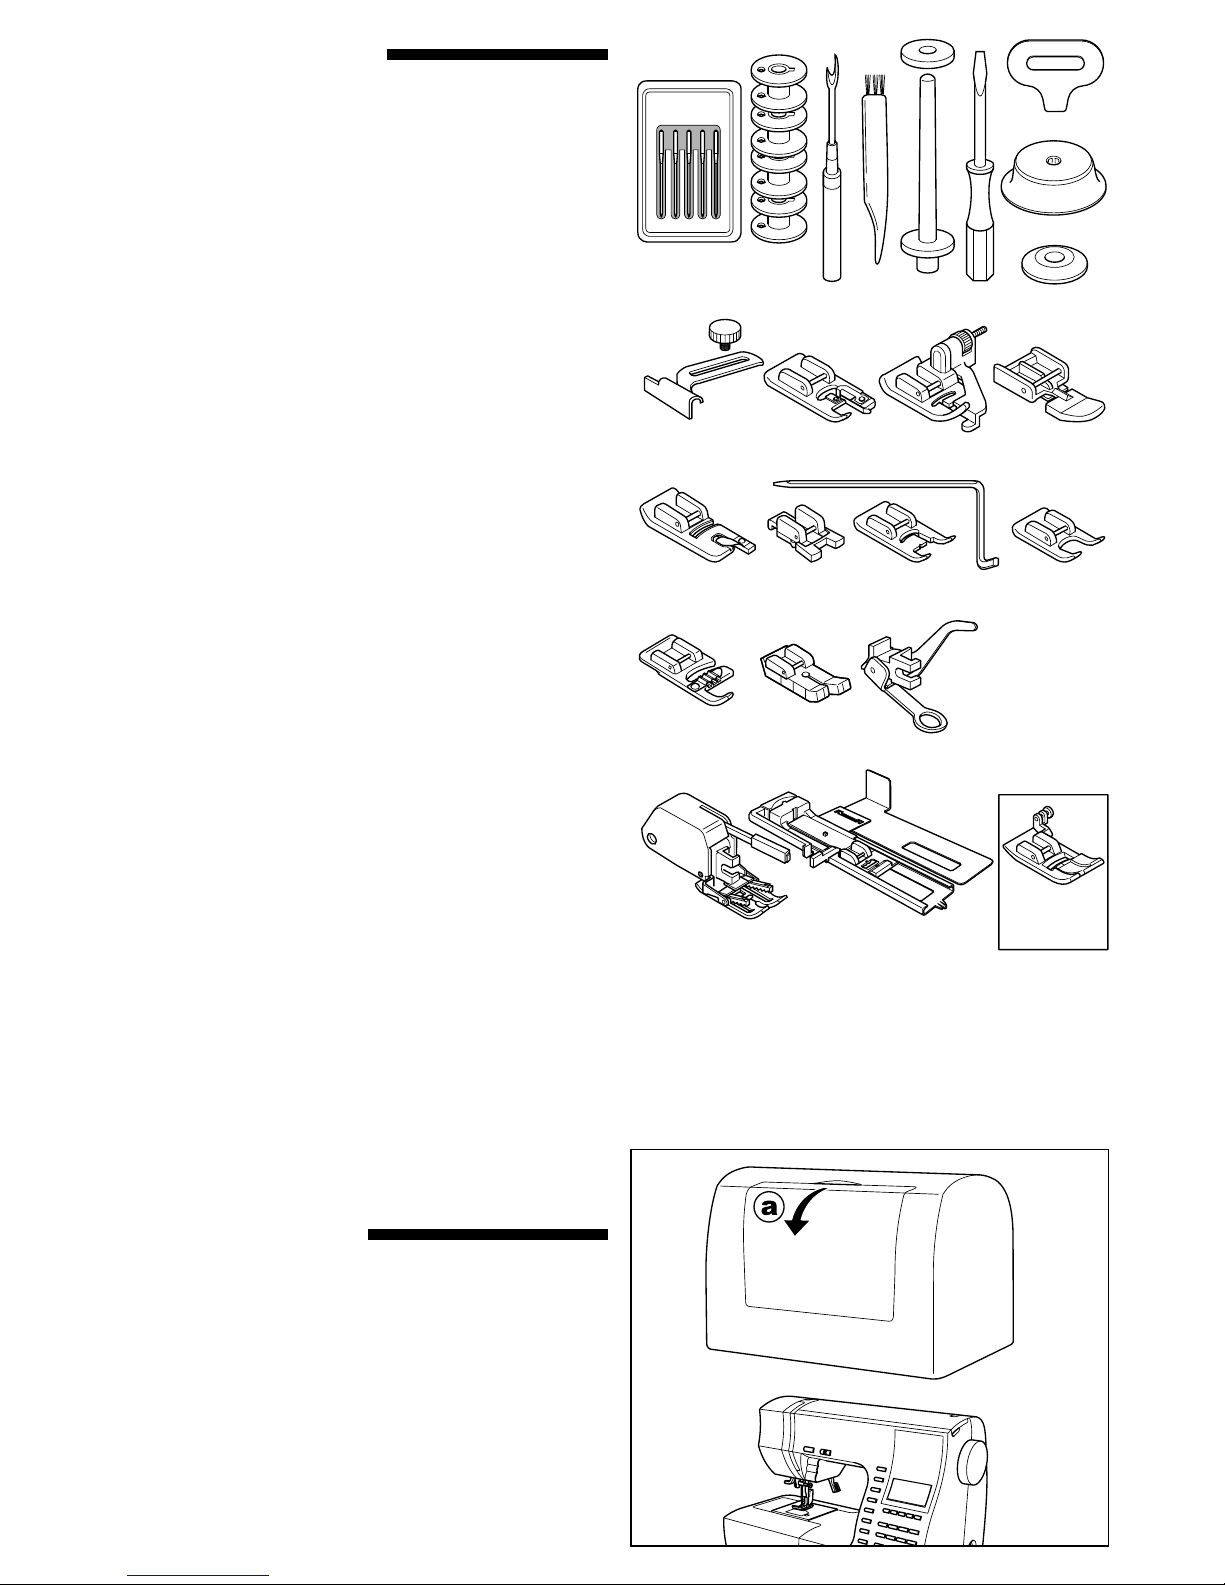
ACCESSORIES
Accessories are provided in the accessory case.
(See next page, [EXTENSION TABLE])
1. Needle Pack
2. 4 Bobbins ( 1 is in the machine)
3. Seam Ripper
4. Brush
5. Auxiliary Spool Pin with Felt Washer
6. Screw river
7. river for Needle Plate
8. Thread Cap (On the machine when delivered)
9. Small Thread Cap
10. Seam Guide and Screw
11. Overcasting Foot (C)
12. Blind Hem Foot ( )
13. Zipper Foot (E)
14. Rolled Hem Foot
15. Button Sewing Foot
16. Satin Foot (B)
17. Quilting Bar
18. Open Toe Foot
19. Cording Foot
20. Straight Stitch / Patch Quilting Foot
21. arning Embroidery Foot
22. Even-feed Foot
23. Buttonhole Foot (F) and Under Plate
24. General Purpose Foot (On machine when
delivered) (A)
• An Extra Wide Table is provided with this
machine. (See Page 11)
DUST COVER
Cover the machine with dust cover when it is not
to be used.
a. The manual may be stored in the compartment
of the dust cover by opening the front cover
towards you.
o not remove the styrofoam located inside of this
cover.
12
34 5 6
7
8
9
10 11 12 13
14 15 16 17 18
19 20 21
22 23 24
OPTIONAL ACCESSORIES
25. Single Welt Cord Foot
26. Adjustable Bias Binder
27. Braiding Foot
28. Stitch in the itch Foot
29. Clearance Plate
30. Braiding Guide
31. Fancy Trim Foot
32. Shank w/o metal

7
EXTENSION TABLE
a. REMOVING THE EXTENSION TABLE
Hook your finger to the left bottom side of
extension table and slide it to the left. To attach,
insert to the right.
b. OPENING THE ACCESSORY CASE
Hook your finger to the left side of accessory
case and pull toward you.
CHANGING THE PRESSER
FOOT
The presser foot must be changed according to
the stitch you sew, or work you do.
A. Changing the pre er foot
1. Turn the hand wheel toward you until the
needle is at its highest point.
2. Raise the presser foot lifter.
3. Remove the presser foot by pushing the
presser foot release lever toward you.
4. Place desired foot with its pin directly under the
slot in presser foot holder.
5. Lower the presser foot lifting lever and the
presser foot will snap into place.
CAUTION: To prevent accident .
Turn off the power switch before you change
the presser foot.
B. Removing the pre er foot holder
When attaching the special presser foot or
cleaning the machine, you should remove the
presser foot holder.
1. Remove the presser foot.
2. Loosen the presser foot thumb screw and
remove the presser foot holder.
3. To replace the holder, pull up the holder as far
as it will go from bottom of presser bar.
4. Tighten the thumb screw.

8
INSERTING THE NEEDLE
Select a needle of the right type and size for the
fabric to be sewn.
FABRIC, THREAD AND
NEEDLE TABLE
Select size of thread and needle in accordance
with fabric to be sewn.
Type of Fabric
Light Weight - thin
georgette,
organdy, voile,
taffeta, silk, etc.
Medium Weight -
gingham, pique,
linen, cotton,
satin, thin
corduroy, velvet
Heavy Weight -
gabardine, tweed,
denim, corduroy
Stretch - double
knit, tricot,
spandex, jersey
Sweatshirt, Swim-
wear, ouble Knit,
Sweater Knit
Leather
Thread Size
Ctn #80 -100
Silk 60 - 80
Syn 80 - 100
Ctn 50 - 80
Silk 50
Syn 50 - 80
Ctn 40 - 50
Silk 50
Syn 50 - 60
Syn 50 - 80
Silk 50
Polyester
Polyester
Needle Size
9/70-11/80
11/80-14/90
14/90-16/100
11/80-14/90
Needle for knit and
synthetic fabric
Needle
Type
2000
gray shank
2000
gray shank
2000
gray shank
2001
green shank
2001
green shank
2032 Leather
U e a Singer brand needle for better ewing re ult .
CAUTION: To prevent accident .
Turn off the power before removing the
needle.
1. Turn the hand wheel toward you until the
needle is at its highest point.
2. Loosen the needle clamp screw.
3. Remove the needle.
4. Insert new needle into needle clamp with the
flat side to the back and push it up as far as it
will go.
5. Tighten the needle clamp screw.
a. o not use the bent or blunt needle. Place
needle on a flat plate and check straightness.

9
CONNECTING THE
MACHINE
DANGER: To reduce the ri k of
electric hock.
Never leave unattended when plugged in. Always
unplug this machine from the electric outlet
immediately after using and before maintenance.
WARNING: To reduce the ri k of
burn , fire, electric hock, or injury
to per on .
o not unplug by pulling on cord. To unplug, grasp
the plug, not the cord.
1. Place machine on stable table.
2. Connect the power line cord to the machine by
inserting the 2-hole plug into the terminal box.
3. Connect the power line plug to the electric outlet.
4. Turn on the power switch.
5. A lamp will light up when switch is turned on.
6. To disconnect, turn the power switch to the off
position (symbol O), then remove plug from
outlet.
FOOT CONTROLLER
Use of foot controller will permit control of start,
stop and speed with your foot.
When the foot controller is connected, start/stop
button will be deactivated. (See page 10)
1. Turn off the power switch. (symbol O)
2. Push foot controller plug into the jack on
machine.
3. Place foot controller at your feet.
4. Turn on the power switch.
5. A lamp will light up when switch is turned on.
6. The harder you press the foot controller, the
faster the machine will sew. The machine will
stop when foot controller is released.
WARNING: To reduce the ri k of
burn , fire, electric hock, or injury
to per on .
1. Turn off the power when connecting the foot
controller to the machine.
2. Handle the foot controller with care and avoid
dropping it on the floor. Be sure not to place
anything on top of it.
3. Use only foot controller provided with this
machine. (Type 4C-337B)
FOR UNITED STATES AND CANADA USERS:
POLARIZED PLUG INFORMATION
This appliance has a polarized plug (one blade wider than the other). To reduce the risk of electric
shock, this plug is intended to fit in a polarized outlet only one way. If the plug does not fit fully in the
outlet, reverse the plug. If it still does not fit, contact a qualified electrician to install the proper outlet. o
not modify the plug in any way.

10
FUNCTION OF EACH PART
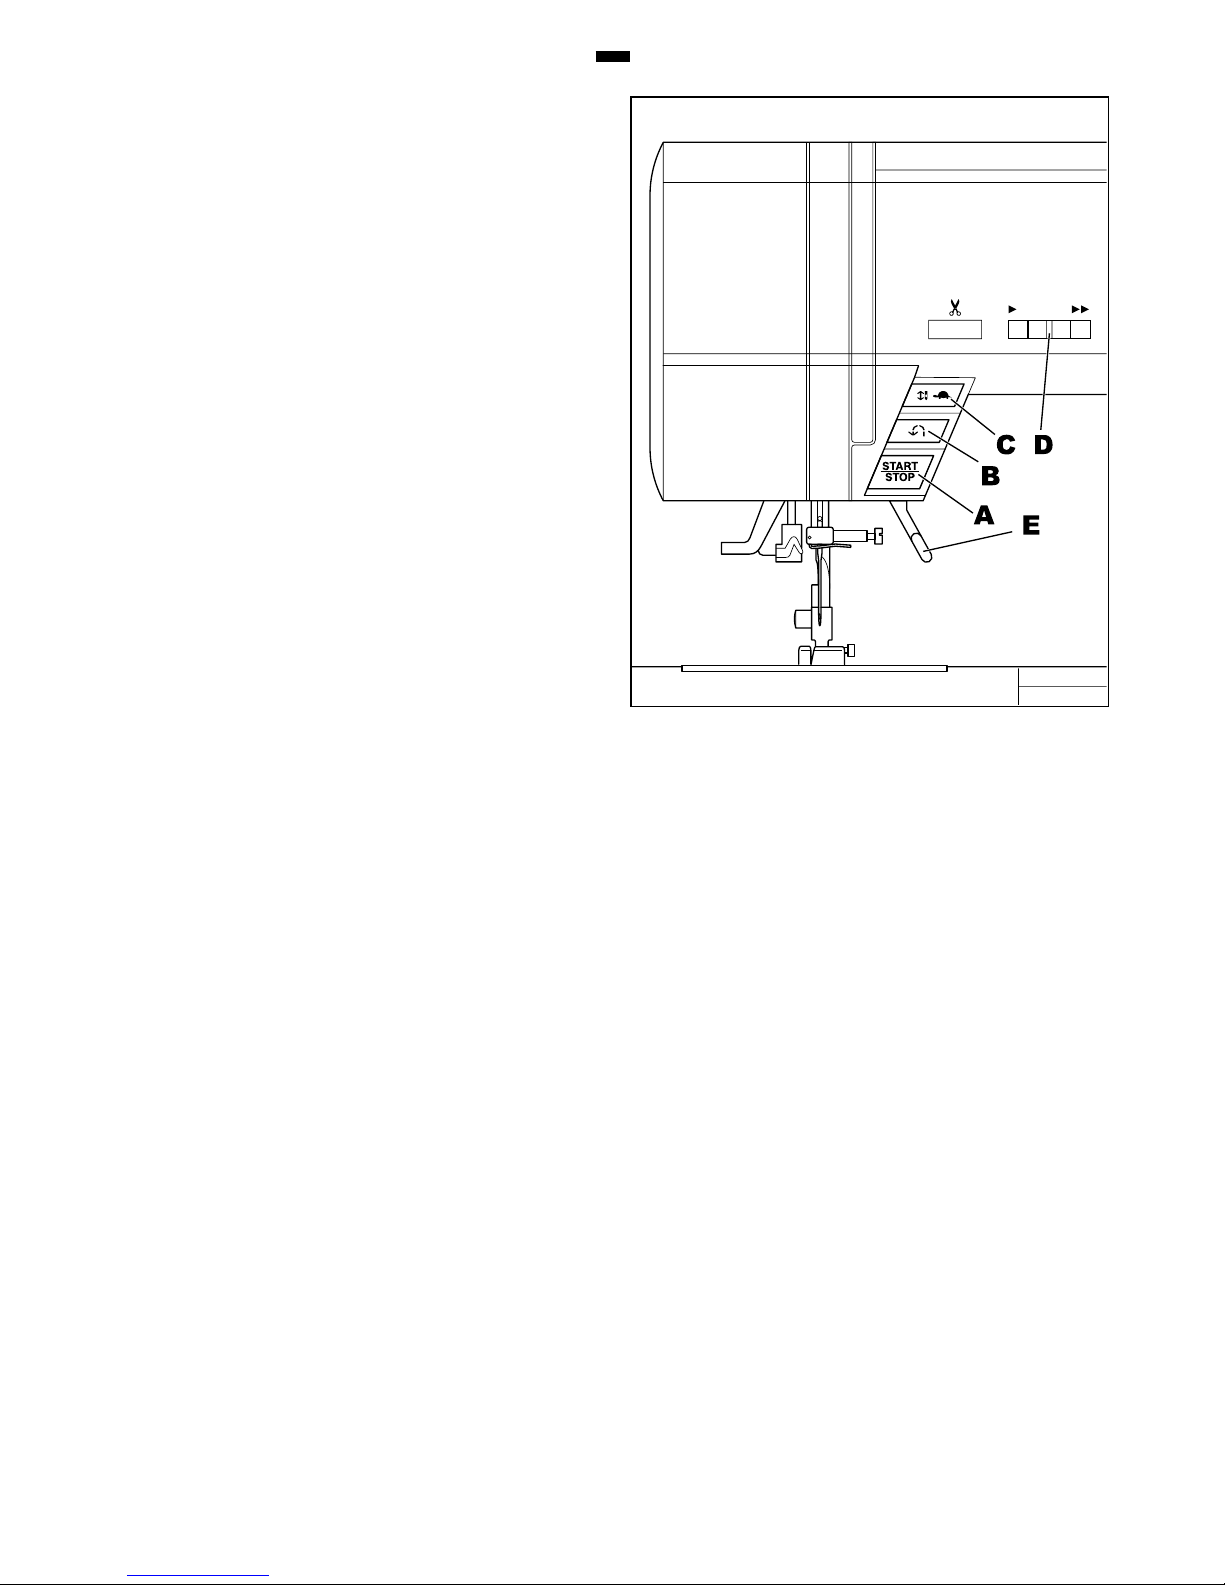
A. START/STOP BUTTON
The machine will start running when start/stop
button is pressed and will stop when pressed the
second time. The machine will rotate slowly at
start of sewing.
MONITOR LAMP
Green Light “ON”
Ready to sew or bobbin winding.
Red Light “ON”
Presser foot is not in down position or buttonhole
lever is not lowered.
If the red light is on, the machine will not start even
when start/stop button is pressed.
If upper thread is not threaded, machine will stop
after a few turns. (Upper thread sensor)
Note:
When the foot controller is connected, start/stop
button will be deactivated.
B. REVERSE STITCH BUTTON
The machine will continue to sew in reverse at low
speed while this button is pressed and stop when
this button is released.
Note:
When the foot controller is connected, machine
will sew in reverse while this button is pressed.
When released, machine will sew forward.
C. NEEDLE UP-DOWN / SLOW BUTTON
Pressing this button when the machine is stopped,
will change the needle position from down to up or
from up to down.
While sewing, by pressing this button, machine
will sew in slow speed. Pressing this button again,
the speed will return.
D. SPEED CONTROL BUTTON
The machine will sew faster when the button is slid
to the right, and sew slower when the button is slid
to the left.
Note:
When the foot controller is connected, this button
limits the maximum speed.
E. PRESSER FOOT LIFTER
The presser foot is lifed up or down by this lever.
Note: Machine will not start when the presser foot
is lifted. (Except for bobbin winding)
Other manuals for QUANTUM STYLIST 9960
4
Table of contents
Other Singer Sewing Machine manuals

Singer
Singer 331Kl User manual

Singer
Singer 484.1544180 User manual

Singer
Singer 7902 Specifications

Singer
Singer 263-1 User manual

Singer
Singer One User manual

Singer
Singer 2277 User manual

Singer
Singer 107W17 Instruction manual

Singer
Singer 522D User manual

Singer
Singer CG-590 User manual

Singer
Singer 457A105 Setup guide

Singer
Singer 4423 User manual

Singer
Singer 17W15 User manual

Singer
Singer 111W141 Quick start guide

Singer
Singer 1507 User manual

Singer
Singer 3100 SERIES 569U User manual

Singer
Singer 2259 User manual

Singer
Singer 107W50 User manual

Singer
Singer 27W User manual

Singer
Singer 191D - User manual

Singer
Singer Stylist 476 User manual