
Simmons SD7K User manual
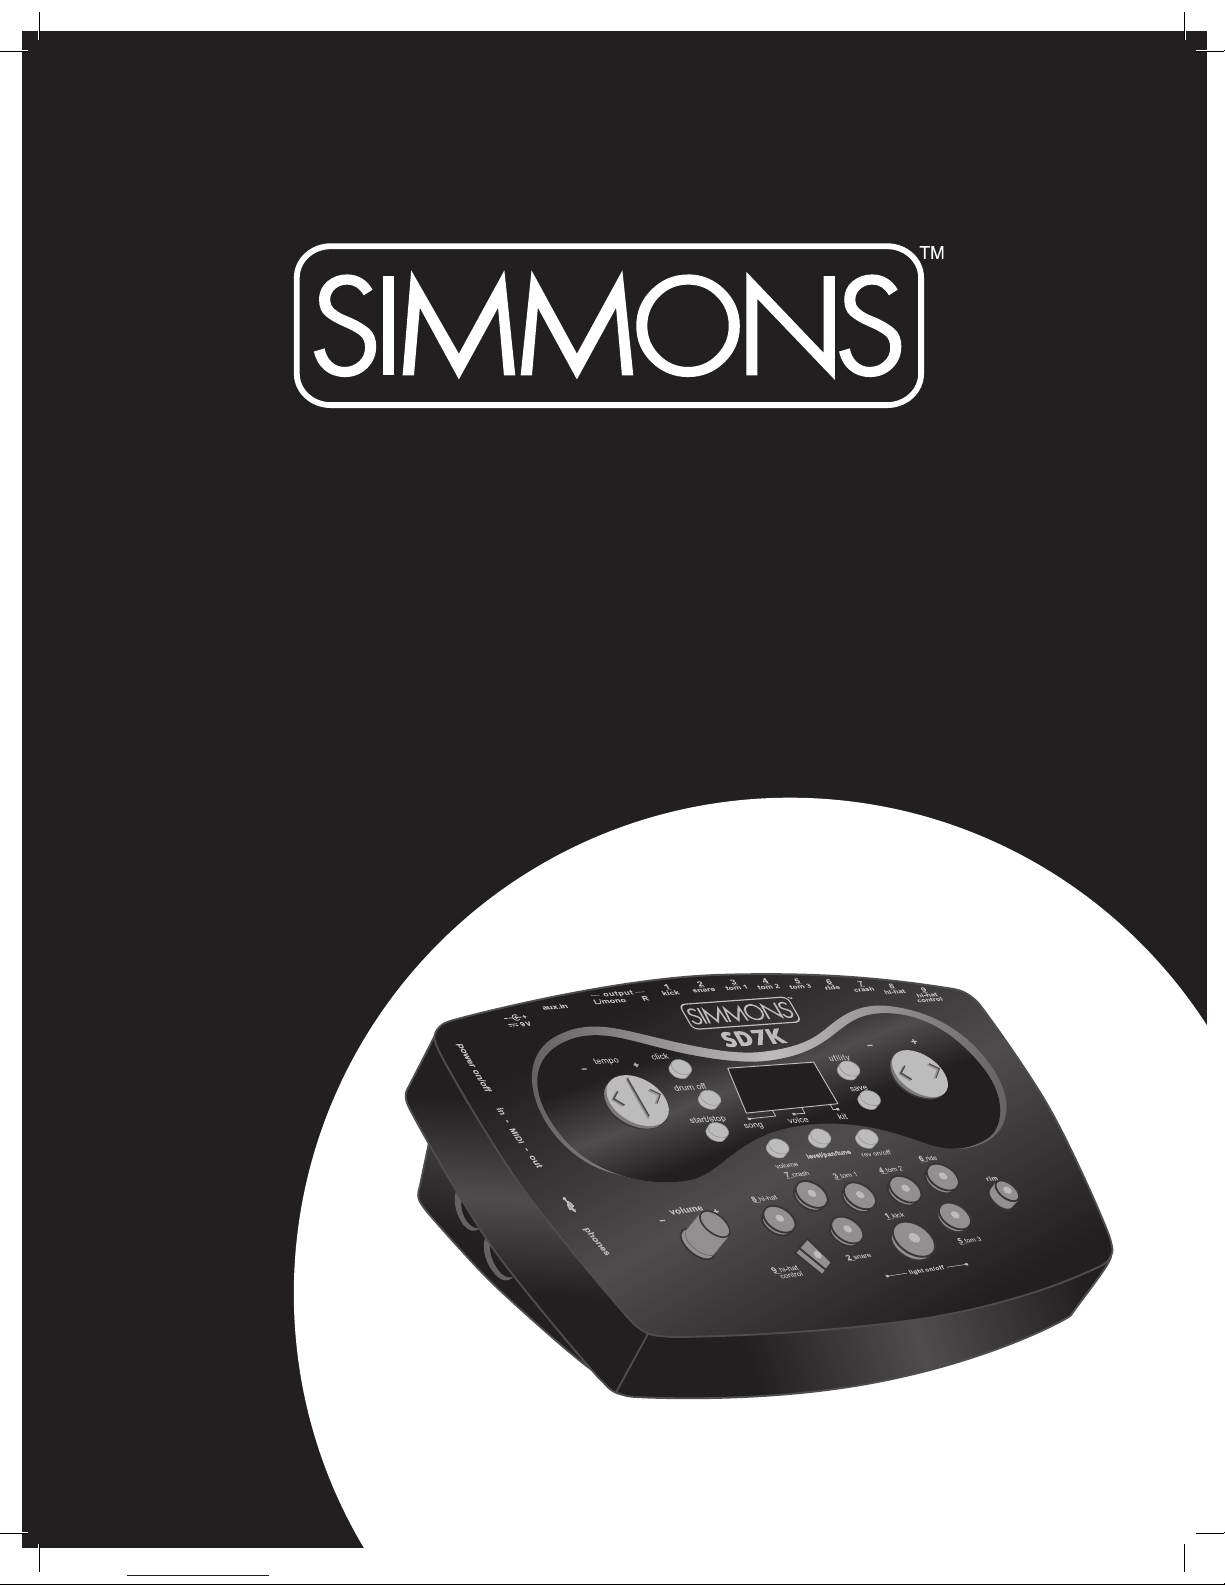
SD7K
Digital Drum Kit
User Manual
www.simmonsdrums.net

FCC Statements
1. Caution: Changes or modifications to this unit not expressly approved by the party responsible for compliance could void
the user’s authority to operate the equipment.
2. Note: This equipment has been tested and found to comply with the limits for a Class B digital device, pursuant to Part 15 of the FCC Rules.
These limits are designed to provide reasonable protection against harmful interference in a residential installation. This equipment generates,
uses, and can radiate radio frequency energy and, if not installed and used in accordance with the instructions, may cause harmful interference
to radio communications. However, there is no guarantee that interference will not occur in a particular installation. If this equipment does cause
harmful interference to radio or television reception, which can be determined by turning the equipment off and on, the user is encouraged to
try to correct the interference by one or more of the following measures:
•Reorientorrelocatethereceivingantenna.
•Increasetheseparationbetweentheequipmentandreceiver.
•Connecttheequipmentintoanoutletonadifferentcircuit.
•Consultanexperiencedradio/TVtechnicianforhelp.

SD7K
www.simmonsdrums.net 1
… on your purchase of the Simmons SD7K Electronic Drum Kit. To get the most
enjoyment from it, we recommend that you skim through this manual at least
once, then refer back to it often to learn more about specific functions.
Taking Care of Your Digital Drum Set
Location
• To avoid deformation, discoloration, or more serious damage, do not expose the unit to direct sunlight,
high temperature sources, or excessive humidity.
Power Supply
• Turn the power switch OFF when the SD7K is not in use.
• The AC adapter should be unplugged from the AC outlet if the SD7K is not to be used
for an extended period of time.
• Avoid plugging the AC adapter into an AC outlet that is also powering high-consumption appliances
such as electric heaters or televisions. Also avoid using multi plug adapters since these can reduce
sound quality, cause operation errors and result in possible damage.
• To avoid damage, turn OFF the SD7K’s power switch and all related devices prior to connecting
or disconnecting cables.
Handling and Transport
• Never apply excessive force to controls, connectors, and other parts.
• Unplug cables by gripping the plug rmly. Do not pull on the cable.
• Disconnect all cables before moving the module.
• Physical shocks caused by dropping, bumping, or placing heavy objects on the module can result
in scratches and more serious damage.
Cleaning
• Clean the module with a dry, soft cloth.
• A slightly damp cloth may be used to remove stubborn grime and dirt.
• Never use cleaners such as alcohol or thinner.
• To avoid discoloration, do not place vinyl objects on top of module.
Electrical Interference
• The module contains digital circuitry and may cause interference if placed too close to radio or
television receivers. If this occurs, move the SD7K further away from the affected equipment.
Service and Modication
• There are no user serviceable parts in the drum module.
• Do not attempt to open the drum module or make any change in the circuits
or parts of the unit. This would void the warranty.
Congratulations!
SD7K User’s Manual
digital drum kit
2
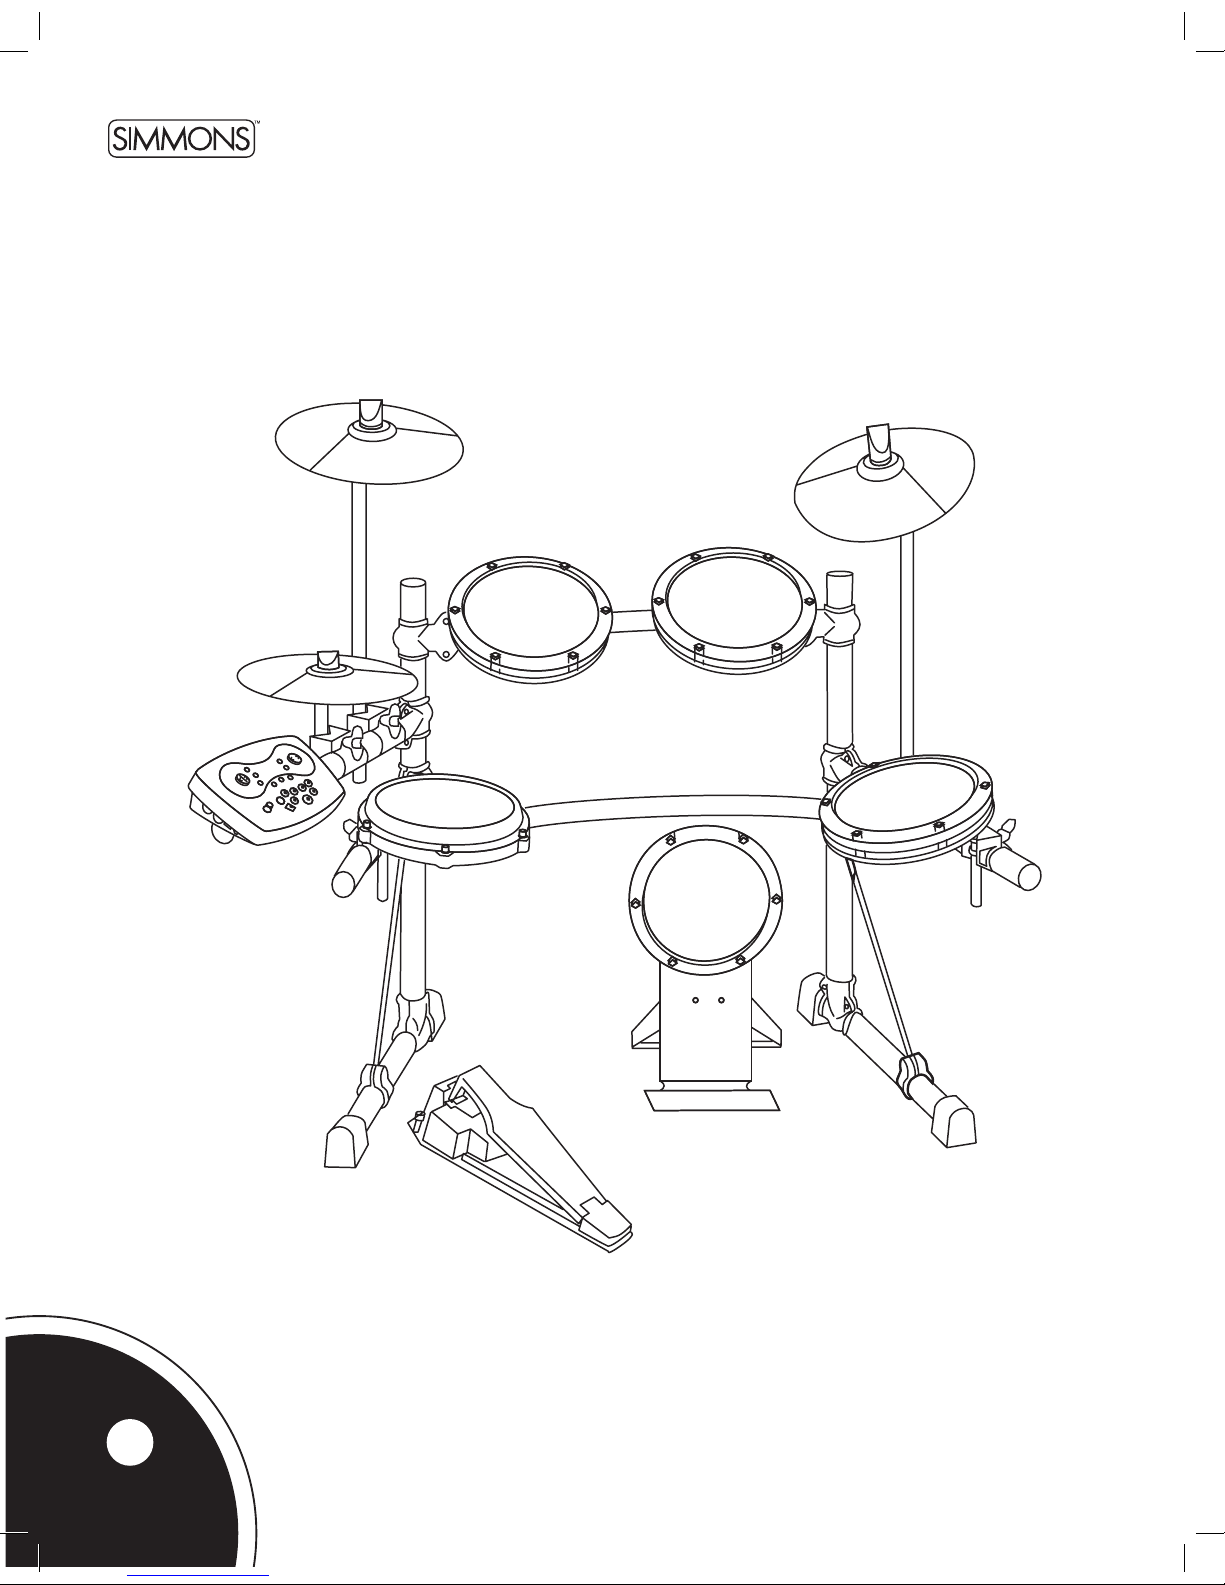
SD7K Setup
Setup your SD7K kit following the included assembly instruction sheet.

SD7K
www.simmonsdrums.net
Panels 4
Top Panel 4
Rear Panel 5
Side Panel 5
Connections 6
Pads and Pedals 6
Audio Equipment 7
Headphones 7
MP3/CD Player 7
Power Supply 7
Power Switch 7
Using the SD7K Pads 8
Playing the Pads 8
Metronome 8
Kit Mode 9
Selecting a Drum Kit 9
Global reverb 9
Voice Mode 10
Selecting the Drum Voice 10
Adjusting Pad Level 11
Adjusting Pad Pan 11
Adjusting Pad Tuning 11
Saving User Kits 11
Utility Menu 12
Pad Sensitivity (Gain) 12
Rim Sensitivity 12
Crosstalk 12
Curve 13
Splash Sensitivity 13
Local Mode 13
Saving Trigger Settings 13
Restoring the Factory Preset 13
Song Mode 14
Selecting a Song 14
Listening to a Song 14
Muting the Drum Part 14
Accompaniment Volume 15
Drum Volume 15
Song Source 15
Song Tempo 15
MIDI and USB 16
MIDI Connection 16
USB Connection 16
Local Mode 16
MIDI Channels 16-17
Voice List 18
Drum Kit List 20
Song List 20
General MIDI Voice List 21
Percussion Set List 22
MIDI Implementation Chart 24
Table of Contents
3
SD7K User’s Manual
digital drum kit
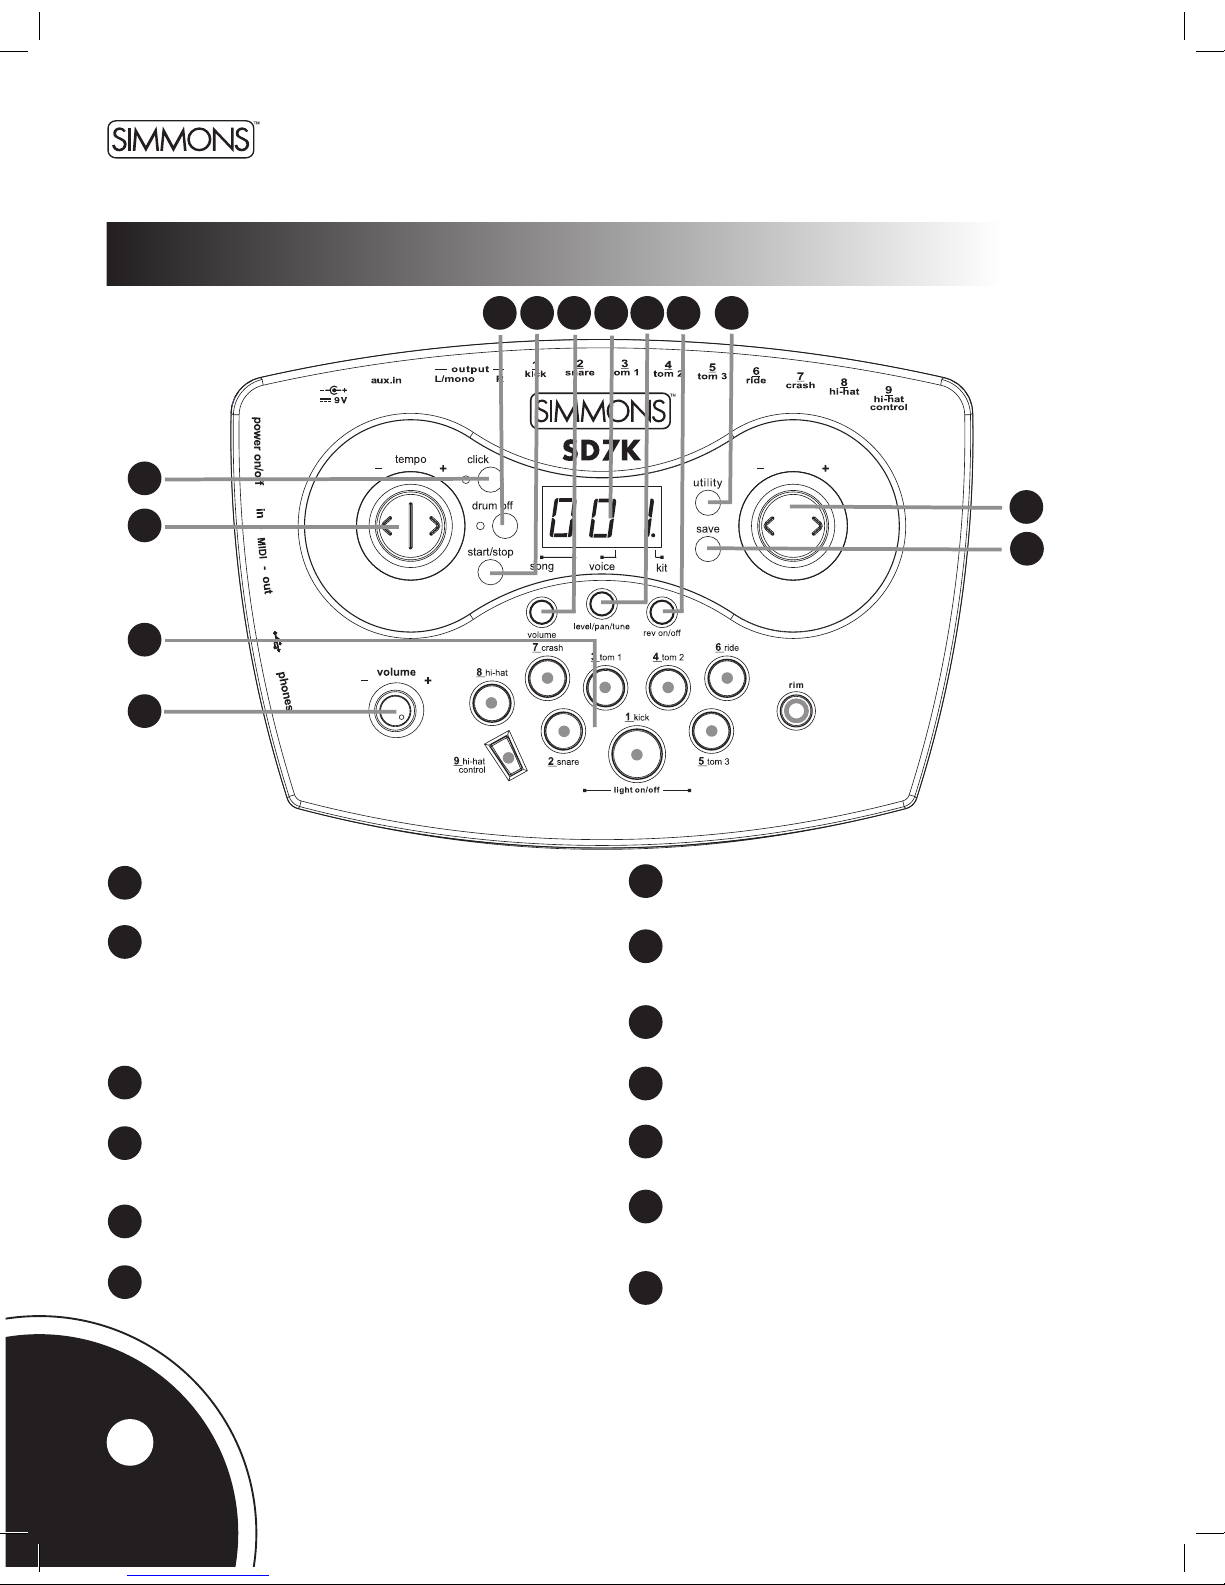
Panels
Master volume knob
Controls the volume of phone and line outputs.
1
12 [+] button, [-] button
Changes values (kit number, voice number,
song number, etc.) when editing.
3[TEMPO+] button, [TEMPO-] button
Changes current tempo.
2Pad select buttons and indicators
In Kit mode, the buttons can play the pad voices.
In Voice Mode, they select the pad to be edited
and the indicators show the current selected pad.
In Song Mode, the indicators will display which pads
are being played by the drum track.
4[CLICK] button and indicator
Turns the metronome on or off and selects the metronome
sound (click or voice).
5[DRUM OFF] button and indicator
Mutes the drum part of the Song.
6[START/STOP] button
Starts and stops the selected song.
[SONG] button
Enters or switches Song menu pages.
7
9[VOICE] button
Enters or switches Voice menu pages.
10 [KIT] button
Enters or switches Kit menu pages.
83-digit LED
This LED is the main display device of the SD7K,
which will show the parameters of the current menu.
11 [UTILITY] button
Enters or switches Utility menu pages.
13 [SAVE] button
This button is used to save the current kit
settings in a user kit and saves the trigger
settings under the Utility menu pages.
Top Panel
1
2
3
4
567910
811
12
13
4
SD7K
www.simmonsdrums.net 5
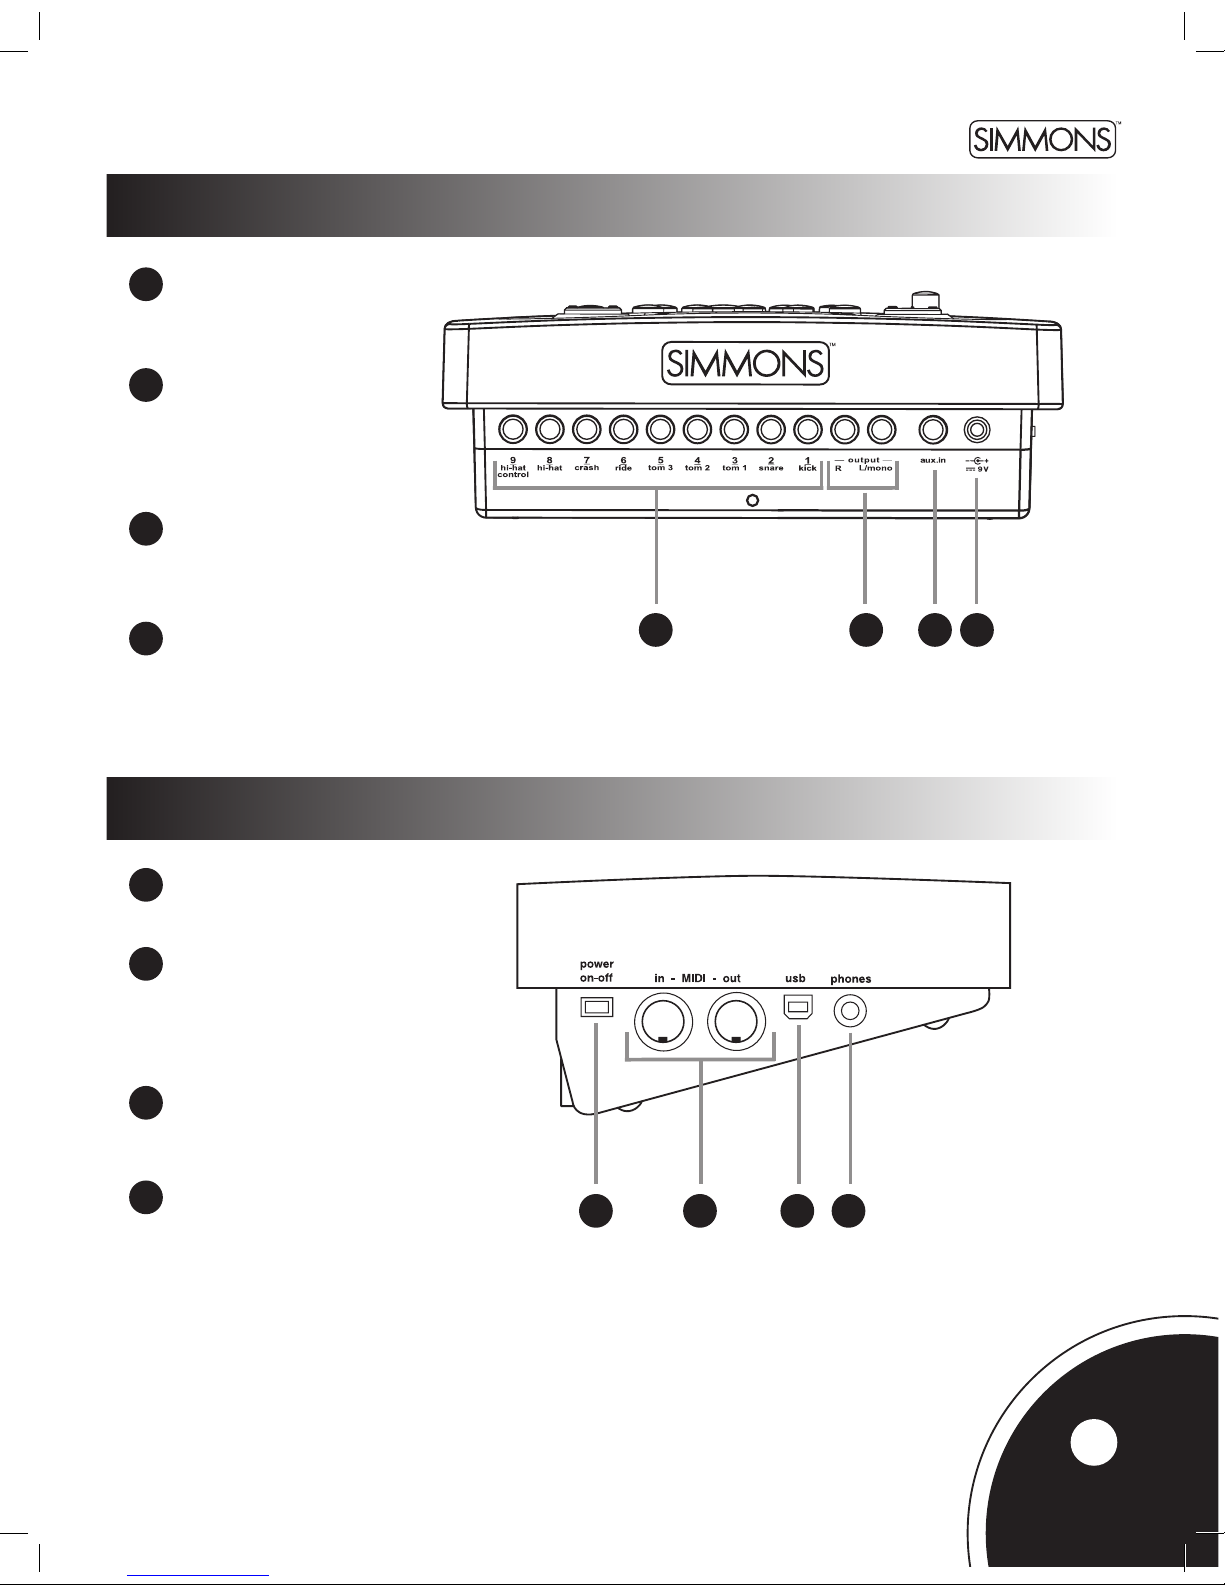
Rear panel
side panel
DC input
Connection for the DC 9V
power adapter
17
14 Pad input jacks
Input connections for kick,
snare, tom, cymbal pads
and hi-hat control pedal.
15 Line output jacks
Stereo output connection to an
audio system or drum amplier
such as the Simmons DA50 or
DA200S.
16 AUX input jack
This stereo input jack is for an
external sound source such as
an MP3 or CD player.
21 Phone jack
This stereo jack is used to
connect headphones.
19 MIDI IN and OUT
These ports allow communication with
other products equipped with a MIDI
interface. Please see the MIDI section
of this manual for details.
18 Power switch
This switch turns power on and off.
20 USB port
This port is used to connect to a
computer. (MIDI In/Out via USB)
14 15 16 17
18 19 20 21
SD7K User’s Manual
digital drum kit
6
connections
Pads and Pedals
CAUTION!
To avoid damage, turn OFF the SD7K’s power switch and all related devices
prior to connecting or disconnecting cables.
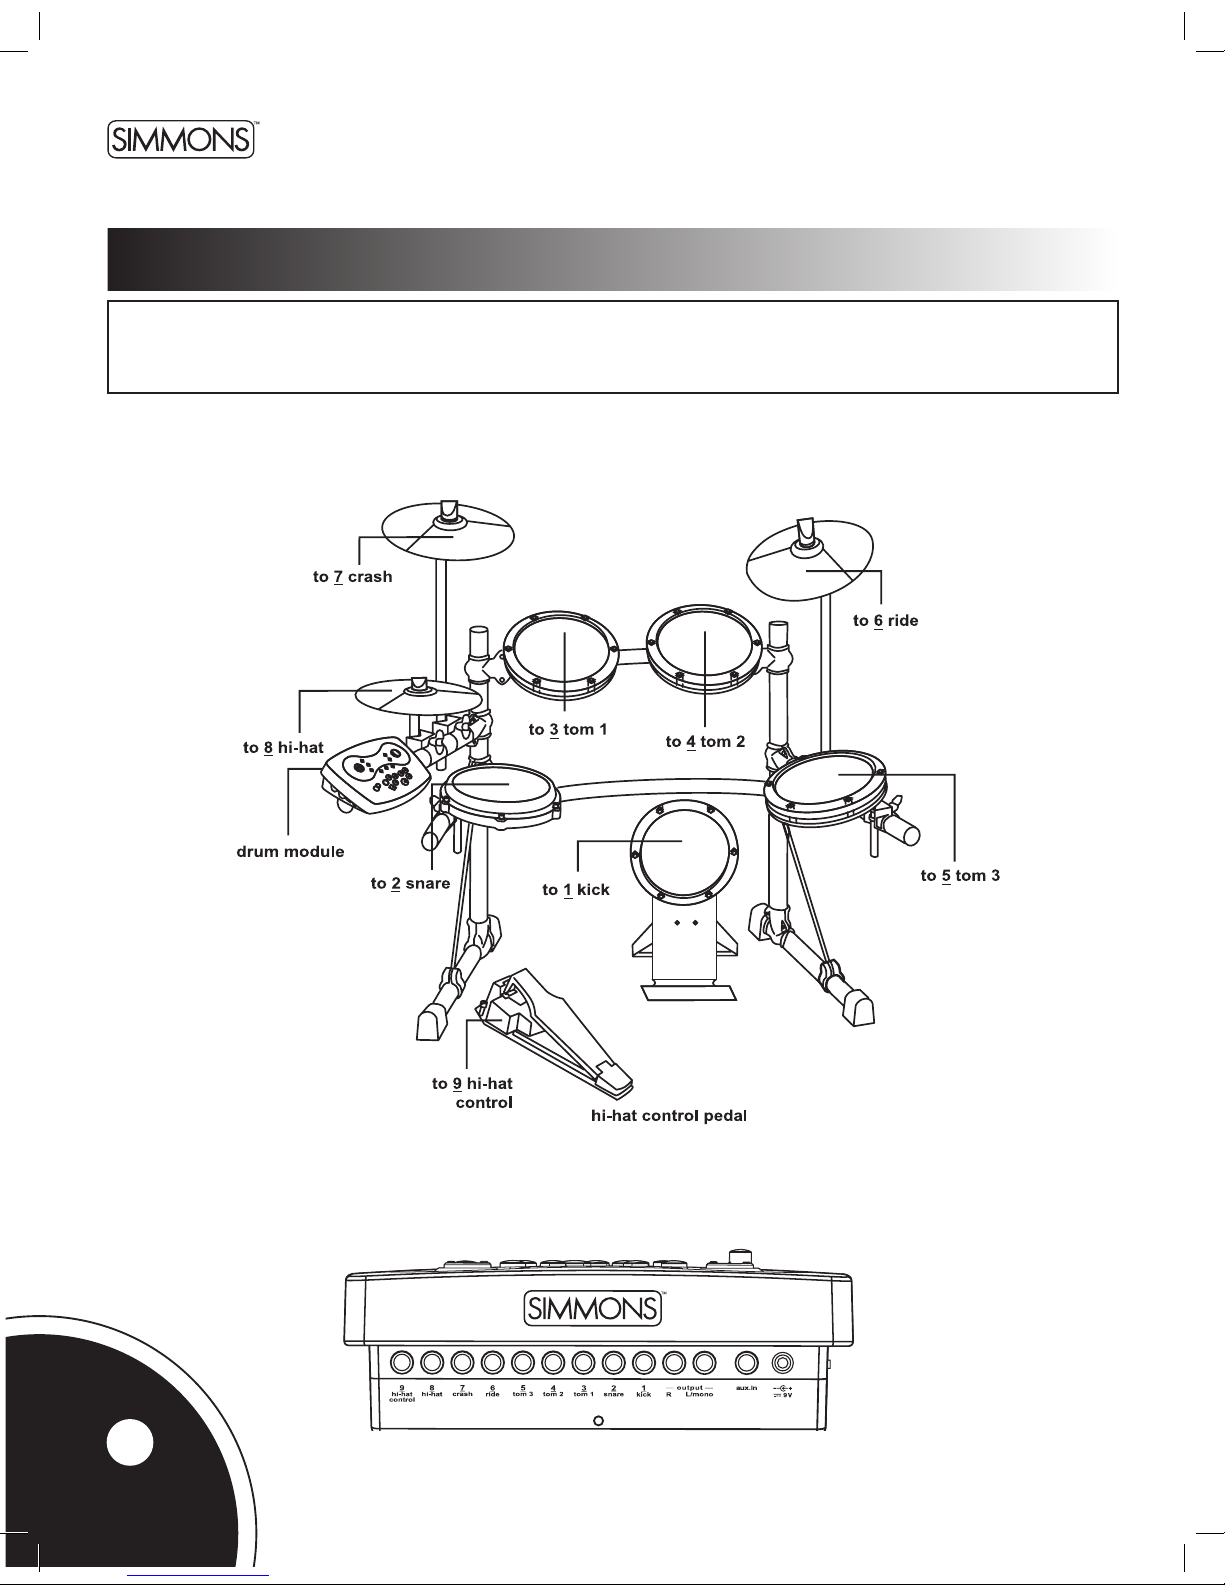
Pads and Pedal:
Using the provided cables, connect each pad to its corresponding trigger input jack, following the marking on the cables.
Secure all the cables to the stand using the provided velcro strips.
SD7K
www.simmonsdrums.net
equalization
volume
input
right
left/mono
druminputs
aux
drum
aux
low
mid
high
line
in
head
phones
equalization
volume
input
right
left/mono
druminputs
aux
drum
aux
low
mid
high
line
in
head
phones
7
audio equipment
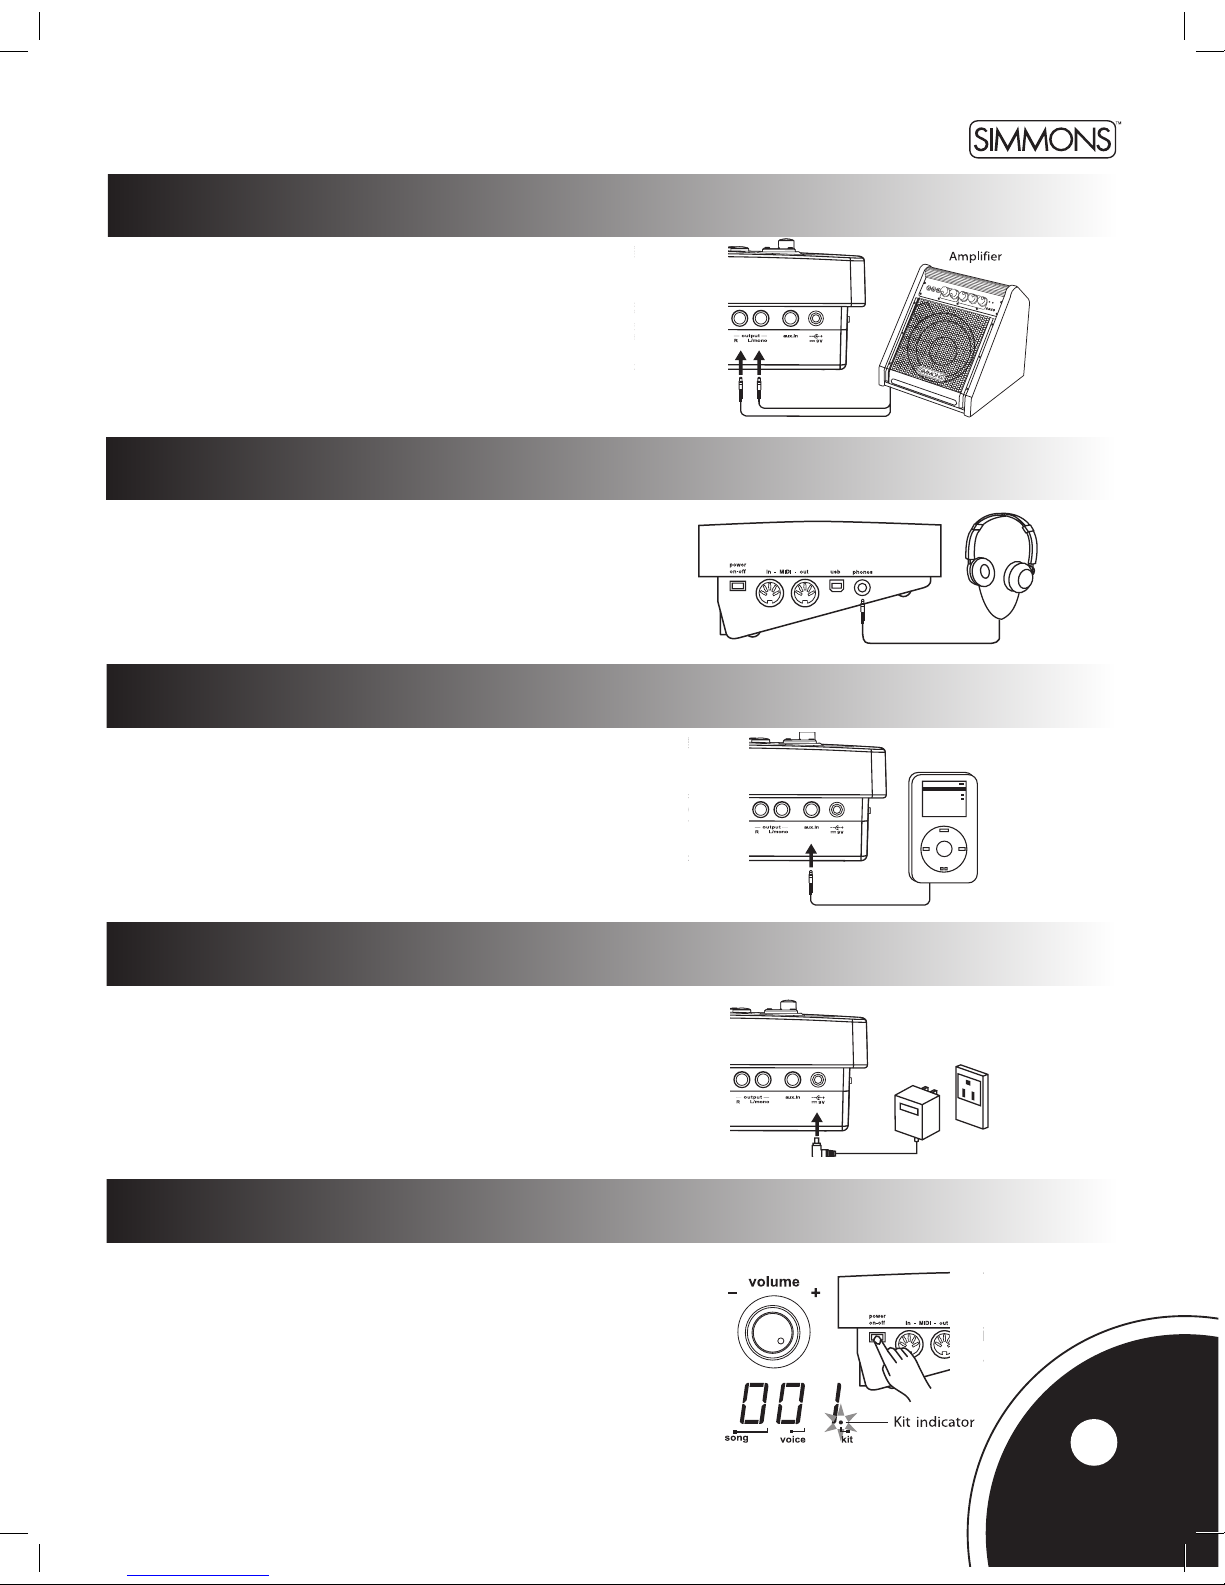
When using an amplier such as the Simmons DA50 or DA200S,
connect the Output L/MONO and R jacks on the rear panel to the
input of the amplier. (For mono playback, use the L/MONO jack;
for stereo playback, connect both L/MONO and R jacks.)
headphones
An optional set of stereo headphones can be connected to the
PHONES jack located on the side of the drum module.
MP3/cd player
1. Connect the audio output of an MP3/CD player or other audio
source to the stereo AUX IN TRS jack on the rear panel.
2. The input signal is mixed with the drum signal,
allowing you to play along.
power supply
Make sure the power is switched OFF.
Connect the power adapter to the DC IN jack on the rear panel.
Note:
Make sure the power is switched OFF when connecting the
drum module with external devices.
Power Switch
After conrming that all connections have been completed,
rotate the volume knob to the left (minimum volume level)
before switching the power on.
Set the power switch to the “ON” position. The kit indicator
will light up and the display will show kit number 001.
equalization
volume
input
right
left/mono
druminputs
aux
drum
aux
low
mid
high
line
in
head
phones
equalization
volume
input
right
left/mono
druminputs
aux
drum
aux
low
mid
high
line
in
head
phones
equalization
volume
input
right
left/mono
druminputs
aux
drum
aux
low
mid
high
line
in
head
phones
SD7K User’s Manual
digital drum kit
8
• All the drum pads and cymbal pads use a single trigger sensor for the whole pad, except the dual-zone snare pad that
uses one trigger for the head and another trigger for the rim.
• All the pads are velocity sensitive. Some voices can change sounds depending on the velocity level (striking force).
• The trigger area of the cymbal pads (ride, crash or hi-hat) is near the edge of the pad.
• Similar to an acoustic drum kit, the Hi-Hat sound varies depending on the position of the pedal (Hi-Hat Control):
• Open Hi-Hat: Strike the hi-hat pad without pressing the pedal
• Half Open Hi-Hat: Strike the hi-hat pad with the pedal pressed half-way
• Closed Hi-Hat: Strike the hi-hat pad with the pedal pressed all the way down
• Foot Close: Press the pedal all the way down
• Splash: Step fully on the pedal and release it immediately
metronome
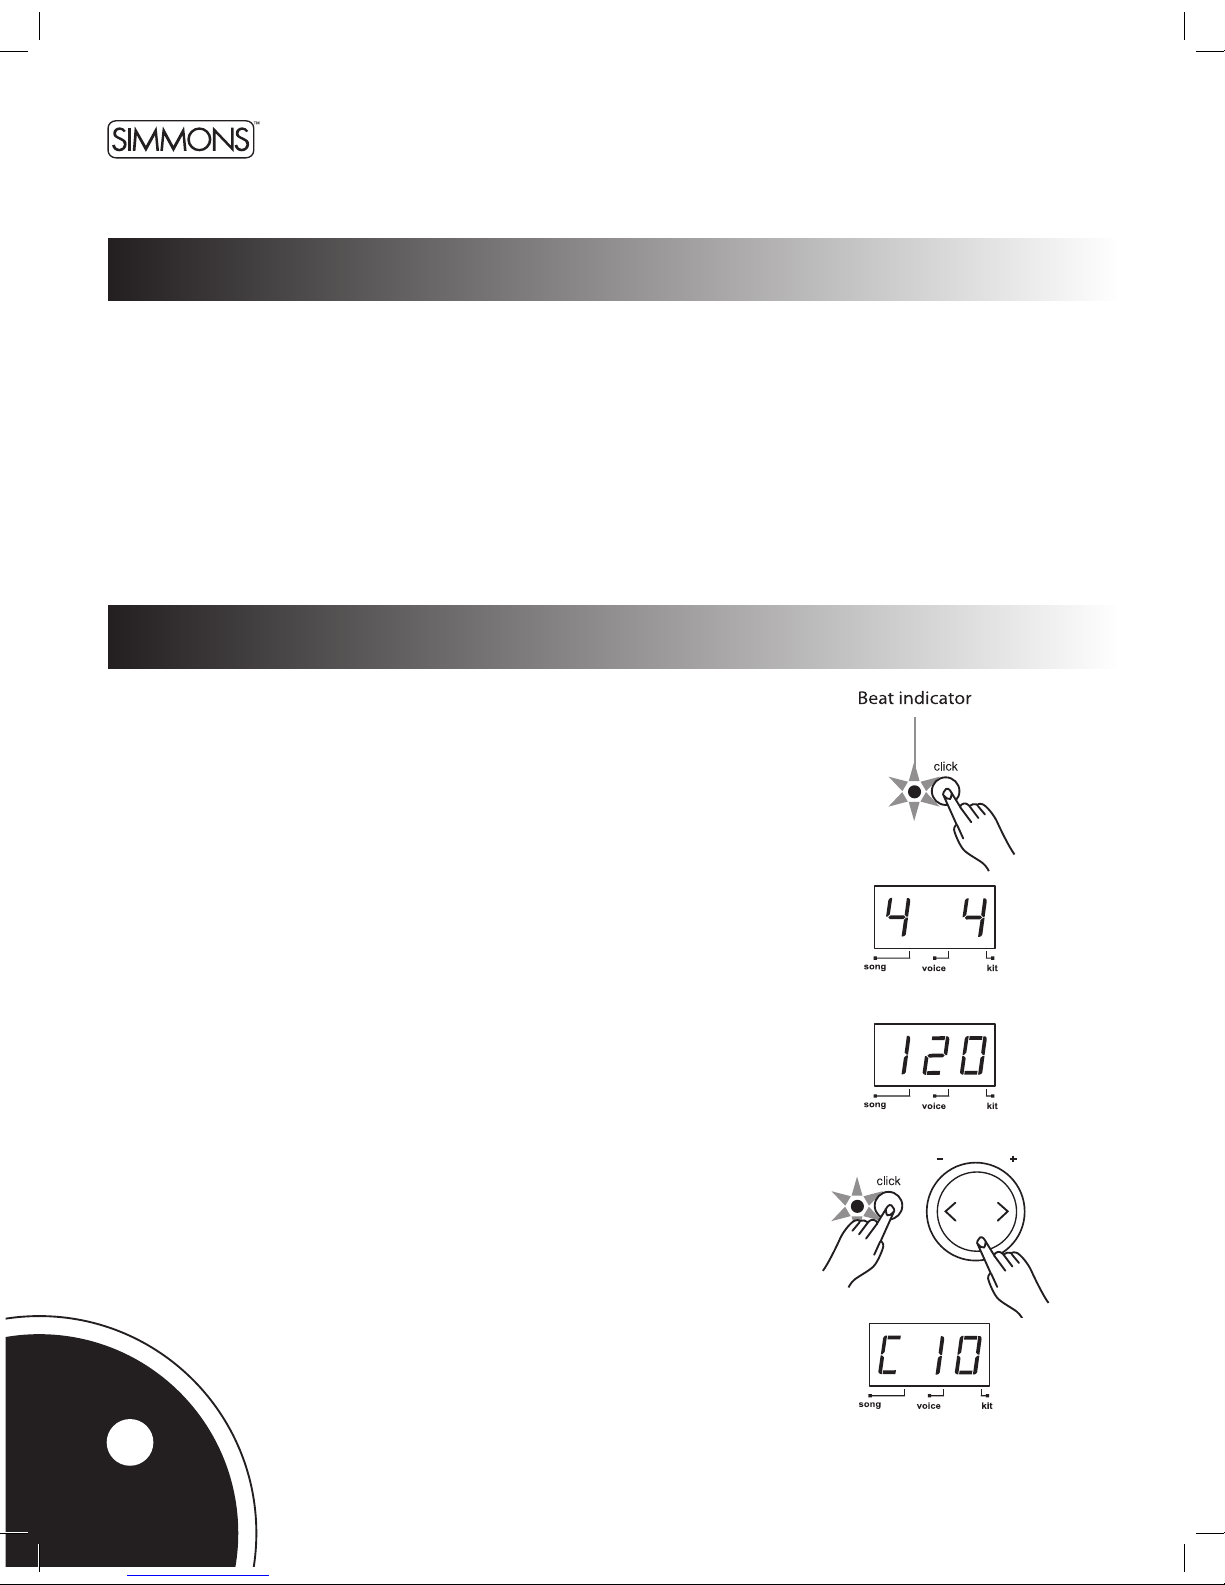
The SD7K includes a Metronome feature with two types of sounds: Click (Bell sound
on the rst beat, and click sound on the other beats) or Vocal Counting (“one”, “two”,
“three”, “four”, …).
Press the [CLICK] button to start the metronome with Click sound.
Press the [CLICK] button a second time to change the metronome to Vocal Counting.
Press the [CLICK] button again to stop the metronome.
While the metronome is playing, the Beat indicator ashes at the current tempo.
While the metronome is playing, the LED shows the current time signature.
The time signature of the metronome can be changed using the [+] and [-] buttons.
There are ve available options: 2/4, 3/4, 4/4, 5/4 and 6/8.
The SD7K returns to the previous display when the metronome is stopped.
Press the [Tempo +] or [Tempo -] buttons to change the tempo (30 ~ 280). The LED
shows the current tempo and returns to the previous display after about 2 seconds if
there is no operation of the Tempo [+] and [-] buttons.
The volume of the metronome can be adjusted by holding down the [CLICK] button
and pressing the [+] or [-] buttons. The LED shows “Cxx” (xx = metronome volume:
0 ~ 16), and returns to the previous display about 2 seconds after releasing the
[CLICK] button. The metronome volume resets to its default value when turning
off the SD7K.
using the SD7k pads
Playing the pads
Other manuals for SD7K
1
Table of contents
Other Simmons Drum manuals

Simmons
Simmons SD9K User manual

Simmons
Simmons SD1500 User manual

Simmons
Simmons SDMK2 User manual

Simmons
Simmons SD600 User manual

Simmons
Simmons SD300KIT User manual

Simmons
Simmons SDS 1 User manual

Simmons
Simmons SDMP1 User manual

Simmons
Simmons SD7PK User manual

Simmons
Simmons sd1000 kit User manual

Simmons
Simmons SD1200 User manual

Simmons
Simmons SD550 User manual

Simmons
Simmons SD7K User manual

Simmons
Simmons TITAN 20 User manual

Simmons
Simmons Five User manual

Simmons
Simmons SD5X User manual

Simmons
Simmons SD5K User manual

Simmons
Simmons SDD7 User manual

Simmons
Simmons SD1500 User manual

Simmons
Simmons SD81 User manual

Simmons
Simmons SDMP1 User manual


