Shure ADX Series User manual

1/21
ADX2 -- Handheld Transmitter
WARNING
• Battery packs may explode or release toxic materials. Risk of fire or burns. Do not open, crush, modify, disas
semble, heat above 140°F (60°C), or incinerate.
•Follow instructions from manufacturer
•Only use Shure charger to recharge Shure rechargeable batteries
•WARNING: Danger of explosion if battery incorrectly replaced. Replace only with same or equivalent type.
•Never put batteries in mouth. If swallowed, contact your physician or local poison control center
•Do not short circuit; may cause burns or catch fire
•Do not charge or use battery packs other than Shure rechargeable batteries
•Dispose of battery packs properly. Check with local vendor for proper disposal of used battery packs.
•Batteries (battery pack or batteries installed) shall not be exposed to excessive heat such as sunshine, fire or
the like
Note: Use only with the included power supply or a Shure-approved equivalent.
Please follow your regional recycling scheme for batteries, packaging, and electronic waste.
WARNING: This product contains a chemical known to the State of California to cause cancer and birth defects or
other reproductive harm.
低功率電波輻射性電機管理辦法
第十二條
經型式認證合格之低功率射頻電機,非經許可,公司、商號或使用者均不得擅自變更頻率、加大功率或變更原設計
之特性及功能。第十四條
低功率射頻電機之使用不得影響飛航安全及干擾合法通信;經發現有干擾現象時,應立即停用,並改善至無干擾時
方得繼續使用。前項合法通信,指依電信法規定作業之無線電通信。低功率射頻電機須忍受合法通信或工業、科學
及醫療用電波輻射性電機設備之干擾。
ADX2 Handheld Transmitter
ADX series transmitters deliver impeccable audio quality and RF performance, and are equipped with ShowLink
remote control for real-time parameter adjustments and interference avoidance. This transmitter features wide tun
ing, High Density (HD) mode, encryption, and advanced rechargeability in a streamlined design. Lightweight alu
minum construction and SB920 rechargeable power options (with dockable charging).
®

Shure Incorporated
2/21
Features
Performance
•184 MHz tuning range
•20 Hz to 20 kHz range with flat frequency response
•Automatic input staging optimizes gain setting
•Diversity ShowLink-enabled for remote transmitter control and automatic interference avoidance
•AES 256-bit encryption-enabled for secure transmission
•>120 dB, A-weighted, System Gain @ +10
•Digital output: >125dB, A-weighted (Dante, AES3, AES67)
•100 meter (300 feet) line-of-sight operating range
•Selectable modulation modes optimize performance for spectral efficiency or audio quality:
◦ Standard – optimal coverage, low latency
◦ High density – dramatic increase in max system channel count
•Switchable Power Levels = 2/10/40 mW (region dependent)
•Built-in tone generator and RF markers to facilitate range-testing
Design
•Interchangeable Shure microphone cartridges
•Backlit LCD with easy to navigate menu and controls
•Rugged metal construction
•Menu and power lockout
Power
•Shure SB920 rechargeable batteries for up to 9 hours of runtime, precision metering, and zero memory effect
•External charging contacts for docked charging
Included Components
SB920 Shure Rechargeable Battery (2) 95A25763
Zipper Bag 95B2313
Threaded Adapter 31B1856
Swivel Adapter, black 90F4046
Shure Incorporated
3/21
Choice of (1) of the following Shure microphone cartridges:
SM58 (RPW112) KSM9 Nickel (RPW188)
BETA 87C (RPW122) BETA 87A (RPW120)
BETA 58A (RPW 118) KSM9 Black (RPW184)
KSM8 Black (RPW174) KSM8 Nickel (RPW170)
KSM9HS Black (RPW186) KSM9HS Nickel (RPW190)
Optional Accessories
SB920 Shure Rechargeable Battery 95A25763
Battery Contact Cover (part number varies by frequency range) WA619-A (470-636 MHz), WA619-B
(606-810 MHz), WA619-C (750-960
MHz)
AD651B Talk Switch Button (black) 90A37347B
Microphone stand adapter WA371
Shure Networked Docking Charger 2-Up SBC240
Optional Shure microphone cartridges:
SM58 (RPW112)
SM86 (RPW114)
SM87A (RPW116)
BETA 58A (RPW118)
BETA 87A (RPW120)
BETA 87C (RPW122)
VP68 (RPW124)
KSM9 Nickel (RPW188)
KSM9HS Nickel (RPW190)
KSM9 Black (RPW184)
KSM9HS Black (RPW186)

Shure Incorporated
4/21
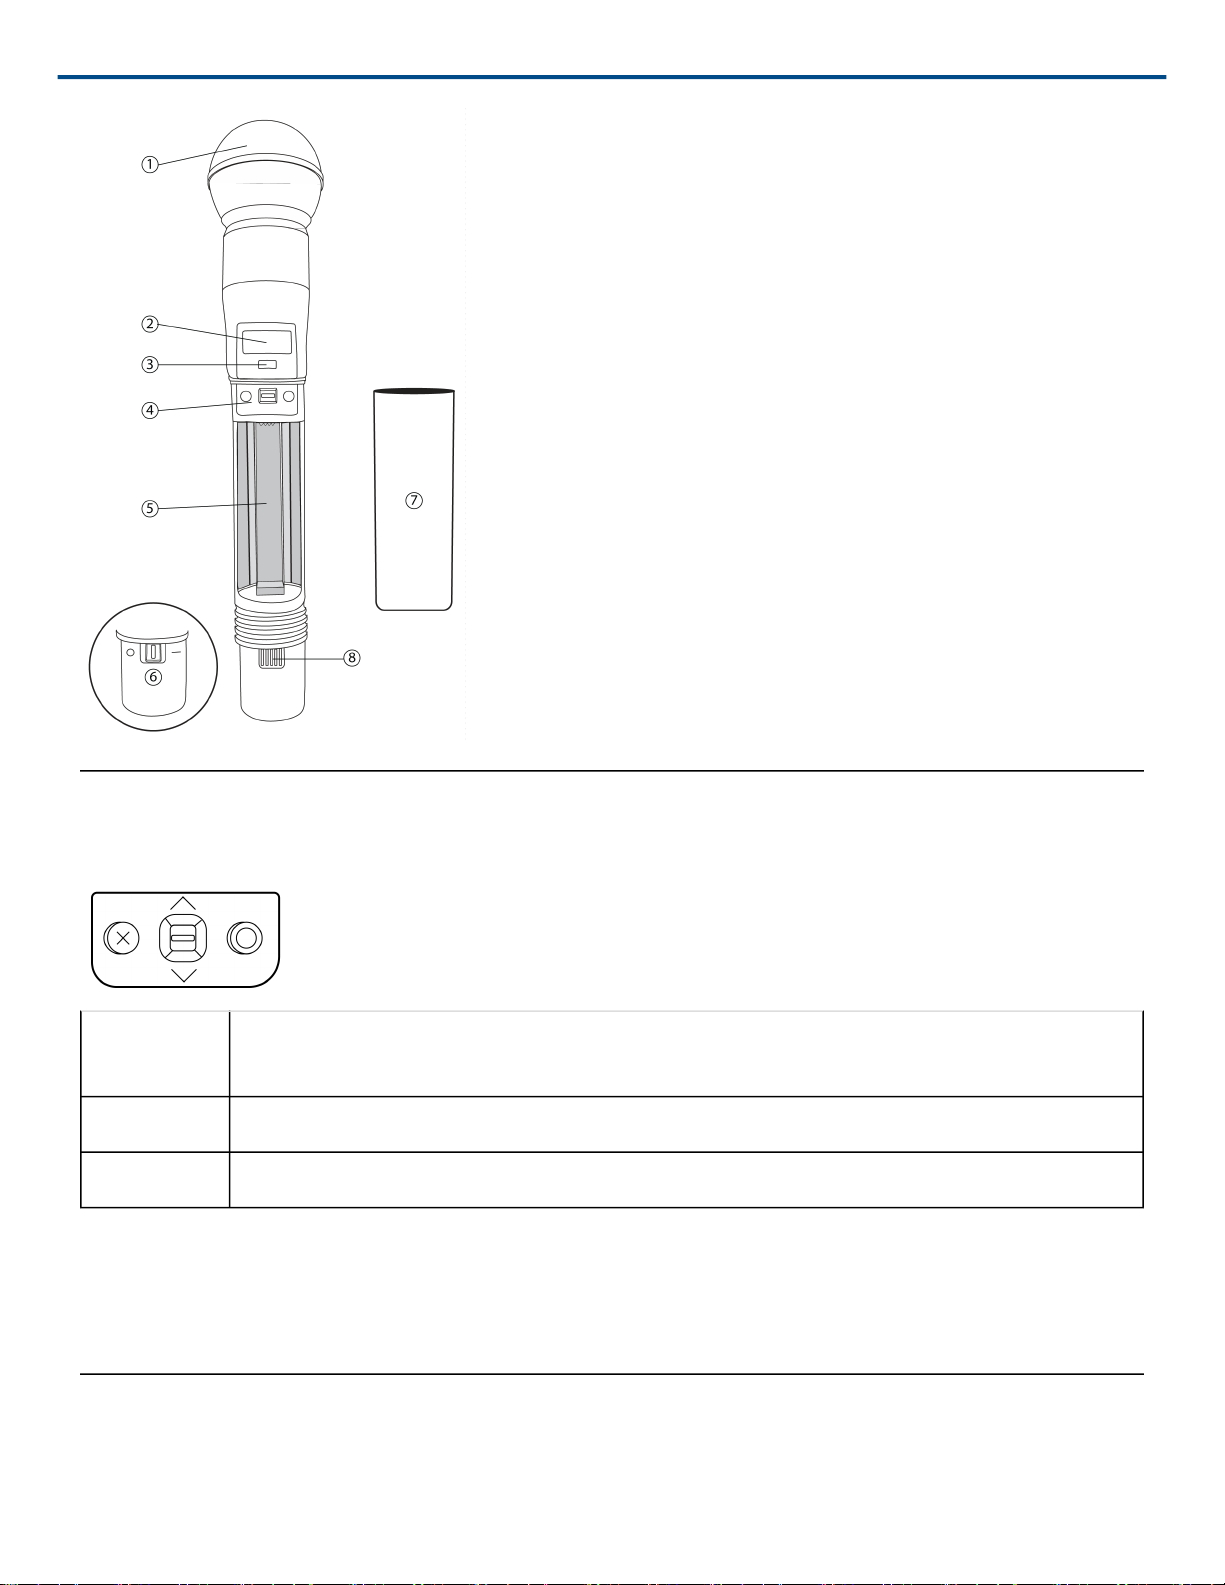
ADX2 Transmitter Overview
①Microphone Cartridge
See Optional Accessories for a list of compatible cartridges.
②Display
View menu screens and settings. Press any control button to activate the backlight.
③Infrared (IR) Port
Align with the receiver IR port during an IR Sync for automated transmitter programming.
④Control Buttons
Use to navigate through parameter menus and change values.
⑤Battery Compartment
Requires Shure rechargeable battery.
⑥On/Off Switch
Powers the unit on or off.
⑦Handle
Unscrew to access controls and batteries.
⑧Battery Charging Contacts
Charging contacts for use with docking battery chargers.
Shure Incorporated
5/21
Transmitter Controls
Use to navigate through parameter menus and change values.
XExit: Acts as a 'back' button to return to previous menus or parameters without confirming a val
ue change
O Enter: Selects menu screens and confirms parameter changes
∨∧ Use to scroll through menu screens and to change parameter values
Tip: Use the following control shortcuts for quick set up:
•Hold the ∧button while powering-on to lock or unlock the transmitter controls
•Hold the X button while powering-on to set the transmitter RF output to mute
Home Screen Display
The home screen shows transmitter information and status.

Shure Incorporated
6/21
Tip: There are four options to choose the information shown on the home screen. Use the arrow buttons to select
one of the following choices:
•Name
•Frequency Setting
•Group (G) and Channel (C)
•Device ID
The following icons appear to indicate transmitter settings:
Battery runtime in hours and minutes or bar display
Key: Displayed when encryption is enabled
Lock: Displayed when controls are locked. Icon will
flash if access is attempted to a locked control (power
or menu).
ShowLink signal strength displays 0 to 5 bars
STD: Standard Transmission Mode
HD: High Density Transmission Mode
Box: When the box has an "x", Mute Mode is on and
engaged. If the box is empty, Mute Mode is on, but not
engaged.
Locking the Interface
Lock transmitter interface controls to prevent accidental or unauthorized changes to parameters. The lock icon ap
pears on the home screen when the interface lock is enabled.
1. From the Utilities menu, navigate to Locks and select one of the following lock options:
◦None: The controls are unlocked
◦Power: The power switch is locked
◦Menu: The menu parameters are locked
◦All: The power switch and menu parameters are locked
2. Press O to save.
Tip: To quickly unlock a transmitter: Press O twice, select None, and press O.
Shure Incorporated
7/21
Shure Rechargeable Batteries
Shure lithium-ion batteries offer a rechargeable option for powering the transmitters. Batteries quickly charge to
50% capacity in one hour and reach full charge within three hours.
Single chargers and multiple bay chargers are available to recharge the Shure batteries.
Caution: Only charge Shure rechargeable batteries with a Shure battery charger.
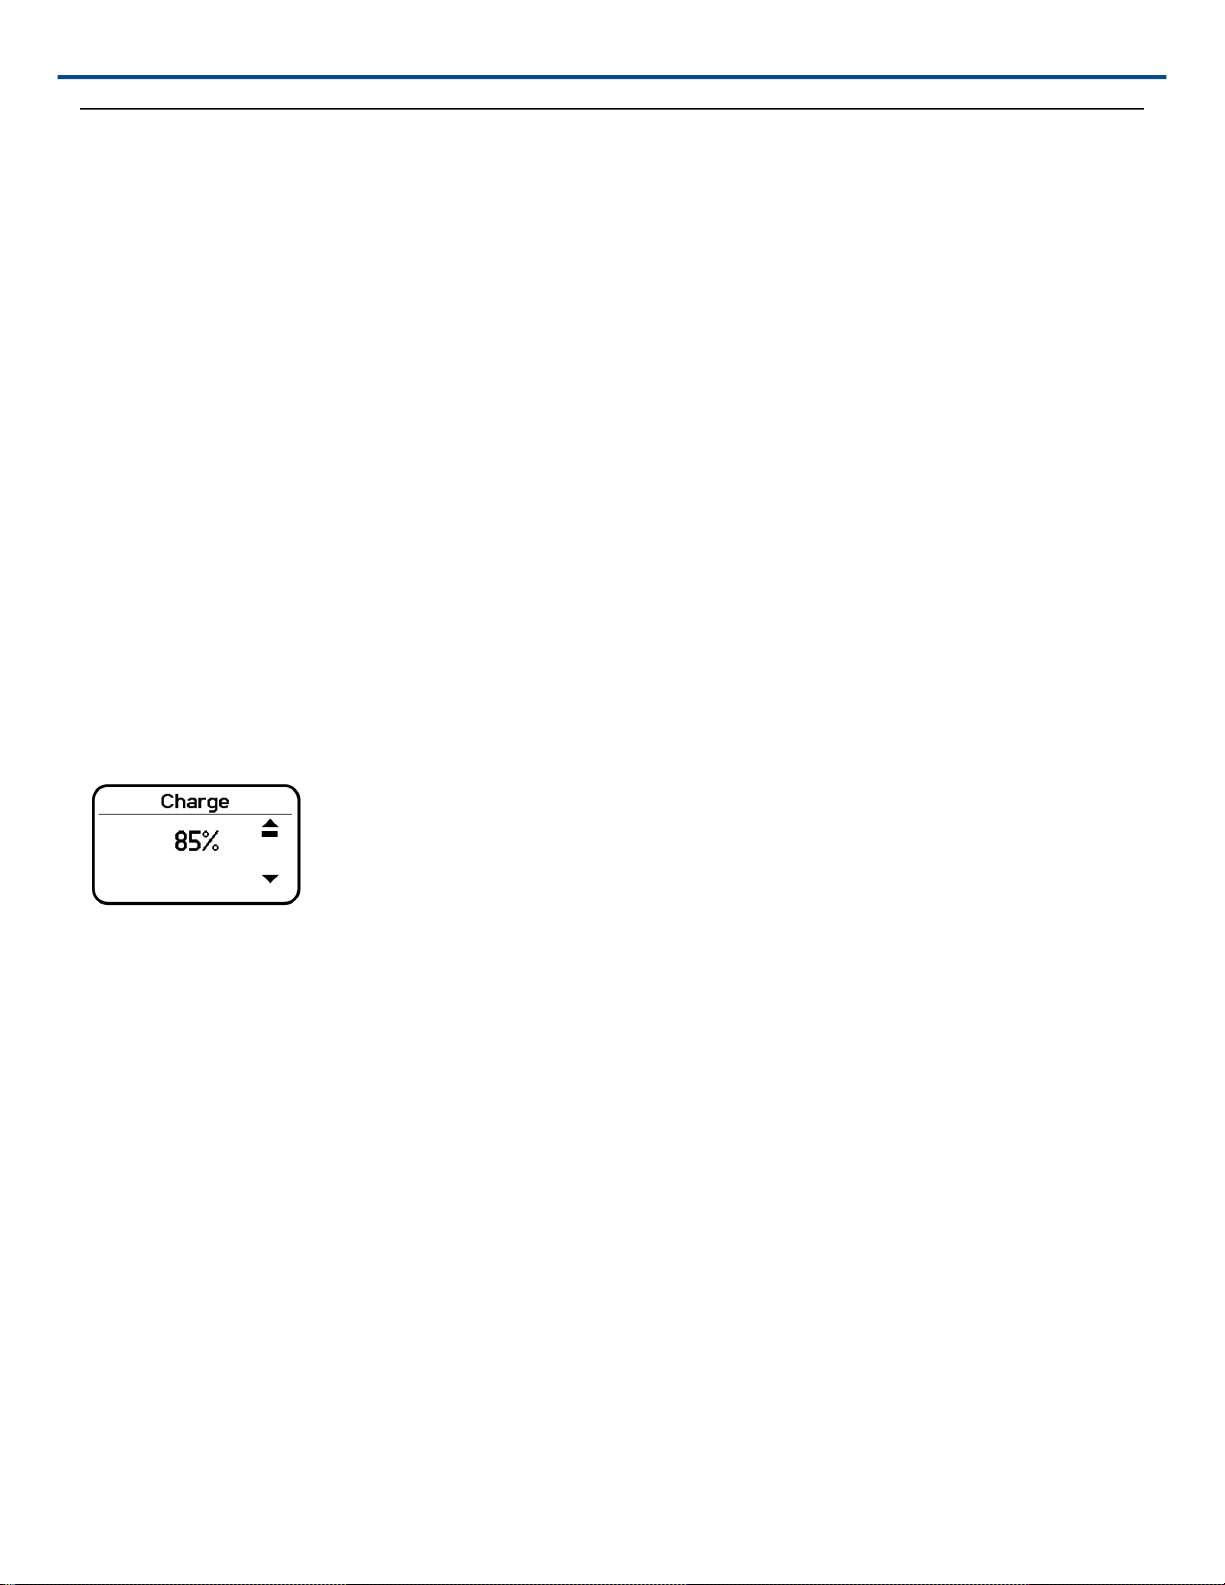
Checking Battery Info
When using a Shure rechargeable battery, the receiver and transmitter home screens display the number of hours
and minutes remaining.
Detailed information for the battery is displayed Battery menu of the transmitter: Utilities > Battery
•Battery: The chemistry type of for the installed battery (Shure, Alkaline, Lithium, NiMH)
•Bars: Indicates the number of bars displayed
•Time: Battery runtime
•Charge: Percentage of charge capacity
•Health: Percentage of current battery health
•Cycle Count: Total of the number of charging cycles for the installed battery
•Temperature: Battery temperature reported in Celsius and Fahrenheit
Important Tips for Care and Storage of Shure Rechargeable Batteries
Proper care and storage of Shure batteries results in reliable performance and ensures a long lifetime.
•Always store batteries and transmitters at room temperature
•Ideally, batteries should be charged to approximately 40% of capacity for long-term storage
•Periodically clean the battery contacts with alcohol to maintain ideal contact
•During storage, check batteries every 6 months and recharge to 40% of capacity as needed
For additional rechargeable battery information, visit www.shure.com.

Shure Incorporated
8/21
Battery Installation
①Accessing the Battery Compartment
Unscrew and remove the handle as shown.
②Inserting the Battery
Insert the battery, contracts first into the battery compartment. Press down on the tab to fully seat the battery, and
then reinstall the handle.
Tip: To remove the battery, pull up on the tab on the bottom of the battery.
ADX2 SB920 Battery Runtime
Note: Higher RF power levels decrease battery runtime. Battery runtime varies with battery age and environmental
conditions.
2 mW 10 mW 40 mW
11.0 to 12.0 hours 9.0 to 11.0 hours 6.0 to 8.0 hours
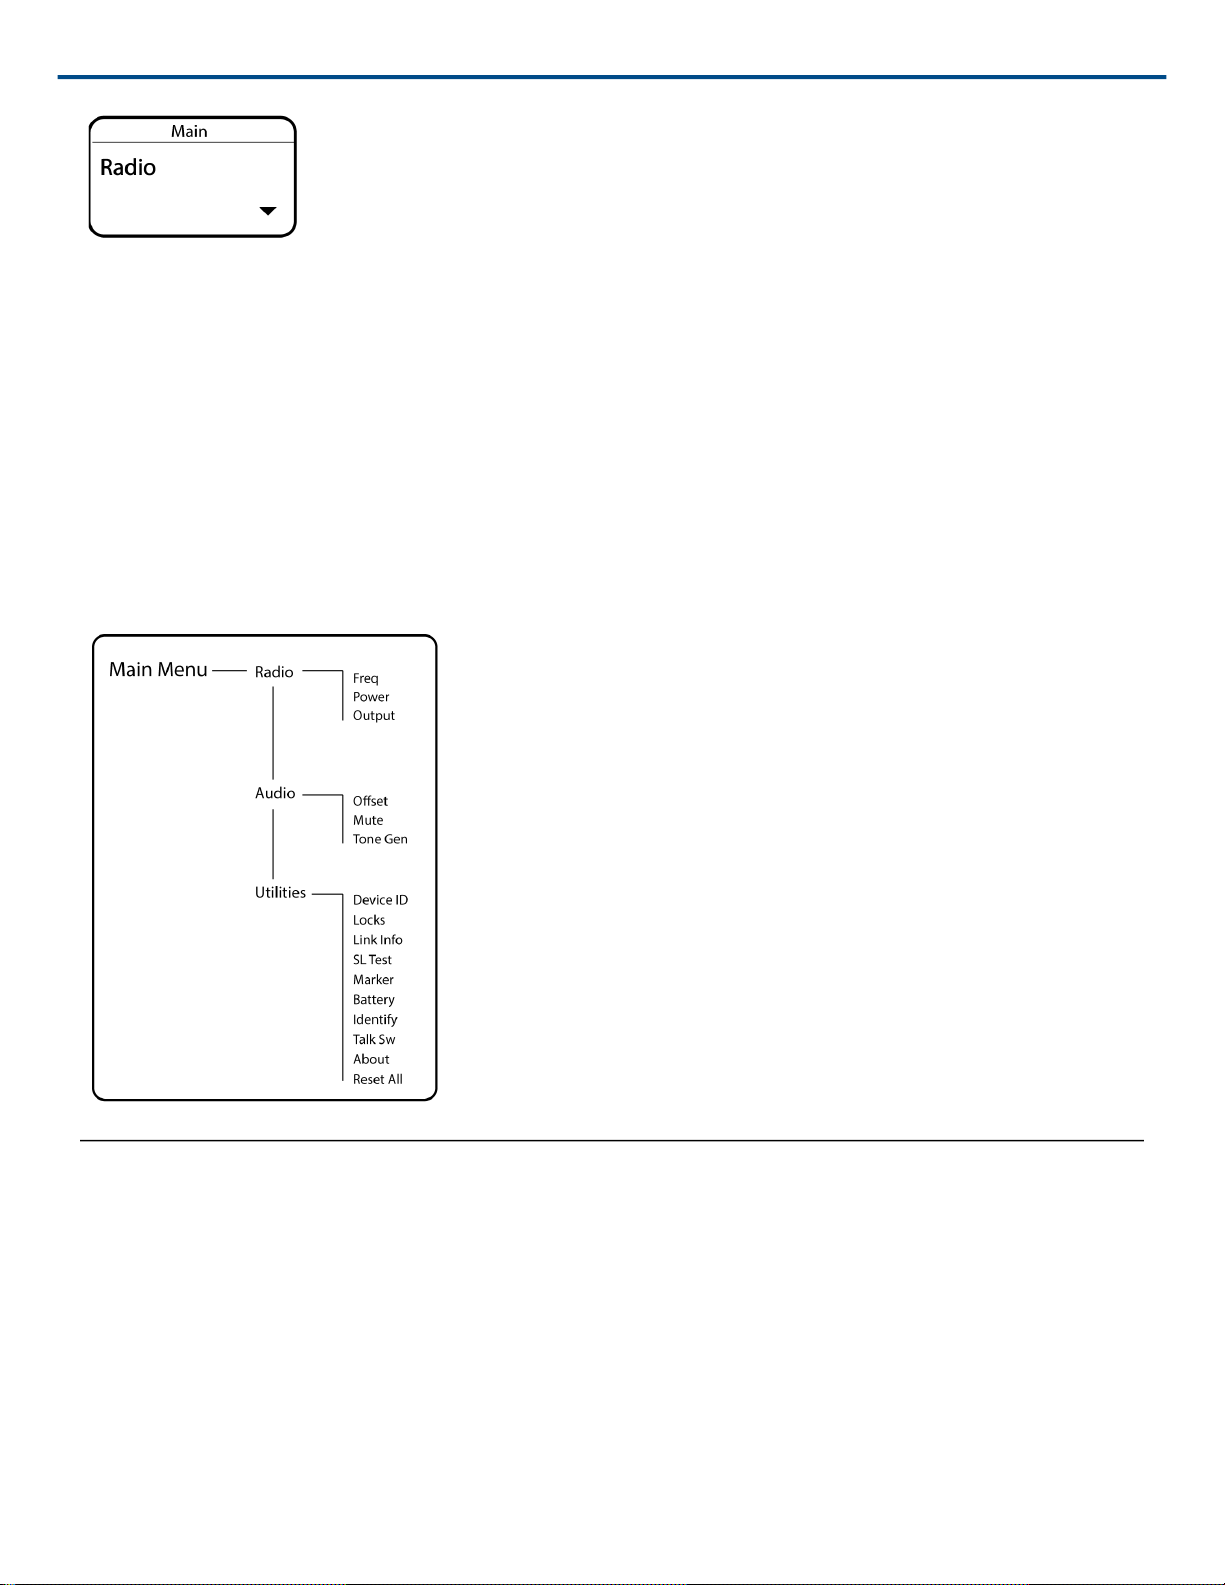
Menu Parameters
The Main menu organizes the available transmitter parameters into three categories:
•Radio
•Audio
•Utilities
Shure Incorporated
9/21
Tips for Editing Menu Parameters
•To access the menu options from the home screen, press O . Use the arrow buttons to access additional menus
and parameters.
•A menu parameter will blink when editing is enabled
•To increase, decrease or change a parameter, use the arrow buttons
•To save a menu change, press O
•To exit a menu without saving a change, press X
Menu Map
Menu Parameter Descriptions
Radio Menu
Freq
Press the enter button to enable editing of a group (G:) channel (C:) or frequency (MHz). Use the arrow buttons to
adjust the values. To edit the frequency, press the O button once to edit the first 3 digits, or twice to edit the second
3 digits.
Power
Higher RF power settings can extend the range of the transmitter.

Shure Incorporated
10/21
Note: Higher RF power settings decrease battery runtime.
Output
Sets the RF output to On or Mute.
•On: RF signal is active
•Mute: RF signal is inactive
Audio Menu
Offset
Adjust Offset level to balance mic levels when using two transmitters for frequency diversity or when assigning
multiple transmitters to receiver slots. Adjustment range: -12 dB to +21 dB.
Mute
When enabled, the power switch is configured as a mute switch for the audio:
•Power switch on: audio signal on
•Power switch off: audio signal muted
Tone Gen
Transmitter will generate a continuous test tone:
•Freq: The tone can be set to 400 Hz or 1000 Hz.
•Level: Allows for adjustment of the output level of the test tone.
Utilities Menu
Device ID
Assign a device ID of up to 9 letters or numbers.
Locks
Locks the transmitter controls and power switch.
•None: The controls are unlocked
•Power: The power switch is locked
•Menu: The menu parameters are locked
•All: The power switch and menu parameters are locked
Link Info
Displays the following information about the link between a transmitter and receiver:
•Not Linked: The transmitter is not linked to a receiver
•Linked: The transmitter is linked to a receiver. Select Unlink? to free the transmitter from the receiver link.
•Unlinked: The transmitter is not linked to a receiver
SL Test
ShowLink test tool to measure the boundaries of ShowLink coverage.
This manual suits for next models
1
Table of contents
Other Shure Transmitter manuals


Popular Transmitter manuals by other brands


Dejero
Dejero EnGo 3x manual

Rosemount
Rosemount 4600 Reference manual

Speaka Professional
Speaka Professional 2342740 operating instructions

trubomat
trubomat GAB 1000 instruction manual

Teledyne Analytical Instruments
Teledyne Analytical Instruments LXT-380 instructions

Rondish
Rondish UT-11 quick start guide


