Seiki SE50FYT User manual

Printed in China
www.SEIKI.com
Service Hotline:
1-855-MY-SEIKI (1-855-697-3454)
Ligne d’assistance téléphonique:
Línea de servicio:
Imprimé en Chine
Impreso en China
USER MANUAL
Read the User Manual carefully before using the TV and keep it for further reference.
MANUEL D’UTILISATION
MANUAL DEL USUARIO
Avant d’utiliser le téléviseur, lisez attentivement le manuel d’utilisation et conservez-le
pour consultation future
Lea el Manual del usuario antes de utilizar el televisor y consérvelo para futuras consultas
SE50FYT
© 2015 Seiki LLC All rights reserved.

1
En -
CONTENTS
Important Safety Instructions 2
Safety Information 3
Preparation 4
What's Included 4
Front View 5
Rear View 6
Installing the Stand 7
Removing the Stand for Wall-Mounting 7
Remote Control 8
Connecting External Devices 9
Customizing TV Settings 10
Initial Setup 10
Navigating the Setup Settings 11
Streaming 12
Media 13
Viewing Photos 13
Listening to Music 14
Source 14
Setup 15
Settings 15
Audio 16
Picture 17
Channel 18
Time 18
Network 19
Lock 21
Parental Control 22
Troubleshooting 24
Maintaining 25
Specication26
Limited Warranty 27
OTT APP Service 28
CONTENTS

2
En -
IMPORTANT SAFETY INSTRUCTIONS
• Read these instructions – All the safety and
operating instructions should be read before this
product is operated.
• Keep these instructions – The safety and
operating instructions should be retained for future
reference.
• Heed all warnings – All warnings on the appliance
and in the operating instructions should be adhered
to.
• Follow all instructions – All operating and use
instructions should be followed.
• Do not use this apparatus near water – The
appliance should not be used near water or
moisture – for example, in a wet basement or near
a swimming pool, and the like.
• Clean only with dry cloth.
• Do not block any ventilation openings. Install in
accordance with the manufacturer’s instructions.
• Do not install near any heat sources such as
radiators, heat registers, stoves, or other apparatus
(includingampliers)thatproduceheat.
• Do not defeat the safety purpose of the polarized
or grounding-type plug. A polarized plug has two
blades with one wider than the other. A grounding-
type plug has two blades and a third grounding
prong. The wide blade or the third prong are
provided for your safety. If the provided plug does
not fit into your outlet, consult an electrician for
replacement of the obsolete outlet.
• Protect the power cord from being walked on
or pinched particularly at plugs, convenience
receptacles, and the point where they exit from the
apparatus.
• Onlyuseattachments/accessoriesspeciedbythe
manufacturer.
• Use only with the cart, stand, tripod, bracket, or
tablespeciedbythemanufacturer,orsoldwiththe
apparatus. When a cart is used, use caution when
moving the cart/apparatus combination to avoid
injury from tip-over.
• Unplug this apparatus during lightning storms or
when unused for long periods of time.
IMPORTANT SAFETY INSTRUCTIONS
• Unplug this apparatus during lightning storms or
when unused for long periods of time.
• Referallservicingtoqualiedservicepersonnel.
Servicing is required when the apparatus has
been damaged in any way, such as the power-
supply cord or plug is damaged, liquid has been
spilled or objects have fallen into the apparatus,
the apparatus has been exposed to rain or
moisture, does not operate normally, or has been
dropped.
• Please keep the unit in a well-ventilated environment.
WARNING:Toreducetheriskofreor electricshock,
do not expose this apparatus to rain or moisture.
The apparatus should not be exposed to dripping or
splashing. Objects filled with liquids, such as vases
should not be placed on apparatus.
WARNING: The batteries shall not be exposed to
excessiveheatsuchassunshine,reorthelike.
WARNING: The mains plug is used as disconnect
device, the disconnect device shall remain readily
operable.
WARNING: To reduce the risk of electric shock, do not
removecover(orback)astherearenouser-serviceable
partsinside.Referservicingtoqualiedpersonnel.
This lightning flash with arrowhead symbol
within an equilateral triangle is intended to
alert the user to the presence of non-insulated
“dangerous voltage” within the product’s enclosure that
may be of sufficient magnitude to constitute a risk of
electric shock.
The exclamation point within an equilateral
triangle is intended to alert the user to
the presence of important operating and
maintenance instructions in the literature accompanying
the appliance.
This equipment is a Class II or double insulated
electrical appliance. It has been designed in such
a way that it does not require a safety connection
to electrical earth.
This product contains electrical or electronic
materials. The presence of these materials may,if
not disposed of properly, have potential adverse
effects on the environment and human health.
Presence of this label on the product means it
should not be disposed of as unsorted waste and
must be collectedseparately. As a consumer, you
are responsible for ensuring that this product is
disposed of properly.

3
En -
SAFETY INFORMATION
To ensure reliable and safe operation of this equipment, please carefully read all the instructions in
this user guide, especially the safety information below.
Electrical Safety
• The TV set should only be connected to a main power supply with voltage that matches the
label at the rear of the product.
• To prevent overload, do not share the same power supply socket with too many other
electronic components.
• Do not place any connecting wires where they may be stepped on or tripped over.
• Do not place heavy items on any connecting wire, which may damage the wire.
• Hold the main plug, not the wires, when removing from a socket.
• During a thunderstorm or when not in using the television for long periods, turn off the power
switch on the back of the television.
• Do not allow water or moisture to enter the TV or power adapter. Do not use in wet, moist
areas, such as bathrooms, steamy kitchens or near swimming pools.
• Pull the plug out immediately, and seek professional help if the main plug or cable is damaged,
liquid is spilled onto the set, if the TV set accidentally exposed to water or moisture, if anything
accidentally penetrates the ventilation slots or if the TV set does not work normally.
• Do not remove the safety covers. There are no user serviceable parts inside. Trying to service
theunityourselfisdangerousandmayinvalidatetheproduct’swarranty.Qualiedpersonnel
must only service this apparatus.
• To avoid a battery leakage, remove batteries from the remote control, when the remote is not
use for long period, or when the batteries are exhausted.
• Donotbreakopenorthrowexhaustedbatteriesintoare.
Physical Safety
• Do not block ventilation slots in the back cover. You may place the TV in a cabinet, but ensure
atleast5cm(2’’)clearanceallaround.
• Do not tap or shake the TV screen, or you may damage the internal circuits. Take good care
of the remote control.
• TocleantheTVuseasoftdrycloth.Donotusesolventsorpetroleumbaseduids.
• Do not install near any heat sources such as radiators, heat registers, stoves or other
apparatus(includingampliers)thatproduceheat.
• Do not defeat the safety purpose of the polarized or grounding-type plug. A polarized plug
has two blades with one wider than the other. A grounding plug has two blades and a third
grounding prong, the wide blade,or the third prong is provided for your safety. If the provided
plugdoesnottintoyouroutlet,consultanelectricianforreplacementoftheobsoleteoutlet.
• Protect the power cord from being walked on or pinched particularly at plugs.
• Unplug the apparatus during lightning storms or when unused for long periods.
• Referallservicingtoaqualiedservicepersonnel.Servicingisrequirediftheapparatusdoes
not operate normally or if the apparatus, including the power supply cord or pulg, has been
damaged in any way.
• Servicing is also required if liquid has been spilled, or objects have fallen into the apparatus;
when the apparatus has been exposed to rain or moisture; or if the apparatus has been
dropped.
• Always connect your television to a power outlet with protective ground connection.
SAFETY INFORMATION

4
En -
User Manual
User Manual
PREPARATION
What's Included
Remote Control with Batteries
TV Set
Quick Start Guide
Quick
Start Guide
PREPARATION
TV Stand Four Screws

5
En -
PREPARATION
Front View
1. POWER
Switch the TV between On / Standby mode.
2. SOURCE
Press to select among different input signal sources.
3. MENU
DisplaytheOSD(onscreendisplay)menu.
4. CH /
Press to select a channel.
5. VOL +/-
Press to adjust the volume.
6. POWER Indicator
Illuminate blue when the TV is turned on. Illuminate red when the TV is in standby mode.
7. IR (Infrared Receiver)
Receive IR signals from the remote control.

6
En -
PREPARATION
Rear View
1. Power Cord
Connect to AC power outlet.
2. Headphone Socket
Connect to the Headphones.
3. USB Port
Connect to a USB storage device to play
compatibleaudioandphotoles.
4. LAN
Network connection port.
5. HDMI Input
Connecttoa High-Denition(HD)signal
input device.
6. VGA Input
Connect to a computer or other devices
with a VGA interface.
7. PC AUDIO Input
Connect to a computer audio output.
8. DTV/TV Input
Connecttotheantenna(75ΩVHF/UHF)
socket with the RF coaxial cable.
9. OPTICAL Output
Connect a digital sound system to this
jack.
10. AUDIO Input
ConnecttotheAUDIO(L/R)output
sockets on external audio devices.
11. COMPOSITE/COMPONENT IN
Connect to AV devices with composite/
component (Y/Pb/Pr)video andaudio
output sockets. COMPOSITE VIDEO and
COMPONENT(Y/PB/PR)sharewithAUDIO
IN(L/R).
2
HDMI 1
HDMI
3
HDMI
10

7
En -
PREPARATION
Installing the Stand
WARNING: This apparatus is intended to be supported by UL Listed wall mount bracket.
• 1.Lay the TV face down on a flat,
cushioned surface to avoid damaging
or scratching.
• 2.Untighten the 4 pcs screws holding
the stand assembly and remove them.
• 3.Attach the wall-mount bracket to
the TV using the mounting holes on
the back of the TV. Mount this TV
according to the instructions included
in the wall-mount bracket.
Removing the Stand for Wall-Mounting
• 1. Lay the TV face-down on a flat,
cushioned surface to avoid damaging
or scratching.
• 2. Fix the Left Base Stand to the main
unit using 2pcs provided screws.
• 3. Fix the Right Base Stand to the
main unit using 2pcs provided screws.

8
En -
PREPARATION
Remote Control
9
En -
CONNECTING EXTERNAL DEVICES
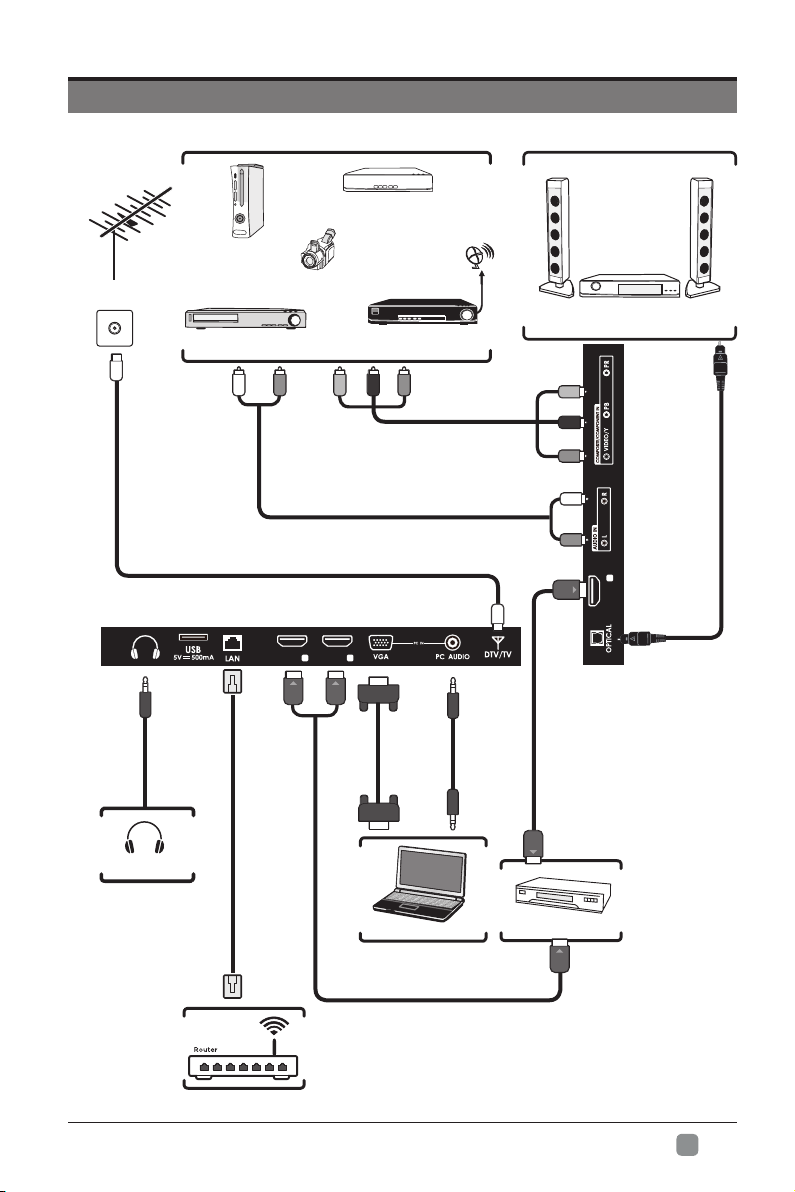
CONNECTING EXTERNAL DEVICES
RFCable(notincluded)
Audio Cable
(notincluded)
Composite/Component Cable
(notincluded)
Video Camera
Game Console
Blu-ray Player / Recorder
VCR Satellite Receiver
Satellite
Antenna Cable
OR
HDMI Device
Computer
Digital Audio System
VGA Cable
(notincluded)
3.5mm Audio
Cable
(notincluded)
Headphones
Cable
(notincluded)
HDMICable(notincluded)
Optical Cable
(notincluded)
2
HDMI 1
HDMI
3
HDMI
WIFI
Network Cable
(notincluded)
Table of contents
Other Seiki LED TV manuals

Seiki
Seiki SE40FYP1T User manual

Seiki
Seiki SE221FS User manual

Seiki
Seiki ELSFC5017 User manual

Seiki
Seiki SE32HY User manual

Seiki
Seiki SE24FT11-D User manual

Seiki
Seiki SE421TT Owner's manual

Seiki
Seiki SE60GY05 User manual

Seiki
Seiki SE42UMT User manual

Seiki
Seiki SE242TS User manual

Seiki
Seiki SE551GS User manual

Seiki
Seiki SE32HY19C User manual

Seiki
Seiki SE40FY19T User manual

Seiki
Seiki SE26HQ04 User manual

Seiki
Seiki SE50UY04EC User manual

Seiki
Seiki SE32HYT User manual

Seiki
Seiki LED Series User manual

Seiki
Seiki SC-49AU300 User manual

Seiki
Seiki SE50UY04-1 User manual

Seiki
Seiki SE58GY27T User manual

Seiki
Seiki SE48UXC4T User manual