
ROTHFELS 1575050 User manual

Revision 2.1
8
1575050
1x E27 max.29W
230V ~ 50Hz
Maßeinheit/Unit of measure/ Unité de mesure: mm
(DE) Bestimmungsgemäße Verwendung
(GB) Intended use / (FR) Utilisation conforme / (NL) Beoogd gebruik / (PL) Stosowanie zgodnie z przeznaczeniem /
(NO) Riktig bruk / (DK) Korrekt brug / (SE) Avsedd användning / (FI) Määräystenmukainen käyttö
(IT) Impiego appropriato / (ES) Uso prescrito / (CZ) Použití v souladu s určením / (PT) Utilização correta / (GR) Ενδεδειγμένη χρήση
(DE)
Als Tischleuchte im Innenbereich
(GB)
Provided for use as table lamp, indoors
(FR)
En tant que lampe à poser, à l'intérieur
(NL)
Als tafellamp binnenshuis
(PL)
Jako lampa stołowa do wnętrz
(NO)
Som bordlampe innendørs
(DK)
Som bordlampe indendørs
(SE)
Används som bordslampa inomhus
(FI)
Käyttö sisätilojen pöytävalaisimena
(IT)
Impiego come lampada da tavolo in ambienti interni
(ES)
Empleo en tanto lámpara de mesa en interiores
(CZ)
Použití jako stolní lampa v interiéru
(PT)
Aplicação como candeeiro de mesa em interiores
(GR)
Χρήση ως επιτραπέζιο φωτιστικό σε εσωτερικό χώρο
(DE) Verwendete Symbole
(GB) Safety Precautions / (FR) Symboles utilisés / (NL) Gebruikte symbolen / (PL) Stosowane symbole / (NO) Brukte symboler /
(DK) Brugte symboler / (SE) Använda symboler / (FI) Käytetyt symbolit / (IT) Simboli usati / (ES) Símbolos empleados /
(CZ) Použité symboly / (PT) Símbolos utilizados / (GR) Χρησιμοποιούμενα σύμβολα
IP 20
630 - 820
O290
O350
220O
9
(DE) Lieferumfang
(GB) Package contents / (FR) Contenu de la livraison / (NL) Bij de levering inbegrepen / (PL) Zakres dostawy / (NO) Levering /
(DK) Leveringsomfang / (SE) Leveransomfattning / (FI) Toimitussisältö / (IT) Fornitura / (ES) Volumen de suministro /
(CZ) Rozsah dodávky / (PT) Material fornecido / (GR) Παραδοτέος εξοπλισμός
(DE)
1 Tischleuchte
Montagematerial
Montageanleitung
(GB)
1 Table lamp
Installation hardware
Mounting instructions
(FR)
1 Lampe à poser
Matérial de montage
Instructions de montage
(NL)
1 Tafellamp
Monteringsmateriale
Montagehandleiding
(PL)
1 Lampa stołowa
Elementy montażowe
Instrukcja montażu
(NO)
1 Bordlampe
Monteringsmateriale
Brukerveiledning
(DK)
1 Bordlampe
Monteringsmateriale
Brugervejledning
(SE)
1 Bordslampa
Monteringsmaterial
Monteringsanvisning
(FI)
1 Pöytävalaisin
Asennus materiaali
Asennusohjeet
(IT)
1 Lampada da tavolo
Materiale di montaggio
Istruzioni di montaggio
(ES)
1 Lámpara de mesa
Material de montaje
Instrucciones de montaje
(CZ)
1 Stolní lampa
Materiál pro montáž
Návod k montáži
(PT)
1 Candeeiro de mesa
Material de montagem
Instruções de montagem
(GR)
1 Επιτραπέζιο φωτιστικό
Υλικό συναρμολόγησης
Οδηγίες συναρμολόγησης
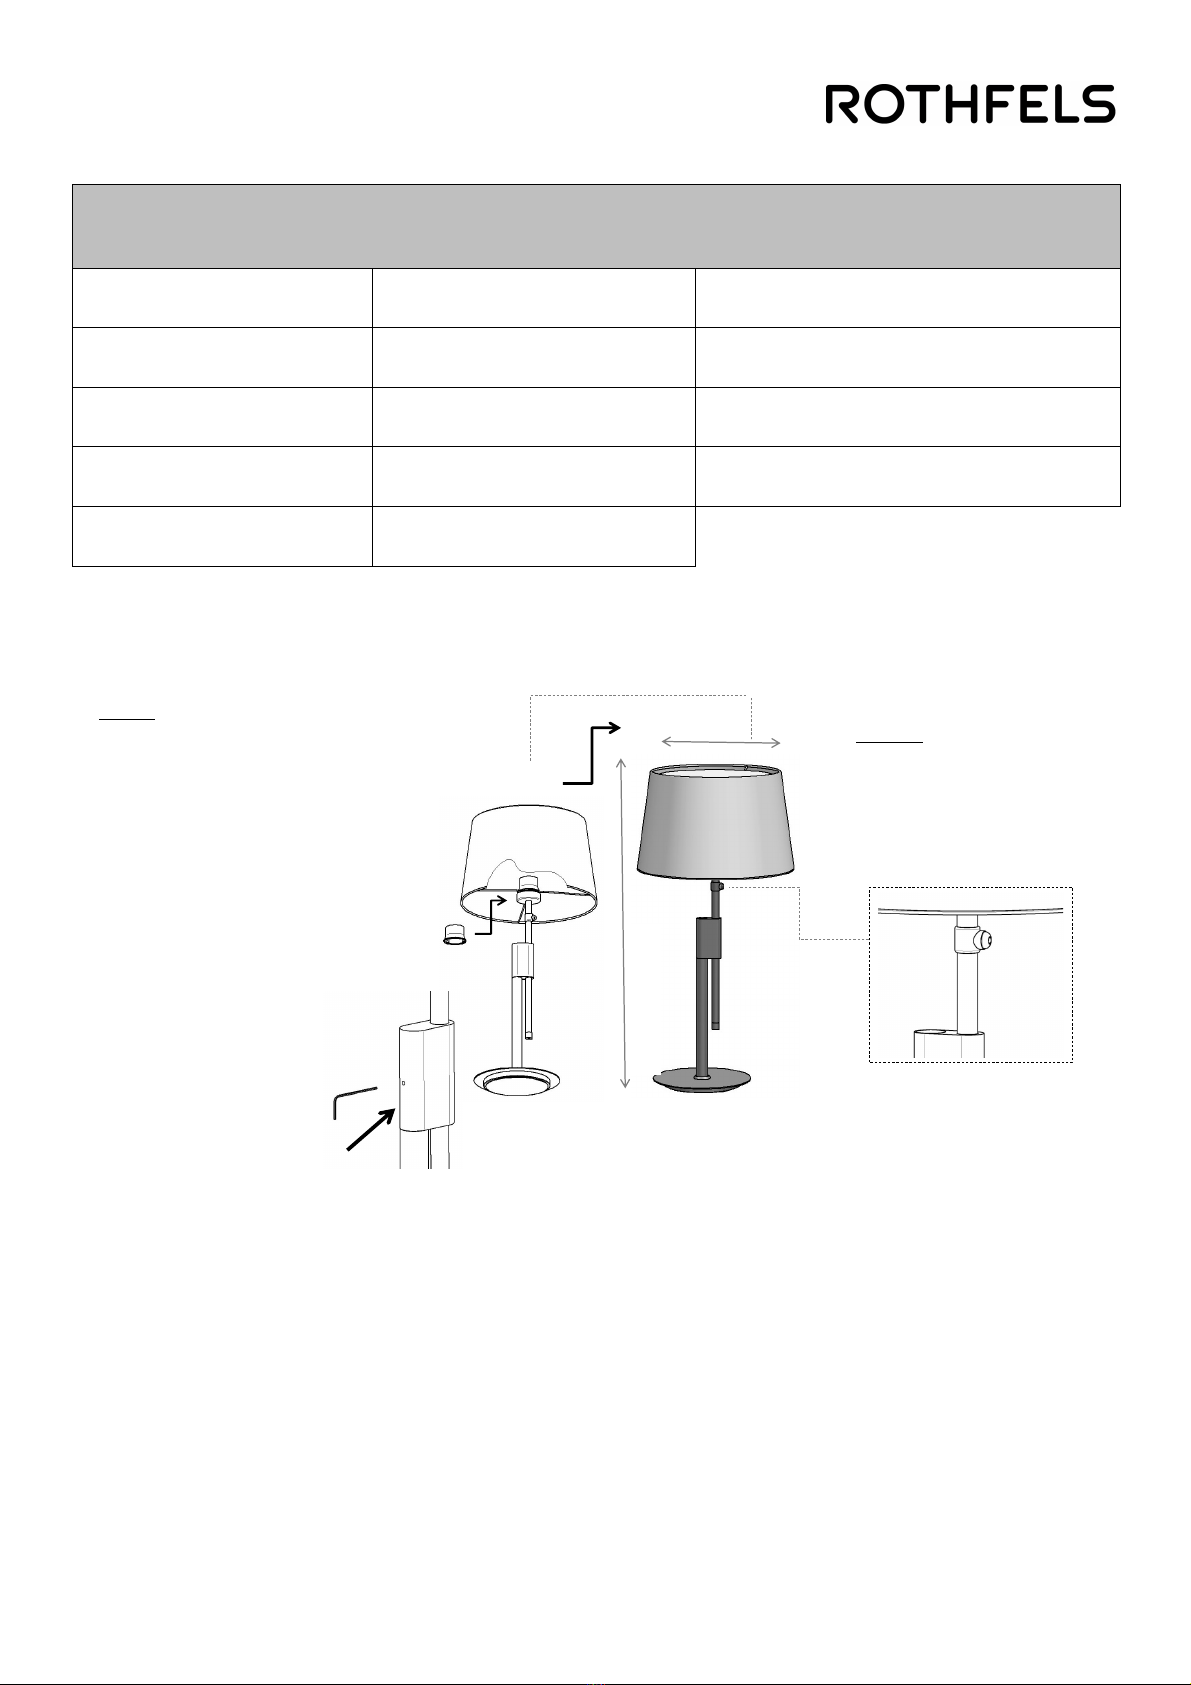
Montage
1. Der Schraubring wird von der Stange
abgedreht. Danach stecken Sie den
Schirm, mit den Bügeln nach unten
gerichtet, auf das Gewinde.
Anschließend nehmen Sie den zuvor
abgedrehten Schraubring in die Hand
und greifen von unten in den Schirm
um ihn wieder auf sein ursprüngliches
Gewinde zu schrauben (siehe Abb.
(a)).
2. Schrauben Sie das Leuchtmittel ein.
Aufgrund der Wärmeentwicklung
dürfen nur LED-Leuchtmittel
verwendet werden!
3. Sie können die Gangbarkeit der
Höhenverstellung nachregulieren,
indem sie mit dem beigefügten
Inbusschlüssel (1,5mm) die innen
liegende Madenschraube im
Mittelstück in die entsprechende
Richtung drehen (siehe Abb. (b)).
Durch das Anziehen der
Madenschraube wird die Gangbarkeit
der Höhenverstellung schwerer.
22cm
63 - 82cm
Bedienung
(1) Einmaliges Drücken: An/Aus
Gedrückt halten: Dimmung
(hell/dunkel)
Nach jedem Einschalten startet
die Leuchte mit der zuletzt
verwendeten Leuchtkraft.
(1)
(2)
(a)
(b)
DE

10
Assembly
1. unscrew the screw ring from the
rod. Then put the shade onto the
thread with the brackets pointing
downwards. Then take the
previously unscrewed screw ring in
your hand and reach into the shade
from below to screw it back onto
its original thread (see fig. (a)).
2.Screw in the lamp. Due to heat
generation, only LED bulbs may be
used!
3. You can readjust the height
adjustment by turning the internal
grub screw in the centre piece in
the corresponding direction with
the enclosed Allen key (1.5mm)
(see fig. (b)).
Tightening the grub screw makes
the height adjustment more
difficult to move.
22cm
63 - 82cm
Operation
(1) Press once: On/Off
Press and hold: Dimming
(light/dark)
After each switch-on, the lamp
starts with the last luminosity
used.
(1)
(2)
(a)
(b)
GB
Montage
1. la bague à visser est dévissée
de la tige. Ensuite, placez le
parasol sur le filetage, les
branches orientées vers le bas.
Ensuite, prenez en main la
bague à visser que vous avez
dévissée auparavant et saisissez
le parapluie par le bas pour le
revisser sur son filetage
d'origine (voir fig. (a)).
2. vissez l'ampoule. En raison de
la chaleur dégagée, seules des
ampoules LED peuvent être
utilisées !
3. vous pouvez ajuster la course
du réglage en hauteur en
tournant la vis sans tête située à
l'intérieur de la pièce centrale
dans la direction
correspondante à l'aide de la clé
Allen fournie (1,5 mm) (voir ill.
(b)).
Le serrage de la vis sans tête
rend le réglage de la hauteur
plus difficile.
22cm
63 - 82cm
Utilisation
(1) Appuyer une fois : Marche/arrêt
Maintenir la touche enfoncée :
Variation d'intensité (clair/foncé)
Après chaque allumage, le luminaire
démarre avec la dernière
intensité lumineuse utilisée.
(1)
(2)
(a)
(b)
FR
Popular Lighting Equipment manuals by other brands


Qazqa
Qazqa Suplux SL 3 Black 103062 instruction manual

Commercial Electric
Commercial Electric 54568141 Use and care guide

CREE LIGHTING
CREE LIGHTING 304 Series installation instructions

Goobay
Goobay 49867 user manual

ECOMAN ITALIA
ECOMAN ITALIA LED T8 instruction manual

Alkalite
Alkalite Krypton KT-81 user manual


