
REDHEAD RH360 User manual

1
Elec-
tronic Dog Trainer

2
NOTICE!
According to how you use your
transmitter, the transmitting range
might be much different.
You will have more range if you
use your transmitter apart from
your body as follows:
Maximum Range
Typical Range
Minimum Range

3
TABLE OF CONTENTS
• Table of Contents .......................................3
• Introduction.................................................4
• Package Contents ...................................... 5
• Model Features........................................... 5
• Parts and Functions....................................6
• Installing/Charging Batteries ....................... 10
• Turning ON and OFF ..................................11
• Battery Saving Mode ..................................12
• Testing........................................................13
• Reprogramming ..........................................14
• Properly Fitting the Collar ........................... 15
• Setting the Intensity Level...........................16
• Maintenance ...............................................17
• Important Safety Notes ............................... 18
• Warranty.....................................................19
• FCC Compliance ........................................19
• Contact Information ....................................20

4
Congratulations and thank you for purchasing our
RedHead RH360 Remote Dog Trainer. The
RH360 Dog Training Collar is durable, safe and
very humane when used correctly. This training
system offers Maxx-Range™ technology, the
industry’s only internally woven antenna in the
collar. With a 360 yard range, the RH360 is
perfect for general obedience training around the
home. The RH360 features fifteen levels of
stimulation intensity, with an easy ‘no-look’
clicking intensity selection dial. This model
includes both the Continuous Stimulation and the
Beep function. The collar unit is rechargeable
and features our Quick-charge and SmartLED
light that lets you know when charging is
complete. There is also a Battery Saving Mode to
extend the life of the collar battery. The Collar
Receiver is 100% waterproof and can be worn
even when the dog is submerged. The automatic
safety shut-off feature stops the stimulus from
both the Transmitter and the Collar Receiver to
prevent accidental or prolonged stimulation. We
hope you and your dog both enjoy using your
RH360. Happy training!
INTRODUCTION

5
PACKAGE CONTENTS
• Transmitter (9 volt battery NOT included)
• Collar Receiver
• Test Light
• Owner’s Manual
• Battery Charger
MODEL FEATURES
IMPORTANT NOTE:
Please read this owner’s manual in its entirety before
operating this unit. Should you have any questions about
our collars or their operation please contact our Customer
Service department (see back page for address and phone
number information).
• Digital Technology
• Up to 360 yard range
• Rechargeable Quick-Charge Li-Poly battery in
collar
• Lightweight, compact collar and transmitter
• 15 adjustable intensity levels of Continuous
Stimulation
• Beeping Tone
• SmartLED light on Collar Receiver
• Battery Saving Mode for collar battery
• Completely waterproof collars
• Weather resistant transmitter
• Built in safety shut-off system
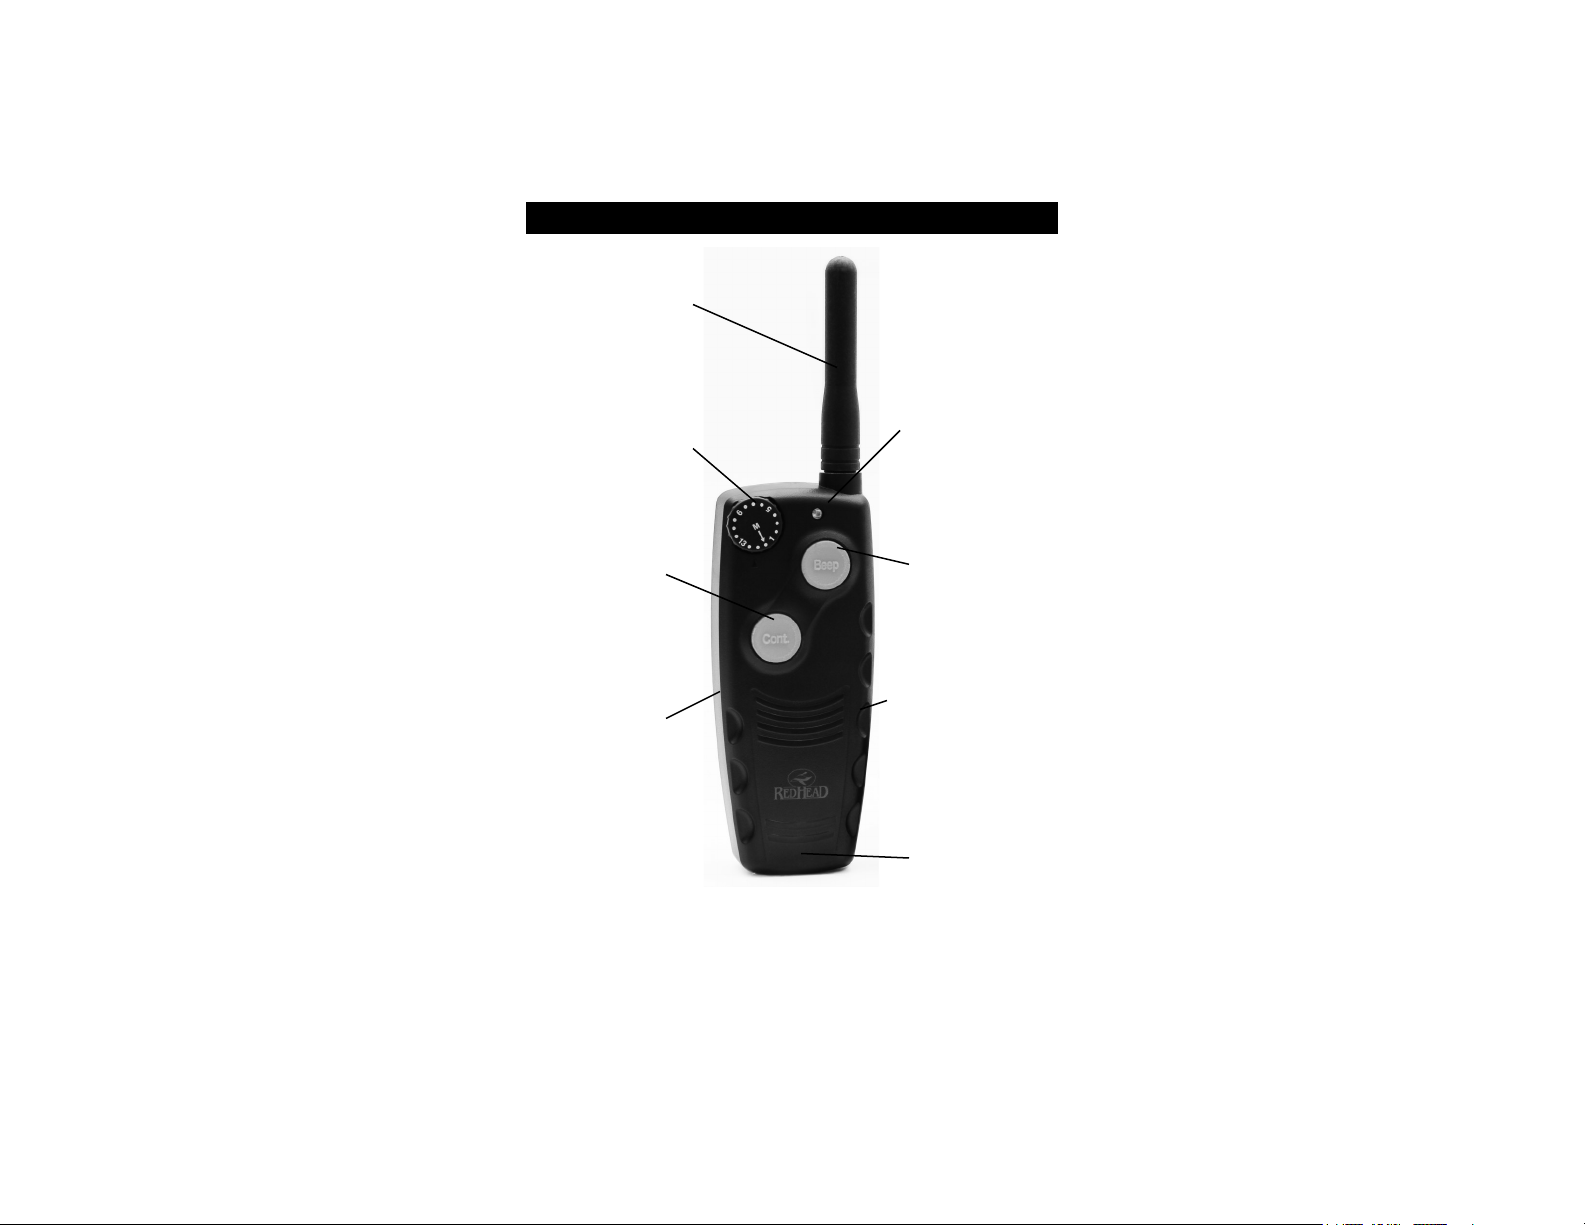
6
Transmitter
PARTS & FUNCTIONS
Intensity
Selection Dial
LED
Indicator
Light
Magnet
Indicator
(Red Mark
in back)
Continuous
Stimulation
Button
Beep
Button
Lanyard
Attachment
Battery
Compartment
(in back)
Antenna

7
PARTS & FUNCTIONS
Intensity Selection Dial
The intensity selection dial allows you to choose between
15 different levels of stimulation for very precise control.
On the ‘M’ setting, you can choose between regular and
Battery Saving Mode* (see page 12).
Transmitter Antenna
Be sure to check that the antenna is securely fastened to
the transmitter before each use. Hand-tighten only: over-
tightening can cause damage to the antenna or the
antenna mount.
Magnet Indicator (Red Mark)
The Magnet Indicator marks the location of the magnet in
the Transmitter. The magnet is used to turn the Collar
Receiver ON/OFF and for ID reprogramming.
Transmitter LED Indicator Light
When any of the buttons on the transmitter is pushed,
the LED light will turn on to indicate that the transmitter is
being operated. When the battery is low, the LED light
will flash rapidly.
Remote Training Buttons
Pressing the “Cont.” button sends a Continuous
Stimulation from the Collar Receiver to your dog.
Pressing the “Beep” button emits an audible beep from
the Collar Receiver.
*IMPORTANT NOTE:
In Battery Saving Mode, there may be a slight delay in the
Collar Receiver’s response to the Transmitter. This feature
was added to prolong battery life (see page 12).

8
PARTS & FUNCTIONS
Collar Receiver
LED
Indicator
Light
Magnetic
Switch
Indicator
(“M” Mark)
Collar Belt
with
Embedded
Receiver
Antenna
Speaker
Buckle with
Activation
Magnet
Collar SmartLED Indicator Light
When the collar unit is on, the SmartLED will flash green at
51%-100% charge, and will flash red if it has 21%-50%
charge. The light will flash red rapidly if it requires a re-
charge. The SmartLED light stays red while plugged into
the charger and turns green once charging is complete.
Contacts
Contacts deliver the electrical stimulation to the dog’s skin.
Contacts

9
Magnetic Switch Indicator (“M” Mark)
The Magnetic Switch Indicator is an “M” showing where
the Magnetic Activation Switch is located. You can use
the Magnetic Indicator on the Transmitter or the
Activation Magnet on the Buckle to activate and
deactivate your Collar Receiver (see page 11).
Collar Receiver LED Indicator Light
The LED light on the Collar Receiver will turn on when
Magnet Indicator is held against the Magnetic Switch
Indicator. When the Collar Receiver is ON, the LED light
will flash once every 2 seconds in normal mode and
double-flash every 2 seconds in Battery Saving Mode.
You will also see flashes when applying Continuous
Stimulation or Beep. When the collar battery is low and
needs to be replaced, the LED will flash rapidly (about 3
times every 2 seconds) while the Collar Receiver is ON.
Speaker
Emits an audible beep when “Beep” button is pushed.
Collar Belt with Embedded Receiver Antenna
The Collar Belt is adjustable to fit a wide range of neck
sizes (see page 15). The embedded collar antenna is
woven into the Collar Belt, and it is about 4 inches long.
You should be able to feel the embedded antenna on the
nylon belt.
PARTS & FUNCTIONS
WARNING
Do not cut the part of the Collar Belt that has the embedded
antenna. Doing so will damage the antenna and may result
in severely decreased Collar Receiver range.

10
INSTALLING/CHARGING BATTERIES
Transmitter Battery
1. Open Battery Cap on back of
Transmitter.
2. Install new 9V battery with ‘-’ terminal
on left and ‘+’ terminal on right.
3. Slide the Battery Compartment cover
back into place until it clicks.
Collar Battery Charging Procedure
1. Make sure the collar unit is off.
2. Plug the charger into a standard electrical outlet and
connect charger into collar unit. The SmartLED
should light solid red while charging.*
3. Charging is complete when the SmartLED turns
green (may take from 2.5 to 5 hours).
4. As soon as charging is complete, disconnect the
battery charging cable from the receptacle, securely
replace the rubber receptacle cover, and test unit.
WARNING: DO NOT CHARGE WHILE UNIT IS WET!
SmartLED
When the Collar Unit is Charging:
• The SmartLED lights red while the battery is
charging, and green when charging is complete.
• The SmartLED has a long red blink once every other
second when there is a charging error.*
When the Collar Unit is ON:
• Green LED: 51-100%. Charge.
• Red LED: 21% - 50% Charge.
• Quick Flashing Red LED every second: Low Battery.
Table of contents


