Raddy WF-60C User manual

WEATHER STATION
USER MANUAL
Please read the instruction before using the product and keep it for future
reference.
Any questions, please feel free to contact support@iraddy.com or visit
https://iraddy.com/
WF-60C

READ BEFORE USE
IMPORTANT PLACEMENT GUIDELINES
PACKAGE CONTENTS
INSTALLATION
INITIALIZATION
OVERVIEW
FEATURES
BAROMETER CALIBRATION
REMOTE SENSOR RECONNECTION
RCC SIGNAL RECEPTION
SETTING MODE
LANGUAGES SELECTION
KEY TONE
ADJUST BACKLIGHT
AUTO DIM
ALARM CLOCK SETTING
SNOOZE FUNCTION
MAX AND MIN RECORD
LOW BATTERY INDICATORS
TEMPERATURE
HUMIDITY
WEATHER FORECAST
MOON PHASE
PLACEMENT INSTRUCTION
IF YOU HAVE PROBLEMS, PLEASE TRY AS FOLLOWING
TIPS
SPECIFICATION
01
01
02
02
03
04
06
07
08
08
09
10
11
11
12
13
13
14
14
15
15
16
17
17
18
19
19
WF-60C WEATHER STATION
CONTENTS

Do not clean any part of the product with benzene, thinner or other solvent
chemicals. If necessary, clean it with a soft cloth.
Do not dismantle or modify the product in any way.
Never immerse the product in water, It will damage the product.
Do not tamper with the internal components. Do not use new and used
batteries.
Do not use different types of batteries alkaline, standard or rechargeable
batteries with this product.
Remove the batteries if storing this product for a long period of time,
otherwise the battery might damage the product.
Do not dispose of this product as unsorted municipal waste, it’s
necessary to separately collect it for special treatment.
Do not place the base station in rain or moisture.
The transmit range depends on the type of obstacles located between the
transmitter and the receiver (e.g. a concrete wall will interfere with the
signal much more than a plasterboard wall).
Be sure the sensor is mounted vertically, to allow moisture to drain out
properly.
Place out of direct sunlight & ensure the sensor is well-ventilated.
The distance between base station and sensors should be at least
5~ 6.5 feet (1.5~2 meters) away from any interfering sources such as
computer monitors or TV sets.
The base station stay away from the metal window frames.
Please do not use other electrical products such as headphones or
microphone operating on the same signal frequency. (433.92MHz),
neighbors using electrical devices operating on the same signal frequency
WF-60C WEATHER STATION
1.
2.
3.
READ BEFORE USE
IMPORTANT PLACEMENT GUIDELINES
01
1 x Weather Station
3 x Remote Sensor
1 x User Manual
1 x DC Adapter
*Alkaline batteries are not included
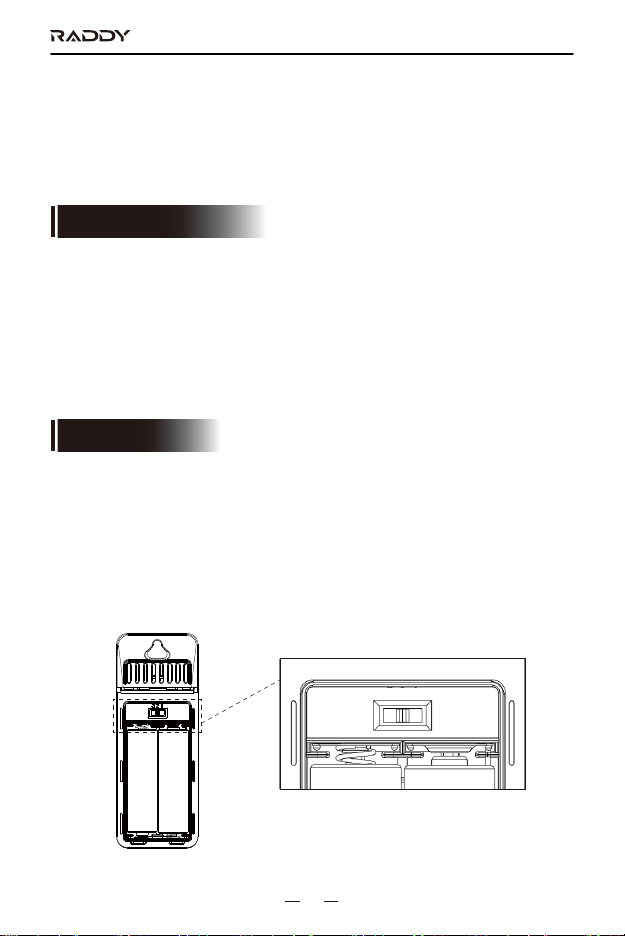
SENSOR SET UP
Base station supports up to 3 sensors connection, the sensor switch is
located inside the battery compartment. It can be switched between 1,2,3,
matching the info of Channel 1, Channel 2, Channel 3 that synchronize on
the OUTDOOR Dashboard. Install 2 alkaline AA batteries to activate the
sensor.
can also cause interference.
Place the base station in a dry area, free of dirt and dust. To ensure
accurate temperature measurement, place out of direct sunlight and away
from heat sources or vents.
4.
WF-60C WEATHER STATION
PACKAGE CONTENTS
INSTALLATION
321
02

BASE STATION SET UP
Remove the protective film that is applied to the LCD screen before using
the product.
Plugged in with power adapter and the base station will start to work.
Battery power is optional but it helps keep the settings when plugged out.
Since previous settings will be reset when plugged out, we recommend
installing the batteries for the base station.
Base station can stand upright on the table or mount on the wall.
1.
2.
Open the battery compartment cover at the back of the base station,
insert 3 x AA batteries or plug in the power adapter to power up the base
station.
After power-on, all icons on the LCD will light up in 3 seconds, and you
will hear a beep tone. At the mean time it will start to detect the indoor
temperature and humidity.
Then it will start to detect the air pressure for 10 seconds, and the
pressure reading will keep flashing during this process.
Next, it will start to make connections to the remote sensors. Now open
the remote sensor battery compartment, set channels of the 3 remote
1.
2.
3.
4.
3.
WF-60C WEATHER STATION
INITIALIZATION
03

sensors to 1, 2, 3 and install the batteries respectively. The base station
will detect the RF signals from the remote sensors for a maximum of 3
minutes, and the signal icons on the outdoor channel dashboard will
keep flashing during detection until it connects with the sensor.
Finally, it will enter the RCC (Radio Control Clock) reception mode for 7
minutes. Once the signal is received, the LCD will display the received
time/month/date/weekday.
5.
WF-60C WEATHER STATION
MAIN UNIT
1. Temperature and Humidity of Channel 1
2. Max/Min Record of Outdoor Channels
3. Low Battery Indicator for Base Unit
4. Max/Min Record of Base Unit
5. Indoor Temperature and Humidity
6. Trends Indicator for Indoor Temperature and Humidity
7. Barometer Air Pressure
OVERVIEW
1
2
3
4
5 6 7 8 9 10 11 12
13
14
15
16
17
18
19
2021
04

WF-60C WEATHER STATION
8. Barometer Air Pressure Trends
9. Weather Forecast
10. Alarm Icon
11. Time in 12/24 Hours Format
12. Snooze Icon
13. Auto Dim
14. Calendar in Date And Month
15. Moon Phase
16. Rcc Icon and Dst
17. Weekday
18. Trends Indicator for 3 Channels’ Temperature and Humidity
19. Temperature and Humidity of Channel 3
20. Temperature and Humidity of Channel 2
21. Low Battery Indicator for 3 Sensors
22. Hanging Hole
23. Battery Compartment Cover
24. Stand Bracket
25. DC Jack
26. 7 Buttons: ALARM, MEM, CH, SNOOZE/LIGHT, +/RCC, -, SET
22
23
24
25
26
ALARM MEM CH SET
SNOOZE/LIGHT -
/ RCC
+
05

WF-60C WEATHER STATION
REMOTE SENSOR
Time and Calendar (Day/Month)
12/24 hours format switchable
Alarm with snooze function
Weather forecast with 5 variables: sunny, partly cloudy, cloudy, rainy,
and snowy
Indoor temperature and humidity
Outdoor temperature and humidity
Support up to 3 sensors
FEATURES
1. LED Indicator
2. Battery Compartment Cover
3. Hang Hole for Wall Mounting
4. Channel Switch
5. Hole for Hanging Strip
1
2
3
4
5
321
WEATHER ICON
Description Sunny Partly Cloudy Cloudy Rainy Snowy
06

WF-60C WEATHER STATION
Max/Min memory records for all indoor/outdoor temperature and humidity
Trend index
C/F(Celsius/Fahrenheit) switchable
Comfort dashboard
Low battery indicator
Key tone on/off
Transmission range: up to 100 meters/330 feet in open area
3-mode brightness: Bright/Dim/Off
Support desk standing or wall hanging
After powering on, the pressure reading will be flashing for 10 seconds.
If there is no need for calibration, press【SNOOZE/LIGHT】button to exit
setting. If calibration is required, you can press【+/RCC】or【-】
buttons to adjust data. Press and hold【+/RCC】and【-】buttons will
quickly change the value by 8 steps.
If no operation within 10 seconds, it will automatically save and exit
setting.
Barometer range: 850-1050hPa/mb (600-832mmHg, 23.62-32.75inHg).
Arrow indication for humidity changes:
will display when the reading increase by 2mb, within one hour or
compared with last reading.
will display when the reading decrease by 2mb, within one hour or
compared with last reading.
will display when the reading changes less than 2mb, within one
hour or compared with last reading.
1.
2.
3.
4.
BAROMETER CALIBRATION
07
WF-60C WEATHER STATION
Press and hold the【CH】button to clear all sensors data and re-search
for RF signal from the remote sensors again. While the unit is searching
for signal, the signal icons on the outdoor channel dashboard will keep
flashing.
If you want to change the channel of the remote sensor, remove the
batteries from the sensor, toggle the channel selection on the sensor,
install the batteries, and then repeat step 1 on the main unit.
Note: If the unit is in searching for RCC signal, long press the【+/RCC】
button to exit the RCC Receiving Mode first. Otherwise, the unit won’t
respond to the【CH】button.
1.
2.
REMOTE SENSOR RECONNECTION
Every day at 1:00 AM, 2:00 AM, 3:00 AM, 4:00 AM, and 5:00 AM, the
clock will automatically carries out the synchronization procedure to
correct any deviations to the exact time if the Daily RCC Reception is
enabled. The signal searching lasts 7 minutes once a time. If the signal is
received successfully once, the remaining RCC signals on that day will be
ignored. If no signal is received in the scheduled time, the signal searching
will be stopped for today.
Press and hold the【SET】button to enter the Setting Mode, the
language display flashes.
Short press the【SET】button 6 times and use the【+/RCC】or【-】
button to select “ON”/”OFF” for the Daily RCC Reception.
Short press the【SET】button to save and go to the next item setting.
If you choose “OFF”, the unit will go to the Calendar Year Setting. If you
choose “ON”, the unit will go to the RCC Time Zone Calibration.
Use the【+/RCC】and【-】button to select the time zone deviation
1. Turn On/Off the Daily Auto RCC Reception:
RCC SIGNAL RECEPTION
①
②
③
④
08
Table of contents
Languages:
Other Raddy Weather Station manuals


Popular Weather Station manuals by other brands


National Geographic
National Geographic VA Colour RC instruction manual

Renkforce
Renkforce 1208067 operating instructions

Levenhuk
Levenhuk Discovery Report WA40 quick start guide

Instant Transmission
Instant Transmission MA 10410 instruction manual

Lutron Electronics
Lutron Electronics PHB-318 Operation manual

WAREMA
WAREMA EWFS Weather station eco Operating and installation instructions