Qsonix Q100 User manual

1
1


3
Qsonix Q100 User Guide
Version 3.01
Manual copyright © 2005 Qsonix, Inc All Rights Reserved

4
4
Introduction
Welcome to Qsonix, an exciting new digital music management system. The Qsonix Q100 has been
designed to make loading, organizing and playing your CD music collection a pleasurable experience.
Qsonix allows you to quickly and easily load your CD collection directly to the internal hard drives of
the system. Using its unique AlbumBrowser™ interface, Qsonix displays detailed information about
each of your CDs, including the CD cover art. Qsonix supports a variety of compression quality
options including CD Quality Lossless Compression. Lossless Compression significantly reduces the
storage space required to rip CDs while still maintaining CD quality, making it possible to use Qsonix
to store a library of hundreds of CDs on a single hard drive.
Qsonix also includes many other unique high-quality features, such as the user controllable
SoftFade™ engine that delivers incredibly smooth cross-fading and soft volume transitions on all
transport functions such as Play, Stop, Pause and Mute. Qsonix’s user interface has been carefully
designed to take the work out of browsing your music, and building custom playlists using simple
drag-and-drop operations with the Q100’s integrated touchscreen controller.

5
Setting Up Your Q100 System
In order to begin using your Qsonix Q100 system, you must first have it properly installed and
integrated with your sound system. Begin by unpacking both packages that came with your system
and identifying all of the cables that you will need for your installation
Confirm your package contents! Report any missing items to your installer/dealer. * = Qty
Q100 System Box Touchscreen Controller Box
-Q100 System (*1)
-Cable Package (*1)
-RCA Stereo audio cable (*1)
-Digital audio Coaxial cable (*1)
-Qsonix Touchscreen controller (*1)
-Power adapter (*1)
-Power cord (*1)
-D-sub 15-pin VGA signal cable (*1)
-RS-232 signal cable (*1)
-Touch monitor supporting bracket (*1)
and screws (*2)
6
6
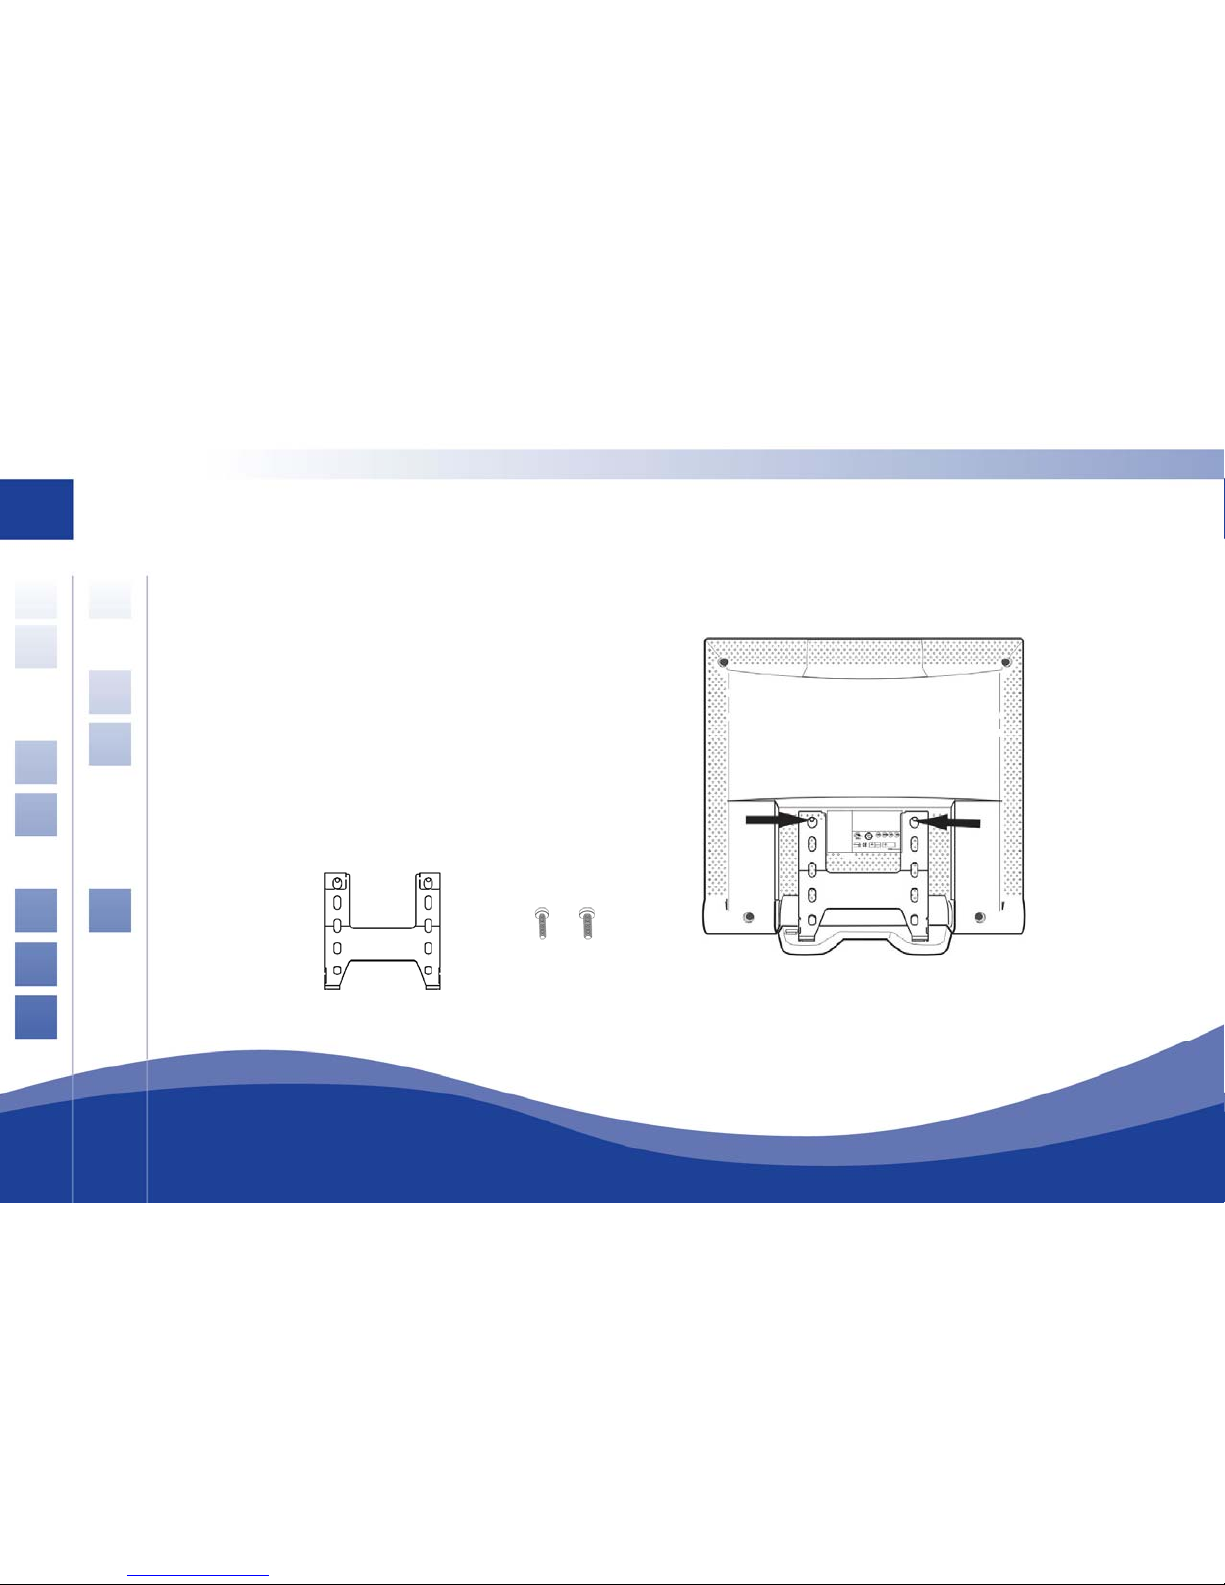
Attaching the Touch Monitor Support
To prevent the monitor from moving while using the touch screen, the touch screen
support should be attached.
Attach the touch screen support to the
rear of the monitor with the two
supplied screws as shown here.

Identifying your touchscreen controls
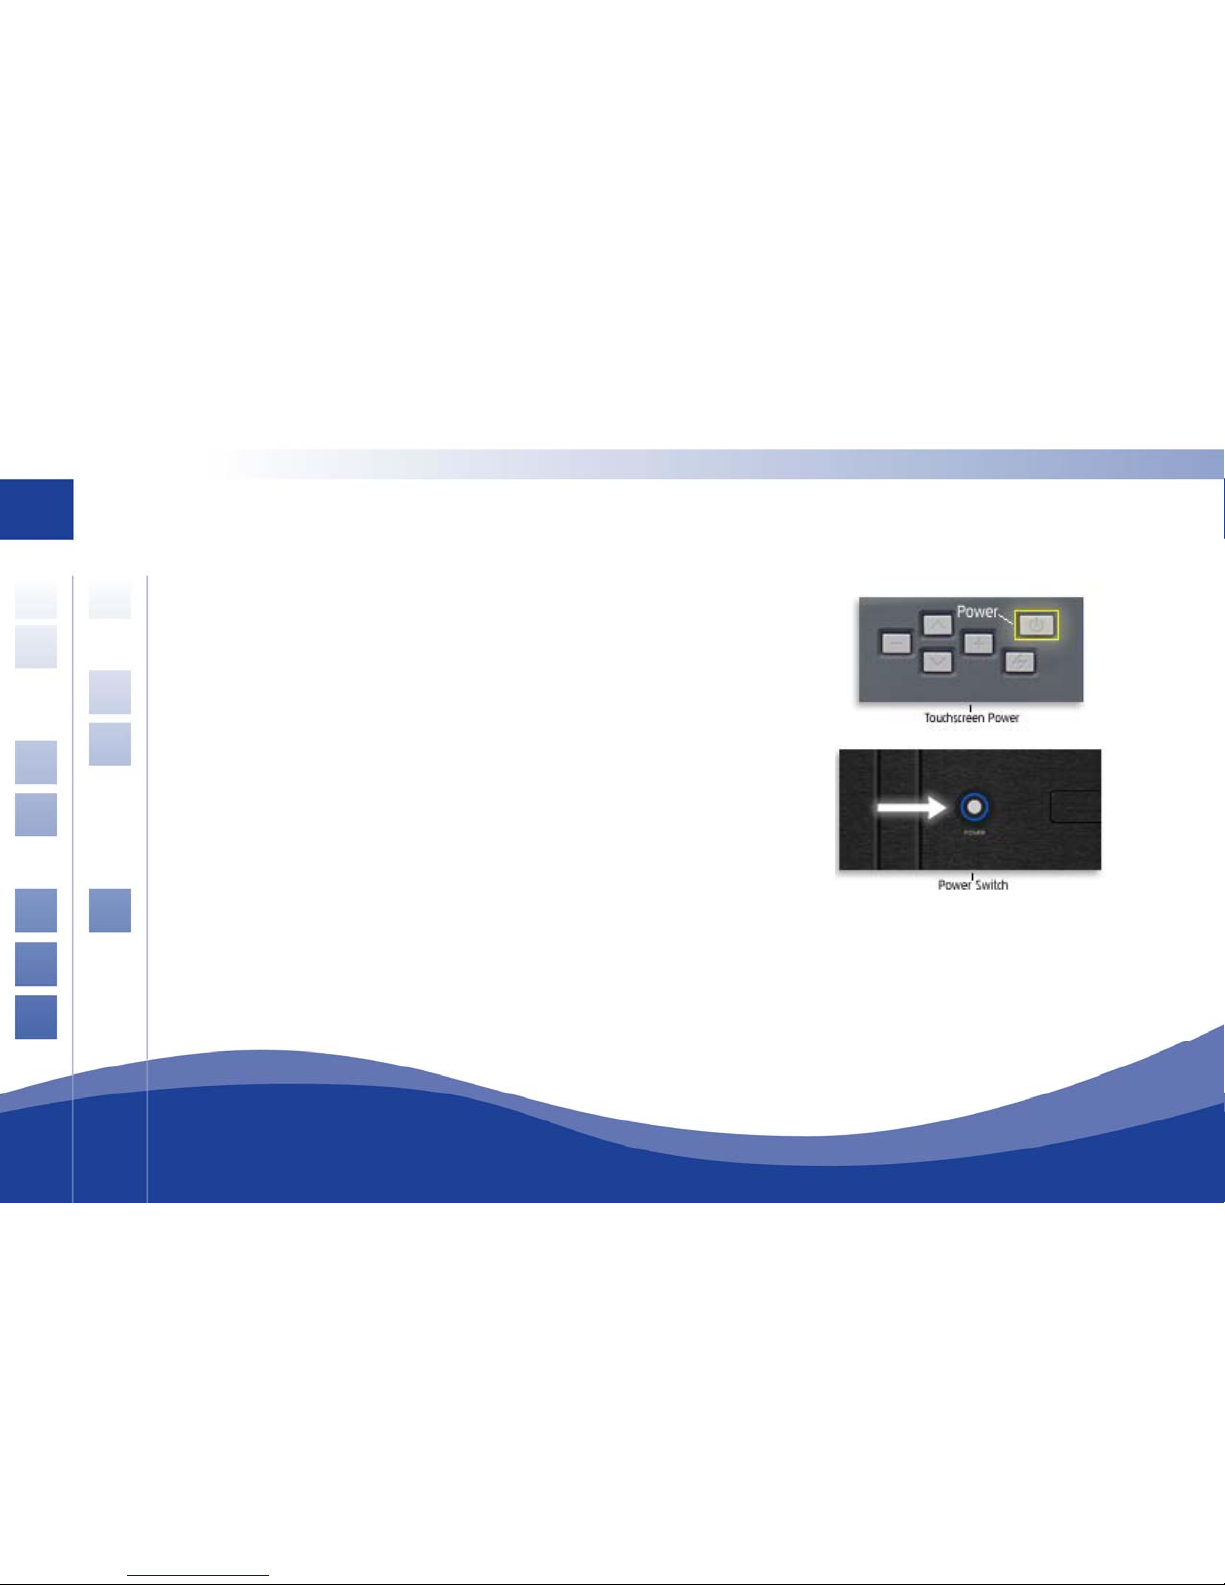
Power switch
Turns the monitor on or off.
LED indicator
The indicator lights up in green when the
monitor is turned on, and lights
up in orange when the monitor is in power saving
mode.
AUTO button
Adjust the picture position and performance
automatically. It is highly recommended that you
press this button the first time you use the
monitor or any time you have a calibration or
image size issue.
UP button
Activates the On-Screen Display
menu.
Move the selected item clockwise.
Down button
Activates the On-Screen Display
menu.
Move the selected item counterclockwise.
Increase button
Activates the On-Screen Display menu.
Function as the “+” (increase)button when
Decre e button
creen Display menu.
Function as the “-” (decrease) button when
adjusting.
adjusting.
as
Activates the On-S
7
8
8
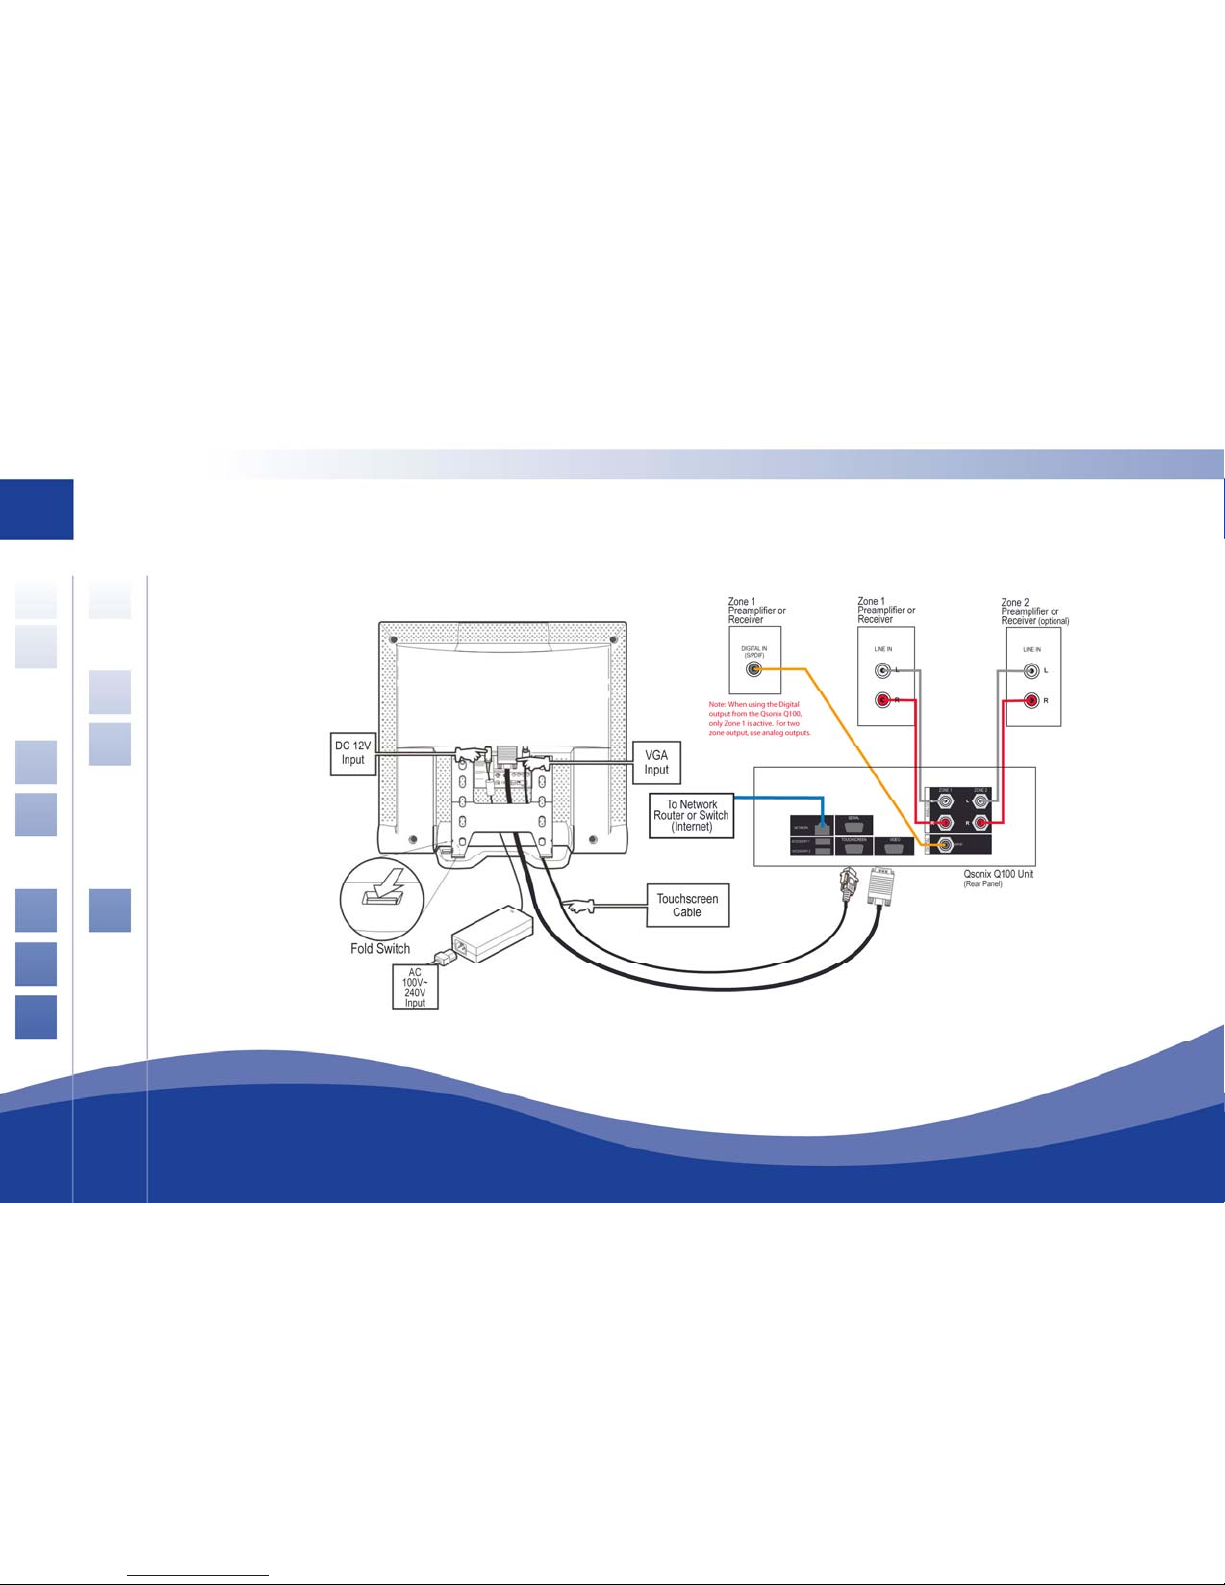
Connecting your Q100 System and Touchsc roller
Please use the following diagram to assist you in making the necessary audio, video, power and
network connections.
reen Cont

9
h
Note: The Q100 can only operate in two-zone mode when connected using analog outputs.
Step by Step cabling guidelines
1. Open the monitor stand (use fold switch), so you can locate the monitor on a flat surface suc
as a tabletop, on top of the Q100 unit or other suitable location. (Unit can be wall-mounted
with optional mounting kit and professional installation – contact your Qsonix dealer)
2. Connect AC power cable to touchscreen power adapter.
3. Connect DC 12V mini connector from power adapter to rear of touchscreen DC 12V input.
4. Connect one end of the D-sub 15-pin VGA signal cable to the “Video” connector on the Q100
unit and the other end to the “VGA Input” connector on the back of the touchscreen.
5. Connect the DB-9 (square) end of the RS-232 signal cable to the “Touchscreen” connector on
the back of the Q100 unit, and the other end (round plug) to the serial/touchscreen connector
on the back of the touchscreen.
6. Connect the Network port on the rear of the Q100 to your Network router, hub or switch using
a CAT5 Ethernet cable. (You may also use a 3rd party passive Wireless bridge)
7. Using the supplied audio cables, connect the appropriate analog and digital outputs to the
line-level inputs of your amplifier, preamplifier or powered speakers.
10
10
100 for the First Time
O y
using i
N
turned e “power”
b n
Starting your Q
nce ou have plugged in all the necessary cables, you are ready to power-up the system and begin
t.
Step 1: Turn on the Touchscreen’s power
Step 2; Turn on the Q100s power switch
ote: The Q100 has been designed to be left in the “Power on” state, and does not need to be
off when not in use. The system may be completely turned off by pressing th
utto located in the center of the front panel.
Other manuals for Q100
1
Table of contents


