prologue IW007 User manual

Wireless
Weather Station
Trådlös väderstation
Trådløs værstasjon
Langaton sääasema
Funk-Wetterstation
Art.no. Model
36-5087 IW007 Ver. 20141211
EnglishSvenskaNorskSuomiDeutsch


A
B
C
D
E
F
G
H
3
English
Wireless Weather Station
Art.no 36-5087 Model IW007
Please read theentire instruction manual before using theproduct and save it for
future reference. We reserve theright for any errors in text or images and any necessary
changes made to technical data. If you have any questions regarding technical problems
please contact our Customer Services.
Important details:
• Other wireless equipment sharing thesame frequency can reduce
thetransmission range.
• Therange of all wireless equipment depends on thetype of obstacles located
between thetransmitter and thereceiver (e.g. aconcrete wall will interfere with
thesignal more than aplasterboard wall).
If you experience problems, try thefollowing:
• Turn off any existing wireless equipment to see if that could be causing theproblem.
• Move thewireless equipment and/or shorten thedistance and reduce thenumber
of obstacles (walls, furniture, etc) between thetransmitter and receiver.
Product description
• Wireless weather station with; temperature, humidity, wind speed, direction and
wind chill factor, pressure, rainfall and simple next-day weather forecast.
• Wireless sensor which monitors wind, rain and temperature at ranges up to
40 m line-of-sight.
• Outdoor temperature and humidity sensor.
• Memory for themax and min temperature and humidity readings.
• Time and date display.
Contents
A. Main unit
B. Anemometer
C. Anemometer mounting arm
D. Stand
E. Anemometer mounting base
F. Anemometer mounting pole
G. Rain catcher
H. Outdoor temperature sensor

1
9
2
10
3
11
4
12
5
6
7
8
13
4
English
Buttons and functions
Main unit
Remove theprotective film from thescreen.
Rear panel of main unit
1. [SNOOZE]
2. [SCALE] Choose aunit of measurement
3. [MAX/MIN] Display max/min history of
thetemperature and wind speed
4. [HISTORY] Display pressure history,
reset rain gauge
5. [CHANNEL] Channel selector
6. Wall bracket
7. Table stand attachment
8. [RESET] Reset main unit
9. [UP] Increase setting
10. [SET] Clock and alarm settings
11. [ALARM] Alarm settings
12. [DOWN] Decrease setting
13. Battery cover

16 17
18
14
15
19
20
23
21 22
5
English
LCD display
14. Time and alarm
15. Forecast and pressure
16. Indoor humidity and temperature
17. Outdoor humidity and temperature
18. Wind
19. Rain
Time and alarm
20. 12/24 hour clock
21. Icon which shows when thesnooze function is activated
22. Icon which shows when Alarm 1 and/or Alarm 2 is activated
23. Date

25
26
24
27
28
29 39
45
30
31 41
34
44
33
43
32
42
35
36 3837
40
6
English
Forecast and pressure
24. Weather history
25. Pressure icon
26. Sunny, sunny intervals and
cloudy symbols
27. Rain or snow symbol
28. Barometer
29. Indoor temperature and humidity
30. Indoor temperature trend
31. Wind speed
32. Speed of thewind gusts
33. Rain icon
34. Signal indicator for therain gauge
35. Rain catcher battery level indicator
36. MAX/MIN indicator
37. Icons which indicate when readings
from sensor 1 or 2 are displayed.
38. Alternative display mode for
thereadings from sensor 1 and 2.
39. Outdoor temperature and humidity
40. Frost warning
41. Outdoor sensor battery level indicator
42. Outdoor temperature trend (rising/falling)
43. Anemometer battery level indicator
44. Wind chill
45. Rain gauge
Indoor humidity and temperature, wind and rain

7
English
Getting started
Note: Move themain unit and sensors to their intended locations and make sure that
you can receive readings from all thesensors before installing theunits permanently.
Batteries
Main unit
1. Open thebattery cover on theback of themain
unit by sliding it in thedirection of thearrow.
2. Insert 3×AA/LR6 batteries. Note thepolarity
markings at thebottom of thebattery
compartment to ensure correct insertion.
3. Refit thebattery cover.
4. Carefully press [RESET] thefirst time
themain unit is switched on and then again
every time thebatteries are replaced.
Rain gauge
1. Undo the4 screws holding thebattery cover
in place.
2. Insert 2×AA/LR6 batteries. Note thepolarity
markings at thebottom of thebattery
compartment to ensure correct insertion.
3. Put thebattery cover back and tighten thescrews.
Outdoor temperature and humidity sensor
1. Open thebattery cover on theback of thesensor
by sliding it in thedirection of thearrow.
2. Insert 2×AAA/LR03 batteries. Note thepolarity
markings at thebottom of thebattery
compartment to ensure correct insertion.
3. Refit thebattery cover.
Anemometer
1. Open theanemometer by twisting off
thelower part.
2. Open thebattery cover by sliding it in
thedirection of thearrow.
3. Insert 2×AA/LR6 batteries. Note thepolarity
markings on theside of thebattery
compartment to ensure correct insertion.
4. Refit thebattery cover.
8
English
Checks and installation
Note:
• Theweather station has no on/off switch. It is operational as soon as
thebatteries are inserted.
• Thescan for signals from thesensors and thedisplay of data from thesensors
occurs automatically as soon as thebatteries have been inserted.
Mounting the main unit
• Themain unit should be located indoors, away from any potential sources of
interference such as TVs and computers.
• Since themain unit contains asensor for pressure, humidity and indoor
temperature, it should not be located too close to sources of heat such as
cookers or heaters/radiators. Neither should it be located in aplace where it is
permanently exposed to direct sunlight.
• Fasten themain unit to awall using thebracket on theback or stand it
on its table stand.
Mounting the rain gauge
Note: Thegauge is self-emptying but should be kept indoors at temperatures below
zero to prevent thewater freezing and damaging it.
• Place thegauge in anopen space at least 45 cm above theground.
• Make sure that thegauge is placed on alevel surface.
• Secure thegauge using 2 screws.
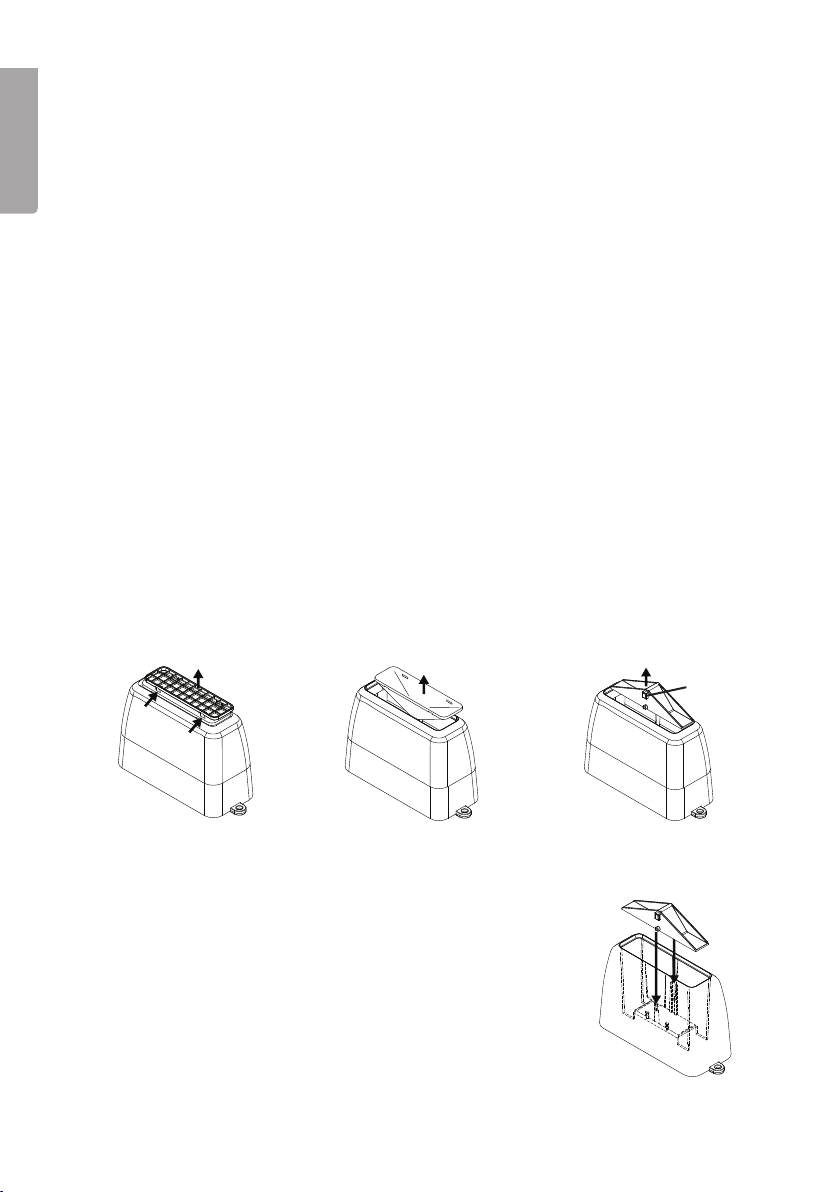
Dismantling the rain gauge for cleaning
1. Carefully remove
thegrille using
asuitable object.
2. Carefully remove
thefilter.
3. Lift out thesensor unit.
4. Re-assemble in reversed order. Make sure that
thesensor unit is correctly aligned. Themetal pins
should fit into theholes and thelittle magnet should
be against theinside of thehousing.
Magnet

a
b
c
9
English
Mounting the outdoor temperature and humidity sensor
Note: Theweather station can be supplemented by
theaddition of anextra sensor (our art no: 36-5123).
• Mount thesensor upright (not horizontally or on its
side) on ahorizontal surface or on awall using
theincluded holder.
• Make sure that thesensor is shielded from direct
sunlight or heavy rain.
Mounting the anemometer
Note: Make sure that the “N” mark on thesensor is pointing north in order for
theweather station to indicate thecorrect wind direction.
• Install theanemometer in anopen space where it is fully exposed to thewind.
• Theanemometer can be mounted on aroof using
theincluded pole and base.
• Theanemometer can be mounted on
awall using theincluded mounting arm.
a) Wind direction indicator.
b) TheN indicator marked on top of
theanemometer must be fixed to point north.
c) Wind speed indicator.

10
English
Operation
Setting the clock
1. Hold in [SET] for 3 seconds – “12 hr” flashes.
2. Press [UP] or [DOWN] to set 12/24-hour clock. Note: The “AM” and “PM” icons
appear only when theclock is set to 12-hour format.
3. Whilst theselected time format is flashing, press [SET] again – thehours display
will flash.
4. Press [UP] or [DOWN] to set thehours.
5. Press [SET] again – theminutes display will flash.
6. Press [UP] or [DOWN] to set theminutes.
7. Press [SET] again – M & D will flash on thedisplay.
8. Use [UP] or [DOWN] to select adate format.
9. Press [SET] again – theyear display will flash.
10. Use [UP] or [DOWN] to set theyear.
11. Press [SET] again – themonth display will flash.
12. Use [UP] or [DOWN] to set themonth.
13. Press [SET] again – thedate display will flash.
14. Use [UP] or [DOWN] to set thedate.
15. Press [SET] again – theselection of languages will flash.
16. Use [UP] or [DOWN] to set thelanguage. Thelanguages are EN (English),
GE (German), FR (French), IT (Italian) and SP (Spanish).
17. Press [SET] again to finish making settings. Thecorrect day sets automatically
in accordance with set date.
Note: If [SET] is pressed once more after step 17 above, you will enter thetime zone
setting. This feature only works on models with radio-controlled (atomic) clocks, not
this model. Thetime zone setting is activated by ashort press on [SET].
Setting alarm 1 and 2
1. In clock mode, press [ALARM] once – “AL1” and thetime of alarm 1 will appear
on thedisplay.
2. Hold in [SET] for 3 seconds – thehours display will flash.
3. Press [UP] or [DOWN] to set thehours.
4. Press [SET] again – theminutes display will flash.
5. Press [UP] or [DOWN] to set theminutes.
6. Press [SET] to finish setting alarm 1. Thealarm 1 icon will appear on thedisplay.
7. Press [ALARM] once. “AL 2” and thetime of alarm 2 will appear on thedisplay.
8. Set thetime in thesame way as you did for alarm 1.
9. Press [ALARM] to finish.
Note: If thesettings process is interrupted for over 10 seconds, theunit automatically
reverts to clock mode.
Checking the alarm times
1. In clock mode, press [ALARM] once to view thetime set for alarm 1.
2. Press [ALARM] twice to view thetime set for alarm 2.
Table of contents
Languages:
Other prologue Weather Station manuals


Popular Weather Station manuals by other brands


National Geographic
National Geographic VA Colour RC instruction manual

Renkforce
Renkforce 1208067 operating instructions

Levenhuk
Levenhuk Discovery Report WA40 quick start guide

Instant Transmission
Instant Transmission MA 10410 instruction manual

Lutron Electronics
Lutron Electronics PHB-318 Operation manual

WAREMA
WAREMA EWFS Weather station eco Operating and installation instructions