Power Dynamics USB DJ CONTROLLER User manual
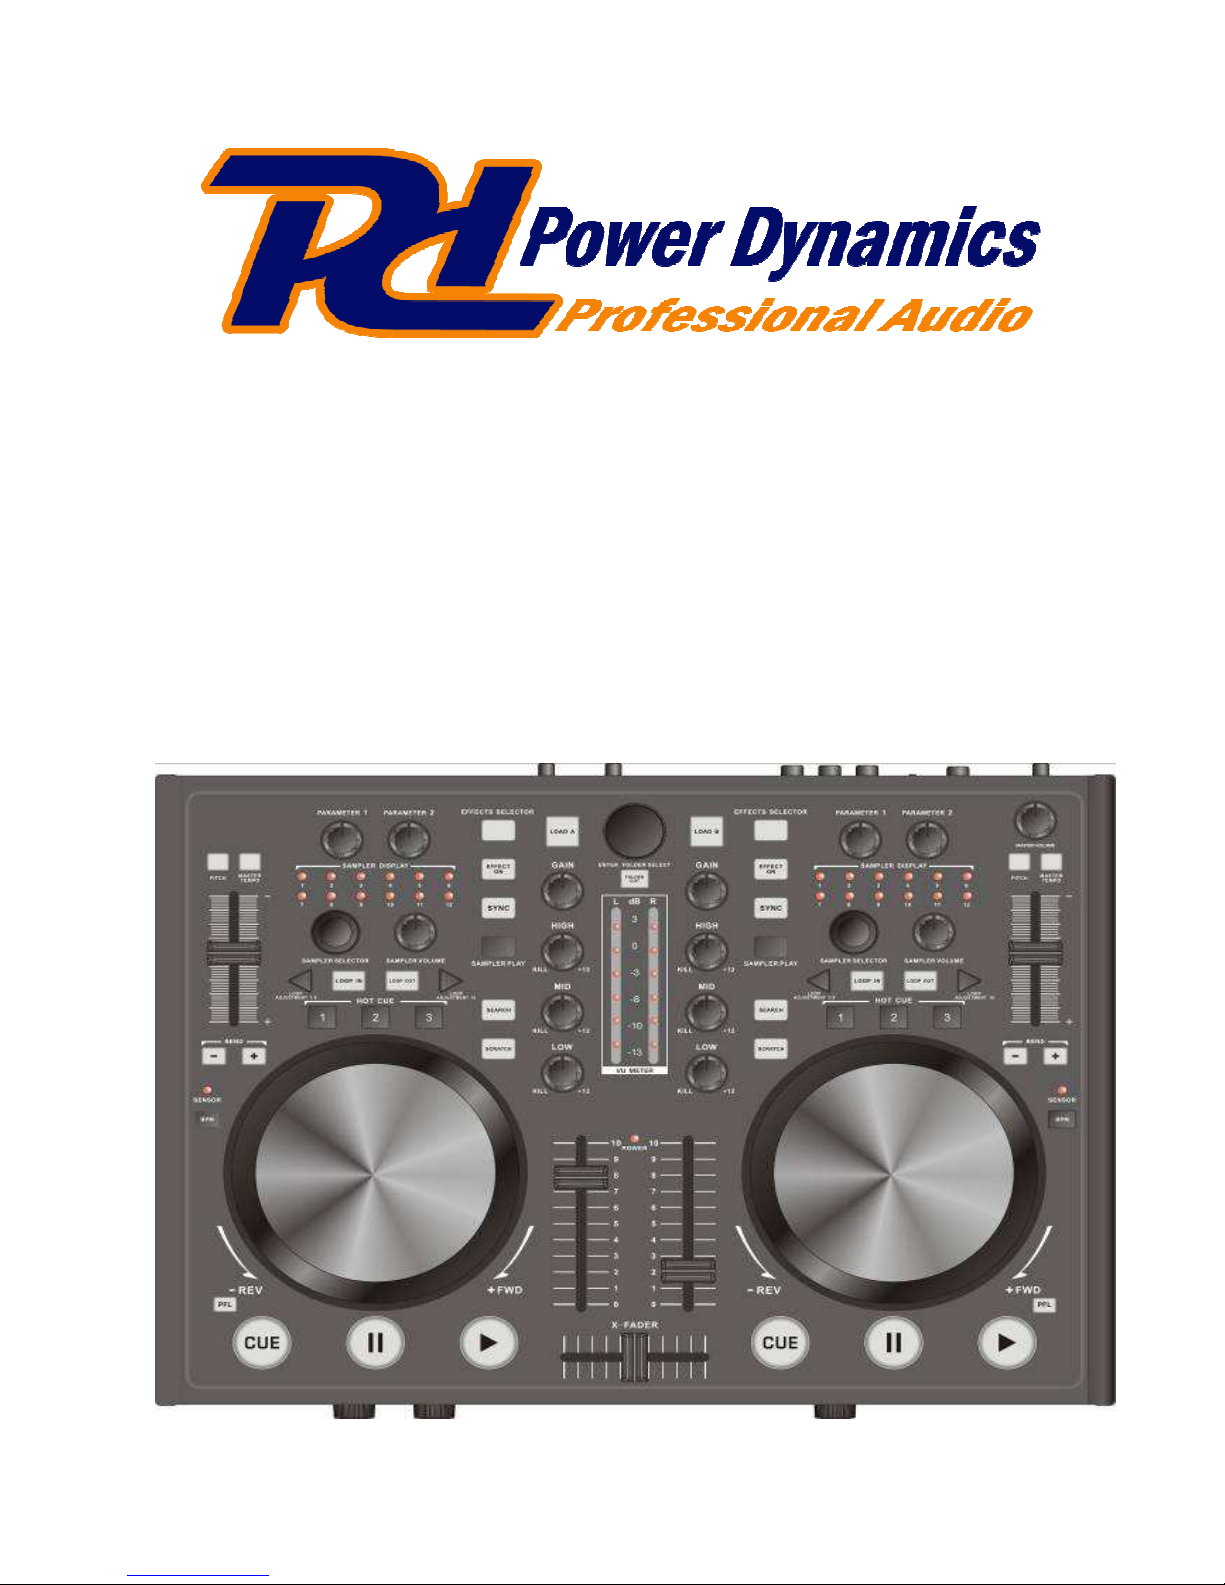
USB DJ CONTROLLER
USERS MANUAL
GEBRAUCHSANWEISUNG
HANDLEIDING

1. WARNING SAFETY INSTRUCTIONS
1. Read this instruction manual carefully before operating unit for the first time.
2. Keep this instruction manual for reference.
3. Follow all instructions carefully.
4. Do not use this apparatus near water.
5. Clean only with a dry cloth.
6.Do not block any ventilation openings.Install in accordance with manufacturer’s instructions.
7. Do not install near any heat sources such as radiators,registers,stoves,or other apparatus
(including amplifiers)that produce heat.
8. Only use attachments and accessories specified by the manufacturer.
9.Use only with the cart, stand,tripod,bracket,or table specified by the manufacturer,or sold
with the apparatus.When a cart is used,use caution when moving the cart/apparatus
combination to avoid injury from tip-over.
10.Unplug this apparatus during lightning storms or when unused for long periods of time.
11.Refer all servicing to qualified service personnel.Servicing is required when the apparatus
has been spilled or objects have fallen into the apparatus,the apparatus has been exposed
to rain or moisture,does not operate normally,or has been dropped.
12.If rack-mounting,provide adequate ventilation.Equipment may be located above orbelow
this apparatus,but some equipment(like large power amplifiers) may cause an unacceptable
amount of hum or may generate too much heat and degrade the performance of this
apparatus.
WARNING:To reduce the risk of fire or electric shock,do not expose this apparatus
to rain or moisture. Apparatus shall not be exposed to dripping or splashing and no
object filled with liquids,such as vases,shall be placed on the apparatus.
2
22
2.
..
. DESCRIPTION
DESCRIPTION DESCRIPTION
DESCRIPTION
Features
Features Features
Features
•Play, mix and scratch digital audio like vinyl records
•Compatible to any MIDI controlled audio software, all MIDI controllers can be edited and freely
assigned
•Optimized for control of the powerful audio and video mixing software Virtual DJ
•Supplied with Virtual DJ 7 Limited Edition, can be upgraded at discount price
•Supports all standard codecs, e.g. MP3, WAV, WMA, OGG, M4A, AAC, AVI, MPEG
•2-channel mixer section:
•3-band EQ, gain control and level fader per channel
•Ultra-smooth crossfader with adjustable curve
•Cue function with 3 hot cues
•LED level display
•Extra large track encoder for quick music library browsing
•Dual player section:
•Touch-sensitive jog dials with mode selector: pitch bend, scratch, fast search
•Automatic beat detection and beat mixing
•Beat-accurate loops and samples
•Master Tempo (tonal pitch remains constant)
•Effect units with controls for selection and parameters
•Sample players with LED display, and controls for selection and level
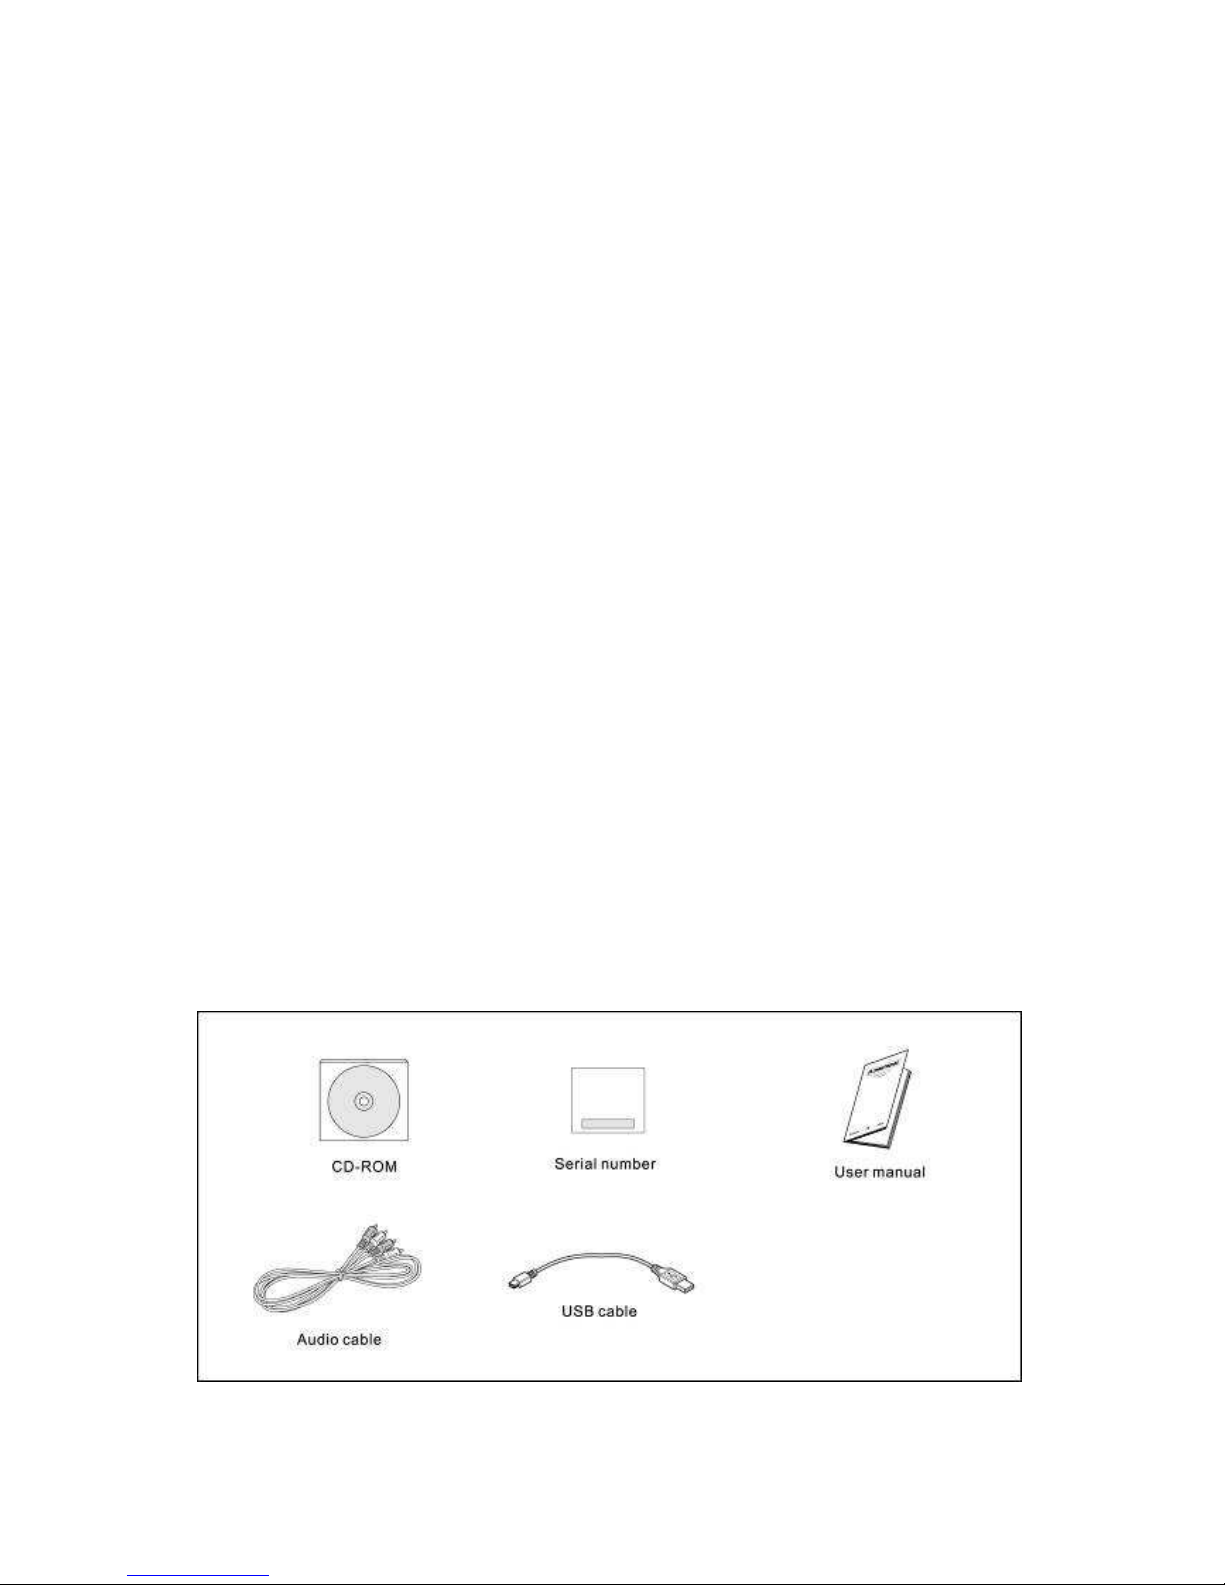
•Powered via USB or included PSU Incl. USB cable
•Fully functional home version of the software available under virtualdj.com
•Minimum system requirements PC: Windows XP(SP2), Vista and 7 (32-bit/64-bit), Pentium IV, 1.6
GHz processor, 1 GB RAM or better
•Minimum system requirements Mac: OS X 10.4.11, Core Duo, 1.66 GHz processor, 1 GB RAM or
better.
Supplied accessories
Supplied accessoriesSupplied accessories
Supplied accessories
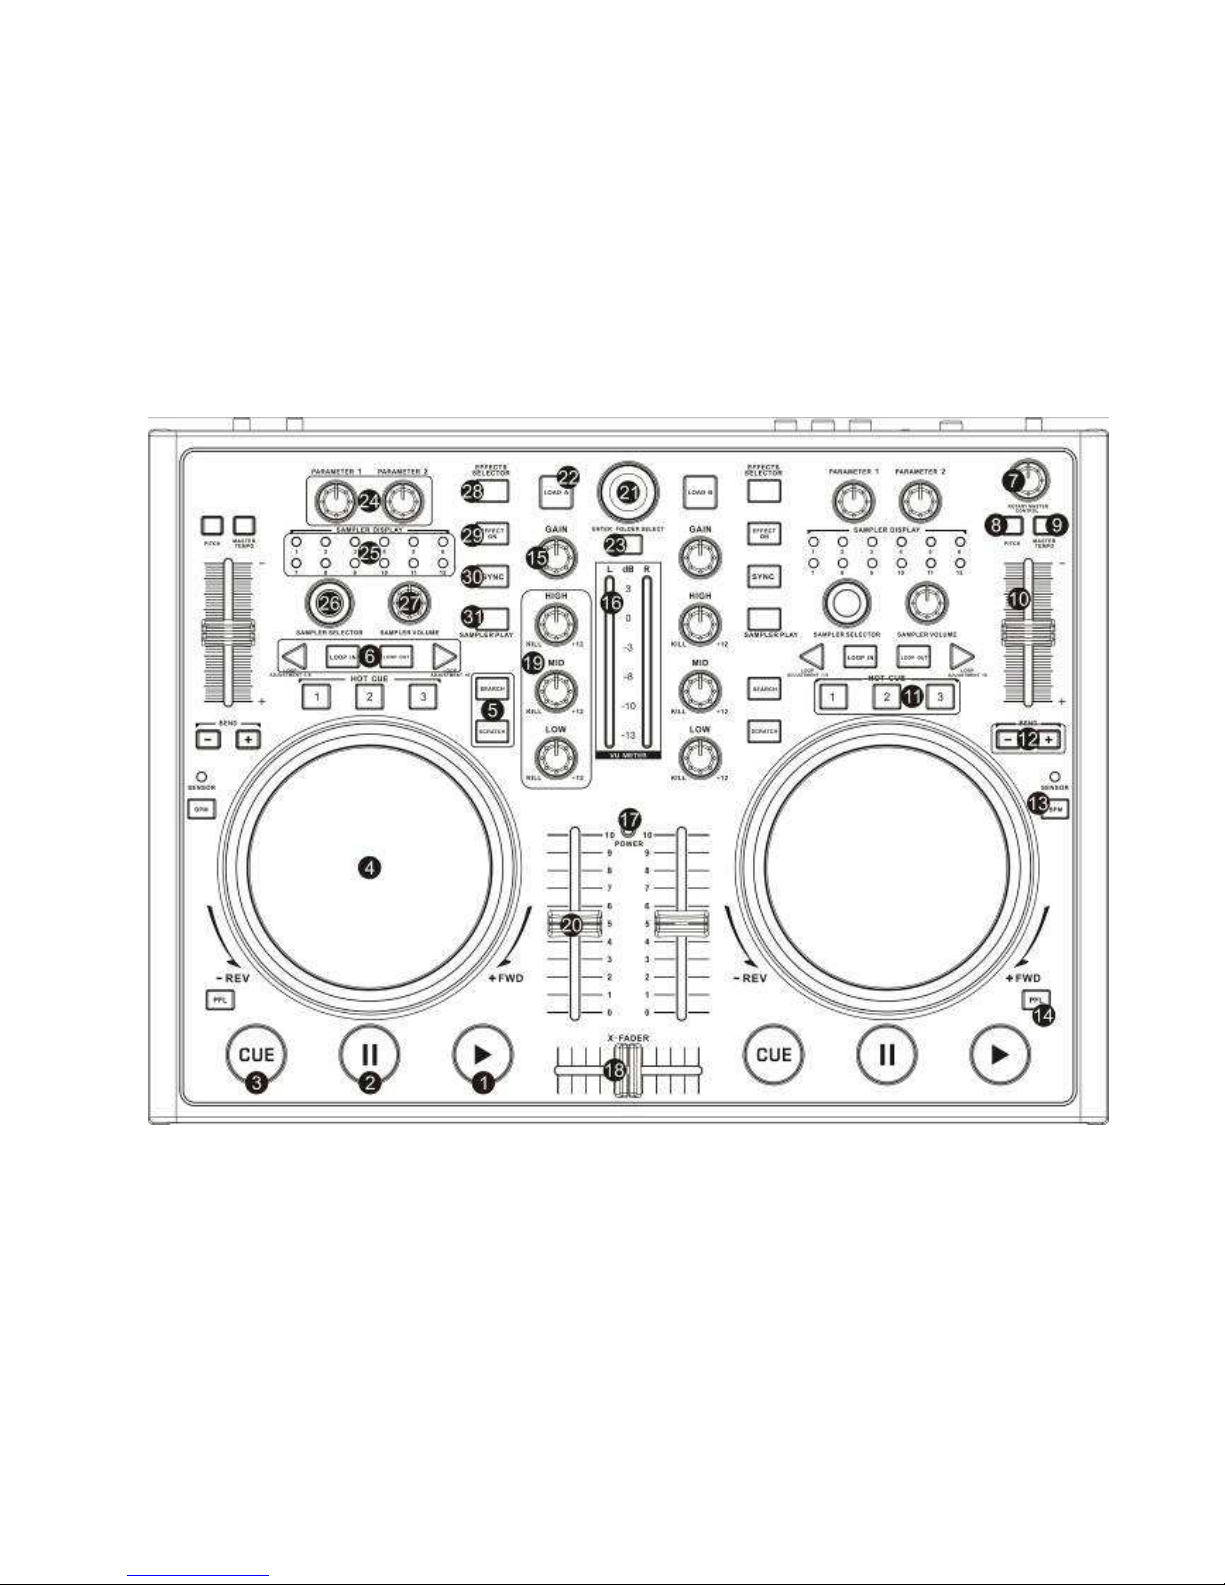
Operating elements and connections of the controller
The functions of the control elements described below apply when using the MIDI5 with the
supplied DJ software Virtual DJ LE which is designed to integrate seamlessly with the
controller.
The MIDI5 uses the MIDI data control and can therefore also be used for other MIDI controlled
audio software
OVERVIEW
1 Button ►[PLAY]
To start playback and for stutter effects.
2 Button II [PAUSE]To switch to pause and to
jump to cue points.
3 Button CUE
For return to the beginning of the title or a cue
point defined before (the unit is in pause mode).
When keeping the button pressed in pause mode,
the title is momentarily played. As soon as you
release the button the unit instantly returns to the
cue point.
4 Jogdial
In play mode for the function pitch bend (as with
the buttons [PITCH BEND +/–]).
If the fast search mode is activated (button
[SEARCH] lights), for fast forward and reverse
within a title.
If the scratch function is activated (button
[SCRATCH] lights), for generating scratch
effects.
The control LED [SENSOR] lights up, as soon as
the [Jogdial] is actuated.

5 Buttons SEARCH and SCRATCH
Determine the operating mode of the jogdials:
button [SEARCH]: switches fast forward and
reverse on and off
button [SCRATCH]: switches the scratch function
on and off
6 Buttons LOOP IN, OUT and ADJ
Buttons for playing a continuous loop
synchronized to the beat:
button [IN]: Sets the starting point of a loop.
button [OUT]: Sets the end point of a loop which
is instantly started. The loop will continue to play
until the button is pressed once again.
buttons [LOOP ADJ]: Set the length of the loop to
exactly 1, 2, 4, 8, 18 or 32 beats.
7 Control MASTER CONTROL
Adjusts the overall volume.
8 Button MASTER TEMPO
For constant pitch when the speed has been
changed with the [pitch slide control].
9 Button PITCH
For selecting the pitch adjustment range. Each
push of the button switches between ±100 %, ±6
%, ±12 % and ±25 %.
10 Pitch slide control Sets the speed (if the button
[MASTER TEMPO] lights up, the tonal pitch will
not be changed). Slide the control up to decrease
the pitch, slide it down to increase it. The pitch
percentage is indicated in the display.
11 Buttons HOT CUE 1-3
To store and to call up to three cue points per title.
13 Button BPM
Sets the number of beats per minute (BPM) of a
title manually. For this press the button several
times to the beat of the music.
12 Buttons PITCH BEND + and –
The function Pitch Bend creates a temporary
change of speed. As long as the buttons are
pressed, the title is played slower or faster.
14 Button PFL
For prefader listening of the channel.
15 Control GAIN
Adjusts the input amplification.
16 LED level meter L/R
6-digit LED meter of the stereo master signal
within the range of -13 dB to +3 dB.
17 Power indicator
18 Crossfader
For crossfading between Deck A and Deck B. In
mid-position both decks can be heard at the
same volume.
19 Tone controls
3-band equalizer (HIGH, MID, LOW).
20 Channel fader
Adjusts the channel level.
21 Track encoder
Turn the encoder to browse folder and titles in
the browser section
Press the encoder to select a folder and access
titles
22 Button LOAD A
To load the title selected in the browser section
into Deck A.
23 Button FOLDER SELECT
Activates the browser section after powering on
Opens and closes folders
24 Controls PARAMETER 1 and PARAMETER 2
Adjust the parameters for the selected effect.
25 Indicators SAMPLE DISPLAY
Indicate the selected samples.
26 Control SAMPLE SELECTOR
For selecting samples.
27 Control SAMPLER LEVEL
For adjusting level of the sample selected.
28 Button EFFECT SELECTOR
For selecting an effect.
29 Button EFFECT ON
Switches the selected effect on and off. With the
effect activated, the LED will light up.
30 Button SYNC
To synchronize the beats per minute to the other
deck.
31 Button SAMPLER PLAY
To start the sample selected.
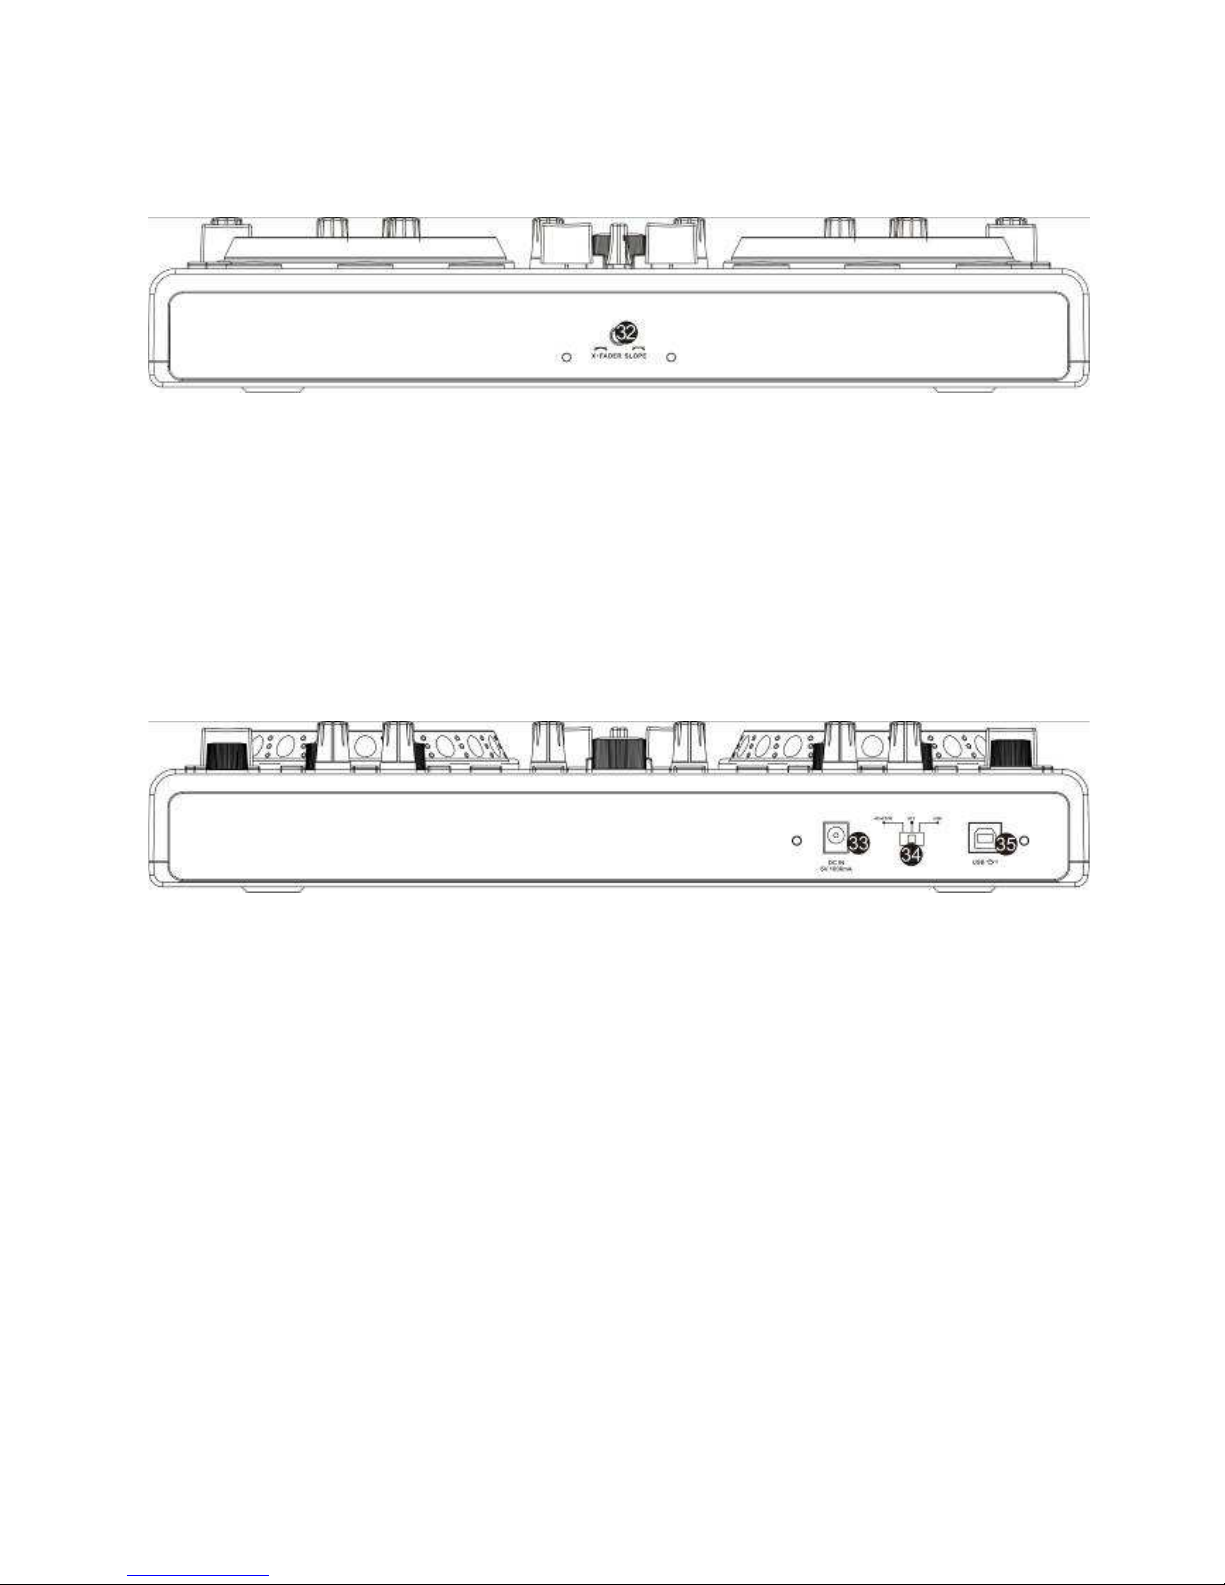
FRONT PANEL
32 Control X-FADER CURVE
Adjusts the characteristic of the crossfader:
left position: smooth crossfading (gradual
transition) e.g. for long mixes
right position: sharp crossfading (abrupt
transition)
e.g. for scratching and cutting.
Note
Do not use this control while a signal is present
as this may cause a sudden change in volume.
BACK PANEL
33 Power input
For connecting the included power unit
alternatively to power supply via the USB
connection.
34 Power selector switch
position [ADAPTOR]: power supply is via the
included power unit
position [OFF]: controller is powered off
position [USB]: power supply is via the USB
connection
35 USB port
USB jack type B for connecting a computer. The
controller sends and receives audio and MIDI data via
the USB connection and is supplied with power.
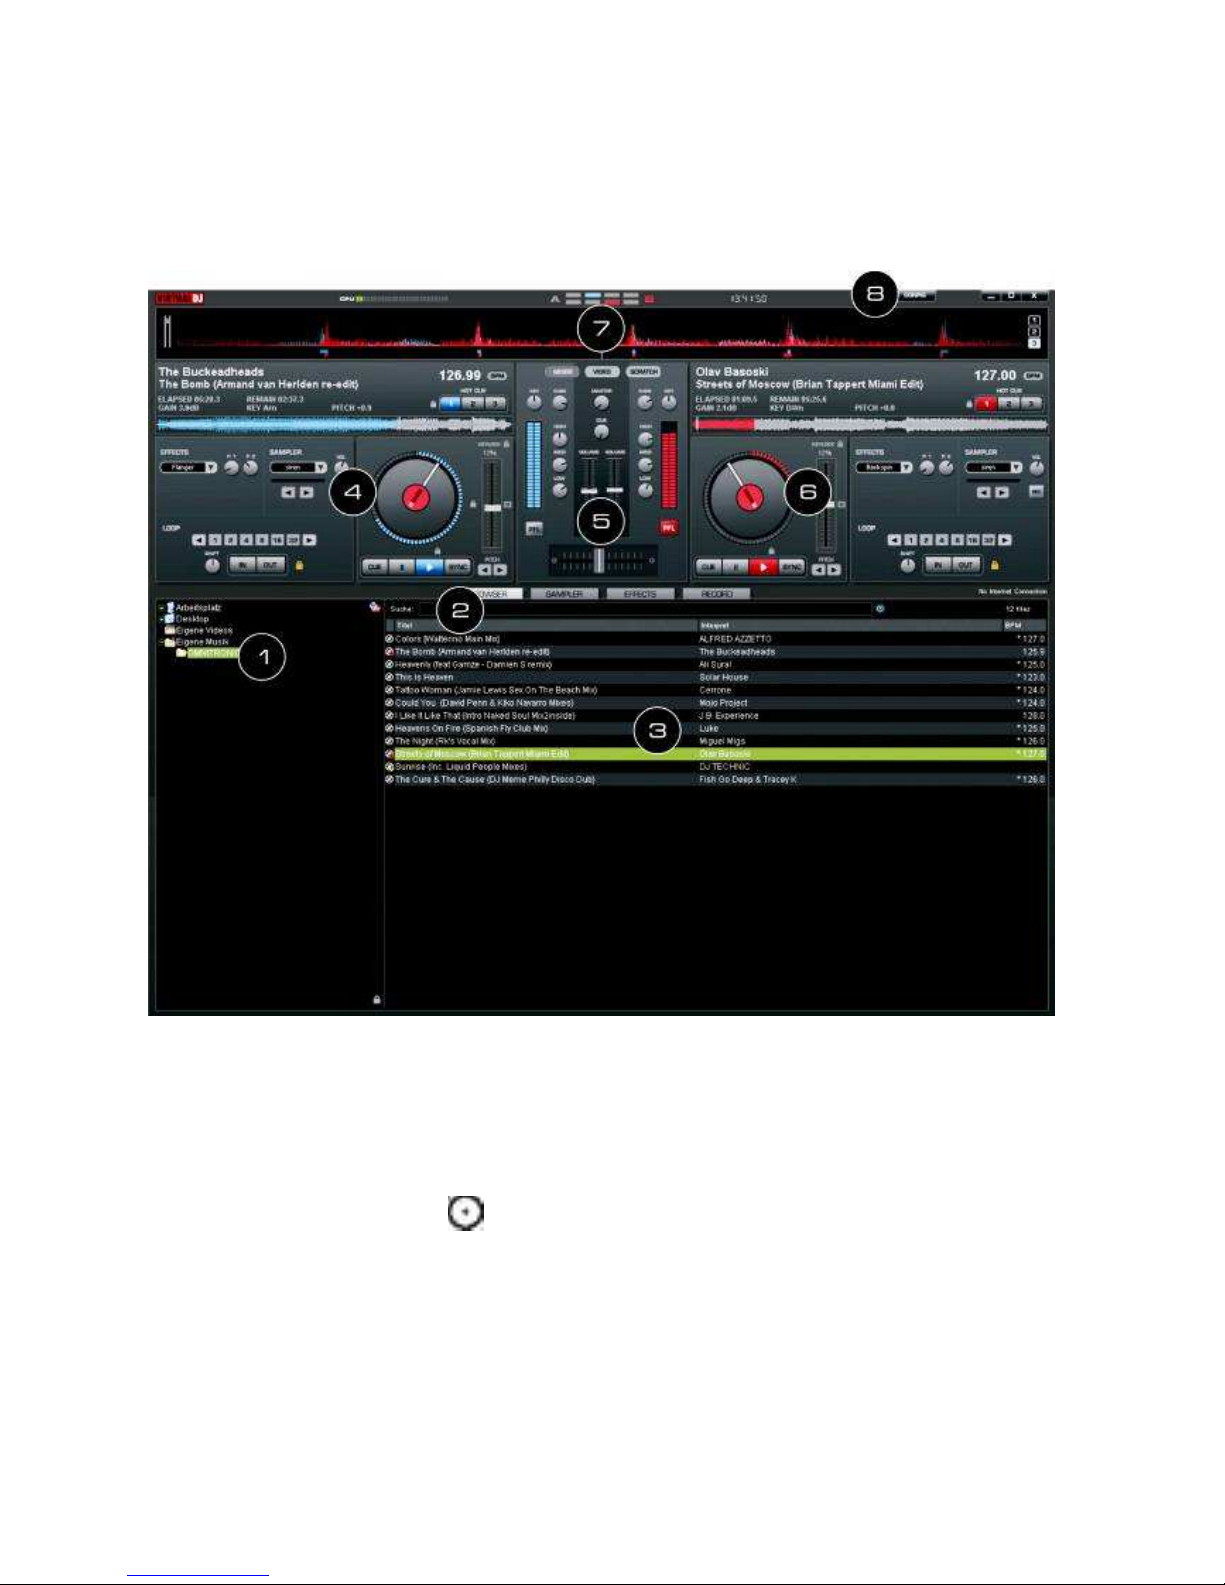
3. VIRTUAL DJ LE
Similar to the controller the software's user interface is split up into several sections: on the top of the screen
you will see the rhythm window and the access button to the configuration menu. Underneath are the decks
on the right and left side, which are separated by the mixer section in the middle. On the bottom half, the
browser section is displayed.
1 Browser section
Lists all compatible drives and folders of the
computer in a tree structure.
2 Search field
For searching titles in the data base of the
computer. Via the selector button [ ]several
search criteria can be selected.
3 File and search result window
Lists all files of the selected folder or displays the
search results.
4 Control panel Deck A
5 Mixer section
Switchable to video or scratch mode.
6 Control panel Deck B
7 Rhythm window
8 Button CONFIG
For calling the configuration menu.
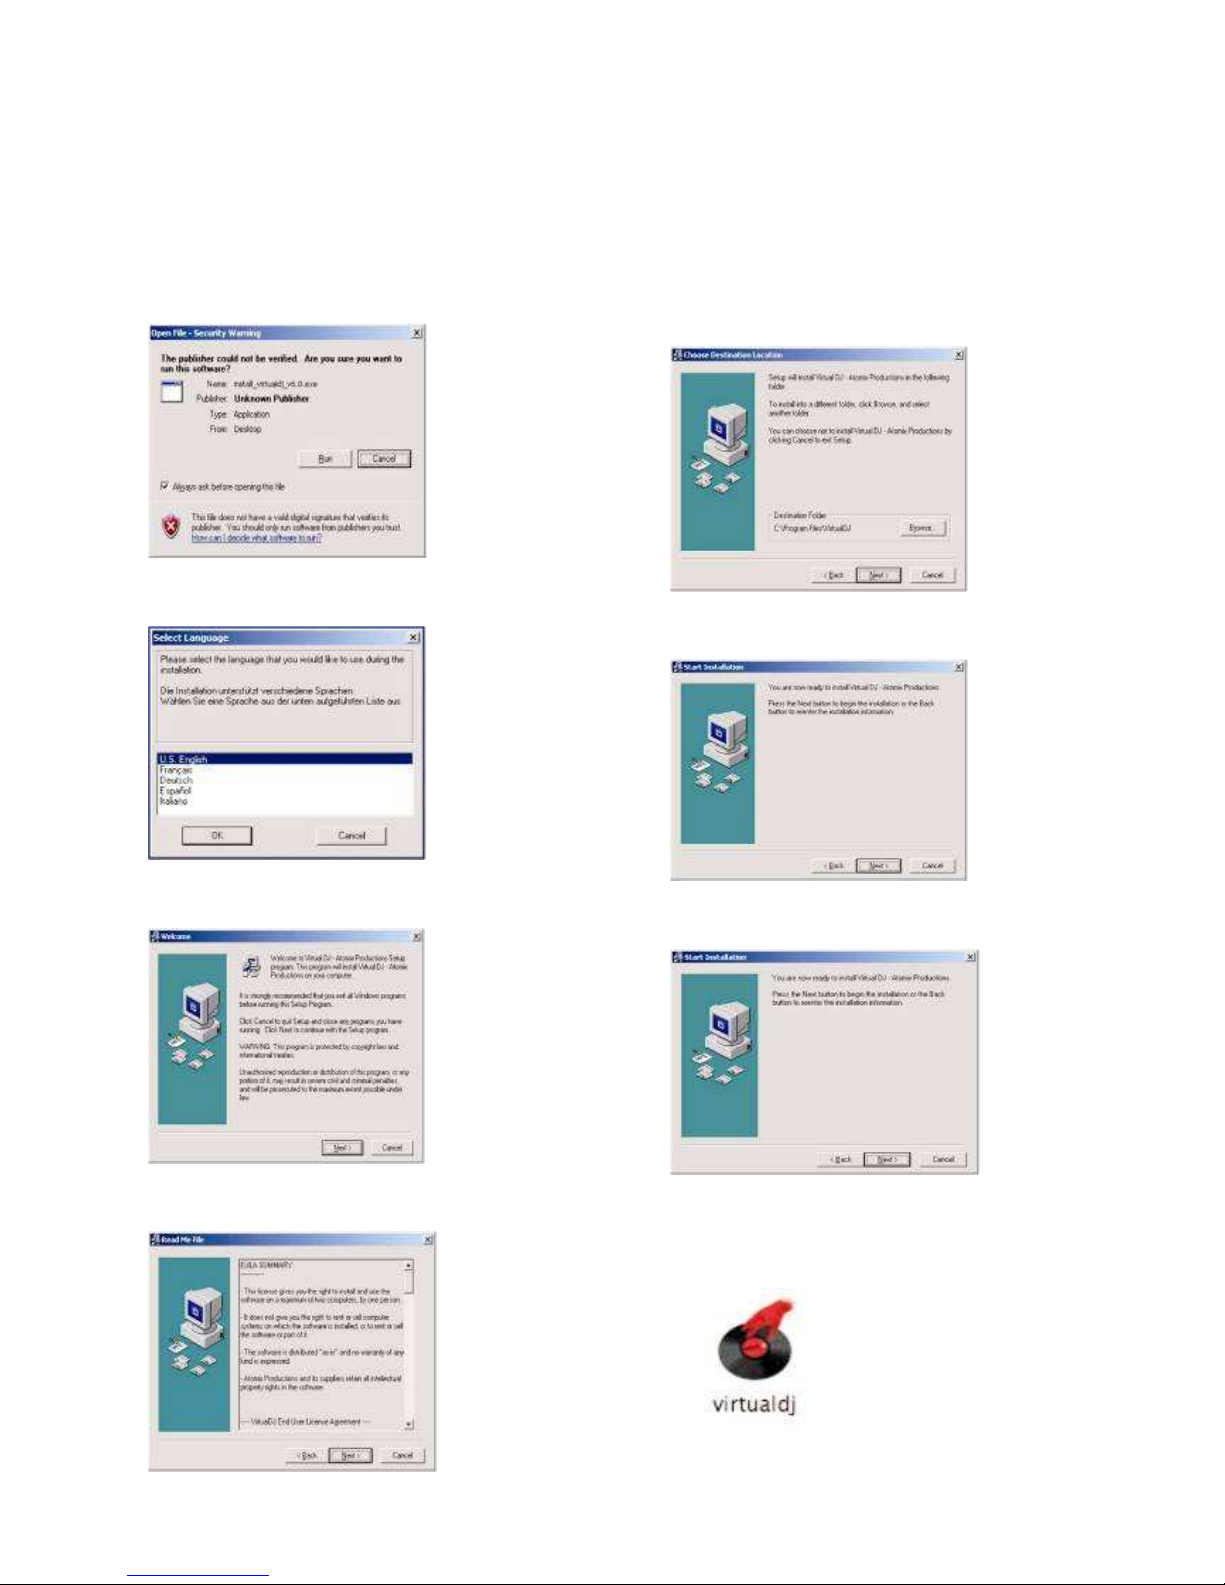
3.1 Installing the software
Insert the CD-ROM with the software into the CD drive of your computer. After reading in the CD the
automatic installation routine should start. If not, browse the CD-ROM and click the file
[install_virtualdj¬v7.exe] under Windows or [install_virtualdj-v7.dmg] under Mac. Then follow the
instructions of the installation program.
3.2 Installation under Windows
1 Allow the installation to run
2 Select your language
3 The welcome screen is displayed
4 Read and accept the license agreement
5 Enter the application path
6 Start copying files
7 Finish the installation
Now the software is installed on your computer
and you should find an icon on your desktop for
opening Virtual DJ.
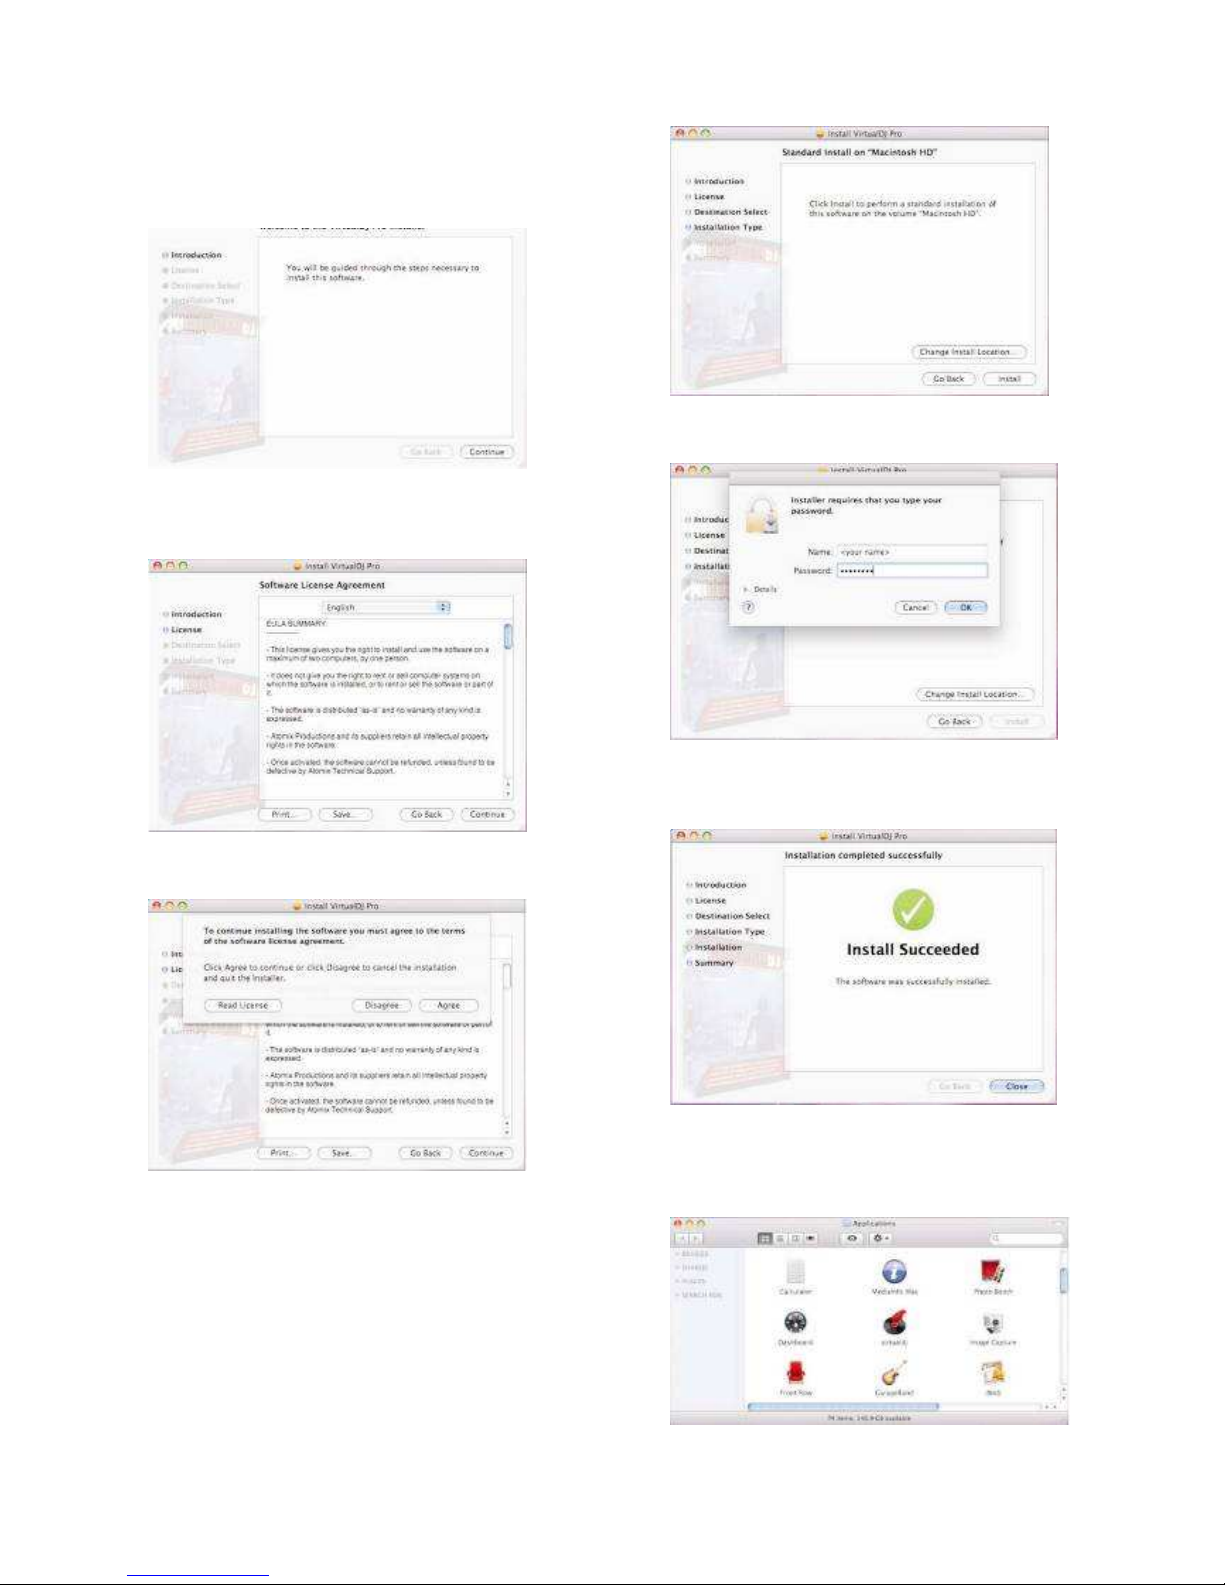
3.3 Installation under Mac
1 Click [Continue] to begin the installation
2 Click [Continue] after reading the License
Agreement
3 Click [Agree] to accept the License Agreement
4 Click [Install] to preform the installation
5 Enter your system's password for installations
6 Files will now copy onto your system
7 Click Close to finish the installation
Now the software is installed on your computer
and you should find an icon in your Applications
folder for opening Virtual DJ.
3.4 Activating the software
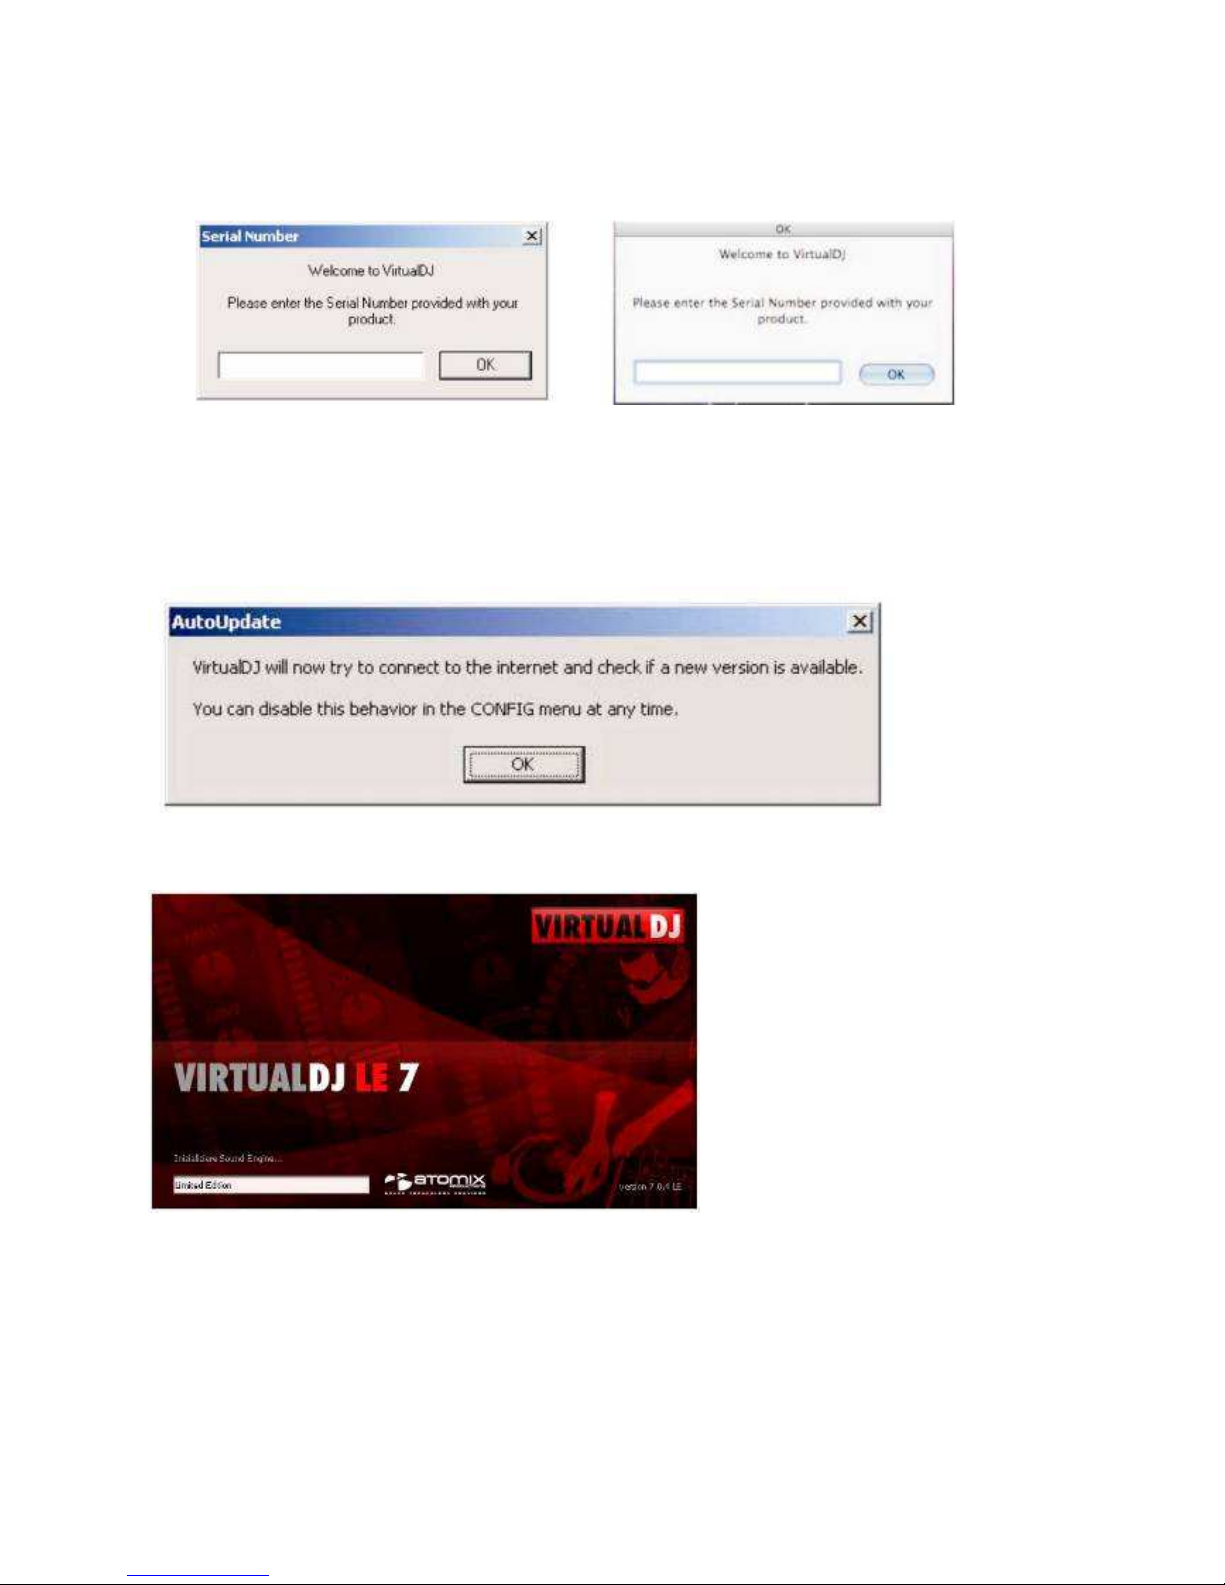
Connect the controller to your computer and start the software. Enter the serial number supplied with the
CD-ROM to activate the software.
Note
• Keep both the serial number and the installation CD in a safe place, since both the serial number and the
installation CD are required if you re-install your system, or change your computer.
1 The Auto Update indication comes on: Virtual DJ will now try to connect to the internet to check if a new
version of the software is available.
2 The initialization screen is shown and the program is opened.
This manual suits for next models
1
Table of contents
Languages:
Other Power Dynamics Dj Equipment manuals