PJLink CP-CX300WN User manual
1
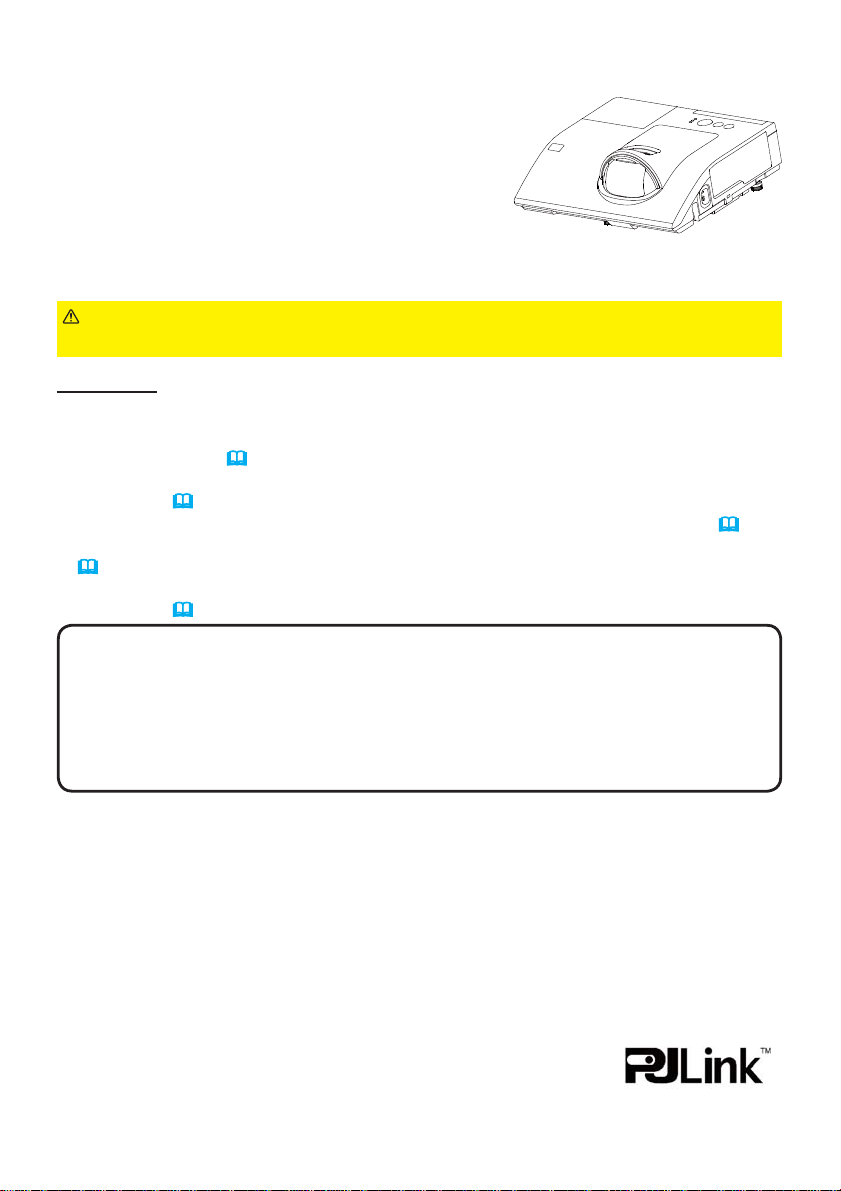
Projector
User's Manual (detailed)
Network Guide
Thank you for purchasing this product.
This manual is intended to explain only the network function. For proper use of this
product, please refer to this manual and the other manuals for this product.
Features
This projector has the network function that brings you the following main features.
Ź%HIRUHXVLQJWKLVSURGXFWEHVXUHWRUHDGDOOPDQXDOVIRUWKLV
product. After reading them, store them in a safe place for future reference.
WARNING
7KHLQIRUPDWLRQLQWKLVPDQXDOLVVXEMHFWWRFKDQJHZLWKRXWQRWLFH
7KHLOOXVWUDWLRQVLQWKLVPDQXDODUHIRULOOXVWUDWLYHSXUSRVHV7KH\PD\GLIIHU
slightly from your projector.
7KHPDQXIDFWXUHUDVVXPHVQRUHVSRQVLELOLW\IRUDQ\HUURUVWKDWPD\DSSHDULQ
this manual.
7KHUHSURGXFWLRQWUDQVIHURUFRS\RIDOORUDQ\SDUWRIWKLVGRFXPHQWLVQRW
permitted without express written consent.
NOTE
Trademark acknowledgment
9Network Presentation : allows the projector to project computer images transmitted
through a network (15).
9Web Control : allows you to monitor and control the projector through a network from
a computer (16).
9My Image : allows the projector to store up to four still images and project them (50).
9Messenger : allows the projector to display text sent from a computer through a network
(51).
9Network Bridge DOORZV\RXWRFRQWURODQH[WHUQDOGHYLFHWKURXJKWKHSURMHFWRUIURP
a computer (52).
Microsoft
®
, Internet Explorer
®
, Windows
®
, Windows Vista
®
are registered trademarks of
Microsoft Corporation in the U.S. and/or other countries.
$GREH®and Flash®are registered trademarks of Adobe Systems Incorporated.
3HQWLXP®is a registered trademark of Intel Corporation.
-DYD6FULSW®is a registered trademark of Sun Microsystems, Inc.
+'0,WKH+'0,ORJRDQG+LJK'H¿QLWLRQ0XOWLPHGLD,QWHUIDFHDUHWUDGHPDUNVRU
UHJLVWHUHGWUDGHPDUNVRI+'0,/LFHQVLQJ//&LQWKH8QLWHG6WDWHVDQGRWKHUFRXQWULHV
&UHVWURQ®&UHVWURQH&RQWURO®H&RQWURO®, Crestron RoomView®and RoomView®are
trademarks or registered trademarks of Crestron Electronics, Inc. in the United States and
other countries.
7UDGHPDUN3-/LQNLVDWUDGHPDUNDSSOLHGIRUWUDGHPDUNULJKWVLQ
-DSDQWKH8QLWHG6WDWHVRI$PHULFDDQGRWKHUFRXQWULHVDQGDUHDV
$OORWKHUWUDGHPDUNVDUHWKHSURSHUWLHVRIWKHLUUHVSHFWLYHRZQHUV
CP-CX300WN/CP-CW250WN/
CP-CW300WN

2
Contents
Contents
Caution .......................................................................................... 4
1. Connection to the network ...................................................... 5
1.1 System requirements ................................................................................. 5
1.1.1 Required equipment preparation ..................................................................................... 5
+DUGZDUHDQGVRIWZDUHUHTXLUHPHQWIRUFRPSXWHU .......................................................... 5
0DQXDOQHWZRUNFRQQHFWLRQVHWWLQJ:LUHG/$1 ...................................... 7
1.2.1 Equipments connection .................................................................................................... 7
1HWZRUNVHWWLQJV .............................................................................................................. 7
1.2.3 “Internet Option” setting ................................................................................................. 10
0DQXDOQHWZRUNFRQQHFWLRQVHWWLQJ:LUHOHVV/$1............................... 11
3UHSDUDWLRQIRUZLUHOHVV/$1FRQQHFWLRQ....................................................................... 11
:LUHOHVV/$1FRQQHFWLRQVHWXS .................................................................................... 12
2. Network Presentation ............................................................. 15
3. Web Control ............................................................................ 16
3URMHFWRU:HE&RQWURO ...............................................................................17
/RJRQ ............................................................................................................................. 17
1HWZRUN,QIRUPDWLRQ....................................................................................................... 18
1HWZRUN6HWWLQJV............................................................................................................ 19
3RUW6HWWLQJV .................................................................................................................. 22
3.1.5 Mail Settings .................................................................................................................. 24
3.1.6 Alert Settings .................................................................................................................. 25
3.1.7 Schedule Settings .......................................................................................................... 27
'DWH7LPH6HWWLQJV......................................................................................................... 30
3.1.9 Security Settings ............................................................................................................ 32
3URMHFWRU&RQWURO .......................................................................................................... 33
3.1.11 Remote Control ............................................................................................................ 39
3URMHFWRU6WDWXV ........................................................................................................... 40
1HWZRUN5HVWDUW ........................................................................................................... 41
&UHVWURQH&RQWURO®.................................................................................. 42
3.2.1 Main window .................................................................................................................... 43
3.2.2 Tools window ................................................................................................................... 45
3.2.3 Info window ..................................................................................................................... 47
+HOS'HVNZLQGRZ........................................................................................................... 48
3.2.5 Emergency Alert .............................................................................................................. 49
4. My Image Function ................................................................. 50
5. Messenger Function ............................................................... 51

3
Contents
6. Network Bridge Function ....................................................... 52
&RQQHFWLQJGHYLFHV .................................................................................. 52
6.2 Communication setup ............................................................................... 53
6.3 Communication port ................................................................................. 53
6.4 Transmission method ............................................................................... 54
+$/)'83/(; .............................................................................................................. 54
)8//'83/(;............................................................................................................... 55
7. Other Functions ...................................................................... 56
(PDLO$OHUWV ............................................................................................. 56
3URMHFWRU0DQDJHPHQWXVLQJ6103 ........................................................ 58
(YHQW6FKHGXOLQJ ..................................................................................... 59
&RPPDQG&RQWUROYLDWKH1HWZRUN .......................................................... 62
7.5 Crestron RoomView®.................................................................................67
8. Troubleshooting ..................................................................... 68
9. Warranty and after-sales service .......................................... 69

4
7RXVHWKHZLUHOHVVQHWZRUNIXQFWLRQRIWKLVSURMHFWRUWKHGHVLJQDWHG86%ZLUH
less adapter that is sold as an option is required. For precautions according to
the standards and laws, refer to the documents that come with the adapter.
[Restriction on plugging and unplugging the USB wireless adapter]
%HIRUH\RXLQVHUWRUSXOORXWWKH86%ZLUHOHVVDGDSWHUIURPWKHSURMHFWRUWXUQRII
the power of the projector and pull out the power cord’s plug from the outlet.
'RQRWWRXFKWKH86%ZLUHOHVVDGDSWHUWKDWLVFRQQHFWHGWRWKHSURMHFWRUZKLOH
WKHSURMHFWRULVUHFHLYLQJ$&SRZHU
'RQRWXVHDQ\H[WHQVLRQFDEOHRUGHYLFHZKHQFRQQHFWLQJWKHDGDSWHUWRWKHSURMHFWRU
[Security precautions when using wireless LAN]
,WLVUHFRPPHQGHGWKDWVHFXULW\VHWWLQJVVXFKDV66,'DQG(1&5<37,21DUH
VSHFL¿HGZKHQXVLQJZLUHOHVV/$1FRPPXQLFDWLRQ,IWKHVHFXULW\VHWWLQJVDUHQRW
VSHFL¿HGWKHFRQWHQWVPD\EHLQWHUFHSWHGRULWPD\FDXVHXQDXWKRUL]HGDFFHVV
WRWKHV\VWHP)RUGHWDLOVRQZLUHOHVV/$1VHFXULW\VHWWLQJVUHIHUWR3.1 Projector
Web Control or NETWORK menu in the Operating Guide.
CAUTION
Caution
Caution
Ź7KHRSWLRQDO,(((EJQ86%ZLUHOHVVDGDSWHUXVHV
WKH*+]UDGLRIUHTXHQF\EDQG<RXGRQRWQHHGDUDGLROLFHQVHWRXVHWKH
adapter, but you should be aware of the following:
'212786(1($57+()2//2:,1*
0LFURZDYHRYHQV
,QGXVWULDOVFLHQWL¿FRUPHGLFDOGHYLFHV
'HVLJQDWHGORZSRZHUUDGLRVWDWLRQV
3UHPLVHVUDGLRVWDWLRQV
8VLQJWKH86%ZLUHOHVVDGDSWHUQHDUWKHDERYHPD\FDXVHUDGLRLQWHUIHUHQFH
which would result in a decrease in transmission speed or interruption, and
HYHQOHDGWRPDOIXQFWLRQLQJRIGHYLFHVVXFKDVSDFHPDNHUV
'HSHQGLQJRQWKHORFDWLRQZKHUHWKH86%ZLUHOHVVDGDSWHULVXVHGUDGLRZDYH
interference may occur, which may result in a decrease in transmission speed
RULQWHUUXSWLRQLQFRPPXQLFDWLRQ,QSDUWLFXODUSOHDVHEHDZDUHWKDWXVLQJWKH86%
wireless adapter at locations where there is reinforced steel, other types of
PHWDOVRUFRQFUHWHLVOLNHO\WRFDXVHUDGLRZDYHLQWHUIHUHQFH
$YDLODEOH&KDQQHOV
7KH86%ZLUHOHVVDGDSWHUXVHVWKH*+]UDGLRIUHTXHQF\EDQGEXW
depending on the country or region you are in, the channels that you can use
PLJKWEHOLPLWHG3OHDVHFRQVXOW\RXUGHDOHUIRULQIRUPDWLRQRQWKHXVDEOH
channels.
%ULQJLQJWKHRSWLRQDO86%ZLUHOHVVDGDSWHURXWRIWKHFRXQWU\RUUHJLRQ\RX
UHVLGHLQDQGXVLQJLWWKHUHFRXOGOHDGWRDYLRODWLRQRIWKHUDGLRODZVRIWKDW
country or region.

5
1. Connection to the network
1.1 System requirements
1. Connection to the network
The following equipments are required to connect the projector to your computer
through the network.
Ŷ&RPPRQ The projector: 1 unit, Computer : minimum 1 set
Ŷ'HSHQGLQJRQKRZ\RXZDQWWRFRQQHFW
1) For the wired connection *1
/$1FDEOH&$7RUJUHDWHUSLHFH
2) For the wireless connection *2
3URMHFWRUVLGH
IEEE802.11b/g/n 86%ZLUHOHVVDGDSWHU (option: 86%:/1): 1 unit
&RPSXWHUVLGH
,(((EJQZLUHOHVV/$1HTXLSPHQWXQLWIRUHDFK*3
To connect your computer to the projector and use the network function of
he projector, your computer needs to meet the following requirements.
1.1.1 Required equipment preparation
1.1.2 Hardware and software requirement for computer
9OS: One of the following.
Windows ®;3+RPH(GLWLRQ3URIHVVLRQDO(GLWLRQ
Windows Vista ®+RPH%DVLF+RPH3UHPLXP%XVLQHVV8OWLPDWH(QWHUSULVH
Windows ®6WDUWHU+RPH%DVLF+RPH3UHPLXP3URIHVVLRQDO8OWLPDWH
Enterprise
Windows ®8
Windows ®3UR(QWHUSULVH
9CPU3HQWLXP*+]RUKLJKHU
9Graphic cardELW;*$RUKLJKHU
:KHQXVLQJWKH³/LYH9LHZHU´LWLVUHFRPPHQGHGWKDWWKHGLVSOD\UHVROXWLRQRI
your computer is set to 1024 x 768.
9Memory0%RUKLJKHU
9Hard disk space0%RUKLJKHU
9Web browser: Internet Explorer ®6.0 or higher
9&'520'9'520GULYH
*1: The system for using the network function of the projector requires
FRPPXQLFDWLRQHQYLURQPHQWFRQIRUPLQJ%DVH7;RU%DVH7
*2:$QDFFHVVSRLQWLVUHTXLUHGZKHQWKHZLUHOHVV/$1FRQQHFWLRQLVXVHGDV
Infrastructure mode.
*3:'HSHQGLQJRQWKHW\SHRIZLUHOHVVQHWZRUNGHYLFHDQGFRPSXWHU\RXDUHXVLQJ
the projector may not be able to communicate properly with your computer,
HYHQLIWKHFRPSXWHULVHTXLSSHGZLWKDEXLOWLQZLUHOHVV/$1IXQFWLRQ
7RHOLPLQDWHFRPPXQLFDWLRQSUREOHPVSOHDVHXVHD:L)LFHUWL¿HGZLUHOHVV
QHWZRUNGHYLFH

6
1. Connection to the network
1.1 System requirements (continued)
7KHQHWZRUNFRPPXQLFDWLRQFRQWUROLVGLVDEOHGZKLOHWKHSURMHFWRULV
LQVWDQGE\PRGHLIWKH67$1'%<02'(LWHPLVVHWWR6$9,1*3OHDVHFRQQHFW
WKHQHWZRUNFRPPXQLFDWLRQWRWKHSURMHFWRUDIWHUVHWWLQJWKH67$1'%<02'(
WR1250$/SETUP menu in the Operating Guide).
<RXFDQJHWWKHODWHVWYHUVLRQRIWKHDSSOLFDWLRQVIRUWKHQHWZRUNIXQFWLRQVRI
the projector and the latest information for this product from the website. (Refer
to the User's Manual. (concise))
NOTE

7
1. Connection to the network
(continued on next page)
1.2 Manual network connection setting - Wired LAN -
1.2.1 Equipments connection
1.2.2 Network setting
This section explains how to set it up manually.
&RQQHFWWKHSURMHFWRUDQGDFRPSXWHUZLWKD/$1FDEOH
%HIRUHFRQQHFWLQJZLWKDQH[LVWLQJQHWZRUNFRQWDFWWKHQHWZRUNDGPLQLVWUDWRU
1H[WFKHFNWKHIROORZLQJFRPSXWHUVHWWLQJV
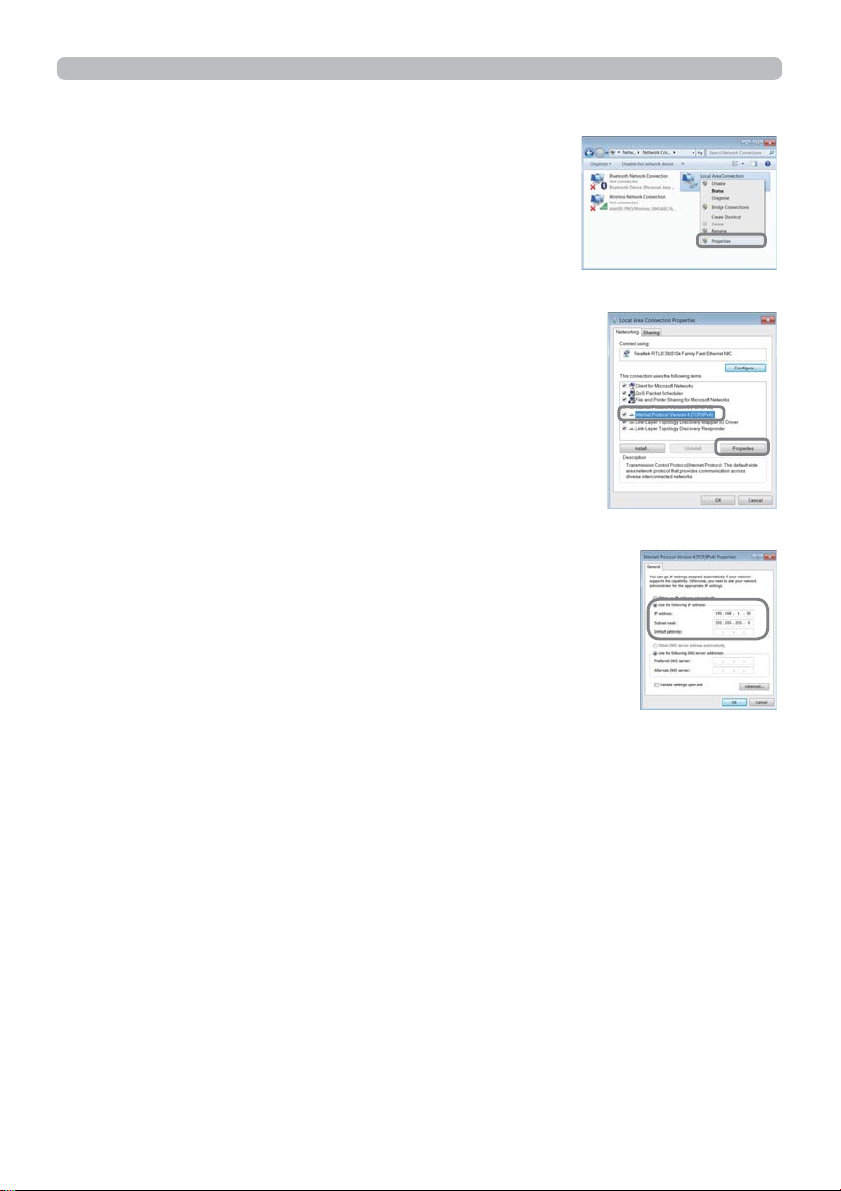
This is an explanation of network connection settings for Windows®7.
/RJRQWR:LQGRZV®7 as administrator authority. Administrator authority is
the account, which can access to all functions.
2SHQ³&RQWURO3DQHO´IURP³6WDUW´PHQX
2SHQ³9LHZQHWZRUNVWDWXVDQGWDVNV´LQ³1HWZRUNDQG,QWHUQHW´
:LWKWKHLFRQVLQWKH&RQWURO3DQHOZLQGRZGLVSOD\HGFOLFN1HWZRUNDQG
Sharing Center".
4) Click "Change adapter settings" in the menu
RQWKHOHIWVLGHRIWKH1HWZRUNDQG6KDULQJ
Center" window.
8
1. Connection to the network
(continued on next page)
1.2 Manual network connection setting - Wired LAN - (continued)
5LJKWFOLFN/RFDO$UHD&RQQHFWLRQWRRSHQWKHPHQX
DQGVHOHFW3URSHUWLHV
6HOHFW,QWHUQHW3URWRFRO9HUVLRQ7&3,3YDQG
FOLFN>3URSHUWLHV@
6HOHFW8VHWKHIROORZLQJ,3DGGUHVVDQGFRQ¿JXUHWKH,3
DGGUHVV6XEQHWPDVNDQG'HIDXOWJDWHZD\IRUWKHFRPSXWHU
DFFRUGLQJO\,ID'+&3VHUYHUH[LVWVLQWKHQHWZRUN\RX
FDQVHOHFW2EWDLQDQ,3DGGUHVVDXWRPDWLFDOO\DQGWKH,3
address will be assigned automatically.
$IWHUVHWWLQJLVFRPSOHWHFOLFN>2.@WRFORVHWKHZLQGRZ

9
1. Connection to the network
NOTE
1.2 Manual network connection setting - Wired LAN - (continued)
´FDQQRWEHVHWWRWKH,3DGGUHVV
7KHSURMHFWRU¶V,3DGGUHVVFDQEHFKDQJHGE\XVLQJWKHFRQ¿JXUDWLRQXWLOLW\
YLDDZHEEURZVHU(21).
If the projector and the computer exist in the same network (i.e., same network
DGGUHVV\RXFDQOHDYHWKHGHIDXOWJDWHZD\¿HOGEODQN
:KHQWKHSURMHFWRUDQGWKHFRPSXWHUH[LVWLQGLIIHUHQWQHWZRUNVWKHGHIDXOW
gateway must be set. Consult to the network administrator in detail.
ŶSetting automatically
:KHQD'+&3VHUYHUH[LVWVLQWKHFRQQHFWHGQHWZRUNLWLVSRVVLEOHWRDVVLJQ
DQ,3DGGUHVVWRWKHSURMHFWRUDQGFRPSXWHUDXWRPDWLFDOO\
'+&3LVDEEUHYLDWLRQIRU³'\QDPLF+RVW&RQ¿JXUDWLRQ3URWRFRO´DQGKDV
WKHIXQFWLRQWRSURYLGHQHFHVVDU\VHWWLQJIRUQHWZRUNOLNH,3DGGUHVVIURPVHUYHU
WRFOLHQW$VHUYHUWKDWKDV'+&3IXQFWLRQLVFDOOHG'+&3VHUYHU
[About IP address]
ŶSetting manually
7KH1HWZRUNDGGUHVVSRUWLRQRIWKH,3DGGUHVVVHWWLQJRQ\RXUFRPSXWHUPXVWEH
the same as the setting on the projector.
$OVRWKHHQWLUH,3DGGUHVVRQWKHFRPSXWHUPXVWQRWRYHUODSZLWKWKDWRIWKHRWKHU
GHYLFHVRQWKHVDPHQHWZRUNLQFOXGLQJWKHSURMHFWRU
For example
The projector’s settings are as follows.
TKHUHIRUHVSHFLI\WKHFRPSXWHU¶V,3DGGUHVVDVIROORZV
Select from 1 to 254 for “xxx” not duplicating with any other equipments.
In this case, VLQFHWKH,3DGGUHVVRIWKHSURMHFWRULV³´VSHFLI\
a setting between 1 to 253 for the computer.
,3address : 192.168.1.254
Subnet mask : 255.255.255.0
1HWZRUNDGGUHVVLQWKLVFDVH
,3address : 192.168.1.xxx (xxx shows decimal number.)
Subnet mask: 255.255.255.0
1HWZRUNDGGUHVVLQWKLVFDVH
10
1. Connection to the network
1.2 Manual network connection setting - Wired LAN - (continued)
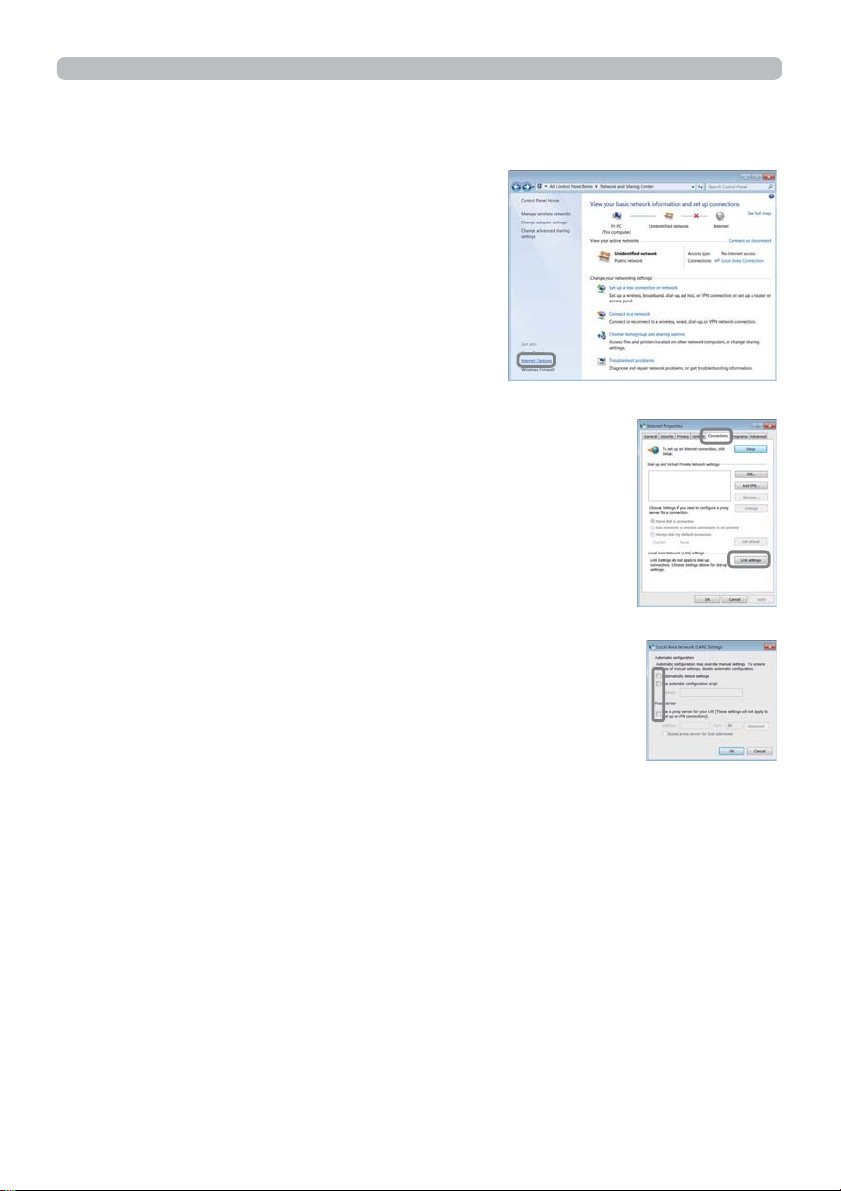
1.2.3 “Internet Option” setting
&OLFN,QWHUQHW2SWLRQV´LQ³1HWZRUNDQG
Sharing Center” window to open "Internet
3URSHUWLHVZLQGRZ
&OLFN&RQQHFWLRQV´WDEDQGWKHQFOLFN>/$1VHWWLQJV@EXWWRQ
WRRSHQ³/RFDO$UHD1HWZRUN/$16HWWLQJV
8QFKHFNDOOER[HVLQ³/RFDO$UHD1HWZRUN/$16HWWLQJV´
window.
$IWHUVHWWLQJLVFRPSOHWHFOLFN>2.@WRFORVHWKHZLQGRZ
This manual suits for next models
2
Table of contents
Other PJLink Projector manuals

PJLink
PJLink CP-X9110 User manual

PJLink
PJLink CP-D27WN User manual

PJLink
PJLink MP-JU4001 User manual

PJLink
PJLink MAX-WU55S User manual

PJLink
PJLink TEQ-Z782WN User manual

PJLink
PJLink CP-X2021WN User manual

PJLink
PJLink CP-X2015WN User manual

PJLink
PJLink IN5132 Installation and maintenance instructions

PJLink
PJLink CP-WX3530WN User manual

PJLink
PJLink CP-DW10N User manual


