
Pioneer DVR-543H-S User manual

English
français
Language
Switch on the recorder.
Also switch on your
TV and make sure
that the
video input
is set to this
recorder.
Select an OSD language. Start using the Setup Navigator.
Off
USA
Alaska
Manual Clock Setting 1/2
Time Zone
D.S.T
English
Cancel
Start
Complete this setup before you
start using your recorder.
Please use the Initial Setup if you
want to make more detailed settings.
HELP
TOPMENU
PAUSE
PLAY
STOP
OPEN
PREV NEXT
RETURN
ENTER
STOPREC
CM
BACK
CM
SKIP

REC
HOMEMENU
DISC
NAVIGATOR CHANNEL
CHANNEL
HELP
TOP MENU
STOP REC
HOME MENU
HELP
TOPMENU
PAUSE
PLAY
STOP
OPEN
PREV NEXT
RETURN
ENTER
STOPREC
CM
BACK
CM
SKIP

REC
HOMEMENU
DISC
NAVIGATOR CHANNEL
CHANNEL
PAUSE RETURN
ENTER
CM
BACK
CM
SKIP

REC
DISC
NAVIGATOR CHANNEL
CHANNEL
Antenna/
Cable TV
wall outlet
Wall outlet
Connecting up
Please refer to the main operating instructions if you want to connect other components, such as a cable box or satellite receiver.
Quick Start Guide
• Use the / buttons to set
your time zone, then press .
• Use the / buttons to set
summer (daylight saving) time
On or Off, then press ENTER.
• Set the time and date. Use the /
buttons to change the value in
the highlighted field; use the /
buttons to move from one field
to another.
• Press ENTER to finish setting the time.
Switching on and setting up
When you switch the recorder on for the first time, you can make several basic settings using the Setup Navigator feature. This takes you through setting the clock, the internal TV tuner and the video output settings.
If you're using the recorder for the first time, we strongly recommend you use the Setup Navigator before starting to use the recorder.
Manual Clock Setting 2/2
Date
Time
Time Zone
D.S.T Off
01 01 SUN//
12 :00 AM
2006
USA
Alaska
HELP
TOPMENU
PAUSE
PLAY
STOP
OPEN
PREV NEXT
RETURN
ENTER
STOPREC
CM
BACK
CM
SKIP

REC
HOMEMENU
DISC
NAVIGATOR CHANNEL
CHANNEL
PAUSE RETURN
ENTER
CM
BACK
CM
SKIP
¶REC
DISC
NAVIGATOR CHANNEL
CHANNEL
HELP
TOPMENU
PAUSE
PLAY
STOP
OPEN
PREV NEXT
RETURN
ENTER
STOPREC
CM
BACK
CM
SKIP

REC
HOMEMENU
DISC
NAVIGATOR CHANNEL
CHANNEL
PAUSE RETURN
ENTER
CM
BACK
CM
SKIP

REC
DISC
NAVIGATOR CHANNEL
CHANNEL
Select the kind of TV
you have.
TV Screen Size
Wide (16:9)
Standard (4:3)
Finish setting up.
Select Go Back if you want to start again.
Setup is complete!
Enjoy using your DVD recorder!
Finish Setup
Go Back
Finish Setup
Select ‘Not Compatible’ for
the progressive scan setting.
If you want to use progressive
scan video, please see the main
operating instructions for more
information.
Progressive
Compatible
Not Compatible
Don't Know
Not Compatible
Select how you receive your terrestrial TV channels.
Tun ing
7/68
Cancel
After selecting Antenna or Cable the
recorder starts automatic tuning. This
takes a couple of minutes to complete.
Auto Channel Setting
English
Cable
Do not Set
Antenna
Putting the batteries in the remote
control
Insert two AA/R6P batteries into the battery
compartment following the indications (,)
inside the compartment.
HELP
TOPMENU
PAUSE
PLAY
STOP
OPEN
PREV NEXT
RETURN
ENTER
STOPREC
CM
BACK
CM
SKIP

REC
HOMEMENU
DISC
NAVIGATOR CHANNEL
CHANNEL
PAUSE RETURN
ENTER
CM
BACK
CM
SKIP

REC
DISC
NAVIGATOR CHANNEL
CHANNEL
HELP
TOPMENU
PAUSE
PLAY
STOP
OPEN
PREV NEXT
RETURN
ENTER
STOPREC
CM
BACK
CM
SKIP

REC
HOMEMENU
DISC
NAVIGATOR CHANNEL
CHANNEL
PAUSE RETURN
ENTER
CM
BACK
CM
SKIP

REC
DISC
NAVIGATOR CHANNEL
CHANNEL
HELP
TOPMENU
PAUSE
PLAY
STOP
OPEN
PREV NEXT
RETURN
ENTER
STOPREC
CM
BACK
CM
SKIP

REC
HOMEMENU
DISC
NAVIGATOR CHANNEL
CHANNEL
PAUSE RETURN
ENTER
CM
BACK
CM
SKIP

REC
DISC
NAVIGATOR CHANNEL
CHANNEL
<VRG1014-A>
Product Use Questions – (800) 421-1404 (US)
In the event that you have additional questions, Pioneer maintains a Toll-Free Customer Service Hotline at (800) 421-1404.
Telephone lines are open Monday through Friday 6:00 AM to 4:30 PM (Pacific Time) and Saturday 8:00 AM to 4:30 PM (Pacific
Time).
Product Use Questions – (877) 283-5901 (Canada)
In the event that you have additional questions, Pioneer maintains a Toll-Free Customer Service Hotline at (877) 283-5901.
Telephone lines are open Monday through Friday 9.00 AM to 5.00 PM (EST).
HELP
TOPMENU
PAUSE
PLAY
STOP
OPEN
PREV NEXT
RETURN
ENTER
STOPREC
CM
BACK
CM
SKIP

REC
HOMEMENU
DISC
NAVIGATOR CHANNEL
CHANNEL
PAUSE RETURN
ENTER
CM
BACK
CM
SKIP

REC
DISC
NAVIGATOR CHANNEL
CHANNEL
HELP
TOPMENU
PAUSE
PLAY
STOP
OPEN
PREV NEXT
RETURN
ENTER
STOPREC
CM
BACK
CM
SKIP

REC
HOMEMENU
DISC
NAVIGATOR CHANNEL
CHANNEL
PAUSE RETURN
ENTER
CM
BACK
CM
SKIP

REC
DISC
NAVIGATOR CHANNEL
CHANNEL
Clock Setting
Auto
Manual
Set the clock.
Select Manual to
start setting the
clock.
HELP
TOPMENU
PAUSE
PLAY
STOP
OPEN
PREV NEXT
RETURN
ENTER
STOPREC
CM
BACK
CM
SKIP

REC
HOMEMENU
DISC
NAVIGATOR CHANNEL
CHANNEL
PAUSE RETURN
ENTER
CM
BACK
CM
SKIP

REC
DISC
NAVIGATOR CHANNEL
CHANNEL
Press to continue after
reading the HDD caution.
In the event of HDD failure, recordings may
be lost or normal playback/recording may
not be possible.
As recordings might be lost in case of a HDD
failure, we recommend to use the HDD only
as temporary storage media.
Please copy recordings you want to keep
to recordable DVD.
Press ENTER to continue.
HELP
TOPMENU
PAUSE
PLAY
STOP
OPEN
PREV NEXT
RETURN
ENTER
STOPREC
CM
BACK
CM
SKIP

REC
HOMEMENU
DISC
NAVIGATOR CHANNEL
CHANNEL
PAUSE RETURN
ENTER
CM
BACK
CM
SKIP

REC
DISC
NAVIGATOR CHANNEL
CHANNEL
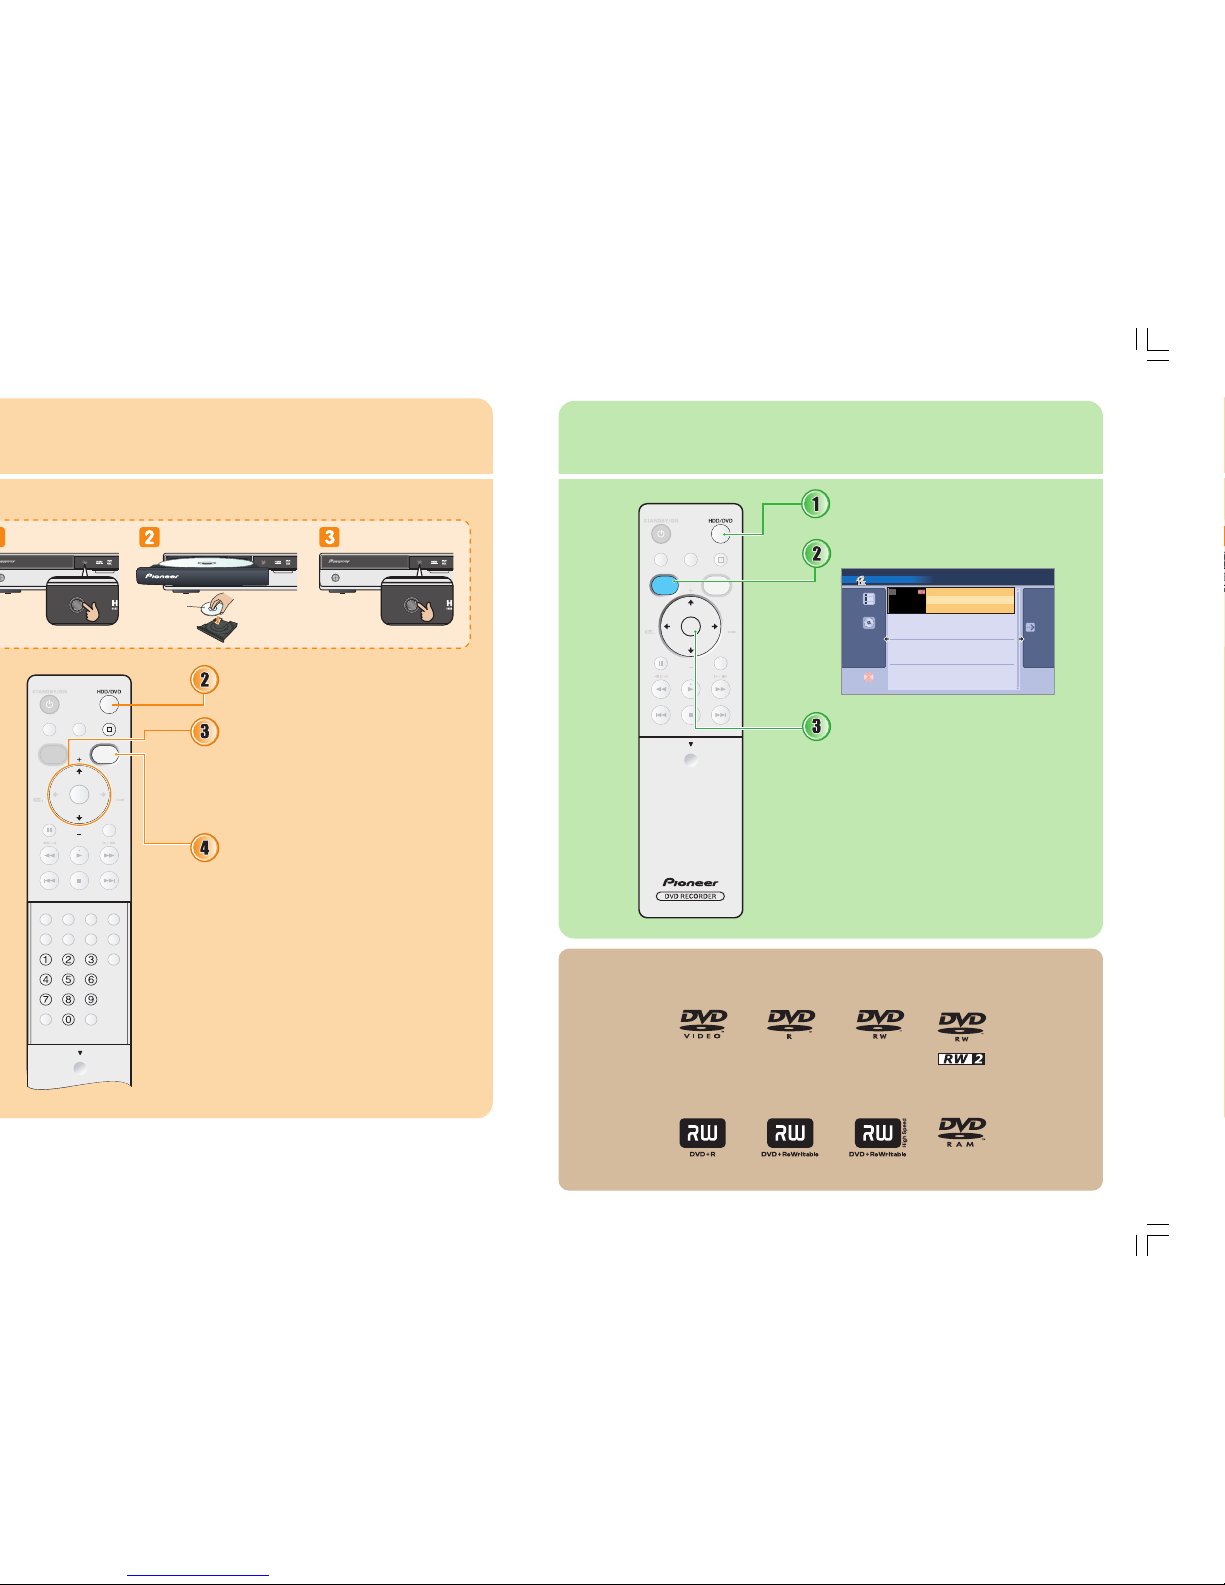
Making your first recording
This quick guide shows you how to make a basic recording of a TV program to a recordable DVD or
the built-in HDD.
Select DVD to record to a DVD or
HDD to record to the HDD.
Select the TV channel you want
to record.
You can also use the number buttons on the
remote. For example, to select channel 4, press
4then ENTER; for channel 34, press 3, 4,
ENTER; for channel 102, press 1, 0, 2, ENTER.
Start recording.
•When you want to stop recording, press
STOP REC.
•The TV program will be recorded on the DVD
or HDD as a single title with one or more
chapters.
After recording:
Press PLAY to start playback. (If you want to
stop playback before the end of the recording,
press STOP.)
HELP
TOP MENU
PAUSE
PLAY
STOP
OPEN
PREV NEXT
RETURN
ENTER
STOP REC
CM
BACK
CM
SKIP

REC
HOME MENU
DISC
NAVIGATOR CHANNEL
CHANNEL
OPEN
AUDIO SUBTITLE ANGLE PLAY MODE
DISPLAY MENU
REC MODE
GHI JKL MNO
PQRS TUV WXYZ
+ CLEAR
VCR Plus+ CLEAR
ABC DEF
ONE TOUCH COPY
INPUT SELECT
OPEN
Open the disc tray and load a blank DVD-RW disc.
Playing back your recordings
Show the Disc Navigator.
Use the Disc Navigator to browse and edit video on recordable DVDs and the HDD, and to view
information on titles.
Select DVD or HDD.
Disc Navigator (DVD)
11/29 MON 7:00PM
11/29Mon 7:00PM 2ch SP
2h00m(1.0G)
1
4 Titles
Remain
Original
1Titles
1h01m
DVD
VR Mode
MENU
11/29 WED 7:00PM
11/29Wed 7:00PM 2ch SP
1h00m(2.2G)
1
HELP
TOP MENU
PAUSE
PLAY
STOP
OPEN
PREV NEXT
RETURN
ENTER
STOP REC
CM
BACK
CM
SKIP

REC
HOME MENU
DISC
NAVIGATOR CHANNEL
CHANNEL
Select title you want to play then
press ENTER.
•Use the / buttons to browse up and down
the list of titles.
•Use the /buttons to display the
previous/next page of titles, if there are more
titles than can fit on to the screen.
After playing:
If you want to erase the title you’ve just played,
return to the Disc Navigator screen, make sure
the title is highlighted, then press and select
Erase from the menu options.
Use ONLY discs that feature one of these logos:
Look for the disc logo on the disc and/or the disc packaging.
OPEN/CLOSE
STANDBY/ON
OPEN/CLOSE
STANDBY/ON
OPEN/CLOSE
STANDBY/ON
Load the disc
label-side face-
up, using the
disc guide to
align the disc.
The recorder will
take a moment to
initialize the disc
for recording.
OPEN/CLOSE
OPEN/CLOSE
Open the disc tray. Load a blank DVD-RW. Close the disc tray.
DVD-R
Play
Rec
DVD-RW
Play
Rec
Play
Rec
DVD-Video
Play Rec
DVD+R
Play
Rec
DVD+RW
Play
Rec
Play
Rec
DVD-RAM
Play
Rec
Other manuals for DVR-543H-S
1
Other Pioneer DVR manuals

Pioneer
Pioneer DVR-810 H Quick start guide

Pioneer
Pioneer DVR531H User manual

Pioneer
Pioneer DVR-231-S User manual

Pioneer
Pioneer DVR-LX61D User manual

Pioneer
Pioneer dvr-3100-s User manual

Pioneer
Pioneer HTZ-929DVR User manual

Pioneer
Pioneer PRV-LX1 Setup guide

Pioneer
Pioneer DVR-231-S User manual

Pioneer
Pioneer DRM-7000 Manual

Pioneer
Pioneer Recorder Instruction Manual


