Pfaff creative 3.0 User manual

Owner's manual

This household sewing machine is designed to comply with IEC/EN 60335-2-28 and UL1594.
IMPORTANT SAFETY INSTRUCTIONS
When using an electrical appliance, basic safety precautions should always be followed, including
the following:
Read all instructions before using this household sewing machine. Keep the instructions at a suitable
place close to the machine. Make sure to hand them over if the machine is given to a third party.
DANGER – To reduce the risk of electric shock:
• A sewing machine should never be left unattended when plugged in. Always unplug this sewing
machine from the electric outlet immediately after using and before cleaning, removing covers,
lubricating or when making any other user servicing adjustments mentioned in the instruction
manual.
WARNING – 7RUHGXFHWKHULVNRIEXUQVÀUHHOHFWULFVKRFNRULQMXU\WR
person:
• Do not allow to be used as a toy. Close attention is neccesary when this sewing machine is used by
or near children.
• Use this sewing machine only for its intended use as described in this manual. Use only
attachments recommended by the manufacturer as contained in this manual.
• Never operate this sewing machine if it has a damaged cord or plug, if it is not working properly,
if it has been dropped or damaged, or dropped into water. Return the sewing machine to the
nearest authorized dealer or service center for examination, repair, electrical or mechanical
adjustment.
• Never operate the sewing machine with any air openings blocked. Keep ventilation openings of
the sewing machine and foot control free from the accumulation of lint, dust, and loose cloth.
.HHSÀQJHUVDZD\IURPDOOPRYLQJSDUWV6SHFLDOFDUHLVUHTXLUHGDURXQGWKHVHZLQJPDFKLQH
needle.
• Always use the proper needle plate. The wrong plate can cause the needle to break.
• Do not use bent needles.
'RQRWSXOORUSXVKIDEULFZKLOHVWLWFKLQJ,WPD\GHÁHFWWKHQHHGOHFDXVLQJLWWREUHDN
• Wear safety glasses.
6ZLWFKWKHVHZLQJPDFKLQHRII´µZKHQPDNLQJDQ\DGMXVWPHQWLQWKHQHHGOHDUHDVXFKDV
threading needle, changing needle, threading bobbin, or changing presser foot, etc.
• Never drop or insert any object into any opening.
• Do not use outdoors.
'RQRWRSHUDWHZKHUHDHURVROVSUD\SURGXFWVDUHEHLQJXVHGRUZKHUHR[\JHQLVEHLQJ
administrated.
7RGLVFRQQHFWWXUQDOOFRQWUROVWRWKHRII´µSRVLWLRQWKHQUHPRYHSOXJIURPRXWOHW
• Do not unplug by pulling on cord. To unplug, grasp the plug, not the cord.
• The foot control is used to operate the machine. Avoid placing other objects on the foot control.
• Do not use the machine if it is wet.
• If the LED lamp is damaged or broken, it must be replaced by the manufacturer or it's service
DJHQWRUDVLPLODUO\TXDOLÀHGSHUVRQLQRUGHUWRDYRLGDKD]DUG
• If the supply cord connected with the foot control is damaged, it must be replaced by the
PDQXIDFWXUHURULWVVHUYLFHDJHQWRUDVLPLODUO\TXDOLÀHGSHUVRQLQRUGHUWRDYRLGDKD]DUG
• This sewing machine is provided with double insulation. Use only identical replacement parts.
6HHLQVWUXFWLRQVIRU6HUYLFLQJRI'RXEOH,QVXODWHG$SSOLDQFHV
SAVE THESE INSTRUCTIONS

FOR EUROPE ONLY:
This appliance can be used by children aged from 8 years and above and persons with reduced
physical, sensory or mental capabilities or lack of experience and knowledge if they have been
given supervision or instruction concerning use of the appliance in a safe way and understand the
hazards involved. Children shall not play with the appliance. Cleaning and user maintenance shall
not be made by children without supervision.
7KHQRLVHOHYHOXQGHUQRUPDORSHUDWLQJFRQGLWLRQVLVOHVVWKDQG%$
7KHPDFKLQHPXVWRQO\EHXVHGZLWKIRRWFRQWURORIW\SH)5PDQXIDFWXUHGE\6KDQJKDL%LRDR
Precision Mould Co., Ltd.
FOR OUTSIDE EUROPE:
7KLVVHZLQJPDFKLQHLVQRWLQWHQGHGIRUXVHE\SHUVRQVLQFOXGLQJFKLOGUHQZLWKUHGXFHG
physical, sensory or mental capabilities, or lack of experience and knowledge, unless they
have been given supervision or instruction concerning use of the sewing machine by a person
responsible for their safety. Children should be supervised to ensure that they do not play with the
sewing machine.
7KHQRLVHOHYHOXQGHUQRUPDORSHUDWLQJFRQGLWLRQVLVOHVVWKDQG%$
7KHPDFKLQHPXVWRQO\EHXVHGZLWKIRRWFRQWURORIW\SH)5PDQXIDFWXUHGE\6KDQJKDL%LRDR
Precision Mould Co., Ltd.
SERVICING OF DOUBLE INSULATED PRODUCTS
In a double-insulated product, two systems of insulation are provided instead of grounding. No
ground means is provided on a double-insulated product, nor should a means for grounding
EHDGGHGWRWKHSURGXFW6HUYLFLQJRIDGRXEOHLQVXODWHGSURGXFWUHTXLUHVH[WUHPHFDUHDQG
NQRZOHGJHRIWKHV\VWHPDQGVKRXOGEHGRQHRQO\E\TXDOLÀHGVHUYLFHSHUVRQQHO5HSODFHPHQW
parts for a double-insulated product must be identical to those parts in the product. A double-
LQVXODWHGSURGXFWLVPDUNHGZLWKWKHZRUGV¶'28%/(,168/$7,21·RU¶'28%/(,168/$7('·

Congratulations!
Congratulations on purchasing your
new PFAFF®creative™3.0 sewing and
embroidery machine.
As a sewing enthusiast, you have
acquired one of the most advanced and
comprehensive sewing and embroidery
machines in the world; it will enable
you to transform all your creative ideas
into reality using the most highly tuned
technology and features.
Before you start, please spend some time
reading this owner’s manual. You will
soon discover how to maximize the use
of your machine. Our authorized PFAFF®
dealers will of course also be pleased to
advise you at any time.
Your PFAFF® creative™3.0 sewing and
HPEURLGHU\PDFKLQHZLOOGHÀQLWHO\
enable you to experience a totally new
dimension of sewing and embroidery.

TABLE OF CONTENTS
Sewing settings ............................................................ 3:4
Embroidery settings.................................................... 3:5
Machine information .................................................. 3:5
Buttons and indicators 3:6
Common icons 3:8
Sewing mode 4:1
Sewing mode 4:2
Start view...................................................................... 4:2
Sewing mode - overview 4:2
Selection menu 4:3
Selecting a stitch .......................................................... 4:3
Selecting a font............................................................. 4:3
Stitch settings 4:4
Stitch width .................................................................. 4:4
Stitch positioning......................................................... 4:4
Stitch length.................................................................. 4:5
Stitch density................................................................ 4:5
Balance .......................................................................... 4:5
Thread tension ............................................................. 4:6
Mirroring ...................................................................... 4:6
Save to personal menu 4:7
Free-motion options 4:8
Tie-off options 4:10
Sewing programs 4:11
Sequencing 4:12
Stitch Creator 4:12
Sewing techniques 4:13
Sewing in zippers ...................................................... 4:13
Sewing hems in heavy fabric ................................... 4:13
Three-step zigzag stitch............................................ 4:14
Blindhem stitch.......................................................... 4:14
Buttonholes................................................................. 4:15
Sew on a button ......................................................... 4:17
Darning ....................................................................... 4:17
Quilting....................................................................... 4:18
Special sewing techniques 4:20
Common sewing pop-ups 4:21
Sequencing 5:1
Sequencing 5:2
Sequencing - overview 5:2
Open and exit sequencing 5:3
Create a sequence 5:3
Sequence commands................................................... 5:4
Loading and sewing a sequence 5:5
Saving a sequence 5:5
Important sequencing information 5:6
Common sequencing pop-ups 5:6
Introduction 1:7
Machine overview 1:8
Front side...................................................................... 1:8
Rear side ....................................................................... 1:9
Top parts....................................................................... 1:9
Accessory tray.............................................................. 1:9
Parts of the embroidery unit...................................... 1:9
Included accessories 1:10
Presser feet.................................................................. 1:11
Stitch overview 1:12
Utility stitches ............................................................ 1:12
Decorative stitches .................................................... 1:15
Alphabets.................................................................... 1:16
Preparations 2:1
Unpacking 2:2
Connecting the foot control cord 2:2
Connect the power cord
and foot control 2:2
Pack away after sewing 2:3
LED lights 2:3
Free arm 2:3
Thread cutter 2:3
Spool pins 2:4
Threading the machine 2:5
Needle threader ........................................................... 2:5
Thread sensor 2:6
Bobbin winding 2:7
Inserting the bobbin 2:8
IDT™system (Integrated Dual Feed) 2:8
Changing the presser foot 2:9
Changing the needle 2:9
Lowering feed dogs 2:9
Needles 2:10
Threads 2:11
Stabilizers 2:11
USB port 2:12
USB embroidery stick ............................................... 2:12
Complimentary software (PC) 2:12
How to update your machine 2:13
Machine settings & buttons 3:1
Touch screen 3:2
Touch screen - overview 3:2
Settings menu 3:3
Machine settings ......................................................... 3:3
1
2
3
4
5

Stitch Creator™feature 6:1
Stitch Creator™feature 6:2
Stitch Creator™feature - overview 6:2
Open and exit Stitch Creator™feature...................... 6:3
'HÀQLWLRQRIDVWLWFKSRLQW ........................................ 6:3
Start creating - add a stitch
or stitch point ............................................................... 6:3
Select stitch points....................................................... 6:3
Duplicate selected stitch point................................... 6:4
Insert a new stitch point ............................................. 6:4
Triple stitch................................................................... 6:4
Mirroring side to side ................................................. 6:4
Mirroring end to end .................................................. 6:4
Delete selected stitch point ........................................ 6:4
Touch functions 6:5
Position of the marked stitch point 6:5
Loading and sewing a stitch 6:6
Saving a stitch 6:6
Common Stitch Creator™feature pop-ups 6:6
Embroidery mode – preparations 7:1
Embroidery unit overview 7:2
Embroidery hoop overview 7:2
Attach the embroidey foot 6A 7:2
Built-in designs 7:3
creative™3.0 Embroidery collection 7:3
Connect the embroidery unit 7:3
Remove the embroidery unit 7:3
To hoop the fabric 7:4
Slide on/off the hoop 7:4
Getting started embroidering 7:5
Embroidery mode – edit 8:1
Embroidery mode - edit 8:2
Embroidery edit - overview 8:2
Selection menu 8:3
Load a design 8:3
Load a font 8:3
/RDGIURPSHUVRQDOÀOHV86%GHYLFH ...................... 8:3
Touch functions 8:4
Move.............................................................................. 8:4
Scale............................................................................... 8:4
Rotate ............................................................................ 8:4
Select design 8:5
Move design into hoop 8:5
Mirror a design 8:5
Delete a design 8:5
Option bar in embroidery edit 8:6
6DYHWRSHUVRQDOÀOHV................................................... 8:6
Zoom options/pan...................................................... 8:6
Select hoop.................................................................... 8:7
Embroidery text editor ............................................... 8:7
Embroidery stitch-out................................................. 8:7
Embroidery edit pop-ups 8:8
Embroidery mode – stitch-out 9:1
To enter Embroidery stitch-out 9:2
Embroidery stitch-out - overview 9:2
Speed control 9:2
Crosshair 9:3
Basting 9:3
Monochrome 9:3
Step stitch by stitch 9:3
Thread tension 9:3
Embroidery information 9:4
Option bar 9:4
Basic precise positioning ............................................ 9:4
Zoom options/pan...................................................... 9:5
Hoop position .............................................................. 9:5
Color block list............................................................. 9:6
Return to Embroidery edit ......................................... 9:6
How to use basic precise positioning 9:7
Corner icons ................................................................. 9:8
Zoom to crosshair........................................................ 9:8
Common Embroidery stitch-out pop-ups 9:9
3HUVRQDOÀOHV
3HUVRQDOÀOHV
File formats 10:2
%URZVHSHUVRQDOÀOHV
/RDGDÀOH
Open a folder 10:3
Move up one folder level ......................................... 10:3
Organize 10:4
&RPPRQSHUVRQDOÀOHVSRSXSV
Maintenance 11:1
Cleaning the machine 11:2
Non-original parts and accessories 11:2
Troubleshooting 11:3
Index 11:5
Intellectual Property 11:12
8
9
11
7
6

Introduction 1

1:8
Introduction
PFAFF
10
20
30
40
50
2
1
mm
inch
00
Quilt
Machine overview
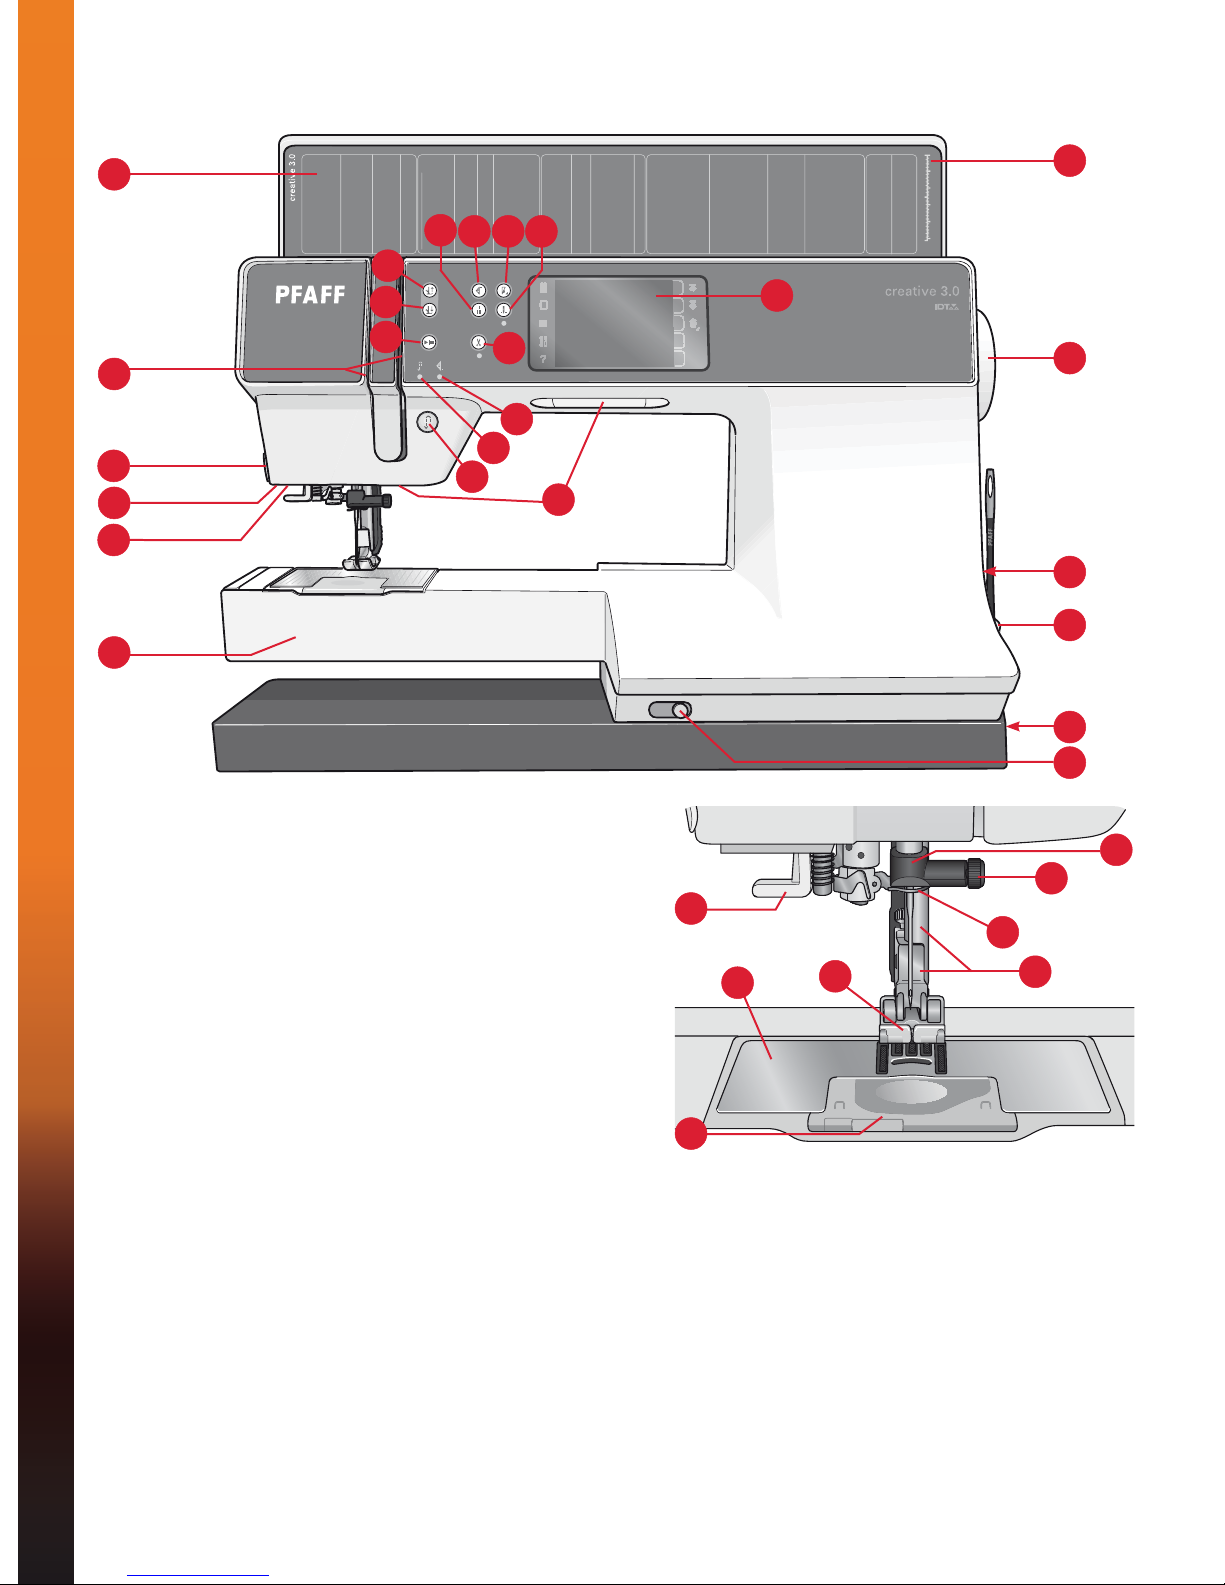
Front side
1. Lid with stitch categories
2. Threading slots
3. Thread cutter
4. Sensormatic buttonhole
foot socket
5. LED lights
6. Free arm
7. Reverse
8. Reverse indicator
9. Action indicator
10. Thread snips
11. Start/stop
12. Presser foot down and pivot
toggle
13. Presser foot up and extra lift
toggle
14. Immediate tie-off
15. Stitch restart
16. Speed control
17. Needle up/down
18. PFAFF®creative™Color
Touch Screen
19. Button ruler
20. Handwheel
21. Built-in USB port
22. Stylus holder
23. Main switch, connectors for
power cord and foot control
24. Slide for lowering the feed
dogs
Needle area
25. Built-in needle threader
26. Bobbin cover
27. Needle plate
28. Presser foot
29. Presser foot bar and presser
foot holder
30. Needle thread guide
31. Needle screw
32. Needle bar
24
31
29
26
27
30
28
25
1
2
3
45
6
7
8
9
13
12
11 10
14 15 16 17
19
18
20
21
22
23
32
5

1:9
Introduction
33
34
35
47
48
49
Rear side
33. Handle
34. IDT™system
35. Embroidery unit connection socket
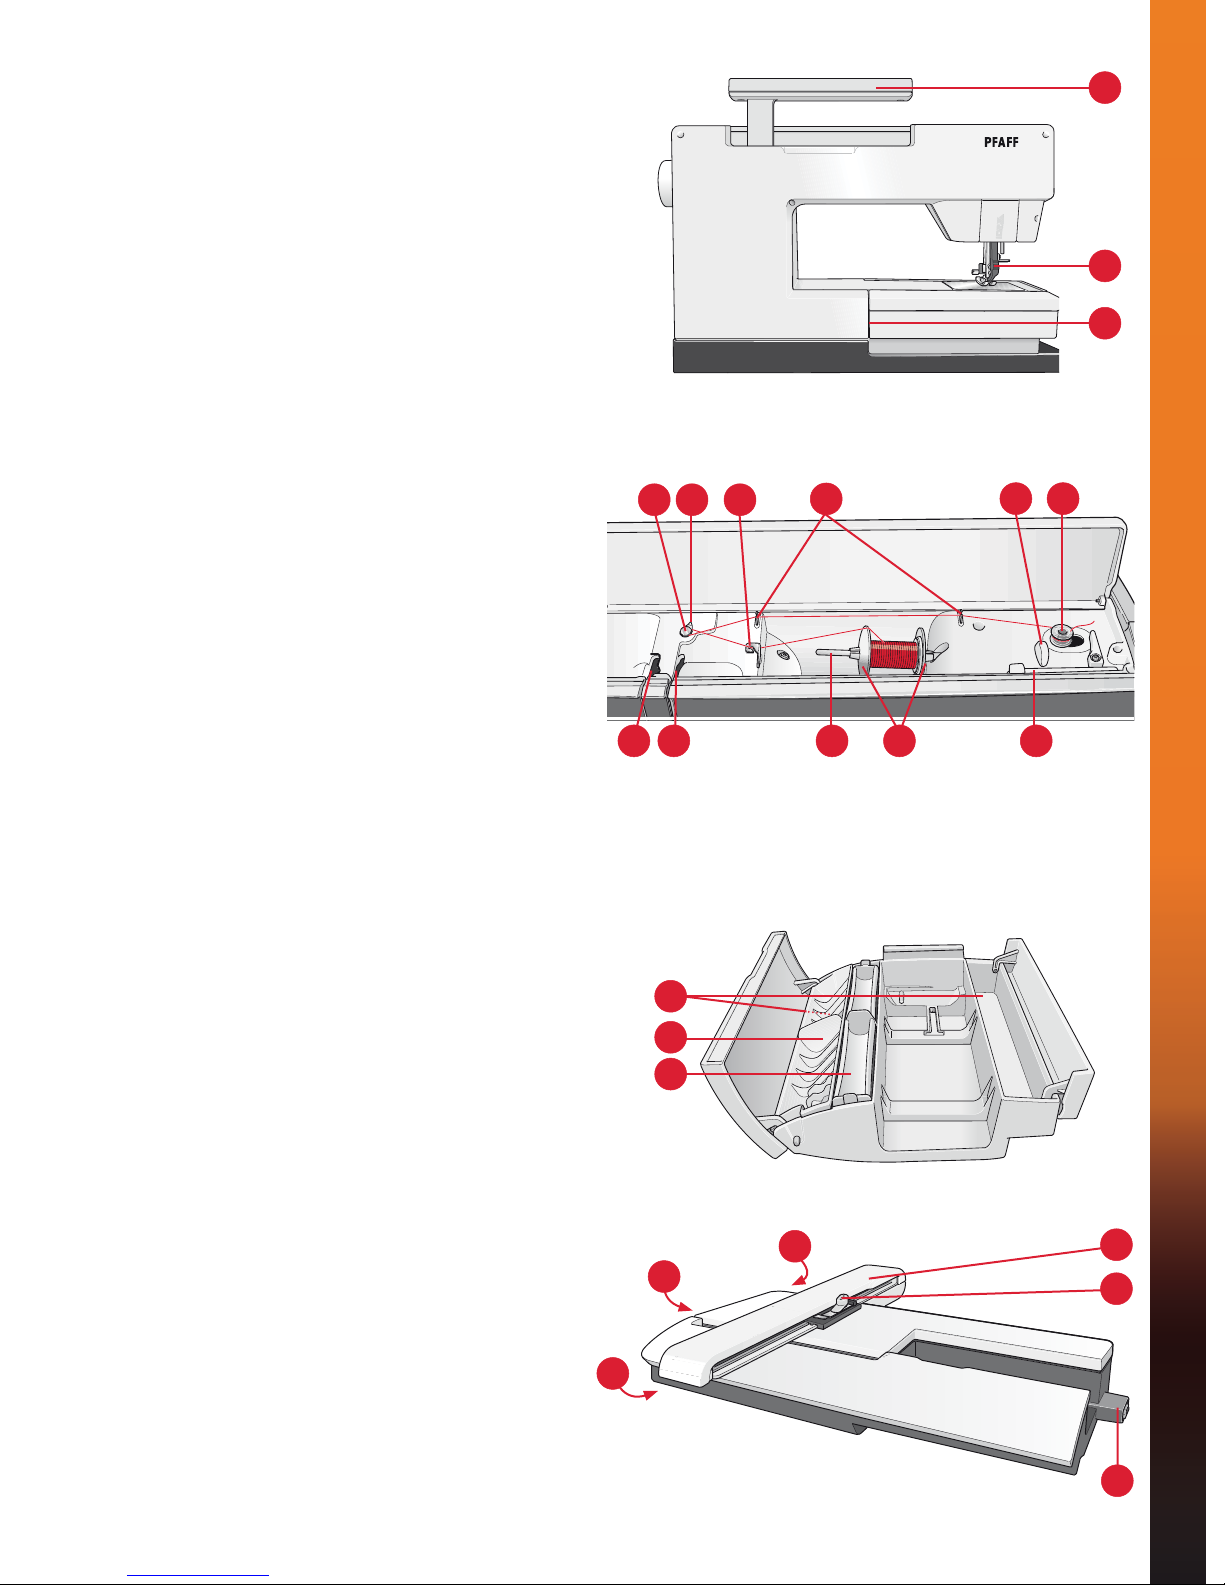
Top parts
36. Pre-tension disk for threading and bobbin
winding
37. Bobbin winder thread guide
38. Thread guide
39. Bobbin winder thread guides
40. Bobbin winder thread cutter
41. Bobbin winder spindle
42. Auxiliary spool pin
43. Spool caps
44. Spool pin
45. Thread tension disk
46. Take-up lever
$FFHVVRU\WUD\
The accessory tray features special compartments
for presser feet and bobbins, plus space for needles
and other accessories. Store the accessories in the
tray so they are easily accessible.
47. Space for accessories
48. Removable tray for presser feet
49. Removable bobbin holder
Parts of the HPEURLGHU\XQLW
(type BE16)
50. Embroidery unit release button
51. Level adjusting feet
52. Embroidery unit socket
53. Embroidery hoop connection assembly
54. Embroidery arm
36 37 38 39 40 41
42434446 45
50
51
51
54
53
52

1:10
Introduction
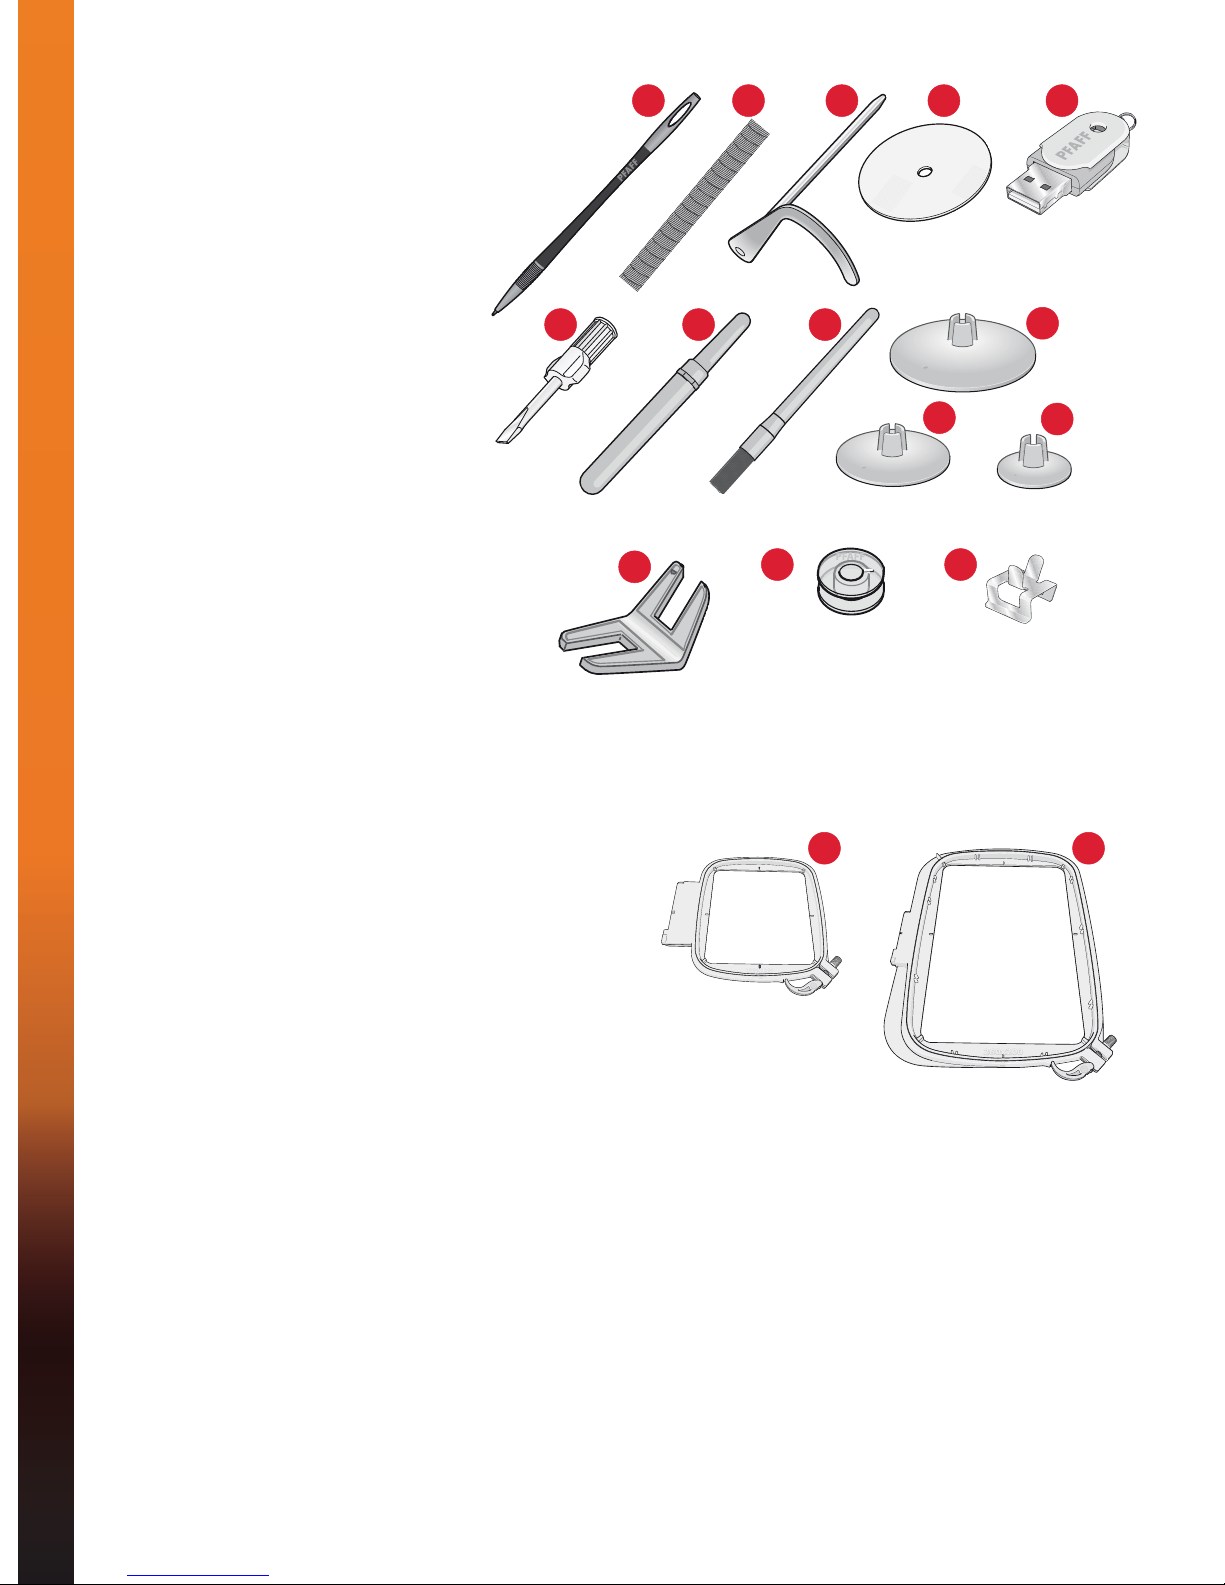
Included accessories
Accessories
55. Stylus
56. Thread net (2)
57. Edge guide
58. Felt pad (2)
59. USB embroidery stick
60. Screwdriver
61. Seam ripper
62. Brush
63. Spool cap, large (2)
64. Spool cap, medium
65. Spool cap, small
66. Multi-purpose tool
67. Bobbins (10)
68. Hoop clips
Included hoops
69. creative™120 Square hoop (120x120)
70. creative™Elite hoop (260x200)
Included accessories not in picture
• Foot control
• Power cord
• Needles
• Carrying case
0LFURÀEHUFORWK
• creative™3.0 Embroidery collection
• Quick start embroidery kit
• Warranty
69 70
55 56 57 58 59
60 61 62 63
64 65
66 67 68
Table of contents
Other Pfaff Sewing Machine manuals

Pfaff
Pfaff expression 2026 User manual

Pfaff
Pfaff Embroidery Machines User manual

Pfaff
Pfaff 3734 - 2/01 User manual

Pfaff
Pfaff Coverstyle User manual

Pfaff
Pfaff 918 User manual

Pfaff
Pfaff select 2.0 User manual

Pfaff
Pfaff 130-6 User manual

Pfaff
Pfaff Select 3.0 User manual

Pfaff
Pfaff hobby 1016 User manual

Pfaff
Pfaff 1571 Guide

Pfaff
Pfaff COVERLOCK 4.0 - User manual

Pfaff
Pfaff 1571 User manual

Pfaff
Pfaff 937 User manual

Pfaff
Pfaff 1181 User manual

Pfaff
Pfaff hobbylock 2.0 User manual

Pfaff
Pfaff Creative 7530 User manual

Pfaff
Pfaff 1053 User manual

Pfaff
Pfaff 78 User manual

Pfaff
Pfaff 9083-2/99 User manual

Pfaff
Pfaff Creative Vision User manual