
Paxton Ins-30130 User manual

Page 1
1
1
25/02/2010
Ins-30130 LCD PROXIMITY reader kit
The current specication for compatible PC hardware, network and operating
systems is available on our website at the following link: http://paxton.info/720
What’s in the box?
Qty Description
Part Number
PROXIMITY LCD reader
Documentation
Net2Air USB dongle
380-592
380-127
Bench test guide
Technical Support
Technical help is available: Monday - Friday from 07:00 - 19:00 (GMT)
Saturday from 09:00 - 13:00 (GMT)
01273 811011 [email protected]
Documentation on all Paxton products can be found on our website - http://www.paxton.co.uk/
Paxton

Page 2
The following pages contain full instruction issued with the PROXIMITY LCD
reader and the Net2Air USB dongle. There are also details on the LCD reader
image uploader.
These include the following procedures:
- Mounting the LCD reader.
- Commissioning.
- Default images.
- Creating and customising your own images.
- Installing the Net2Air USB dongle.
- Downloading the LCD reader image uploader.

Page 3
Fitting
The LCD display is best positioned at eye level for ease
of reading.
It is mounted using the backplate and xings provided
and can be positioned to allow the display of portrait or
landscape images.
Fix the mounting plate to the wall, noting the position of
the orientation arrow (see diagram).
Make a hole in the wall to take the reader cable and
feed this through. Ensure there will be sufcient slack to
allow the reader to slide over the mounting plate during
installation.
Image display
The unit comes with four preloaded images. These relate to the 3 LED’s (Green, Amber and Red) on a
standard Paxton reader plus a default image.
Once a token has been read, the control unit establishes the access permissions of that user. Access is
granted or denied as appropriate with the designated image displayed. For example, if access is denied
the image assigned could show “Please return to Reception”.
Present the reader to the mounting plate so that the slots pass over the side tabs in the plate.
Slide the reader down the plate until the retaining pin clicks into position.
A tool is provided with the reader to depress this pin should the reader ever need to be removed.
The full colour backlit LCD screen can be congured to display images
of the customer’s choice. For example, an image using a company
name/logo could be used as the default display on each reader around
the site.
The reader comes with four preloaded images. These can be replaced
using a free uploader program available from our website via any
Net2Air USB bridge or a Net2Air USB dongle.
If you wish to update these images, you should ensure that you have
a suitable Net2Air device as one is NOT supplied with the reader.
Readers mounted together
between readers
300mm
Mounted on metal surface
Suitability
Security-sensitive doors Wet environments
Ins-30091 PROXIMITY LCD reader
Technical Support
Technical help is available: Monday - Friday from 07:00 - 19:00 (GMT)
Saturday from 09:00 - 13:00 (GMT)
01273 811011 [email protected]
Documentation on all Paxton products can be found on our website - http://www.paxton.co.uk/
Paxton

Page 4
Cable extensions
R
R
Readers can be extended using Belden CR9540 10-core overall screened cable to a maximum of 100 metres.
Wiring
The reader port module is designed to convert the
standard reader ports on Switch2 and Net2 controllers
to accept one or two RJ45 connections. Pull off the
screw terminal block from the reader port and simply
replace it with this module.
This module can be used to provide a connection point
for the reader RJ45 plug. The terminals on the module
are then wired colour for colour to the controller.
Alternatively, the reader can be wired directly into the
screw terminals of the control unit by rst cutting off
the RJ45 plug and stripping back the wires in the cable.
Reader port module (325-030)
This module may be purchased separately to speed up
the installation and replacement of readers.
Connection modules
Further information on how to purchase Installer Tools is available at:
http://paxton.info/841
Reader junction box (325-020)
Connection to a control unit
reader port

Page 5
The metal backplate is marked with an arrow. Click on
the ‘Rotation’ option to turn the green arrow into the
same direction as the backplate arrow.
This display is used to conrm that any image
transmitted to the reader will match the orientation of
the reader as installed. Rotating this display does NOT
alter the actual image that will be sent.
In the example on the left, we have set the rotation
to show a reader installed in a landscape orientation.
This shows that the current image would display
incorrectly. (i.e. sideways)
The image should be corrected and viewed again
before uploading to the unit.
The reader is supplied with four preload images. Images cannot be retrieved from the reader but they can be
refreshed if the orientation is incorrect or replaced using the uploader program.
This program can be download from the website at < http://paxton.info/1521 >
NOTE: This is an uploader utility and does not display the current image that is displayed on any particular reader.
LCD reader image upload
Image orientation
Close down any other Net2 applications, including the Net2 server, to avoid any USB program conicts. Run
the LCD reader image uploader and it will detect the USB Net2Air device connected to the PC. The PC will
then detect and display any LCD units that are in range of the USB device.
They are listed along with their Net2Air signal strength. Highlight the required reader and select one of the
four image types. You can browse the PC for a new image or restore one of the defaults provided.
(see Customised images)
Once the image is displayed, click on ‘Send image’ and this will be uploaded to the selected reader.
If more than one reader requires updating, a batch send function is available.
Select the option in the functions menu and then select the readers to be
updated. The selected image will be sent to each reader in turn.

Page 6
The LCD reader will hold 4 images. These are selected automatically by the reader’s LED control wires. The
‘Present token’ image will display unless one of the three LED wires (Brown, Amber or Green) is individually
active (0v). In that case the corresponding image (Access Granted, Access Denied or Enter PIN) will display. The
supplied images are shown below.
Changing the reader name
The name is stored within the reader. Select the reader, click the ‘Change LCD reader name’ button and you will
then need to enter the password (if set). The reader name can then be changed.
Changing the reader password
The password is stored within the reader itself. Select the unit, click the ‘Change LCD reader password’ button.
You will be asked to enter the old password and the new password.
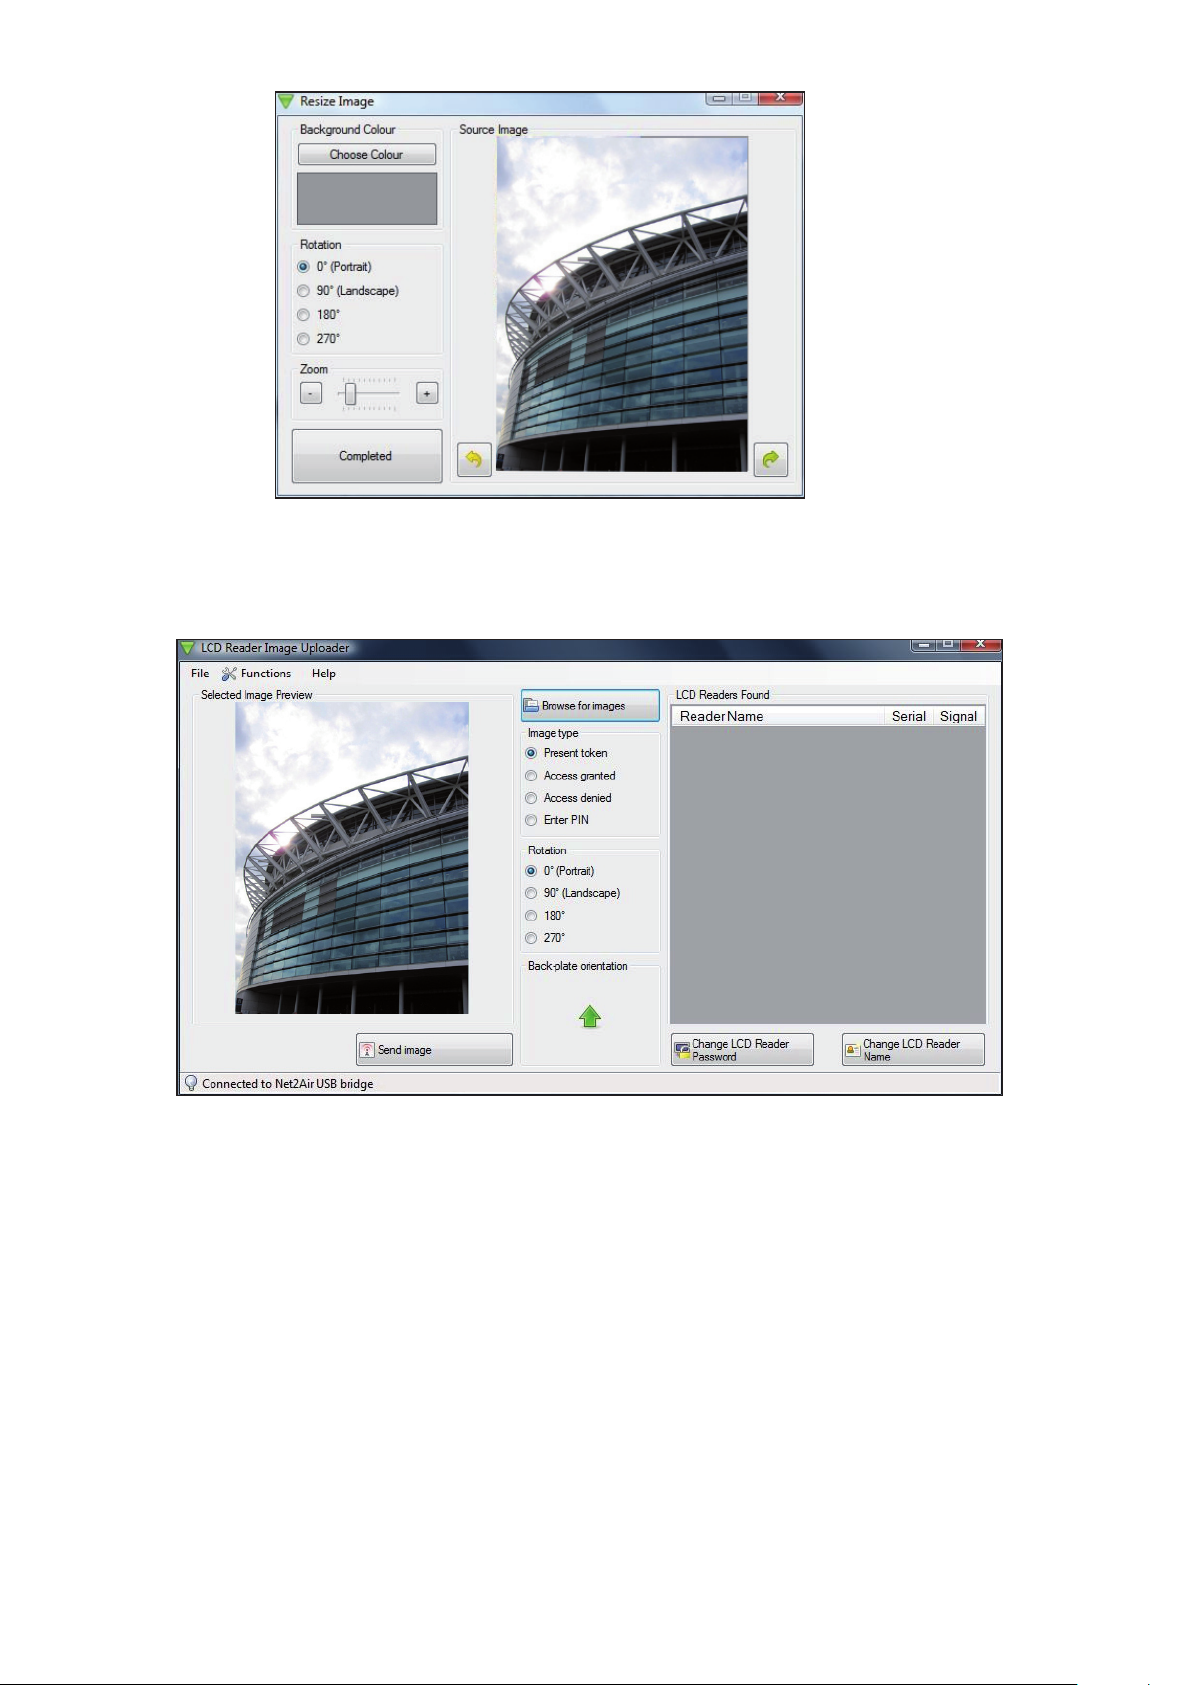
You can rotate or refresh any of the four images or produce your own customised versions.
From the main screen, click on ‘Browse for images’. Select the required image and click ‘Open’. The following
screen will display for editing.
Customised Images
Image selection
You can select a background colour by clicking
on ‘Choose Colour’. The image can be zoomed
to any size using the controls and can also be
dragged around the screen by clicking on the
image and holding down the mouse button.
The display area should be rotated to match the
reader orientation (See page 3). The image can
also be rotated using the arrow buttons.
Page 7
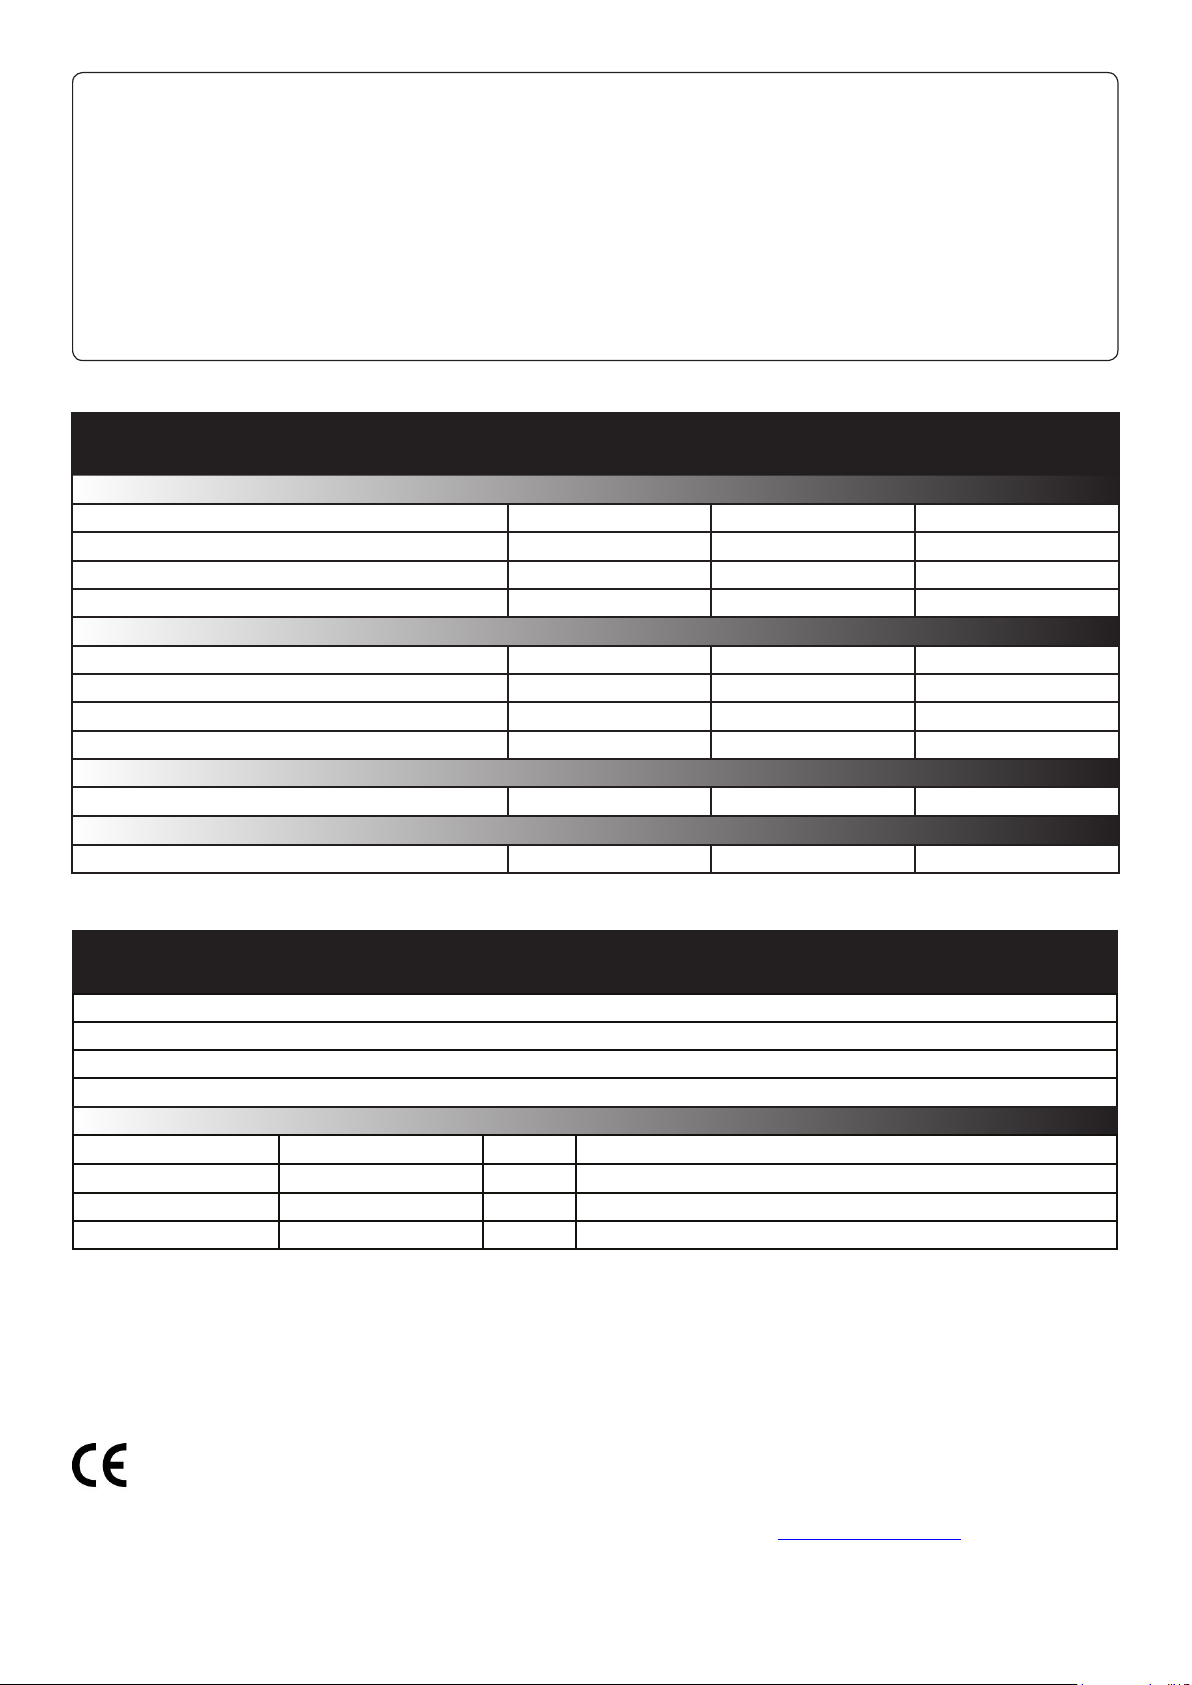
Select the LCD reader from the list of units detected and check that the image type is the correct one to be updated.
Check that the image orientation is correct and then click on the ‘Send Image’ button.
This will bring up a password security screen. The reader password is left blank when supplied but one can be
created if required.
The image will upload to the LCD reader in about 90 seconds and reports the progress on a status bar.
Image upload
Once you have the correct image displayed, click on ‘Completed’ to return to the main updater program.
The modied image can be saved via the ‘File’ menu.
Page 8
-20 °C +55 °C
IPX7
8V DC 14V DC
165 mA 215 mA
125 kHz
600 µs
68 mm 109 mm 22 mm
40 mm 30 mm 400 mm
The declaration of conformity is available on request. Contact details are provided at: http://paxton.info/596
DC supply voltage
Carrier frequency
Specications
Operating temperatures - all items
Electrical
Environment
Dimensions
Min Max
Width Height Depth
DC supply current
Cable length
Read Range Token Keyfob Hands Free Token
Waterproof
PROXIMITY LCD reader
Reader mounting plate
Documentation
Fixing Kit - LCD reader fk1-087 4No 6 x 3/4 in pozi pan self tapping screw - zinc
422 mm Wall Plugs
5Cable clips
1LCD reader removal tool
Contents in box
Description
Option Qty
Min Max
This product is not suitable for retail sale. All warranties are invalid if this product is not installed by a competent person.
5 metres
Clock and data bit period
Silent operation feature Yes
Outdoor Use
Factory reset
The reader can be reset to a factory default state by carrying out the following operation:-
1. Connect together the yellow and green wires. (reset link)
2. Connect power to the reader.
3. The reader will beep 3 times to conrm the reset sequence.
4. Remove the power and remove the reset link.
This factory reset sequence results in the LCD reader images returning to the default images, the LCD reader
name will be cleared and the reader password will be blanked.

Page 9
Ins-30114 Net2Air USB dongle
For further information, please refer to the following documentation as necessary.
XIns-30091 - Proximity LCD reader < http://paxton.info/985 >
XIns-30084 - Net2Air USB bridge < http://paxton.info/926 >
Net2 nano range - The Net2 Server Conguration Utility/Net2Air Bridge tab will display a USB bridge with
a xed IP entry.
Proximity LCD reader - Close down any other Net2 applications, including the Net2 server, to avoid any
USB program conicts. Run the LCD reader image uploader software and it will display any LCD units that
are in range of the dongle.
This USB dongle enables PC software to exchange data with Paxton devices that communicate using
Net2Air wireless technology:
Plug the device into a spare USB port on the PC. Open or restart any Paxton applications and the unit will
register automatically in the software.
1 10
1
2.405 GHz
5 m
4.75 V 5.25 V
100 mA
0 °C 55 °C
23 mm 14 mm 82 mm
Specications
Carrier frequency
Environment
Dimensions
Min Max
Width Height Length
System Specication
Voltage
Electrical
Current
Waterproof
Min Max
Min Max
ACU’s per Net2Air bridge - Recommended
No
Net2Air USB bridge per system
Operating temperature
Net2Air wireless range
USB certied
This product is not suitable for retail sale. All warranties are invalid if this product is not installed by a competent person.
Download the latest version of Net2 software at: http://paxton.info/1438 before commissioning this product.
The declaration of conformity is available on request. Contact details are provided at: http://paxton.info/596
Technical Support
Technical help is available: Monday - Friday from 07:00 - 19:00 (GMT)
Saturday from 09:00 - 13:00 (GMT)
01273 811011 [email protected]
Documentation on all Paxton products can be found on our website - http://www.paxton.co.uk/
Paxton

Page 10
LCD Reader image upload
Sales code: 380-592
Description: Net2Air USB Dongle
http://paxton.info/1523
To upload new images to your LCD reader, you will
need a Net2Air USB dongle or Net2Air USB bridge
Download the free LCD reader image uploader software at:
http://paxton.info/1521
Ins-30117 LCD reader - Image uploader
Technical Support
Technical help is available: Monday - Friday from 07:00 - 19:00 (GMT)
Saturday from 09:00 - 13:00 (GMT)
01273 811011 [email protected]
Documentation on all Paxton products can be found on our website - http://www.paxton.co.uk/
Paxton
Table of contents
Other Paxton IP Access Controllers manuals

Paxton
Paxton Ins-30156 PROXIMITY P Series User manual

Paxton
Paxton PROXIMITY P series User manual

Paxton
Paxton Net2 PaxLock User manual

Paxton
Paxton TOUCHLOCK K Series User manual

Paxton
Paxton Easyprox nano User manual

Paxton
Paxton Proximity LCD reader User manual
Paxton
Paxton ins-20100 User manual

Paxton
Paxton ins-30093-EX User manual

Paxton
Paxton Ins-30160 User manual

Paxton
Paxton Ins-30003 PROXIMITY P Series User manual


