Oster TSSTTVCG02 User manual

User Manual
Countertop Oven
Manual de Instrucciones Horno para
Mostrador
P.N. 157157
Visit us at www.oster.com
MODEL/MODELO
TSSTTVCG02

English-2
IMPORTANT SAFEGUARDS
When using electrical appliances, basic safety precautions should always
be followed, including the following:
READ AND SAVE THESE
INSTRUCTIONS
• READALLINSTRUCTIONS,PRODUCTLABELSANDWARNINGSBEFOREUSINGTHE
COUNTERTOPOVEN.
•
Donottouchhotsurfaces.Alwaysuseovenmittswhenhandlinghotmaterialsandallow
metalpartstocoolbeforecleaning.Allowtheunittocoolthoroughlybeforeputtingin
ortakingoffparts.Alwaysusetheovenhandleswhenmovingtheunit.
NOTE:
Whenopeningtheoven,besuretograspthecenterofthehandleastheendsof
thehandlearehot.
• Whentheunitisnotinuseandbeforecleaning,unplugthecountertopovenfromthe
walloutlet.NOTE:Makesuretheovenisturnedoffbeforeunplugging.
• Toprotectagainstriskofelectricalshock,donotimmersetheapplianceinwateror
anyotherliquids.
• Closesupervisionisalwaysnecessarywhenthisoranyapplianceisused
nearchildren.Thisapplianceisnotforusebychildren.
• Donotoperatethisoranyappliancewithafrayedordamagedcordorplugorafterthe
appliancemalfunctionsorisdroppedorhasbeendamagedinanymanner.Returnthe
countertopoventothenearestAuthorizedSunbeamApplianceServiceCenter
forexamination,repairorelectricalormechanicaladjustment.
• Donotuseattachmentsnotrecommendedbythemanufacturer;theymaycausefire,
electricshockorpersonalinjury.
• Donotuseoutdoorsorforcommercialpurposes.
• Donotusethisapplianceforotherthanitsintendeduse.
• Donotletthecorddangleovertheedgeofatabletoporcountertop
ortouchhotsurfaces.
• Donotplacetheappliancenearahotgasorelectricburnerorinaheatedoven.
• Extremecautionshouldbeusedwhenusingcontainersconstructedofmaterialother
thanmetalorglass.

English-3
• Afiremayoccurifthecountertopoveniscoveredortouchingflammablematerials,
includingcurtains,draperies,walls,etc.,wheninoperation.Donotstoreanyitemson
topoftheappliancewheninoperation.
• Whenusingcountertopoven,pulltheunitoutaminimumof6inchesawayfromthe
wallorothercords.
• Donotstoreanymaterials,otherthanmanufacturer’srecommendedaccessories,
inthisunitwhennotinuse.
• Donotplaceanyflammablematerialsinoven,suchaspaper,cardboard,
plasticoranymaterialsthatmaycatchfireormelt.
• Donotcovertheoventraywithmetalfoil.Thiswillcauseoverheatingoftheappliance.
• Oversizedfoodsormetalutensilsmustnotbeinsertedintheapplianceastheymay
createafireorriskofelectricalshock.
• Donotcleanwithmetalscouringpads.Piecescanbreakoffthepad
andtouchelectricalpartsinvolvingariskofelectricalshock.
• Useextremecautionwhenremovingpanordisposingofhotgreaseorotherhot
liquids.
• Toturnthisapplianceoff,returnallcontrolstothe“OFF”positionandremovecord
fromoutlet.
This Unit Is for Household Use Only
Short Power Supply Cord Instructions
Ashortpower-supplycordisprovidedtoreducetheriskresultingfrombecoming
entangledinortrippingoveralongercord.Anextensioncordmaybeusedifcare
isexercisedinitsuse.Ifanextensioncordisused,theelectricalratingofthecord
mustbeatleastasgreatastheelectricalratingoftheappliance.Theextensioncord
shouldbearrangedsothatitwillnotdrapeoverthecountertoportabletopwhereit
canbepulledonbychildrenortrippedoverunintentionally.
For Products Purchased in the United States and Canada Only
Toreducetheriskofelectricalshock,thisappliancehasapolarizedplug(one blade
is wider than the other).Thisplugfitsapolarizedoutletonlyoneway;iftheplug
doesnotfitfullyintotheoutlet,reversetheplug.Ifitstilldoesnotfit,contacta
qualifiedelectrician. Do not attempt to defeatthissafetyfeature.
SAVE THESE INSTRUCTIONS

English-4
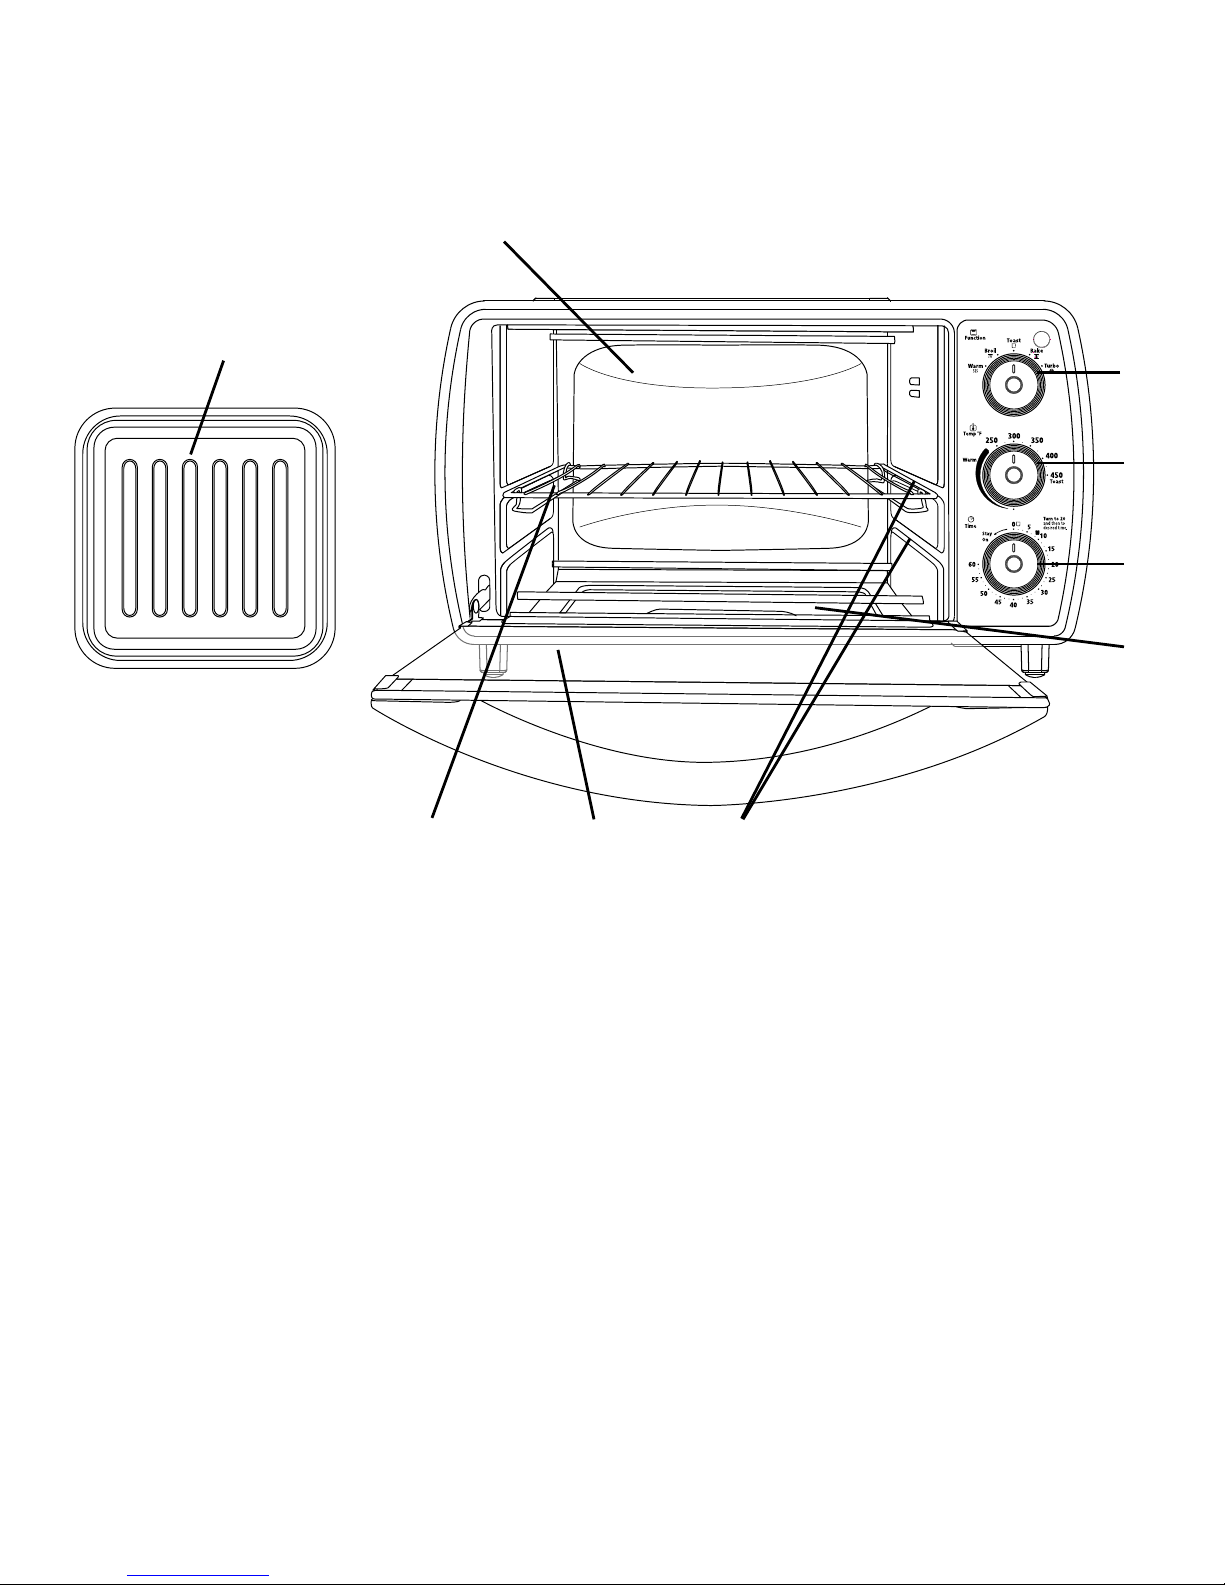
Learning about Your Countertop oven
1. Function Selector Knob – Select cooking function by turning knob to desired
setting. (See Figure 1)
2. Temperature Control Knob – Adjust the dial thermostat to the desired
temperature. (See Figure 2)
3. Timer Control Knob with Bell Signal – Set cooking time up to 60 minutes.
Will automatically turn the oven OFF at the end of the cooking time. (See
Figure 3)
4. Removable Crumb Tray – For crumb or fallen food particles collection. Pulls
out for easy cleaning.
5. Removable Wire/Broil Rack – Use for all your broiling and grilling needs. See
“Positioning Rack” and “Positioning Pan” sections.
6. Tempered Glass Door – For front viewing of food.
7. Two Rack Positions
1
7
8
2
3
4
5 6
9

Figure 1 Figure 2 Figure 3
English-5
8. Baking Pan & Cookie sheet in one – Use for all your baking needs.
See “Positioning Pan” section.
9. Easy Clean Interior Walls – Allows fast clean up.
preparing touse Your Countertop oven for the first time
NOTE: During initial start up you may detect a slight smell and/or smoke.
Turn the temperature to max and let run for approximately 5 minutes.
If you are using your Countertop oven for the first time, please be sure to:
• Remove any stickers from the surface of the oven.
• Open oven door and remove all printed documents and paper from
inside the Countertop Oven.
• Clean the rack and pan with hot water, a small amount of dishwashing
liquid and a non-abrasive cleaning pad.
• DO NOT IMMERSE THE BODY OF THE UNIT IN WATER.
• Dry the unit thoroughly before using.
• Select a location for the Countertop Oven. The location should be in
an open area on a flat counter where the plug will reach an outlet.
• Plug the Countertop Oven into a 120 Volt AC electrical outlet.
WARNING: When Countertop Oven is in use or cooling down, please be
sure there is a 6-inch clearance between the Countertop Oven and any other
surface including cords. Be sure the cord is not resting against the back of the
Countertop Oven.

English-6
touse the toast funCtion (see fig. 4)
Select desired rack position. (See “Positioning Rack”
Section)
NOTE: Different types of bread require different settings.
Lighter breads and waffles require lighter setting. Darker
breads, muffins and English muffins require a darker
setting.
Step 1. Place food on Wire Racks.
Step 2. Close glass door completely.
Step 3. Turn the Function dial to Toast. Both the top and
bottom heater elements will operate.
Step 4. Turn the temperature control knob to the 450º/
TOAST setting.
Step 5. To set the timer, turn the timer past the 20 minute
mark to engage timer switch and set back to
desired toast time.
Step 6. When toasting is complete, a bell will sound.
Open door completely and remove food. For best
toasting results, position the rack in the upper
position. **
touse the turbo ConveCtion heat funCtion
(see fig. 5)
The Turbo Convection Heat Function turns on a built in
fan that circulates hot air in the oven chamber cooking
your food faster and more evenly. Preheat oven 5-7
minutes at desired temperature with oven rack in place.
Step 1. Place baking pan with food inside on
wire rack.
Step 2. Close glass door completely.
Step 3. Turn the Function dial to Turbo.
Step 4. Turn the Temperature dial to desired setting.
Step 5. Turn the Timer to desired cook time.*
Step 6. When baking is complete, open door completely
and remove food.**
Figure 4
Figure 5

English-7
faQsabout turbo ConveCtion heat
What is Turbo Convection Heat?
Answer: In your Countertop Oven there is a built in fan
that circulates the hot air in the oven chamber cooking
your food faster and more evenly.
How do I adjust the time for Turbo Convection?
Answer: On average, the Turbo function will shorten the
cooking time, but it varies by food. It is suggested to go
with a shorter cooking time to start with and then add
time if it is needed.
What are the best foods to use with Turbo?
Answer: While a shorter cook time is often desirable,
baked goods in particular benefit from Turbo cooking
as the circulating air keeps oven temperature consistent
throughout.
touse the bake funCtion (see fig. 6)
Step 1. Place baking pan with food inside on
wire rack.
Step 2. Close glass door completely.
Step 3. Turn the Function dial to Bake.
Step 4. Turn the Temperature dial to desired setting.
Step 5. Turn the Timer to desired cook time.*
Step 6. When baking is complete, open door completely
and remove food.**
Figure 6

English-8
touse the Warm funCtion (see fig. 7)
Step 1. Place baking pan with food inside on
wire rack.
Step 2. Close glass door completely.
Step 3. Turn the Function dial to Warm.
Step 4. Turn the Temperature dial past “Warm”.
Step 5. Turn the Timer to desired warming time.*
Step 6. When Warming is complete, open door
completely and remove food.**
touse the broiL funCtion (see fig. 8)
Adjustable Broil allows the oven to broil at any
temperature. Great for melting cheese at 150º F
or cooking fish at 400º F. Adjust as needed.
Step 1. Place food on broil rack or on baking pan if
needed. See “Positioning Rack” and “Positioning
Pan” sections.
Step 2. Close glass door leaving approximately
a 3-inch opening at the top of the Countertop
Oven.
Step 3. Turn the Function dial to Broil.
Step 4. Turn the Temperature dial to desired
temperature.
Step 5. Turn the Timer to desired cook time.*
Step 6. When Broiling is complete, open door
completely and remove food.**
* Special note: If cook time is less than 20 minutes, you
must turn Timer past the 20 minute mark
to engage the timer then back to desired
time.
** WARNING: Cooked food and metal rack can be
very hot, handle with care. Do not leave
Countertop Oven unattended.
Figure 7
Figure 8

English-9
positioning raCk
• To accommodate a wide variety of foods the oven has two rack positions.
The rack can be inserted in the oven in the upper or lower rack guides. The
rack will fit into either of the rack guides inside of the Countertop Oven.
(See Figure Below)
• Before removing the rack allow the unit to cool.
• To remove the rack, open the oven door and pull the rack towards the front
of the oven. The rack will slide on the rack guides on the inside of the oven.
PLEASE NOTE: the oven rack may tilt downward causing food to shift when
the rack is pulled out, proceed with caution.
• Positioning of the oven rack will depend on the size of the food and
desired browning. Move the rack to the lower rack position to prevent top
browning and move the rack to the upper rack position to prevent bottom
burning.
• For best toasting results, position the rack in the upper rack guide.
raCk guide
options

English-10
positioning pan
• To accommodate a wide variety of foods the oven has two pan positions.
The pan can be placed on top of the rack or inserted into the guide rails
below the rack. (See Figure Below)
• Before removing the pan allow the unit to cool.
• Positioning of the oven pan will depend on the desired cooking method.
For baking, place the pan on top of the rack. For grilling or broiling, insert
the pan into the guide rails below the rack and place the food on top of the
rack.
for
baking
for
griLLing or
broiLing
CLeaning Your Countertop oven
DO NOT IMMERSE IN LIQUIDS.
Step 1. Turn all knobs to “OFF” position and remove plug from electrical
outlet. Allow to cool.
Step 2. Wipe unit down with damp cloth. DO NOT IMMERSE IN WATER.
Make sure to only use mild, soapy water. Abrasive cleaners, scrubbing
brushes and chemical cleaners will damage the coating on this unit.
Step 3. Remove crumb tray by pulling out of Countertop Oven.
Step 4. Shake off crumbs from crumb tray. Cleaning the crumb tray often will
avoid any accumulations.
Step 5. Remove wire rack and clean with damp cloth or place in top rack of
dishwasher.
storing Your Countertop oven
Allow the appliance to cool completely before storing. If storing the
Countertop Oven for long periods of time make certain that the Countertop
Oven is clean and free of food particles. Store the Countertop Oven in a dry
location such as on a table or countertop or cupboard shelf. Other than the
recommended cleaning, no further user maintenance should be necessary.
Other manuals for TSSTTVCG02
1
Table of contents
Languages:
Other Oster Oven manuals

Oster
Oster 4831 User manual

Oster
Oster 6073 User manual

Oster
Oster TSSTTVDFL1 Assembly instructions

Oster
Oster 6056 User manual

Oster
Oster TSSTTVDFL1 User manual

Oster
Oster 6204 User manual

Oster
Oster 6078 User manual

Oster
Oster TSSTTVMAF1 User manual

Oster
Oster TSSTTVRB04 User manual

Oster
Oster OS-BOV70DC User manual

Oster
Oster TSSTTVRB05 User manual

Oster
Oster TSSTTVXLDG-003 User manual

Oster
Oster 4-Slice Toaster Oven User manual

Oster
Oster 6081 User manual

Oster
Oster CKSTRS20-SBC User manual

Oster
Oster TSSTTVFDXL2 User manual

Oster
Oster CKSTRS20-SBHVW User manual

Oster
Oster 6206 User manual

Oster
Oster TSSTTV0000 User manual

Oster
Oster TSSTTVDFL1 User manual