Orbitsound T9 User manual
1
Handbook v1.0
Compact spatial stereo soundbar with dock for
iPhone/iPod and compact subwoofer

2

1
Contents
Welcome 2
Orbitsound contact information: 2
Package contents 2
The soundbar 3
Remote control 3
The subwoofer 3
Setting up the orbitsound T9 4
1. Connect subwoofer 4
2. Connect power 5
3. Connect a sound source 5
1. Power on 6
2. Source selection 6
3. Volume / Mute 7
4. Tone adjustment 7
Advanced Setup 8
1. Positioning: getting the most from spatial stereo 8
2. Subwoofer placement: 8
Connection to TV 9
Enhancement to TV sound (replacing TV speakers, analogue) 10
Video output 10
iPhone/iPod control & charge 10
Charge / Menu 11
Maintenance 11
Cleaning and care 11
Battery replacement (remote) 12
Troubleshooting 12
No sound is heard 12
The sound is out of sync with the TV 12
Remote does not work 12
Sound is distorted 13
Sound is noisy / ‘hissy’ 13
Sound stops when I plug in my iPod 13
Digital optical issues: ‘Clicking’ or no sound 13
Orbitsound Warranty 14
Warranty Terms 14
Making a Warranty Claim 14
Orbitsound Ltd Warranty Terms and Conditions 14
Contact Information 16
Specications 17

2
Welcome
Thank you for purchasing the orbitsound T9 compact spatial stereo soundbar with
iPhone/iPod dock. With proper use the orbitsound T9 delivers superb sound fidelity,
engaging stereo sound and will provide you with a fantastic listening experience.
This instruction booklet covers important safety and setup information as well as
advice on how to get the most out of your orbitsound T9.
Orbitsound contact information:
ORBITSOUND LTD.
UK Support Tel: +44 (0)8456 521 219
International Support: www.orbitsound.com
Email: suppor[email protected]om
Package contents
Inside the packaging you will nd:
• T9 soundbar with iPod/iPhone dock
• Subwoofer
• Remote control
• Inline power supply
• Subwoofer speaker cable
• Mains cable
• Handbook
• Quick start guide
• Audio connection cables - RCA
• Jack audio connection cable
• Digital optical connection cable

3
The soundbar
IR receiver
Spatial stereo generators
Status LED
LED State
RED: Standby
BLUE: On
BLUE (FLASHING): Mute or remote operation
OFF: Power off
iPod Dock
The orbitsound T9 soundbar produces most of the sound that you hear. It produces
the main signal and stereo information. It also houses the ampliers for itself and the
subwoofer.
Remote control
The remote control provides volume control, tone control and sound source
selection, and additionally play/menu controls when using an iPod connected to the
iPod dock on the soundbar.
The subwoofer
The subwoofer is a passive loudspeaker that produces powerful Hi-Fi bass. It has
been designed specially to complement the T9 soundbar.
4
Setting up the orbitsound T9
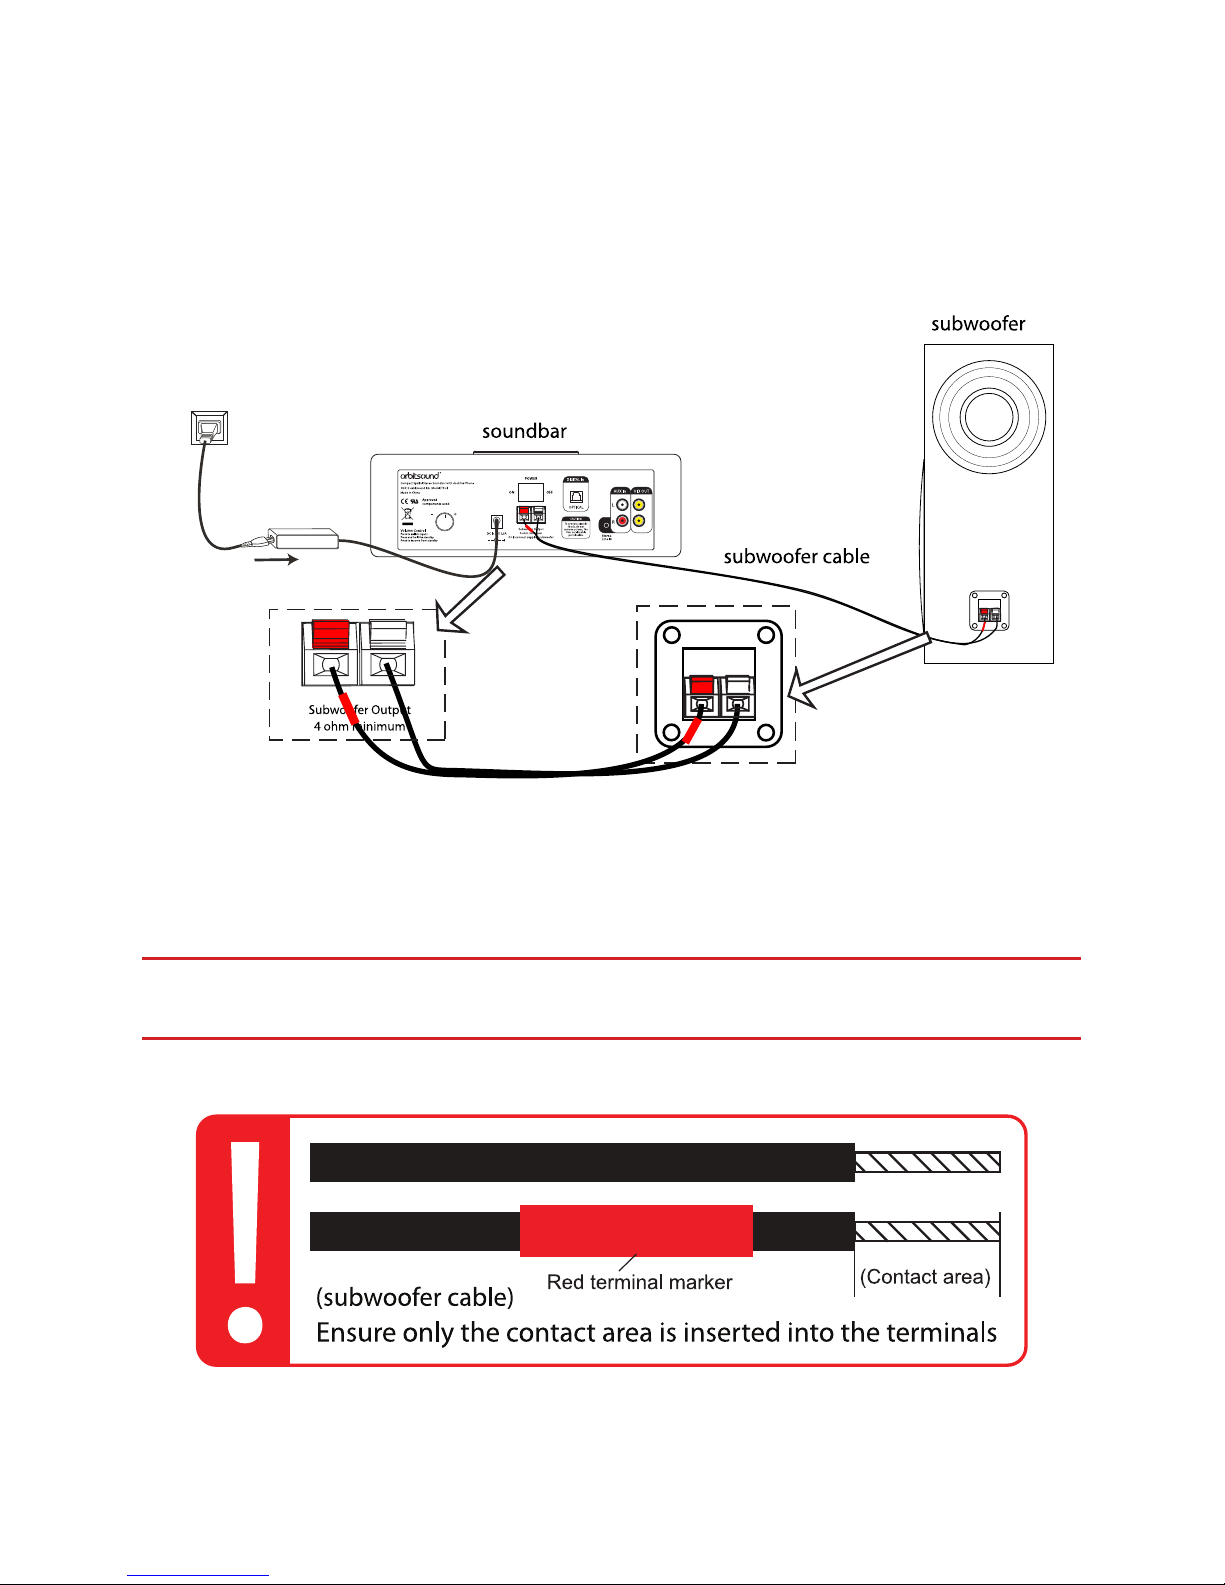
1. Connect subwoofer
Connect the subwoofer to the subwoofer output on the stereo soundbar as shown:
Note: The speaker wire is colour marked to make identifying the correct wire for the
speaker/soundbar terminal easy. Connect the wire marked with a red tab to the red
terminal on the soundbar and the subwoofer.
IMPORTANT: Make certain that the metal core of the wires only is inserted into
the wire socket to ensure metal-metal contact. The contact area is shown:

5
2. Connect power
AC Adaptor
Power Cable
- use correct country plug type
Connect the power supply as shown.
3. Connect a sound source
You can connect multiple sources to the unit and listen to either:
iPod/iPhone iPod Dock
Adapter
Music source
(optional)
A)
B)
iPod connection
AUX connection (rear of sound bar)
IMPORTANT: (A) It is strongly advised that the iPod dock is used with the correct
adaptor for your iPhone/iPod model. Dock adaptors are available from Apple
inc.
NOTE: (B) You can connect your sound source to either the 3.5mm line input OR dual
RCA (phono) AUX IN connectors OR optical (TOSLINK) inputs. Use which ever is most
convenient.

6
Basic operation
1. Power on
Power on Standby
or
ON OFF
Press & hold
(2 seconds)
IMPORTANT: The main power switch must be‘ON’ for soundbar operation. This
is located on the rear of the soundbar unit.
Standby (sleep) / On: The soundbar may be put into ‘standby’ or resumed from
standby by pressing the [power] button on the remote. Briey pressing the volume
control on the rear of the soundbar also resumes the unit when it is in standby.
Pressing and holding the rear volume button for 2 seconds will enable standby
mode.
NOTE: The colour of the LED on the front of the soundbar shows the current status of the
unit. Red means the unit is in standby mode. Solid blue indicates that the unit is on.
2. Source selection
Optical iPod dock Aux
or
(PUSH)
or
(PUSH)
or
(PUSH)
(when iPod connected)
Source Source Source
on soundbar
on remote
Source select: Press the ‘Source’ button on the remote (or briey press the volume
knob on the unit’s rear) to cycle the sound source from optical, to iPod dock, to
analogue (AUX). The iPod selection is skipped if no iPod is present (i.e. only 2 inputs
are available when no iPod is in use).

7
3.Volume / Mute
or
Mute
Main Volume adjust
Volume+Volume -
Mute: Press the [mute] button on the remote to silence or resume play through the
soundbar.
NOTE: When the soundbar is on and mute is enabled, you will see a blue ashing light on
the front of the soundbar. A continuous blue light indicates that the soundbar is on.
Volume: Volume may be adjusted from the [volume] + and - buttons on the remote,
or by turning the volume control on the rear of the unit. The blue light ashes as the
volume is adjusted.
4.Tone adjustment
Bass adjustTreble adjust
Bass+Bass-Treble+Treble-
The sound tone may be adjusted with the remote control.
Note: the blue indicator light on the front of the sound bar will ash as the tone is
adjusted. It will stop ashing when the minimum or maximum bass or treble adjustment
is reached.

8
Advanced Setup
The orbitsound T9 is easy to set up and enjoy, but even better sound can be achieved
by following these guidelines.
1. Positioning: getting the most from spatial stereo
The spatial stereo sound eld is produced by the speakers in the sides of the
soundbar. These stereo signals interact with the main signal (front) to produce true
stereo in your listening environment:
Spatial generation zones
IMPORTANT: The areas marked need to be clear of obstacles in order for the
spatial stereo sound eld to work properly.
HINT: Because Orbitsound produces a uniform stereo sound eld, the soundbar does
not need to be placed directly in front of the listener. Therefore, placing the soundbar
conveniently so that the sides are not obstructed is more important than central
placement, i.e. on low or high shelf, countertop, below/above TV
2. Subwoofer placement:
Subwoofer placement does not aect the overall sound much. Position the
subwoofer after optimising placement of the soundbar.
HINT: The sound output from the subwoofer is omni directional, so this can be placed
anywhere. However, try to avoid placing the subwoofer too far from the soundbar as this
can cause a noticeable ‘separation’ eect. A good place is behind or beside your TV. For
standalone operation, try the subwoofer on the oor, next to the shelf or table that hte T9
is on.
IMPORTANT: Always make sure that the subwoofer’s side with a port (rear) is
clear from obstruction. Facing the nearest wall or corner of a room with the
open port sometimes increases the bass eect.
Table of contents


