NWI LSC60 User manual


5
6
7
1
2
3
4
8
9
10
11

Laser Site Calculator LSC60Laser Site Calculator LSC60 11
EN
LSC60
1. Brief Introduction
LSC60 Laser Site Calculator measures distances up to 60 meters in
just one second with 1.5 millimeter accuracy. It’s integrated with a
worldwide unique feature:
Numeric Keypad.
LSC60 is the world’s first laser site calculator which integrated the
function of laser distance meter and calculator. It’s efficient and
convenient, saves your time and trouble for data processing and notes
taking.
360°tilt measurement
LSC60 measures inclination up to 360° range, so that distance to
inaccessible objects can be measured using trigonometric function.
In the box:
LSC60 Device*1
AAA Battery*2
Pouch*1
User Manual*1
Sling*1
Figure (A)

Laser Site Calculator LSC60Laser Site Calculator LSC60 22
EN
LSC60
2. Safety Instructions
WARNING:
shock, or other injuries, or damage to LSC60 Laser Site Calculator
or other property. Read all the safety information below before using
LSC60.
LSC60 uses a visible laser beam which emerges from the front of the
instrument.
Laser Class 2 products:
Do not stare into the laser beam or direct it towards other people
unnecessarily. Eye protection is normally afforded by aversion
WARNING:
Looking directly into the beam with optical aids (e.g. binoculars,
telescopes) can be hazardous. Do not look directly into the beam with
optical aids.
Looking into the laser beam may be hazardous to the eyes. Do not look
into the laser beam. Make sure the laser is aimed above or below eye
level.
3. Buttons
1. Power On/Measuring/Laser on
2. Area/Volume/ Pythagoras
3. Units/Backlight
4. Numeric Keypad
5. Backspace/Decimal Point
6. Historical Data
7. Tilt/Auto Level/Auto Height
8. Reference
9. Power Off /Cancel/Back/Clear
10. Adding
11. Subtraction
12. Multiplication
13. Division
14. Equal Sign
Figure (B)

Laser Site Calculator LSC60Laser Site Calculator LSC60 33
EN
LSC60
4. Basics
Power On And Off
Long press to power on the instrument and activate the laser. The
display is on and shows the battery symbol until the next button is
pressed.
Long press to power off the instrument.
The instrument will be switched off automatically after three minutes
of inactivity.
Reference Setup
See Figure (C)
Press to switch reference point
between the top, the bottom,
tripod thread, and end-piece of
the instrument. There is a beep
warning tone when reference
point is changed.
The default reference setting is from the bottom of the instrument.
The reference point will be set to default every time when it’s powered
off, i.e. the measuring reference point is from the bottom of the
instrument every time when it’s powered on.
Figure (C)
Display Backlight
Press to switch on or off the display backlight. User can trigger the
function when he/she is in dark situation. The value is clearly visible on
the display.
Distance Unit Setup
Long press to change the distance unit between m, ft, in, ft+/in.
Long press again to continuously change the next unit.
Clear/Cancel
When measuring or calculating, user can press to cancel the last
action, until all data on display are cleared and go back to single
distance measurement interface.
Historical Data
View
Press to view historical data, including 50 measured results, shown
in reversed order. Continuously press to view the next record.

Laser Site Calculator LSC60Laser Site Calculator LSC60 44
EN
LSC60
Jump to
Also user can jump to desired record. If user wants to go to the 13th
record, user can press 1, then 3, and press
jump to the 13th record.
Delete
Long press to delete the selected record.
Calculate
When viewing record, press + - x ÷ to calculate another record or input
number.
Quit
Press to go back to single distance measurement interface.
5. Measurement
Single Distance MeasurementView
Follow the steps below to take single distance measurement.
(1) Press to activate the laser, and aim at the object which is to be
measured.
(2) Press again to take measurement. Results will be seen on display
immediately.
Continuous Measurement
Long press button, until you hear beeps,
to activate continuous measurement. Under
this mode, minimum or maximum distance
can be measured from a fixed measuring
position by sweeping ideal points.
It’s usually used to find the right angle and
diagonal. As shown in Figure (D), user
can press or to stop continuous
measurement, and the values of minimum
and maximum distances are shown in the
display as well as the last measured value in
the summary line.
Area Measurement
Press once, the symbol appears on display.
Press
Press again to take the second distance measurement (e.g. width).
The results of length, width, perimeter and area will be seen on display
orderly.
Figure (D)

Laser Site Calculator LSC60Laser Site Calculator LSC60 55
EN
LSC60
Volume Measurement
Press twice, the symbol appears on display.
Following the hint, press to activate laser, and aim at the target,
measure the width, and then height, the result of volume will be seen in
the summary line.
Indirect Measurement
This device can measure distance to inaccessible points, such as the
distance to a wall which is blocked by obstacles, or the height of a tree,
using trigonometric function.
To ensure measuring accuracy, indirect measurement should be based
on the following conditions:
(1) The measuring points of the object which is to be measured should
be on the same horizontal or vertical line.
Indirect Measurement: Pythagoras Two PointsView
As shown in Figure (E), if user wants to measure the height of a
building, he can use Pythagoras to calculate the height.
(1) Press three times, the symbol appears on display.
(2) Press to activate laser and aim
at the point which is to be measured.
(3) Press again to take the first
measurement, and again to take the
second measurement.
(4) The height of building (third side
value will be seen on display.
Note:
(1) The device will automatically determine the longer distance as
triangle’s hypotenuse, and shorter distance as right-angle side.
(2) When measuring right-angle side (Distance 2 in Figure E), user
should ensure laser beam is right-angled to the target line.
(3) User can press to delete any measured length and then press
to re-measure.
Figure (E)
Indirect Measurement: Pythagoras Three Points
As shown in Figure (F), there is another function to measure the height
of the building.
(1) Press four times, the symbol appears on display.

Laser Site Calculator LSC60Laser Site Calculator LSC60 66
EN
LSC60
(2) Press to activate laser and aim
at the point which is to be measured.
(3) Press again to take the first
measurement, and again to take the
second and third measurement.
(4) The height of building, first,
second and third distance value will be
seen on display.
Note:
(1) The device will automatically determine the longer distance as
triangle’s hypotenuse, and shorter distance as right-angle side.
(2) When measuring right-angle side (Distance 2 in Figure F), user
should ensure laser beam is right-angled to the target line.
(3) User can press to delete any measured length and then press
to re-measure.
Figure (F)
Tilt Measurement
Press to activate tilt sensor, the symbol appears on display.
Press to record the tilt on display, and take a distance measurement.
Note:
The tilt sensor measures inclination between ± 180°.
The accuracy of tilt sensor is 0.1°.
The device cannot measure from the left or right side.
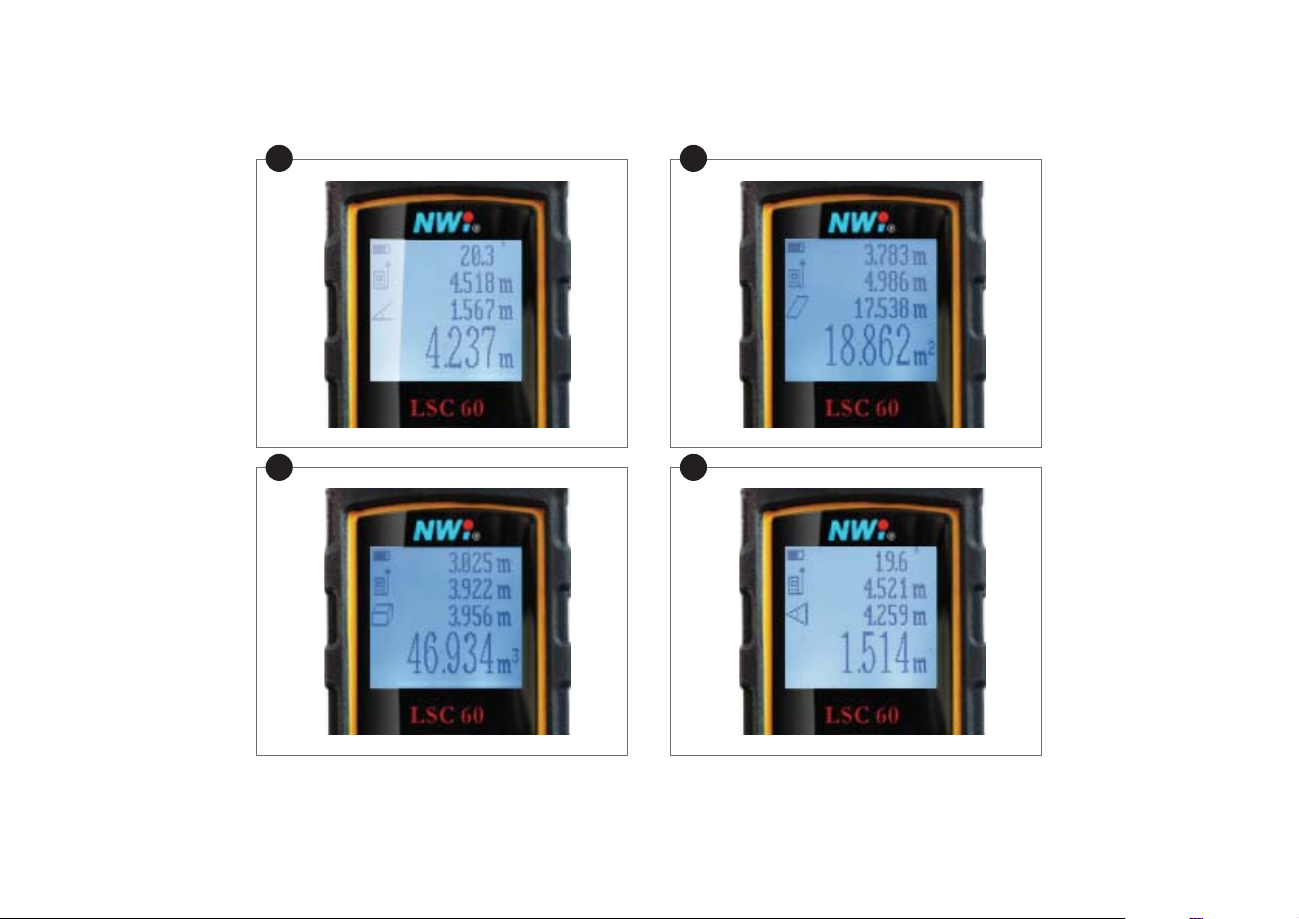
Auto Horizontal Measurement
Press twice, the symbol appears on display. Press to
measure tilt and hypotenuse distance, results of tilt, distance of
hypotenuse and two right-angle sides will be seen on display. Refer to
Figure (G).
Auto Height Measurement
Press third times, the symbol appears on display. Press
button to measure distance to the top and to the bottom of the object,
distance of two hypotenuse, and height of object will be seen on
display. Refer to Figure (H).
Figure (G)
Figure (H)

Laser Site Calculator LSC60Laser Site Calculator LSC60 77
EN
LSC60
Addition / Subtraction
Press to take a measurement, then press button, and press
to take the second measurement, the second value will be automatically
Press to take a measurement, then press button, and press
to take the second measurement, the second value will be automatically
Note:
This process can be repeated as required.
6. Numeric Keypad
Launch/Quit Calculator
Launch: When the device is in the mode of measurement, viewing
historical data, or standby, press any numeric key, to enter Calculator,
meanwhile a calculator icon will be seen on display.
Quit: When the device is in calculator mode, press to clear data,
press again to quit calculator mode.
Ordinary Calculator
When in calculator mode, user can use the device to do four arithmetic
operations (Addition, Subtraction, Multiplication, and Division.), the
Calculator in Measuring
When a measurement was taken, and user enters into calculator
mode, the device will use the measurement result as an original data
to do calculation. User can also edit original data, such as long press
backspace to clear digital, or use numeric keypad to add digital, or
even press to re-measure.
When the original data was confirmed, user presses operational
Keypad List
0~9: Numbers
: Addition
: Subtraction
: Multiplication
: Division
: Decimal Point/Backspace (long press)
: Equal Sign
Table of contents
Other NWI Analytical Instrument manuals